Cream-Filled Brioche Bread

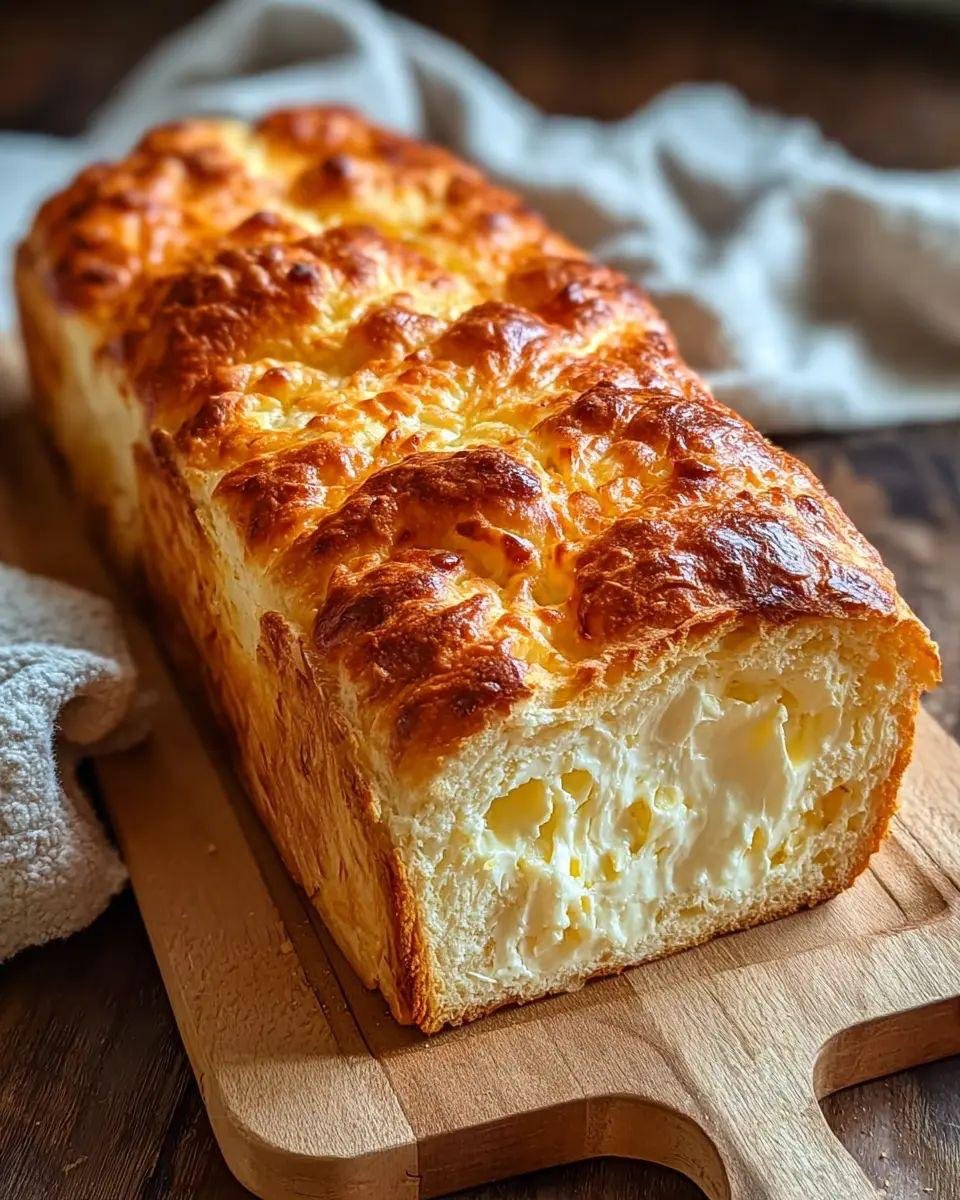
Cream-Filled Brioche Bread

This recipe yields a rich, airy bread that balances the sweetness of the dough with a smooth, savory-sweet cream filling.

Ingredients

For the Dough:

  • 3 ½ cups All-purpose flour

  • ¼ cup Granulated sugar

  • 2 ¼ tsp (1 packet) Active dry yeast

  • ½ tsp Salt

  • ½ cup Whole milk (warm, about 110°F)

  • 3 Large eggs (room temperature)

  • ¾ cup Unsalted butter (softened, added one tablespoon at a time)

For the Cream Filling:

  • 8 oz Cream cheese (softened)

  • ¼ cup Powdered sugar

  • 1 tsp Vanilla extract

  • 2 tbsp Heavy cream (to thin slightly)


Instructions

  1. Activate the Yeast: In a small bowl, combine warm milk, a tablespoon of the sugar, and the yeast. Let it sit for 5–10 minutes until it becomes foamy.

  2. Mix the Dough: In a stand mixer with a dough hook, mix the flour, remaining sugar, and salt. Add the yeast mixture and eggs. Mix on low until a shaggy dough forms.

  3. Incorporate Butter: Increase speed to medium. Add the softened butter one tablespoon at a time, ensuring each piece is fully absorbed before adding the next. Knead for about 10 minutes until the dough is smooth, elastic, and pulls away from the sides.

  4. First Rise: Place the dough in a greased bowl, cover with a damp cloth, and let rise in a warm spot for 1.5 to 2 hours (or until doubled in size).

  5. Prepare Filling: While rising, whisk together the cream cheese, powdered sugar, vanilla, and heavy cream until smooth. Transfer to a piping bag.

  6. Shape & Fill: Punch down the dough. Roll it into a rectangle. You can either pipe the filling down the center and fold the dough over it, or shape the dough into a loaf, place it in a greased tin, and use a dowel to poke holes and pipe the filling directly into the center.

  7. Final Rise: Let the loaf rise in the pan for another 45 minutes.

  8. Bake: Brush the top with an egg wash (1 egg beaten with 1 tbsp water). Bake at 350°F (175°C) for 30–35 minutes until the top is deep golden brown.

  9. Cool: Allow it to cool for at least 20 minutes before slicing so the cream center sets.

Juicy Greek-Style Chicken Burgers with Fresh Herbs, Feta, and Olive Oil

Juicy Greek-Style Chicken Burgers with Fresh Herbs, Feta, and Olive Oil

These Greek-style chicken burgers are packed with flavor and moisture, thanks to the combination of fresh herbs, tangy feta cheese, and a hint of lemon zest. Perfect for a light yet satisfying meal, they’re easy to make and will transport your taste buds to the Mediterranean.

Ingredients:

  • 1 ½ lbs ground chicken
  • ½ cup crumbled feta cheese
  • ¼ cup red onion, finely diced
  • 2 tablespoons fresh parsley, finely chopped
  • 1 tablespoon fresh dill, finely chopped
  • 2 cloves garlic, minced
  • Zest of 1 lemon
  • 1 tablespoon olive oil
  • 1 teaspoon dried oregano
  • ½ teaspoon paprika

Instructions:

  1. In a large bowl, combine the ground chicken, crumbled feta, red onion, parsley, dill, garlic, and lemon zest.
  2. Add the olive oil, dried oregano, and paprika to the mixture. Season with salt and pepper to taste.
  3. Mix the ingredients thoroughly until well combined. Be careful not to overmix to keep the burgers tender.
  4. Divide the mixture into 4 equal portions and shape them into patties.
  5. Heat a skillet or grill pan over medium heat and lightly grease with oil.
  6. Cook the patties for about 5-6 minutes per side or until fully cooked through and golden brown on the outside.
  7. Serve the juicy burgers with a side of fresh salad or on a bun with your favorite toppings. Enjoy!

Flour-Free Golden Skillet Buns (Soft & Fluffy)

Flour-Free Golden Skillet Buns (Soft & Fluffy)

These look like little pan-fried rolls, but they’re completely flour-free. They’re soft inside, golden outside, slightly sweet, and perfect for breakfast or snacks.

 Description

These buns are made primarily with yogurt and eggs instead of flour. The texture is tender and slightly creamy inside with a crisp golden crust from pan frying. They’re naturally gluten-free and can be made low-carb depending on the yogurt used.

Ingredients (Makes ~12 buns)

  • 1 cup thick Greek yogurt (full fat recommended)

  • 2 large eggs

  • ½ cup cornstarch or ½ cup almond flour (for lower carb option)

  • 1 tsp baking powder

  • 1–2 tbsp sugar (optional)

  • 1 tsp vanilla extract (optional for sweet version)

  • Pinch of salt

  • Oil or butter for frying

Instructions

1️⃣ Mix Wet Ingredients

In a bowl, whisk yogurt and eggs until smooth and creamy.

2️⃣ Add Dry Ingredients

Add cornstarch (or almond flour), baking powder, sugar (if using), vanilla, and salt. Mix until a thick batter forms.

If too thin → add 1–2 tbsp more cornstarch.
If too thick → add 1 tbsp milk.

3️⃣ Shape

Lightly oil your hands. Scoop about 2 tablespoons of mixture and gently shape into small rounds.

4️⃣ Cook

Heat a non-stick skillet over low-medium heat.
Add a little oil.

Place buns in pan and cook:

  • 3–4 minutes per side

  • Flip carefully when golden brown

Cook slowly so the inside sets without burning.

5️⃣ Serve

Serve warm with:

  • Honey

  • Jam

  • Nut butter

  • Savory option: cheese & herbs

 Tips for Perfect Texture

✔ Use thick yogurt (strain if watery)

✔ Cook on low heat to avoid raw centers
✔ Cover pan for 1–2 minutes to help steam-cook inside
✔ For extra fluffiness: separate eggs and fold in whipped egg whites

 Servings

  • Makes: 12 small buns

  • Serving size: 2 buns

  • Servings per batch: 6

Approximate Nutritional Info (per serving – 2 buns, using cornstarch)

  • Calories: ~150

  • Protein: 6g

  • Carbs: 18g

  • Fat: 6g

  • Sugar: 3g

(Will vary depending on yogurt type and sweetener.)

Benefits

  • Gluten-free

  • High protein (from yogurt & eggs)

  • Quick (ready in 20 minutes)

  • No yeast required

  • No rising time

  • Kid-friendly

 Q & A

Q: Can I bake them instead of frying?

Yes. Bake at 350°F (175°C) for 15–18 minutes until golden.

Q: Can I make them dairy-free?

Use thick coconut yogurt instead of Greek yogurt.

Q: Can I freeze them?

Yes. Freeze up to 2 months. Reheat in toaster or skillet.

Q: Why are mine flat?

Batter may be too thin or heat too high.

Q: Can I make them savory?

Absolutely! Remove sugar & vanilla and add:

  • ½ cup shredded cheese

  • Chopped herbs

  • Garlic powder

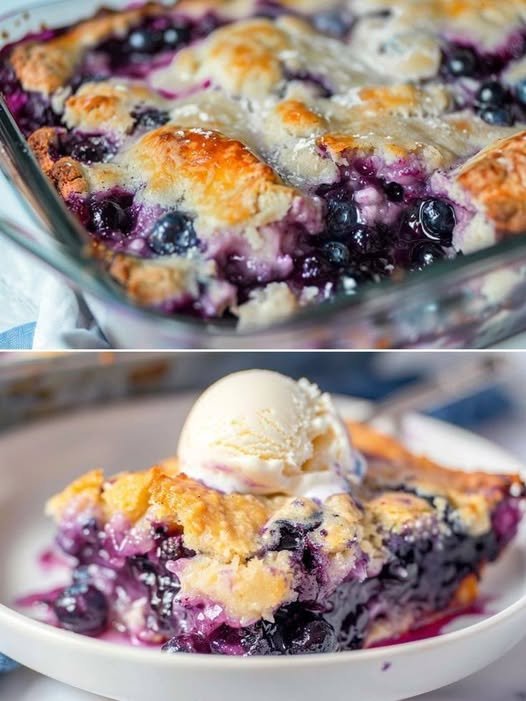
Blueberry Cream Cheese Cobbler

This Keto Blueberry Cream Cheese Cobbler is a brilliant way to enjoy a classic dessert while staying within your ketogenic goals. By swapping traditional grains for almond and coconut flours, it delivers a satisfying, nutty texture with significantly fewer carbs.

Following your request for full recipes, here is the complete guide organized for easy kitchen use.


Keto Blueberry Cream Cheese Cobbler

A decadent, low-carb dessert featuring a jammy fruit base, a velvety cheesecake layer, and a golden almond flour topping.

Prep time: 15 mins | Cook time: 40 mins | Yield: 8 servings

Ingredients

Blueberry Layer:

  • 2 cups Fresh or frozen unsweetened blueberries

  • 2 tbsp Erythritol (powdered preferred)

  • 1/2 tsp Xanthan gum (acts as a thickener)

  • 1 tsp Lemon juice

Cream Cheese Layer:

  • 8 oz Full-fat cream cheese, softened to room temperature

  • 1/4 cup Erythritol

  • 1 large Egg

  • 1 tsp Vanilla essence

Cobbler Topping:

  • 1 1/2 cups Almond flour

  • 2 tbsp Coconut flour

  • 1/4 cup Erythritol

  • 1 tsp Baking powder

  • 1/4 tsp Salt

  • 1/2 cup Unsalted butter, melted

  • 1 large Egg

  • 1 tsp Vanilla essence


Step-by-Step Instructions

  1. Preheat and Prep: Set your oven to 175°C (350°F). Grease a ceramic or glass baking dish with oil or line it with parchment paper for easy removal.

  2. Prepare the Fruit: In a mixing bowl, toss the blueberries with the erythritol, xanthan gum, and lemon juice until well combined. Spread the mixture evenly across the bottom of your prepared baking dish.

  3. Mix the Cream Cheese: In a separate bowl, use an electric hand or stand mixer to beat the softened cream cheese and erythritol until velvety. Add the egg and vanilla essence, beating again until the mixture is smooth and creamy.

  4. Layer the Filling: Carefully pour the cream cheese mixture over the blueberry layer, spreading it out to cover the fruit.

  5. Make the Topping: In a large bowl, whisk together the almond flour, coconut flour, baking powder, erythritol, and salt. Add the melted butter, egg, and vanilla. Mix until a thick, dough-like batter forms.

  6. Assemble and Bake: Using a spoon, drop dollops of the batter over the cream cheese layer. Use a spatula to spread it slightly, but leave some gaps so the blueberries can “peek through” as it bakes.

  7. Bake: Place in the oven and bake for approximately 40 minutes, or until the topping is firm and a beautiful golden brown.

  8. Cool and Serve: Remove from the oven and let the cobbler rest on the counter for at least 20 minutes to allow the layers to set. Serve warm or chilled.


Quick Substitutions

  • Nut-Free: Swap the almond flour for an equal amount of sunflower seed flour.

  • Dairy-Free: Replace the butter with ghee or coconut oil.

  • Berries: If you want even fewer carbs, you can replace the blueberries with raspberries or blackberries.

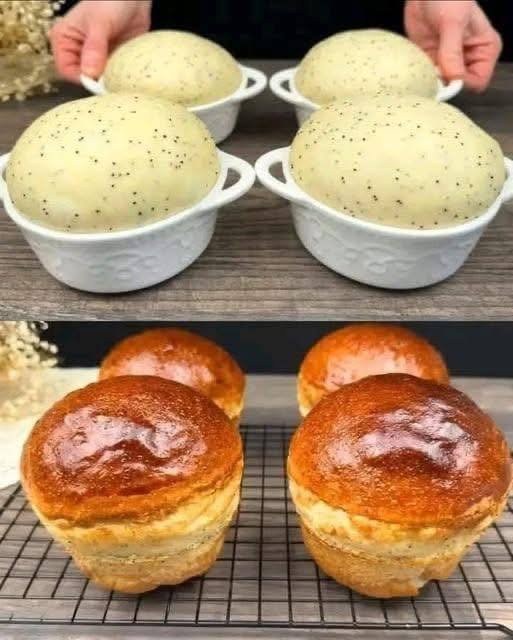
Grandma’s Poppy Seed Brioche Rolls

Grandma’s Poppy Seed Brioche Rolls

Prep time: 20 mins | Rise time: 1.5 hrs | Bake time: 20-25 mins | Yields: 6 large rolls

Ingredients

The Dough:

  • 3 ½ cups All-purpose flour (or Bread flour for extra chew)

  • 1 cup Warm milk (around 43°C or 110°F)

  • 2 ¼ tsp Active dry yeast (1 standard packet)

  • 1/4 cup Granulated sugar

  • 1 large Egg (room temperature)

  • 4 tbsp Unsalted butter, softened

  • 2 tbsp Poppy seeds

  • 1 tsp Salt

The Glaze (for that shiny finish):

  • 1 Egg beaten with 1 tbsp milk

  • Optional: Melted butter for brushing immediately after baking


Detailed Instructions

  1. Activate the Yeast: In a small bowl, combine the warm milk, sugar, and yeast. Let it sit for about 5–10 minutes until it becomes frothy and bubbly.

  2. Mix the Dough: In a large mixing bowl, combine the flour, salt, and poppy seeds. Make a well in the center and add the yeast mixture and the egg.

  3. Knead: Mix until a shaggy dough forms. Add the softened butter one tablespoon at a time, kneading well after each addition. Continue kneading (by hand or with a stand mixer) for 8–10 minutes until the dough is smooth, elastic, and slightly tacky but not sticking to your fingers.

  4. First Rise: Place the dough in a lightly oiled bowl. Cover with a damp cloth and let it rise in a warm, draft-free spot for 1 hour, or until it has doubled in size.

  5. Shape: Punch the dough down to release air. Divide it into 6 equal portions. To get the high-rise look in the photo, roll each portion into a smooth ball and place them into deep, greased ramekins or a jumbo muffin tin.

  6. Second Rise: Cover the ramekins and let the dough rise again for 30–45 minutes. They should puff up well above the rim of the containers.

  7. Bake: Preheat your oven to 180°C (350°F). Gently brush the tops of the rolls with the egg wash. Bake for 20–25 minutes until the tops are a deep, mahogany brown.

  8. Cool: Let them cool in the ramekins for 5 minutes before transferring to a wire rack.


Tips for Beginners

  • The “Windowpane” Test: To see if you’ve kneaded enough, take a small piece of dough and stretch it. If it stretches thin enough to see light through it without tearing, the gluten is ready!

  • Steam for Softness: For an even softer crust, place a small pan of water on the bottom rack of the oven while baking to create steam.

  • Serving: These are incredible served warm with a bit of honey butter or lemon curd to complement the poppy seeds.

10-Minute No-Oven Soft Flatbreads

10-Minute No-Oven Soft Flatbreads

Prep time: 5 mins | Cook time: 5 mins | Yields: 6-8 small breads

Ingredients

  • 2 cups All-purpose flour (plus a little extra for dusting)

  • 1 cup Greek yogurt (Plain, full-fat works best for softness)

  • 1 tsp Baking powder (This is the “magic” for the 10-minute rise)

  • 1/2 tsp Salt

  • 1 tbsp Olive oil or melted butter (optional, for the dough)

  • Butter or Garlic Oil (for brushing at the end)


Instructions

  1. Mix the Dough: In a large bowl, whisk together the flour, baking powder, and salt. Make a well in the center and add the yogurt (and oil/butter if using).

  2. Knead: Use a fork to bring the dough together, then switch to your hands. Knead for about 2–3 minutes until the dough is smooth. If it’s too sticky, add a sprinkle of flour; if too dry, add a teaspoon of yogurt.

  3. Divide & Roll: Divide the dough into 6 to 8 equal pieces. Roll each piece into a ball. On a lightly floured surface, roll each ball into a circle about 1/4 inch thick.

  4. Heat the Pan: Place a cast-iron skillet or non-stick frying pan over medium-high heat. You don’t need oil in the pan, but a tiny drop can help with browning.

  5. Cook: Lay a flatbread in the hot pan. Wait for about 1–2 minutes until you see bubbles forming on the surface and the bottom has golden-brown spots.

  6. Flip: Flip the bread and cook the other side for another minute. It should puff up slightly.

  7. The Finishing Touch: As soon as they come off the heat, brush them with melted butter or olive oil.


Beginner Tips for Success

  • Keep them Warm: As you finish each bread, stack them on a plate and cover them with a clean kitchen towel. The steam will keep them incredibly soft and pliable, just like in your photo.

  • Don’t Over-Flour: Use just enough flour to keep the dough from sticking to your rolling pin. Too much extra flour can make the bread dry or dusty.

  • Flavor Boost: You can mix chopped parsley or minced garlic directly into the butter you brush on at the end for “instant garlic bread.”