Anti-Inflammatory Sage & Lemon Infusion

Anti-Inflammatory Sage & Lemon Infusion

A warm, calming drink rich in antioxidants.

Ingredients

  • 1 tbsp Fresh Sage leaves (about 5-7 leaves) or 1 tsp dried Sage

  • 1 cup Boiling water

  • 1 slice Fresh Lemon (Vitamin C helps with antioxidant absorption)

  • 1 tsp Raw Honey (optional, for soothing the throat)

  • A pinch of Ground Turmeric (optional, for added anti-inflammatory support)


Detailed Instructions

  1. Prepare the Herbs: If using fresh sage, gently bruise the leaves with your fingers to release the natural oils. Place them in your favorite mug or a small teapot.

  2. Infuse: Pour 1 cup of boiling water directly over the leaves.

  3. Steep: Cover the mug with a saucer to trap the steam and essential oils. Let it steep for 5 to 8 minutes. Steeping too long can make sage tea taste slightly bitter.

  4. Strain: Remove the leaves or strain the tea into another cup.

  5. Enhance: Stir in your lemon slice and honey. If you are using turmeric for extra inflammation support, add a tiny pinch now along with a crack of black pepper (which helps the body absorb the turmeric).

  6. Enjoy: Drink warm, ideally once a day.


Why These Ingredients?

  • Sage: Contains rosmarinic acid, which has been shown in studies to have anti-inflammatory and antioxidant effects.

  • Lemon: Adds a burst of Vitamin C, which is essential for collagen production and bone health.

  • Turmeric: Contains curcumin, a well-known natural compound used to help manage joint discomfort.

A Quick Note on Safety

Sage is generally safe for culinary use, but because it contains a compound called thujone, it’s best not to consume sage tea in very large quantities for long periods. If you are pregnant, nursing, or taking medication for diabetes or seizures, please check with your doctor before adding herbal remedies to your routine.


10-Minute No-Oven Soft Flatbreads

10-Minute No-Oven Soft Flatbreads

Prep time: 5 mins | Cook time: 5 mins | Yields: 6-8 small breads

Ingredients

  • 2 cups All-purpose flour (plus a little extra for dusting)

  • 1 cup Greek yogurt (Plain, full-fat works best for softness)

  • 1 tsp Baking powder (This is the “magic” for the 10-minute rise)

  • 1/2 tsp Salt

  • 1 tbsp Olive oil or melted butter (optional, for the dough)

  • Butter or Garlic Oil (for brushing at the end)


Instructions

  1. Mix the Dough: In a large bowl, whisk together the flour, baking powder, and salt. Make a well in the center and add the yogurt (and oil/butter if using).

  2. Knead: Use a fork to bring the dough together, then switch to your hands. Knead for about 2–3 minutes until the dough is smooth. If it’s too sticky, add a sprinkle of flour; if too dry, add a teaspoon of yogurt.

  3. Divide & Roll: Divide the dough into 6 to 8 equal pieces. Roll each piece into a ball. On a lightly floured surface, roll each ball into a circle about 1/4 inch thick.

  4. Heat the Pan: Place a cast-iron skillet or non-stick frying pan over medium-high heat. You don’t need oil in the pan, but a tiny drop can help with browning.

  5. Cook: Lay a flatbread in the hot pan. Wait for about 1–2 minutes until you see bubbles forming on the surface and the bottom has golden-brown spots.

  6. Flip: Flip the bread and cook the other side for another minute. It should puff up slightly.

  7. The Finishing Touch: As soon as they come off the heat, brush them with melted butter or olive oil.


Beginner Tips for Success

  • Keep them Warm: As you finish each bread, stack them on a plate and cover them with a clean kitchen towel. The steam will keep them incredibly soft and pliable, just like in your photo.

  • Don’t Over-Flour: Use just enough flour to keep the dough from sticking to your rolling pin. Too much extra flour can make the bread dry or dusty.

  • Flavor Boost: You can mix chopped parsley or minced garlic directly into the butter you brush on at the end for “instant garlic bread.”

Crispy Garlic Butter Fish Bites with Creamy Herb Sauce

Crispy Garlic Butter Fish Bites with Creamy Herb Sauce

πŸ›’ Ingredients

For the Fish:

  • 500g cod fillets (or any firm white fish like basa/halibut)
  • 1 tsp salt
  • Β½ tsp black pepper
  • 1 tsp paprika
  • Β½ tsp chili flakes (optional)
  • 1 tsp garlic powder
  • 1 tbsp lemon juice
  • 2 tbsp olive oil
  • 2 tbsp butter
  • 3 cloves garlic (minced)

For the Creamy Herb Sauce:

  • Β½ cup mayonnaise
  • 2 tbsp sour cream (or Greek yogurt)
  • 1 tbsp lemon juice
  • 1 tbsp finely chopped parsley
  • 1 tsp dried oregano or mixed herbs
  • 1 small garlic clove (grated)
  • Salt & pepper to taste

πŸ‘©β€πŸ³ Step-by-Step Method

Step 1: Prepare the Fish

  1. Wash and pat dry the fish completely (very important for crispiness).
  2. Cut into thick strips or large chunks like in the picture.
  3. In a bowl, add:
    • Salt
    • Black pepper
    • Paprika
    • Chili flakes
    • Garlic powder
    • Lemon juice
  4. Gently mix and coat evenly.
  5. Let marinate for 15–20 minutes.

Step 2: Make the Creamy Herb Sauce

  1. In a small bowl, combine:
    • Mayonnaise
    • Sour cream
    • Lemon juice
    • Parsley
    • Oregano
    • Grated garlic
  2. Mix until smooth.
  3. Adjust salt and pepper.
  4. Refrigerate until serving (cold sauce tastes better!).

The Natural Immunity Elixir

The Natural Immunity Elixir

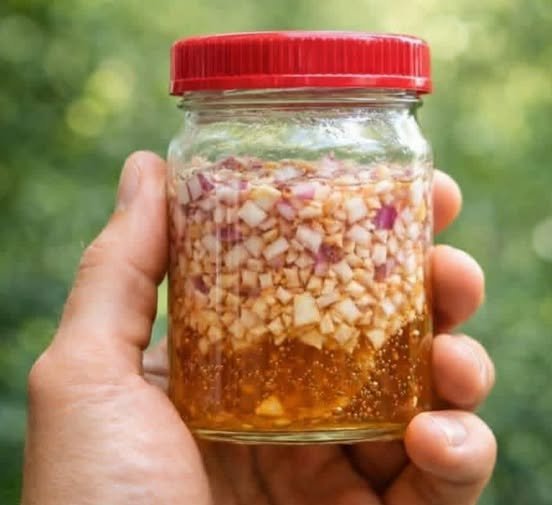
This recipe uses the natural sugars in honey to draw out the juices from the ginger, onion, and garlic, creating a potent, concentrated syrup.

Ingredients

  • 1/2 cup Garlic: Peeled and finely minced.

  • 1/2 cup red onion:Β finely diced (red onion contains higher levels of quercetin).

  • 1/4 cup Fresh Ginger: Grated or finely minced.

  • 2-3 tbsp lemon juice:Β freshly squeezed.

  • Raw Honey: Enough to completely submerge the dry ingredients (approx. 1 cup).

Instructions

  1. Prep the Jar: Ensure you are using a clean, dry glass jar.

  2. Layer the Aromatics: Add the minced garlic, diced onion, and grated ginger into the jar.

  3. Add Acid: Pour in the lemon juice. This adds vitamin C and helps balance the pH of the mixture.

  4. The Honey Pour: Slowly pour the raw honey over the mixture. Use a clean spoon or toothpick to poke through the layers, ensuring there are no air bubbles trapped at the bottom. The honey must completely cover the solids.

  5. The Ferment: Close the lid tightly and store the jar in a cool, dark place (like a kitchen cupboard) for 7 days.

  6. Maintenance: Each day, give the jar a quick flip or stir to make sure the ingredients stay coated in honey. You may notice the honey becoming thinner and more liquidβ€”this is normal!

Usage

As you mentioned, take one teaspoon per day starting on the 7th day. If you feel a cold coming on, some people increase this to 3 times a day.


⚠️ A Quick Note on Safety

  • Botulism Risk: Because garlic and onion grow in soil, they can carry C. botulinum spores. Using raw honey (which is acidic) and lemon juice helps prevent bacterial growth, but if the mixture smells “off,” looks fuzzy, or the lid is bulging excessively, play it safe and toss it.

  • Infants: Never give honey-based recipes to children under 1 year old.

Olive Oil With Lemon in the Morning

Olive Oil With Lemon in the Morning

A simple traditional wellness drink made withΒ extra virgin olive oilΒ andΒ fresh lemon juice, often taken on an empty stomach to support digestion and overall health.

Recipe Name

Morning Olive Oil & Lemon Elixir

Description

This natural tonic combines healthy fats from extra virgin olive oil with vitamin C and antioxidants from fresh lemon juice. Many people use it first thing in the morning to gently stimulate digestion, support liver function, and promote heart health.

Β Ingredients (1 Serving)

  • 1 tablespoonΒ extra virgin olive oilΒ (cold-pressed, high quality)

  • 1 tablespoon fresh lemon juice (about Β½ lemon)

  • Optional: ΒΌ cup warm water (to dilute if preferred)

Β How to Make It

  1. Squeeze fresh lemon juice into a small glass.

  2. Add the olive oil.

  3. Stir or whisk well until lightly blended.

  4. Drink immediately on an empty stomach.

  5. Wait 15–30 minutes before eating breakfast.

Optional method: Mix both into warm (not hot) water for a milder taste.

Tips for Best Results

  • UseΒ high-quality extra virgin olive oilΒ (first cold press).

  • Always use freshly squeezed lemon juice (not bottled).

  • Start with smaller amounts (1 teaspoon each) if you’re new to it.

  • Consistency matters β€” try it for 2–3 weeks before judging results.

  • If you have acid reflux or gallbladder issues, consult a healthcare provider first.

Β Servings

1 serving

You can increase to 2 tablespoons of each if tolerated, but 1 tablespoon each is standard.

Β Nutritional Information (Approximate per serving)

Nutrient Amount
Calories ~120 kcal
Fat 14 g (mostly monounsaturated)
Saturated Fat 2 g
Carbohydrates 1 g
Vitamin C ~10–15% DV
Sugar <1 g

Note: Values vary depending on lemon size.

Β Potential Benefits

1️⃣ Supports Digestion

Olive oil may help lubricate the digestive tract, while lemon juice can stimulate digestive enzymes.

2️⃣ Heart Health

Rich in monounsaturated fats, olive oil may help support healthy cholesterol levels.

3️⃣ Antioxidant Boost

Lemon provides vitamin C; olive oil contains polyphenols.

4️⃣ Mild Detox Support

May support natural liver function (your body detoxes naturally through liver and kidneys).

5️⃣ May Help With Constipation

Olive oil can have a mild natural laxative effect.

6️⃣ Skin Glow Support

Healthy fats + antioxidants may support skin hydration.

Frequently Asked Questions

Q1: Can I take it every day?

Yes, many people take it daily. If you experience stomach upset, reduce the amount.

Q2: Is it good for weight loss?

It’s not a magic weight-loss drink. However, healthy fats may improve satiety and reduce overeating.

Q3: Can I use bottled lemon juice?

Fresh is best for maximum vitamin C and enzymes.

Q4: When is the best time to drink it?

First thing in the morning on an empty stomach.

Q5: Who should avoid this?

  • People with gallstones

  • Severe acid reflux sufferers

  • Those on certain blood thinners
    Always consult a professional if unsure.

Bay Leaf Herbal Tea (Supportive Wellness Drink)

Bay Leaf Herbal Tea (Supportive Wellness Drink)

(Not a cure. May support overall health when combined with medical treatment and healthy lifestyle.)

Β Ingredients

  • 2–3 dried bay leaves

  • 2 cups water

  • Optional: slice of lemon or small piece of cinnamon

Instructions

  1. Bring water to a boil.

  2. Add bay leaves.

  3. Reduce heat and simmer for 10–15 minutes.

  4. Remove from heat and let steep another 5 minutes.

  5. Strain and drink warm.

Β Description

Bay leaf tea is a mild herbal infusion traditionally used to support digestion and general wellness.

Β Notes & Tips

  • Do not consume more than 1–2 cups per day.

  • Avoid during pregnancy.

  • If you have diabetes or take blood pressure medication, monitor levels closely.

  • Never replace prescribed medication with herbal tea.

Servings

Makes 2 cups (1 day supply)

πŸ₯—Β Nutritional Info (Approximate per cup)

  • Calories: ~2

  • Carbohydrates: <1g

  • Fat: 0g

  • Fiber: trace

  • Contains small amounts of plant antioxidants

Β Potential Benefits (Evidence-Based Perspective)

Bay leaves may:

  • Contain antioxidants

  • Support digestion

  • Have mild anti-inflammatory properties

  • Slightly support blood sugar regulation (limited small studies)

But theyΒ do NOT cure:

  • Diabetes

  • High blood pressure

  • High cholesterol

  • Poor circulation

These conditions require medical diagnosis and management.

Q & A

Q: Can one leaf cure diabetes?

No. Diabetes is a metabolic disease that requires long-term medical management.

Q: Can bay leaf replace blood pressure medication?

No. Stopping medication without doctor approval can be dangerous.

Q: Is it safe to try?

In small amounts as tea, generally yes for most adults β€” but always check with your doctor if you have medical conditions or take medication.