Guava Leaf Tea (Traditional Herbal Infusion)

Guava Leaf Tea (Traditional Herbal Infusion)

Ingredients (2 Servings)

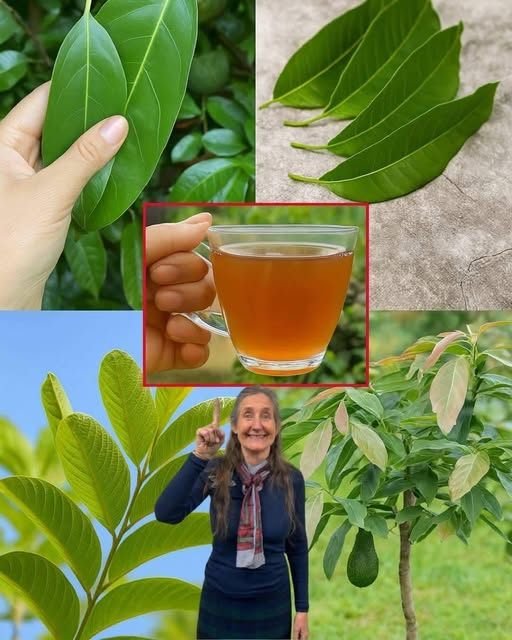
  • 8–10 fresh guava leaves (or 1 tbsp dried guava leaves)

  • 2 cups water

  • Honey or lemon (optional, to taste)

Instructions

1️⃣ Prepare the Leaves

  • Wash fresh leaves thoroughly.

  • If large, tear into smaller pieces to release more flavor.

2️⃣ Boil

  • Bring 2 cups of water to a boil.

  • Add guava leaves.

  • Reduce heat and simmer for 10–15 minutes.

3️⃣ Steep

  • Turn off heat and let steep for another 5 minutes.

4️⃣ Strain & Serve

  • Strain into a cup.

  • Add honey or lemon if desired.

  • Serve warm.

 Description Notes

  • Flavor: Mild, grassy, slightly bitter.

  • Color: Light amber to medium brown.

  • Texture: Smooth herbal infusion.

  • Best consumed fresh.

  • Can also be chilled and served as iced tea.

Tips

  • Use young, bright green leaves for milder flavor.

  • Avoid yellowing or damaged leaves.

  • Do not overboil (can become too bitter).

  • Store dried leaves in an airtight container.

  • Drink 1–2 cups per day.

 Servings

  • Makes: 2 cups

  • Serves: 2 people

 Approximate Nutritional Info (Per Cup)

Guava leaf tea is very low in calories.

  • Calories: 2–5

  • Carbohydrates: <1g

  • Fat: 0g

  • Protein: 0g

  • Sugar: 0g (without honey)

Contains small amounts of:

  • Antioxidants (polyphenols)

  • Vitamin C (trace)

  • Plant compounds (quercetin, flavonoids)

 Potential Benefits

Traditionally associated with:

  • ✔️ Digestive support

  • ✔️ May help with occasional diarrhea

  • ✔️ Supports blood sugar balance

  • ✔️ Rich in antioxidants

  • ✔️ May support immune health

  • ✔️ May help reduce inflammation

Note: Not a medical treatment. Consult a healthcare provider if pregnant, nursing, on medication, or managing medical conditions.

 Q & A

Q: Can I use dried leaves?

Yes. Use about 1 tablespoon dried leaves per 2 cups water.

Q: How often can I drink it?

Typically 1–2 cups daily is common in traditional use.

Q: Can I drink it cold?

Yes. Refrigerate after brewing and serve over ice.

Q: Does it taste bitter?

Slightly. Add honey or lemon to balance.

Q: Can I mix it with other herbs?

Yes. Ginger or mint pairs well.

Clove Steam Inhalation

Clove Steam Inhalation (Traditional Home Remedy)

Clove steam inhalation is a simple, aromatic home remedy traditionally used to help clear nasal congestion, soothe the throat, and support easier breathing. The warm steam hydrates nasal passages while cloves release a strong, spicy vapor rich in natural compounds.

Description

This remedy combines hot water and whole cloves to create a soothing steam. The active compound in cloves, eugenol, is known for its warming aroma and natural antimicrobial properties. When inhaled safely, it may help:

  • Relieve sinus congestion

  • Ease cold and flu discomfort

  • Calm cough irritation

  • Support clearer breathing

  • Provide a relaxing, spa-like experience

 Ingredients (1 Serving)

  • 4 cups (1 liter) water

  • 1–2 tablespoons whole cloves

  • Optional: 1 cinnamon stick or a slice of fresh ginger


👩‍🍳 Instructions

1️⃣ Bring water to a gentle boil.
2️⃣ Add cloves (and optional ingredients).
3️⃣ Simmer 5 minutes, then remove from heat.
4️⃣ Carefully pour into a heat-safe bowl.
5️⃣ Sit comfortably, lean over the bowl.
6️⃣ Drape a towel over your head to trap steam.
7️⃣ Inhale gently for 5–10 minutes (keep eyes closed).

⚠️ Keep face 8–12 inches from the water to avoid burns.

 Tips for Best Results

  • Do not use boiling water directly from heat — let it cool slightly.

  • Keep eyes closed to prevent irritation.

  • Use once daily during congestion.

  • Stay hydrated afterward.

  • Not recommended for young children without medical advice.

 Servings

  • Makes 1 steam session

  • Can be repeated daily as needed

 Nutritional Information

Since this is inhaled (not consumed), it contains no calories, fat, sugar, or carbs.

 Potential Benefits

  • 🌬 Helps loosen mucus

  • 🤧 May ease stuffy nose

  • 🦠 Clove contains natural antimicrobial compounds

  • 😌 Promotes relaxation

  • 🌡 Warm steam supports sinus drainage

Note: This is a supportive home remedy — not a substitute for medical treatment.

Q & A

Q: Can I drink the clove water afterward?
A: It can be strained and sipped like tea, but the flavor will be very strong and spicy.

Q: How often can I use it?
A: Once daily during cold or sinus discomfort.

Q: Can I add essential oils?
A: Only if labeled safe for steam inhalation, and use 1–2 drops max.

Q: Is it safe during pregnancy?
A: Occasional steam inhalation is generally mild, but consult your healthcare provider first.

Q: Does it cure colds?
A: No. It may help relieve symptoms but does not cure infections.

Ginger Lemon Water

Ginger Lemon Water

A refreshing, metabolism-supporting drink that helps reduce bloating, curb cravings, and support overall fat loss when paired with healthy habits. This simple ginger water is hydrating, soothing, and easy to prep for the whole week.

 Description

Ginger water is a natural wellness drink made by infusing fresh ginger (and optional lemon) into water. It’s known for supporting digestion, reducing inflammation, easing bloating, and gently boosting metabolism — which can help with fat loss over time, especially in stubborn areas like the abdomen, arms, back, neck, and thighs when combined with balanced nutrition and movement.


 Ingredients

  • 1–2 inches fresh ginger root, peeled and sliced

  • 1 liter (4 cups) water

  • ½ fresh lemon, sliced or juiced (optional, but recommended)


 Instructions

  1. Prepare ginger
    Peel and thinly slice fresh ginger.

  2. Boil water
    Bring water to a boil, add ginger, and simmer for 10–15 minutes.

  3. Cool & strain
    Remove from heat, let cool slightly, then strain.

  4. Add lemon (optional)
    Stir in lemon juice or add lemon slices.

  5. Store
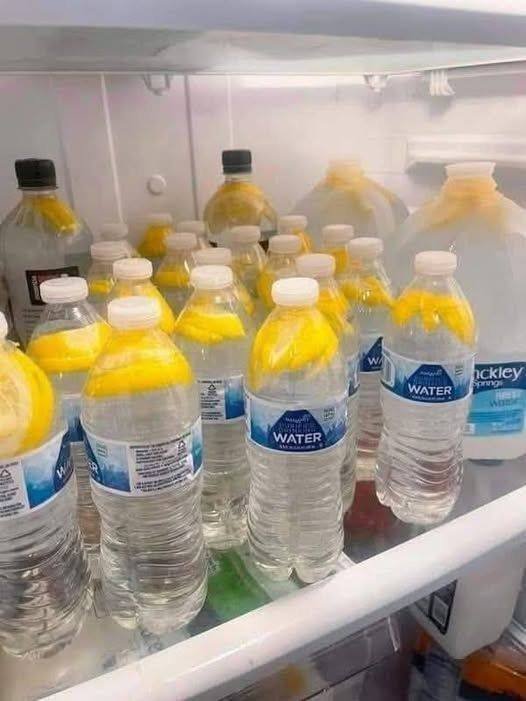
    Pour into bottles and refrigerate for up to 3 days.

Serve warm or cold.

 Notes & Tips

  • 🌿 Stronger flavor? Simmer longer or add more ginger

  • 🧊 Great cold for summer, warm for digestion

  • 🍯 Add a small drizzle of honey if needed (optional)

  • ❄️ Shake before drinking if infused overnight

 Servings

  • 4 servings (1 cup each)

 Nutritional Info (Per Serving – Approx.)

  • Calories: 5–10

  • Carbs: 1–2g

  • Fat: 0g

  • Protein: 0g

  • Sugar: 0g

  • WW Points: 0

 Benefits

  • Supports digestion and gut health

  • Helps reduce bloating and water retention

  • Anti-inflammatory properties

  • May support metabolism and appetite control

  • Naturally detoxifying and hydrating

  • Caffeine-free and sugar-free

 Q & A

Q: Does ginger water burn belly fat?
Ginger water doesn’t burn fat on its own, but it supports fat loss by improving digestion, reducing bloating, and helping control appetite when paired with a healthy lifestyle.

Q: When should I drink it?
Best times are morning on an empty stomach or between meals.

Q: How much can I drink daily?
1–3 cups per day is ideal.

Q: Can I drink it every day?
Yes, most people can safely enjoy it daily.

Q: Who should avoid it?
If you’re pregnant, on blood thinners, or have gallbladder issues, check with a healthcare professional first.

Sugar-Free Oatmeal and Apple Energy Dessert

Sugar-Free Oatmeal and Apple Energy Dessert

Ingredients

  • Rolled Oats: 1 cup

  • Warm Milk: ⅔ cup (150 ml)

  • Apples: 2, grated or finely diced

  • Butter: 2 tablespoons, melted

  • Eggs: 2 large

  • Vanilla Extract: ½ teaspoon

  • Walnuts or Almonds: ½ cup, chopped (optional for added texture)


Detailed Instructions

  1. Hydrate the Oats: In a large mixing bowl, combine the 1 cup of rolled oats with the ⅔ cup of warm milk. Stir well and allow the mixture to sit for 10 minutes so the oats can soften and absorb the liquid.

  2. Prepare the Fruit and Nuts: While the oats are soaking, peel and either grate or finely dice the 2 apples. If using walnuts or almonds, chop them into small pieces to ensure even distribution.

  3. Create the Batter: Add the 2 eggs, 2 tablespoons of melted butter, and ½ teaspoon of vanilla extract to the soaked oats. Mix thoroughly until the eggs are fully incorporated. Fold in the prepared apples and nuts.

  4. Fill the Molds: Lightly grease a silicone mold or muffin tin. Using a spoon, fill each cavity nearly to the top with the batter, as these bites do not rise significantly.

  5. Bake: Preheat your oven to 180°C (350°F). Bake for 25–30 minutes until the tops are golden brown and the centers are firm.

  6. Cool and Serve: Let the dessert cool in the mold for at least 5 minutes before removing. This helps the structure set, making them easy to grab as a portable energy snack.


Why This Works

  • Natural Sweetness: Grated apples provide moisture and sweetness without the need for refined sugar.

  • Satiety: The combination of fiber from the oats and protein from the eggs helps keep you feeling full and energized.

Lemon Garlic Butter Chicken & Creamy Parmesan Pasta

Lemon Garlic Butter Chicken & Creamy Parmesan Pasta

Ingredients

For the Chicken:

  • Chicken: 2 boneless, skinless chicken breasts

  • Olive oil: 1 tablespoon

  • Unsalted butter: 2 tablespoons

  • Garlic: 3 cloves, minced

  • Lemon juice: 1 tablespoon

  • Seasoning: Salt, black pepper, and paprika to taste

For the Pasta:

  • Pasta: 250g spaghetti or linguine

  • Heavy cream: 1 cup

  • Parmesan cheese: ½ cup, freshly grated

  • Garlic: 2 cloves, minced

  • Lemon zest: 1 teaspoon

  • Fresh parsley: 2 tablespoons, chopped


Detailed Instructions

1. Prepare the Chicken

  • Slice and Season: Cut the chicken breasts into bite-sized pieces. Season generously with salt, pepper, and a dash of paprika.

  • Sear: Heat 1 tablespoon of olive oil and 1 tablespoon of butter in a large skillet over medium-high heat. Add the chicken and cook until golden brown and cooked through (about 6–8 minutes).

  • Finish with Flavor: Reduce the heat to low. Add the remaining 1 tablespoon of butter, minced garlic, and 1 tablespoon of lemon juice to the pan. Toss the chicken to coat it in the garlic butter sauce, then remove the chicken from the pan and set it aside.

2. Cook the Pasta

  • Boil: Cook your pasta in a large pot of salted boiling water according to the package instructions until al dente.

  • Reserve Water: Before draining, save about ½ cup of the starchy pasta water.

3. Create the Creamy Parmesan Sauce

  • Sauté Garlic: In the same skillet used for the chicken (don’t wash it—those brown bits add flavor!), add a little more butter if needed and sauté the minced garlic for 30 seconds.

  • Simmer Cream: Pour in the heavy cream and bring to a gentle simmer.

  • Melt Cheese: Whisk in the ½ cup of Parmesan cheese until the sauce is smooth. If it’s too thick, add a splash of the reserved pasta water.

  • Add Zest: Stir in the lemon zest for that bright, zesty finish.

4. Combine and Serve

  • Toss: Add the cooked pasta to the skillet and toss thoroughly to coat every strand in the creamy sauce.

  • Plate: Serve the pasta topped with the lemon garlic chicken. Garnish with fresh parsley and extra Parmesan if desired.


Cooking Tip

To keep this meal balanced, try serving it with a side of steamed broccoli or a fresh green salad.

Homemade Bread in a Bag

Homemade Bread in a Bag

Ingredients

  • All-purpose flour: 3 cups (divided)

  • Sugar: 3 teaspoons

  • Rapid-rise yeast: 1 packet

  • Warm water: 1 cup (essential for activating yeast)

  • Olive oil: 3 tablespoons

  • Salt: $1\frac{1}{4}$ teaspoons


Detailed Instructions

  1. Combine Initial Ingredients:

    Open a large (gallon-sized) heavy-duty freezer bag. Pour in 1 cup of flour, the sugar, the packet of yeast, and 1 cup of warm water. Seal the bag tightly, pushing out the excess air.

  2. The “Shake” Phase:

    Squeeze and shake the bag with your hands until the ingredients are well blended. Let the mixture rest for about 10 minutes; you should see bubbles forming as the yeast activates.

  3. Add Remaining Ingredients:

    Open the bag and add the olive oil, salt, and the remaining 2 cups of flour. Reseal the bag and continue to knead and squish it from the outside until a dough ball forms and pulls away from the sides of the bag.

  4. Knead the Dough:

    Lightly flour a clean surface. Remove the dough from the bag and knead it by hand for about 5–8 minutes until it is smooth and elastic.

  5. First Rise:

    Place the dough in a lightly greased bowl, cover it with a damp cloth, and let it rise in a warm spot for about 30–45 minutes, or until it has doubled in size.

  6. Shape and Second Rise:

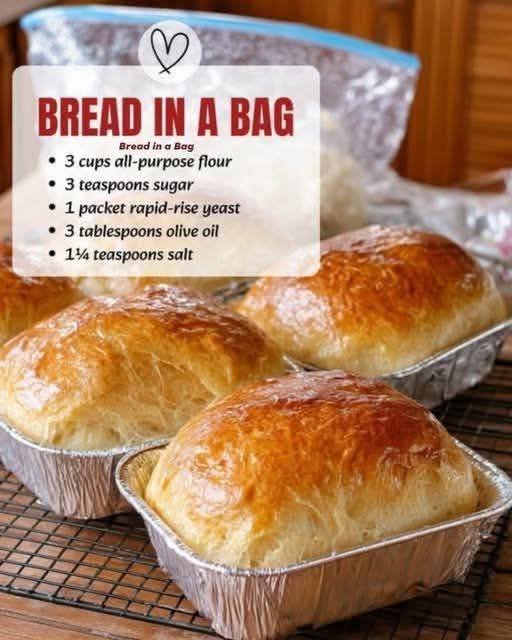
    Gently punch the dough down to release air. Divide it into smaller portions if using mini loaf pans (as seen in the image) or keep it as one large loaf. Place the dough into greased baking pans. Cover again and let rise for another 20 minutes.

  7. Bake:

    Preheat your oven to 190°C (375°F). Bake for 25–30 minutes or until the crust is a deep golden brown and the bread sounds hollow when tapped on the bottom.

  8. Cool:

    Remove from the pans and let the bread cool on a wire rack before slicing to ensure the center stays fluffy.