Crispy Garlic Parmesan Roasted Cauliflower

Crispy Garlic Parmesan Roasted Cauliflower Bites with Creamy Dip

Description


These crispy roasted cauliflower bites are a delicious, healthier alternative to fried snacks, packed with bold garlic, parmesan, and herb flavors. Each floret is coated in a savory seasoning blend, roasted until golden brown and slightly crunchy on the outside while remaining tender inside. Finished with a sprinkle of fresh herbs and served alongside a creamy dipping sauce, this dish is perfect as an appetizer, side dish, or even a light vegetarian main. The balance of crispy texture and rich, cheesy flavor makes these bites irresistible—even for those who aren’t usually fans of vegetables.

Ingredients

For the Cauliflower:

Discover more
Baked Goods
Food
Fruits & Vegetables

  • 1 large head of cauliflower, cut into bite-sized florets
  • 3 tablespoons olive oil
  • 3 cloves garlic, minced
  • 1/2 cup grated parmesan cheese
  • 1/2 cup breadcrumbs (panko for extra crispiness)
  • 1 teaspoon paprika
  • 1/2 teaspoon black pepper
  • 1/2 teaspoon salt
  • 1/2 teaspoon onion powder

For the Creamy Dip:

  • 1/2 cup mayonnaise
  • 2 tablespoons sour cream or Greek yogurt
  • 1 teaspoon Dijon mustard
  • 1 teaspoon lemon juice
  • 1/2 teaspoon garlic powder
  • Salt and pepper to taste

For Garnish:

  • Fresh parsley, chopped

 Instructions

  1. Preheat the Oven: Set your oven to 425°F (220°C) and line a baking tray with parchment paper.
  2. Prepare the Cauliflower: Wash and thoroughly dry the florets to ensure crispiness when roasting.
  3. Season the Florets: In a large bowl, toss cauliflower with olive oil, minced garlic, paprika, salt, pepper, and onion powder until evenly coated.
  4. Add Coating: Mix in breadcrumbs and parmesan cheese, ensuring each piece is well coated for a crispy finish.
  5. Arrange on Tray: Spread the florets in a single layer on the baking sheet, leaving space between each piece.
  6. Roast: Bake for 25–30 minutes, flipping halfway through, until golden brown and crispy on the edges.
  7. Prepare the Dip: While the cauliflower roasts, mix all dip ingredients in a small bowl until smooth and creamy. Adjust seasoning as needed.
  8. Finish & Serve: Remove cauliflower from oven, sprinkle with fresh parsley, and serve hot with the creamy dip.

Tips, Notes, and Q&A

  • Tip: For extra crispiness, broil the cauliflower for the last 2–3 minutes.
  • Tip: Avoid overcrowding the pan, as this causes steaming instead of roasting.
  • Note: You can make this recipe gluten-free by using gluten-free breadcrumbs.
  • Q: Can I air fry instead? Yes—cook at 400°F (200°C) for about 15–18 minutes, shaking halfway through.
  • Q: Can I make it vegan? Substitute parmesan with nutritional yeast and use vegan mayo for the dip.

Servings & Nutrition (Approximate)

  • Serves: 4 people
  • Calories per serving: 220–280 kcal
  • Protein: 6–8g
  • Fat: 14–18g
  • Carbohydrates: 18–22g

The Antioxidant “Green Glow” Mist

The Antioxidant “Green Glow” Mist

This remedy is perfect for those who find their skin looks tired or “gray” by mid-afternoon. It acts as a natural anti-inflammatory.


What You’ll Need

  • 1 Green Tea Bag (or 1 tsp loose leaf—Organic is best for skin).

  • ½ cup Hot Water (Steeped at 80°C to avoid burning the leaves).

  • 1 tsp Raw Honey (A natural humectant that pulls moisture into the skin).

  • Optional: 2 drops of Vitamin E oil (for extra preservation and glow).

Step-by-Step Preparation

  1. Steep: Brew the green tea in the hot water for about 5 minutes. You want it strong, so don’t be afraid to squeeze the tea bag.

  2. Dissolve: While the tea is still warm (but not boiling), stir in the honey until it’s fully incorporated.

  3. Cool: Let the mixture cool completely to room temperature.

  4. Bottle: Pour into a clean spray bottle or a small jar.

  5. Store: Keep this in the fridge. The cold temperature helps constrict blood vessels, reducing puffiness when applied.


How to Use It

  • As a Mid-Day Refresh: Spray directly over your face (even over makeup) when your skin feels tight or looks dull.

  • The “Double-Tone” Method: Use your Rice Water first to hydrate, let it dry, then mist this Green Tea blend over it to seal in the antioxidants.

  • Eye De-Puffer: Soak two cotton pads in the cold mixture and place them over your eyes for 5 minutes in the morning.


Why This Works

Ingredient Benefit
Green Tea High in Caffeine and EGCG; reduces puffiness and protects against UV damage.
Honey Antibacterial and soothing; keeps the skin from feeling “sticky” while adding moisture.
Cold Temp Calms inflammation and “wakes up” the complexion.

A Quick Heads-Up: Because this remedy contains water and honey without professional preservatives, it only stays fresh for about 5 to 7 days in the refrigerator. If it changes color or loses its tea scent, toss it and whip up a fresh batch!

Beetroot, Nopal & Lemon Juice: A Natural Drink to Support Circulation and Daily Wellness

Feeling low on energy, experiencing heavy legs, or dealing with slow digestion is more common than many people think. Over time, these small discomforts can affect your daily routine and overall well-being.

That’s why many people are turning to simple, natural solutions that are easy to include in their lifestyle. One combination that has been gaining attention is beetroot, nopal, celery, and lemon juice.

Stay with us until the end—there’s one key detail about this drink that most people overlook.


Why Is This Natural Juice So Popular?

The mix of beetroot, nopal (cactus), celery, and lemon is not new, but it has recently become popular due to its nutritional profile and simplicity.

Each ingredient brings unique compounds that may help support basic body functions. When combined, their effects may become even more beneficial.Promoted Content


Potential Benefits of Each Ingredient

  • Beetroot: Rich in natural nitrates that may support healthy blood circulation
  • Nopal (cactus): High in fiber, which can aid digestion and promote fullness
  • Celery: Contains antioxidants and high water content, supporting hydration
  • Lemon: A good source of vitamin C, linked to immune system support

👉 Research in nutrition shows that diets rich in vegetables are associated with better cardiovascular and metabolic health.


How to Add This Juice to Your Daily Routine

The secret isn’t just the juice itself—it’s consistency.

Many people try it once and expect immediate results. However, the real benefits come from making it part of your daily habits.

Practical Tips:

  • Drink it in the morning, preferably on an empty stomach or with breakfast
  • Stay hydrated throughout the day
  • Combine it with a balanced diet
  • Avoid adding refined sugar

👉 Here’s something interesting: the timing of consumption can influence how you feel during the day.


Easy Recipe: Step-by-Step Guide

Preparing this juice at home is quick and simple.

Ingredients:

  • 1 medium beetroot
  • 1 nopal (cactus paddle)
  • 1 celery stalk
  • Juice of 1 lemon
  • 1 glass of water

Instructions:

  1. Wash and disinfect all ingredients
  2. Peel and chop the beetroot into small pieces
  3. Cut the nopal and celery
  4. Blend everything with water
  5. Add lemon juice at the end
  6. Strain if you prefer a smoother texture (optional)

👉 Tip: Drink it fresh to maximize nutrient intake.


Natural Juice vs Processed Drinks

Feature Natural Juice Processed Drinks
Added sugars No Often yes
Fiber Partial No
Natural nutrients High Low
Preservatives No Yes

The difference is clear—and it can impact your long-term health.


Key Tips to Maximize Benefits

This is the part many people miss…

The juice alone won’t do all the work. It’s most effective when combined with healthy habits.

Recommended Habits:

  • Engage in light physical activity (20–30 minutes walking daily)
  • Sleep 7–8 hours per night
  • Reduce ultra-processed foods
  • Eat more fruits and vegetables

💡 Consistency in habits is what truly makes a difference.


Conclusion

Adding natural juices like beetroot, nopal, celery, and lemon to your routine can be a practical way to support your daily nutrition.

Natural Circulation Support Routin

Natural Circulation Support Routine

Ingredients

  • 1 cup hot water
  • 3–4 slices fresh ginger
  • 1 tsp honey optional
  • Lemon juice optional
  • Berries or leafy greens daily
  • Plenty of water

Ginger Tea Method

  1. Boil 1 cup water.
  2. Add ginger slices.
  3. Simmer 5–10 minutes.
  4. Strain.
  5. Add honey or lemon if desired.
  6. Drink 1 cup daily.

Daily Leg Routine

  1. Walk 20–30 minutes daily.
  2. Every 45 minutes, stretch or move your ankles.
  3. Elevate legs for 15 minutes at night.
  4. Drink enough water through the day.
  5. Avoid tight clothes and high heels.

Important

For leg swelling, numbness, cold feet, visible veins, pain, diabetes, heart issues, or blood pressure problems, talk to a doctor. Natural remedies are supportive, not a cure.

Wellness Naturally

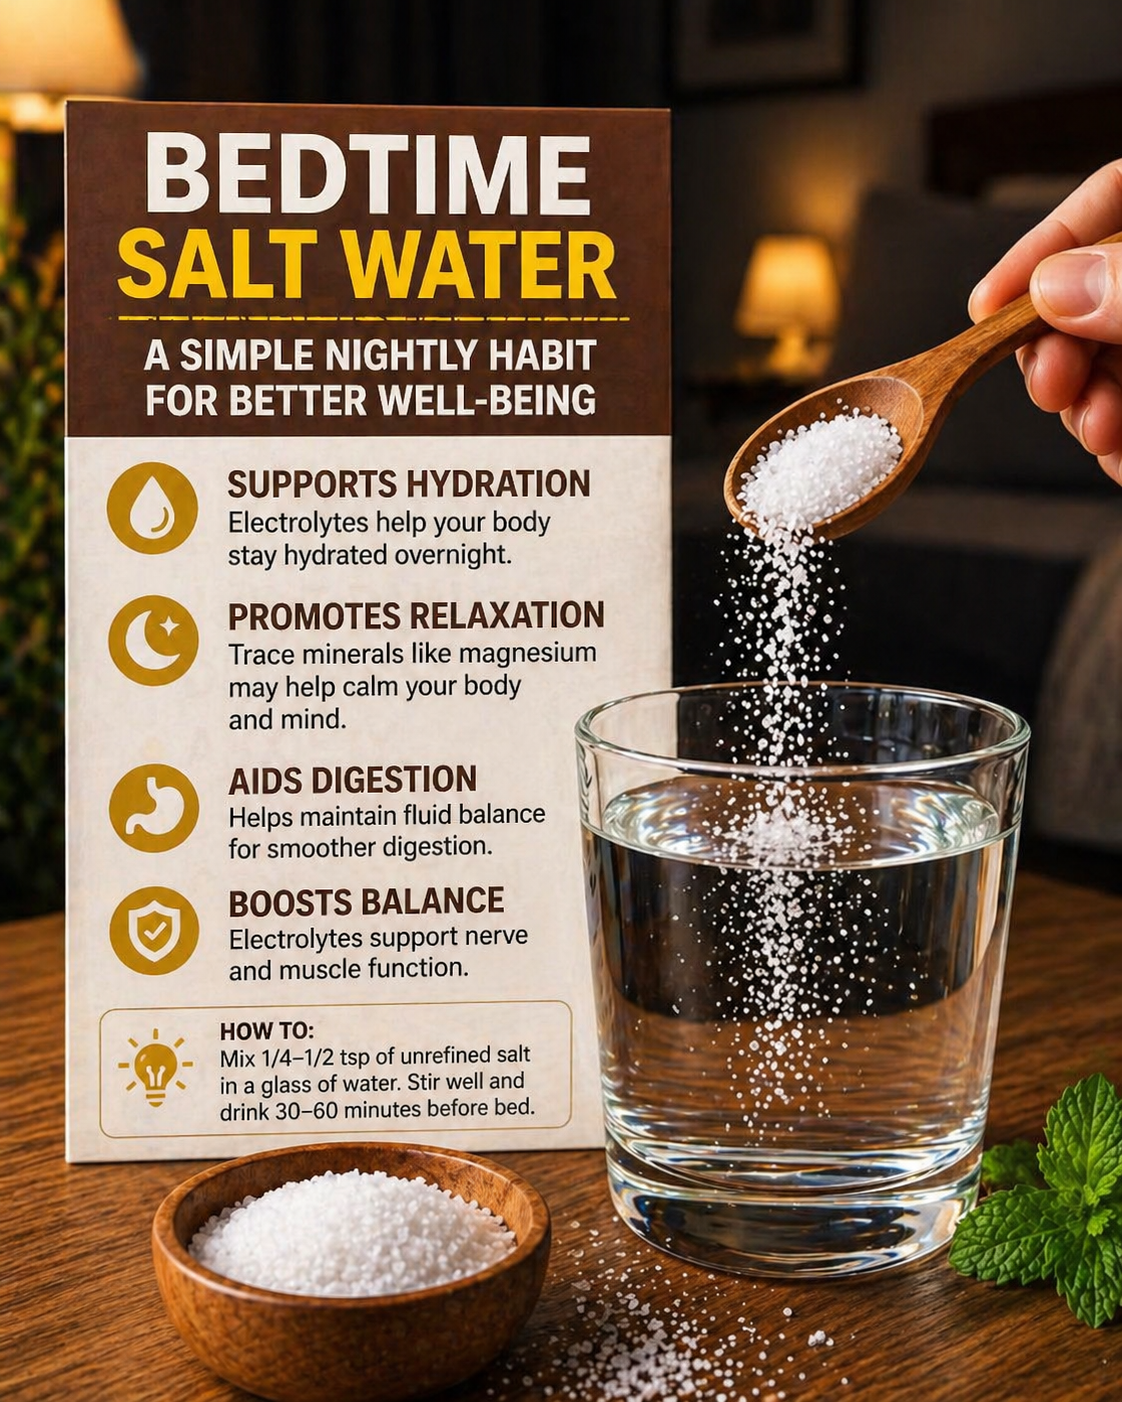
🧂 What it is

  • A glass of water + a small amount of unrefined salt (¼–½ tsp)
  • Drunk 30–60 minutes before bed
  • Supposed to provide electrolytes (sodium + trace minerals)

✅ What might actually help

Some parts are grounded in basic physiology:

  • Electrolytes support hydration
    • Sodium helps your body retain fluid better than plain water
  • Minerals like magnesium (tiny amounts) may support relaxation
  • Drinking a small amount (not excessive) may help you avoid waking up dehydrated

⚠️ What’s exaggerated

Let’s be real—this trend is a bit overhyped:

  • The trace minerals in salt are VERY small → not enough to meaningfully change sleep
  • No strong scientific evidence that salt water:
    • Improves sleep quality significantly
    • Reduces stress directly
  • Effects people feel are often from:
    • Better hydration habits overall
    • Placebo or improved bedtime routine

🚫 Who should NOT try this

Be careful or avoid if you have:

  • High blood pressure
  • Kidney or heart conditions
  • Sodium-restricted diet

👍 If you want to try it (safe version)

  • Start with ¼ tsp salt in 1 glass water
  • Drink not too close to sleep (to avoid bathroom trips)
  • Do NOT exceed small amounts

💡 Better alternatives for sleep

If your goal is better sleep/relaxation, these work more reliably:

  • Magnesium-rich foods or supplements
  • Limiting screens before bed
  • Consistent sleep schedule
  • Warm tea (like chamomile)

Bottom line

This isn’t harmful in small amounts for healthy people, but it’s not a miracle sleep hack—just a minor hydration tweak wrapped in a trend.

How to Make Aloe Vera Oil for Faster Hair Growth and Hair Loss Control

Aloe vera is one of the most trusted natural ingredients for hair care. It contains vitamins A, C, E, and B12 along with enzymes that help repair dead skin cells on the scalp. When combined with oil, it creates a powerful treatment that nourishes hair roots, reduces hair fall, and promotes faster, healthier growth. This homemade aloe vera oil is simple to prepare and works effectively without any chemicals.

Ingredients

2 to 3 fresh aloe vera leaves
1 cup coconut oil or olive oil
1 tablespoon castor oil (optional, for extra growth support)

Step-by-Step Method

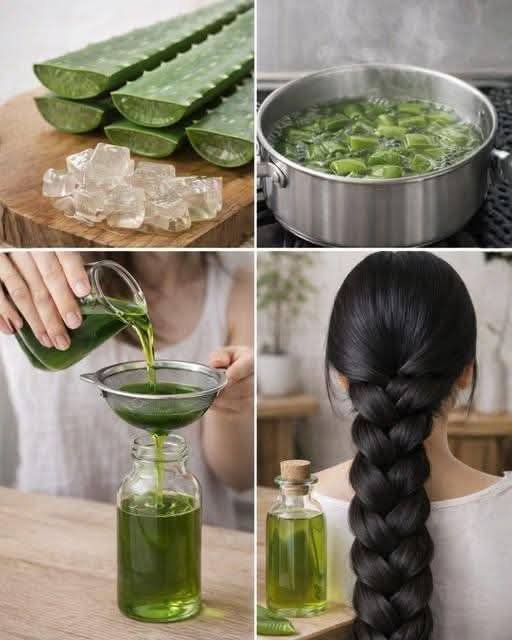
Step 1: Extract Aloe Vera Gel
Wash the aloe vera leaves thoroughly. Cut off the edges and slice them open from the middle. Use a spoon to scoop out the clear gel inside. Avoid using the yellow layer, as it may cause irritation.

Step 2: Cut the Gel

Cut the aloe vera gel into small pieces. This helps release nutrients more effectively when heated.

Step 3: Heat the Oil

Pour coconut oil into a pan and place it on low heat. Add the chopped aloe vera gel into the oil.

Step 4: Cook the Mixture

Let the mixture cook on low flame for about 10 to 15 minutes. Stir occasionally. You will notice the gel changing color slightly and the oil becoming infused with a green tint. This indicates that the nutrients have blended into the oil.

Step 5: Cool and Strain

Turn off the heat and allow the oil to cool completely. Strain the oil using a fine sieve or clean cloth into a dry glass bottle.

Step 6: Storage

Store the oil in an airtight container at room temperature. It can be used for up to 2 to 3 weeks.

How to Use

Take a small amount of the oil and massage it gently into your scalp for 5 to 10 minutes. Leave it on for at least one hour or overnight for deeper nourishment. Wash your hair with a mild shampoo afterward. Use this oil 2 to 3 times a week for best results.

Benefits of Aloe Vera Oil
This oil helps reduce hair fall by strengthening hair roots. It promotes faster hair growth by improving blood circulation in the scalp. It also helps soothe dryness, itching, and dandruff. Regular use can make hair smoother, shinier, and healthier.

Important Tips

Always use low heat while preparing the oil to preserve nutrients. Use fresh aloe vera for better results. Perform a patch test before applying it to your scalp. Avoid overheating, as it can damage the beneficial properties of the ingredients.

Final Thoughts

Homemade aloe vera oil is an easy and natural solution for common hair problems. With consistent use, it can improve hair strength, reduce breakage, and support healthy growth. It is affordable, chemical-free, and suitable for most hair types, making it a great addition to your regular hair care routine.