Papaya Seeds Remedy & Benefits

Papaya seeds are edible and contain fiber, healthy fats, and plant compounds. However, many social media posts exaggerate their effects. They are not a cure for liver disease, obesity, or any medical condition.

🥄 Simple Papaya Seed Remedy

Ingredients

  • 1 ripe papaya
  • ½ to 1 teaspoon fresh papaya seeds
  • 1 tablespoon honey (optional)
  • 1 glass water or smoothie

👩‍🍳 How to Use

  1. Scoop the seeds from a ripe papaya.
  2. Wash and dry them lightly.
  3. Chew ½ teaspoon of seeds or blend them into a smoothie.
  4. If the taste is too strong, mix with honey.
  5. Use occasionally as part of a balanced diet.

🌟 Possible Benefits

✅ Contains antioxidants
✅ Provides dietary fiber
✅ May support healthy digestion
✅ Adds nutrients and plant compounds to the diet
✅ Can be included in a healthy eating pattern

⚠️ Important Notes

  • Papaya seeds have a strong peppery taste.
  • Eating large amounts may cause stomach discomfort.
  • Pregnant women should avoid consuming large quantities.
  • There is no strong evidence that papaya seeds “melt fat,” “detox the liver,” or “clean the intestines.”

❓Q&A

Q: How many papaya seeds can I eat?
A: Start with ½ teaspoon and see how your body tolerates them.

Q: Can papaya seeds help with weight loss?
A: No food alone causes weight loss. Weight management depends on overall diet and activity.

Q: Can I eat them every day?
A: Small amounts are generally used by some people, but moderation is recommended.

🥭 Easy Papaya Seed Smoothie

  • 1 cup papaya chunks
  • ½ teaspoon papaya seeds
  • 1 cup water or milk
  • 1 teaspoon honey (optional)

Blend until smooth and serve chilled. ✨

Crustless Spinach and Ricotta Quiche

Crustless Spinach and Ricotta Quiche

Crustless spinach and ricotta quiche is a light, protein-rich dish that feels comforting without being heavy. It has a soft, custardy texture with creamy ricotta, tender spinach, and a gentle hint of nutmeg that brings everything together. Since there’s no crust, it’s quicker to prepare and naturally lower in carbs, making it a great option for breakfast, brunch, or even a simple dinner. It’s also highly versatile, so you can easily adapt it with whatever cheeses or vegetables you have on hand.

Prep Time: 15 minutes
Cook Time: 35–40 minutes
Total Time: 55–60 minutes
Servings: 6

Ingredients

Main Ingredients

10 oz frozen chopped spinach, thawed and completely squeezed dry or 2–3 cups fresh baby spinach, sautéed and wilted

1 cup ricotta cheese

3 to 6 large eggs, beaten

¼ to ½ cup milk or cream

Cheeses & Flavorings

¼ to ½ cup grated Parmesan cheese

½ to 1 cup shredded mozzarella, cheddar, or Swiss cheese (optional)

1 small onion, diced and sautéed

1 to 2 cloves garlic, minced

Seasonings

¼ teaspoon nutmeg

½ teaspoon garlic powder (optional)

½ teaspoon onion powder (optional)

Salt and black pepper to taste

Instructions

Preheat the oven to 180°C and lightly grease a baking dish or pie dish.

If using fresh spinach, sauté it in a pan until wilted, then let it cool and squeeze out any excess moisture. If using frozen spinach, ensure it is fully thawed and well-drained.

In a pan, lightly sauté onion until soft and translucent. Add garlic and cook briefly until fragrant. Set aside to cool.

In a large bowl, whisk together eggs, milk or cream, ricotta cheese, Parmesan, salt, pepper, and nutmeg until smooth and well combined.

Stir in the spinach, sautéed onion, and garlic. Mix gently until everything is evenly distributed.

If using extra shredded cheese, fold it into the mixture or sprinkle it on top before baking.

Pour the mixture into the prepared baking dish and spread evenly.

Bake for 35 to 40 minutes or until the quiche is set in the center and lightly golden on top. A knife inserted should come out mostly clean.

Let it cool for at least 10 minutes before slicing to help it set properly. Serve warm or at room temperature.

Tips

Make sure spinach is very dry to avoid a watery quiche

Use whole milk ricotta for a creamier, richer texture

Do not overbeat eggs to keep the texture soft and custardy

Let sautéed onions and garlic cool before mixing to avoid curdling eggs

Add nutmeg carefully as it enhances flavor without overpowering

Bake until just set to avoid dryness

Let the quiche rest before slicing for clean portions

Use a ceramic or glass dish for even baking

Add cheese on top for a golden, slightly crisp finish

Serve with a light salad for a balanced meal

Variations

Add mushrooms for an earthy flavor

Include sun-dried tomatoes for a tangy twist

Swap ricotta with cottage cheese for a lighter version

Use feta cheese for a saltier Mediterranean profile

Add cooked bacon or ham for a protein boost

Mix in zucchini or bell peppers for extra vegetables

Make it dairy-free with plant-based cheese and milk alternatives

Add fresh herbs like basil, parsley, or dill

Turn into mini muffin quiches for meal prep

Add chili flakes for a mild spicy kick

FAQs

Can I make this ahead of time
Yes, it stores well and can be reheated or served cold

Can I freeze crustless quiche
Yes, freeze after baking and reheat when needed

Why is my quiche watery
Spinach was likely not fully drained

Can I use fresh spinach instead of frozen
Yes, just cook and drain it well before using

What size baking dish should I use
An 8 to 9 inch dish works best

Can I add meat
Yes, cooked chicken, bacon, or sausage work well

How do I store leftovers
Keep refrigerated for up to 3 days

Can I make it low-fat
Yes, use low-fat ricotta and milk

Is it good for breakfast meal prep
Yes, it reheats very well and is filling

Can I serve it cold
Yes, it tastes great chilled or at room temperature

Nutrition

(Approx. per serving)

Calories: 180–240
Protein: 14–18g
Carbohydrates: 4–7g
Fat: 12–16g
Fiber: 1–2g

Conclusion

Crustless spinach and ricotta quiche is a simple, nourishing dish that delivers comfort and flavor in every bite. The creamy ricotta, tender spinach, and subtle seasoning create a soft, satisfying texture that works for any time of day. It’s easy to prepare, flexible with ingredients, and perfect for meal prep or serving guests. Once you make it, it quickly becomes a go-to recipe for a light yet satisfying homemade meal.


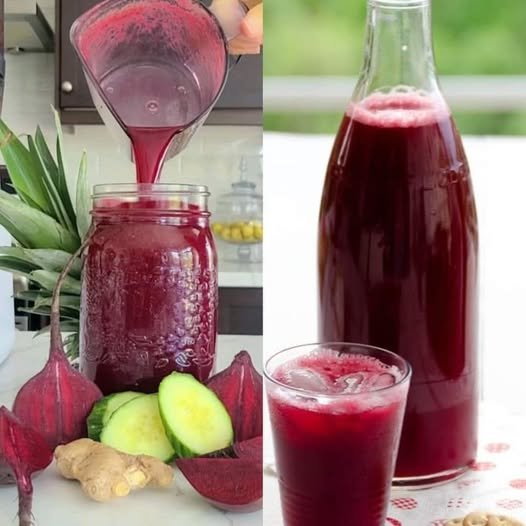
Beetroot, Cucumber & Ginger Detox Juice

Beetroot, Cucumber & Ginger Detox Juice

Description
This vibrant homemade juice combines earthy beetroot, refreshing cucumber, and spicy ginger into a naturally sweet and refreshing drink. It’s easy to make, packed with nutrients, and perfect for breakfast, a midday refreshment, or post-workout hydration.

Ingredients

  • 2 medium beetroots, peeled and chopped
  • 1 large cucumber, chopped
  • 1-inch piece fresh ginger, peeled
  • 1½ cups cold water
  • Juice of 1 lemon (optional)
  • Ice cubes, for serving

Instructions

Step 1: Prepare the Ingredients

  • Wash the beetroot and cucumber thoroughly.
  • Peel the beetroot and ginger.
  • Cut everything into small chunks for easier blending.

Step 2: Blend

  • Add the chopped beetroot, cucumber, ginger, and water to a blender.
  • Blend on high speed for 1–2 minutes until completely smooth.

Step 3: Strain

  • Place a fine-mesh strainer or cheesecloth over a large bowl or pitcher.
  • Pour the blended mixture through the strainer.
  • Press with a spoon to extract as much juice as possible.

Step 4: Add Lemon

  • Stir in the fresh lemon juice if using.
  • Taste and adjust as desired.

Step 5: Serve

  • Pour into glasses over ice.
  • Serve immediately for the freshest flavor.

Tips

  • Chill the ingredients before blending for a colder drink.
  • Add a green apple for extra sweetness.
  • Store in an airtight bottle in the refrigerator for up to 24 hours.

Servings

  • Makes 3–4 servings

Nutrition (Approx. Per Serving)

  • Calories: 55
  • Carbohydrates: 12g
  • Protein: 1g
  • Fat: 0g
  • Fiber: 2g
  • Vitamin C: 15% DV

Q&A

Can I make this without a blender?
Yes, use a juicer instead and skip the straining step.

Can I freeze it?
It’s best enjoyed fresh, but you can freeze it in ice cube trays and blend later.

Can I add other fruits?
Absolutely! Apples, oranges, and pineapple pair very well with beetroot. 🍹🥒🫚💜

Lemon, Ginger & Turmeric Drink

Lemon, Ginger & Turmeric Drink – My Favorite Homemade Wellness Drink

There are some recipes that become a part of your routine without you even realizing it, and this  Lemon, Ginger & Turmeric  Drink is definitely one of them. I first heard about this simple  drink from my aunt, who swears by natural ingredients for staying energized and feeling her best. At first, I wasn’t sure if I’d enjoy the combination of lemon, ginger, and turmeric, but after trying it, I completely understood why she loved it so much.

Flora& Fauna

Last weekend, I made a fresh batch for my family during a relaxed Sunday morning. The weather was pleasant, everyone was gathered around the breakfast table, and this warm golden drink turned out to be the highlight of the morning. Even my family members, who are usually skeptical about healthy drinks, enjoyed it and asked for a second cup.

I find myself making this drink whenever I need a little boost. Sometimes it’s during busy workweeks when I’m feeling stressed, and other times it’s simply part of my weekend self-care routine. There is something incredibly comforting about the warm aroma of ginger and the bright freshness of lemon. It’s simple, refreshing, and always leaves me feeling good.

Why You’ll Love This Drink

  • Made with simple, natural ingredients
  • Refreshing and comforting at the same time
  • Quick to prepare in under 10 minutes
  • Perfect for mornings or afternoons
  • Naturally flavorful without artificial ingredients
  • Easy to customize with honey or black pepper

Ingredients

  • 2 cups water
  • 1 tablespoon fresh ginger, grated
  • ½ teaspoon turmeric powder (or 1 teaspoon fresh turmeric, grated)
  • Juice of 1 fresh lemon
  • 1 teaspoon honey (optional)
  • A pinch of black pepper (optional)

Kitchen Tools Needed

  • Small saucepan
  • Fine strainer
  • Spoon
  • Mug or glass

How to Make Lemon, Ginger & Turmeric Drink

Step 1: Boil the Water

Pour the water into a saucepan and bring it to a gentle boil over medium heat.

Step 2: Add Ginger and Turmeric

Add the grated ginger and turmeric to the boiling water. Reduce the heat and let it simmer for about 5 minutes. This helps release all the wonderful flavors.

Alternative& Natural Medicine

Step 3: Strain the Mixture

Remove the saucepan from the heat and strain the liquid into a mug to remove the ginger pieces.

Step 4: Add Lemon Juice

Allow the drink to cool slightly before adding the fresh lemon juice. Adding lemon after cooking helps preserve its fresh flavor.

Step 5: Sweeten and Serve

If desired, stir in honey and a pinch of black pepper. Mix well and serve warm.

Tips for the Best Flavor

  • Use freshly grated ginger whenever possible for a stronger, fresher taste.
  • Fresh lemon juice provides the brightest flavor.
  • Add honey only after the drink has cooled slightly.
  • A small pinch of black pepper complements the turmeric beautifully.
  • For a chilled version, refrigerate and serve over ice.

Variations

Orange Twist

Replace half of the lemon juice with fresh orange juice for a sweeter citrus flavor.

LemonJuice

Mint Refresh

Add a few fresh mint leaves while steeping the drink.

Spiced Version

Include a small cinnamon stick during simmering for extra warmth and aroma.

Serving Suggestions

I love serving this drink first thing in the morning alongside fresh fruit or a light breakfast. It’s also wonderful during quiet afternoons when you need a moment to relax and recharge. Last weekend, I served it with homemade toast and fruit, and everyone loved how fresh and comforting it tasted.

Nutritional Information

The following values are approximate per serving (without honey):

Nutrient Amount
Calories 12 kcal
Carbohydrates 3 g
Protein 0.3 g
Fat 0.1 g
Fiber 0.5 g
Sugar 1 g
Sodium 3 mg
Vitamin C 20 mg
Potassium 55 mg

Frequently Asked Questions

Can I make this drink ahead of time?

Yes. You can prepare it in advance and store it in the refrigerator for up to 2 days.

Can I use fresh turmeric instead of powder?

Absolutely. Fresh turmeric gives an even more vibrant flavor and color.

Alternative& Natural Medicine

Can I drink it cold?

Yes. It tastes delicious both warm and chilled.

Is honey necessary?

Not at all. The  drink is naturally flavorful, but honey can add a touch of sweetness if preferred.

Final Thoughts

This  Lemon, Ginger & Turmeric  Drink has become one of my favorite homemade beverages because it’s simple, comforting, and incredibly easy to prepare. Every time I make it, it reminds me of that relaxing weekend morning with my family gathered around the table, enjoying something wholesome together. Whether I’m feeling energetic, stressed after a long day, or simply looking for a refreshing drink to enjoy, this recipe never disappoints.

Oatmeal Egg Pancakes 🥞

Oatmeal Egg Pancakes 🥞

Ingredients

  • 1 cup rolled oats (about 90g)
  • 2 eggs
  • 1 cup milk (240ml)
  • 1 tsp baking powder
  • 1 tbsp sugar or honey (optional)
  • 1 pinch salt
  • 1 tbsp vegetable oil or butter (for cooking)

Instructions

1️⃣ Prepare the Batter

  • Add the oats to a blender and blend into a fine flour.
  • Add the eggs, milk, baking powder, salt, and sugar (if using).
  • Blend until the mixture becomes smooth.
  • Let the batter rest for 5 minutes so the oats can absorb some liquid.

2️⃣ Cook the Pancakes

  • Heat a non-stick pan over medium-low heat.
  • Lightly grease with oil or butter.
  • Pour a small amount of batter into the pan and spread gently.
  • Cook for 2–3 minutes until bubbles appear on the surface.
  • Flip carefully and cook another 1–2 minutes until golden.

3️⃣ Serve

  • Stack the pancakes on a plate.
  • Serve warm with honey, maple syrup, fresh fruit, or yogurt.

Tips

✅ For sweeter pancakes, add 1 mashed banana to the batter.
✅ For extra protein, add 2 tablespoons Greek yogurt.
✅ Keep the heat medium-low to prevent burning.

Q & A

Q: Can I make these without a blender?
A: Yes, use oat flour instead of rolled oats.

Q: Can I store leftovers?
A: Yes, refrigerate for up to 3 days and reheat before serving.

Q: Can I freeze them?
A: Yes, freeze for up to 2 months in an airtight container.

Caption

🥞 Just oats, eggs, and milk! No flour, no fuss—these soft and fluffy pancakes are the perfect healthy breakfast. Save this recipe and try it tomorrow! 😍

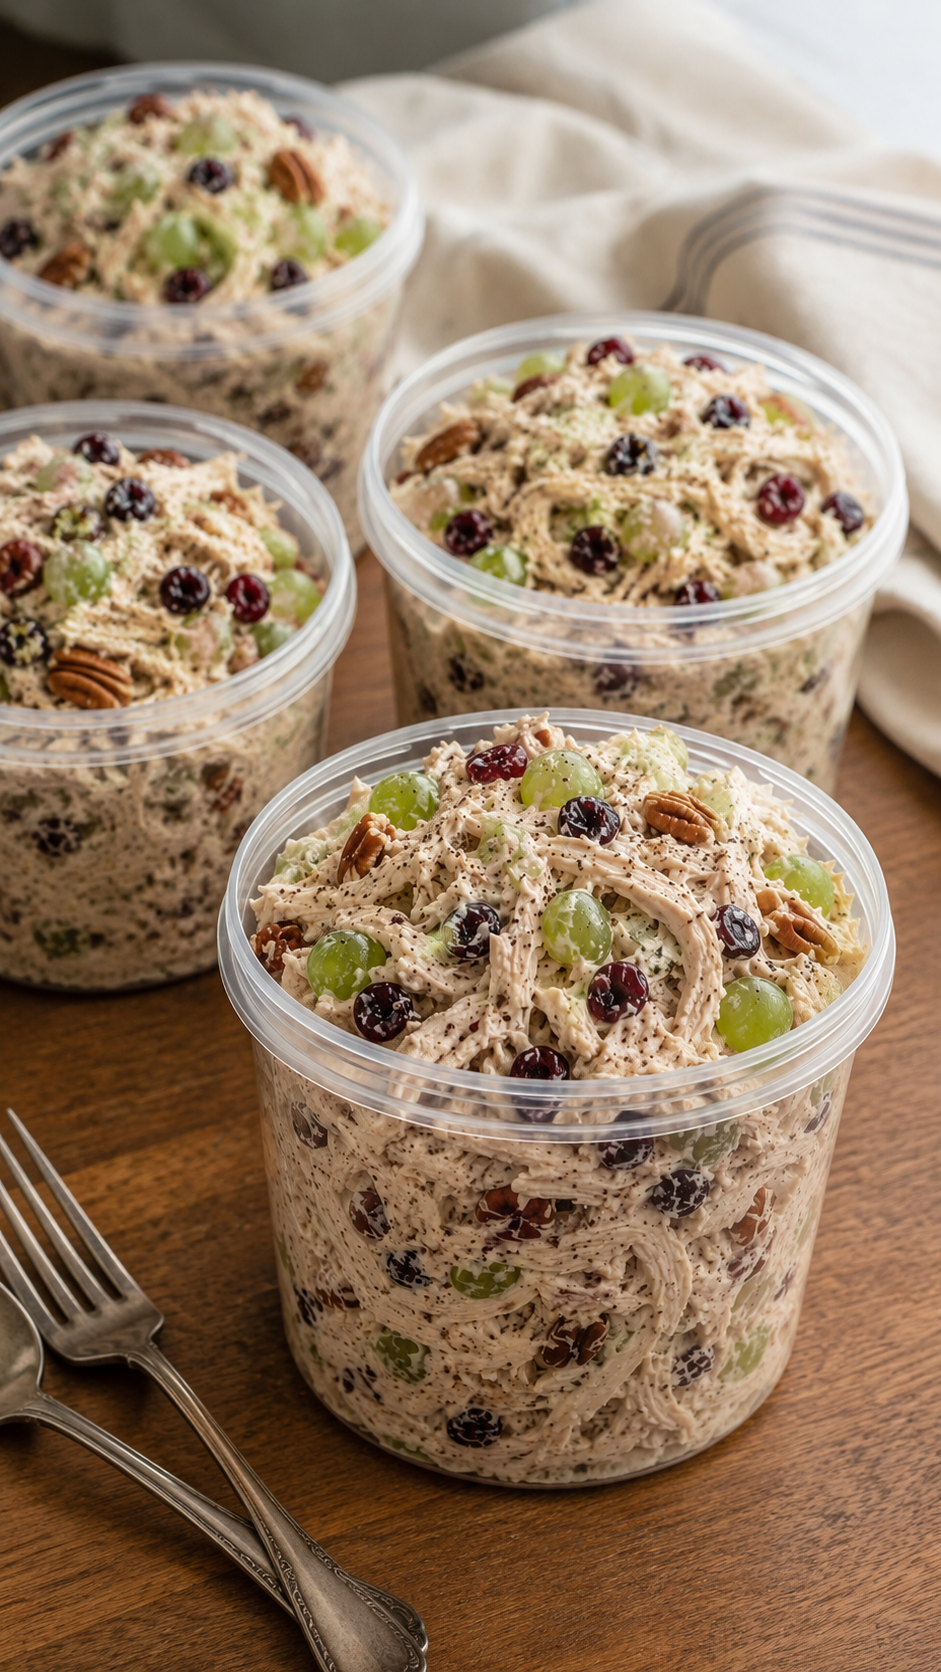
Creamy Chicken Cranberry Grape Salad

Creamy Chicken Cranberry Grape Salad

🥘 Ingredients

  • 4 cups cooked chicken, shredded
  • 1 cup green grapes, halved
  • ½ cup dried cranberries
  • ½ cup pecans, chopped
  • 2 celery stalks, finely diced

For the Dressing

  • ¾ cup mayonnaise
  • ¼ cup Greek yogurt or sour cream
  • 1 tbsp lemon juice
  • ½ tsp garlic powder
  • ½ tsp onion powder
  • Salt and black pepper to taste

👩‍🍳 Instructions

1️⃣ Prepare the Chicken

  • Cook and cool the chicken.
  • Shred it into thin strands using two forks.

2️⃣ Mix the Dressing

  • In a large bowl, combine mayonnaise, Greek yogurt, lemon juice, garlic powder, onion powder, salt, and pepper.
  • Stir until smooth and creamy.

3️⃣ Add the Ingredients

  • Add shredded chicken to the bowl.
  • Mix in grapes, dried cranberries, pecans, and celery.

4️⃣ Combine

  • Toss everything gently until the chicken is evenly coated with the dressing.

5️⃣ Chill

  • Cover and refrigerate for at least 1 hour to allow the flavors to blend.

6️⃣ Serve

  • Serve cold in meal-prep containers, on croissants, in wraps, or over lettuce.

❓ Q & A

Q: Can I make this ahead of time?
✅ Yes! It stays fresh in the refrigerator for up to 4 days.

Q: Can I use rotisserie chicken?
✅ Absolutely. Rotisserie chicken works perfectly and saves time.

Q: Can I substitute the pecans?
✅ Yes, walnuts, almonds, or cashews are great alternatives.

🍽️ Servings: 6–8

🔥 Calories: Approximately 320–380 per serving.