Quick Strawberry Jam-Filled Muffins

Quick Strawberry Jam-Filled Muffins

Prep Time: 15 minutes
Bake Time: 20–25 minutes
Yield: 12 muffins

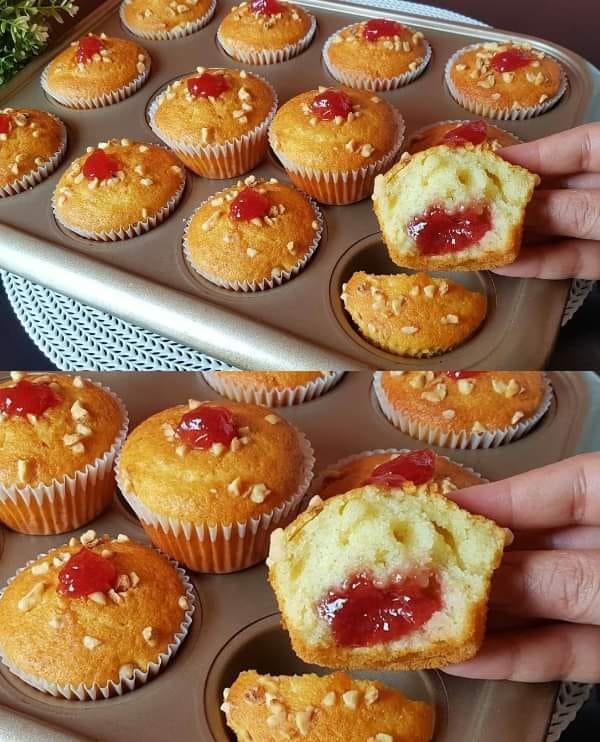
These muffins are soft and moist with a fruity jam center and a lightly crunchy almond topping. They are ideal for breakfast, snacks, or dessert.


πŸ“ Ingredients

  • 2 large eggs

  • 100 g sugar

  • 8 g vanilla sugar (or 1 teaspoon vanilla extract)

  • Pinch of salt

  • 125 g vanilla yogurt

  • 50 ml milk

  • 100 ml vegetable or sunflower oil

  • 200 g all-purpose flour

  • 8 g baking powder

  • Strawberry jam (for filling and topping)

  • Chopped almonds (for topping)


πŸ‘©β€πŸ³ Instructions

Step 1: Prepare the Oven and Pan

Preheat oven to 350Β°F (175Β°C).
Line a muffin tin with paper liners or lightly grease each cup.


Step 2: Mix the Eggs and Sugar

In a large bowl:

  • Add eggs, sugar, vanilla sugar, and salt.

  • Whisk until the mixture becomes pale and slightly thick.


Step 3: Add the Liquid Ingredients

Stir in:

  • Vanilla yogurt

  • Milk

  • Oil

Whisk until the mixture is smooth and evenly blended.


Step 4: Add the Dry Ingredients

Sift together:

  • Flour

  • Baking powder

Add them to the wet mixture.
Fold gently with a spatula until just combined.
Do not mix too much, as this can affect the texture.


Step 5: Fill the Muffin Cups

  • Spoon batter into each cup until half full.

  • Add 1 teaspoon strawberry jam in the center of each.

  • Cover with more batter until cups are about ΒΎ full.


Step 6: Add Toppings

  • Sprinkle chopped almonds on top of each muffin.

  • Add a small dot of jam on the top for appearance.


Step 7: Bake

Bake for 20–25 minutes, or until:

  • The tops are lightly golden

  • A toothpick inserted into the muffin (not the jam) comes out clean


Step 8: Cool

Let muffins cool in the pan for 5 minutes.
Transfer to a wire rack to cool completely or serve slightly warm.


🌟 Tips for Best Results

  • Yogurt: Vanilla or plain yogurt works well.

  • Jam options: Strawberry, raspberry, apricot, or mixed berry can be used.

  • Topping alternative: Use chopped walnuts or omit nuts if preferred.

  • Do not overfill: This prevents overflow during baking.


πŸ“¦ Storage

  • Store in an airtight container at room temperature for up to 3 days.

  • Refrigerate for up to 5 days.

Quick Stovetop Flatbread (No Oven)

Quick Stovetop Flatbread (No Oven)

Prep Time: 5 minutes
Cook Time: 10 minutes
Total Time: 15 minutes
Yield: 8–10 flatbreads

Soft, flexible flatbreads cooked on a pan. Perfect for wraps, dipping, or serving with meals.


πŸ“ Ingredients

For the Dough

  • 4 cups (480 g) all-purpose flour

  • 1 cup (220 g) plain yogurt

  • ΒΎ cup (200 ml) lukewarm water

  • 10 g baking powder

  • 1 teaspoon salt

  • 1 tablespoon vegetable oil

For Finishing

  • 3Β½ tablespoons olive oil (for brushing after cooking)


πŸ‘©β€πŸ³ Instructions

Step 1: Mix the Dough

In a large bowl:

  1. Add yogurt, water, vegetable oil, and salt.

  2. Stir in the baking powder.

  3. Gradually add flour while mixing.

  4. When the dough becomes thick, knead gently with your hands until smooth and no longer sticky.


Step 2: Divide and Shape

  • Divide the dough into 8–10 equal pieces.

  • Lightly flour your work surface.

  • Roll each piece into a circle about ΒΌ inch thick.


Step 3: Cook on the Stovetop

  • Heat a non-stick pan over medium heat (no oil needed).

  • Place one flatbread in the pan.

  • Cook for 1–2 minutes until bubbles appear.

  • Flip and cook the other side for 1–2 minutes until light brown spots form.

  • Repeat with remaining pieces.


Step 4: Brush with Olive Oil

  • As each flatbread comes off the pan, brush lightly with olive oil.

  • Stack them on a plate and cover with a clean cloth to keep warm and soft.


🌟 Tips for Best Results

  • Yogurt: Use plain yogurt for the best texture.

  • Pan heat: Medium heat prevents burning while cooking evenly.

  • Thickness: Thinner dough cooks faster and stays flexible.

  • Flavor ideas: You may add garlic powder or herbs to the dough if desired.


πŸ“¦ Storage

  • Store leftovers in a sealed bag at room temperature for 1 day, or refrigerate for up to 3 days.

  • Reheat briefly in a dry pan or microwave before serving.

Simple Fluffy Breakfast Rolls

Simple Fluffy Breakfast Rolls

Prep Time: 15 minutes + rising time
Bake Time: 20–25 minutes
Yield: 9–12 rolls

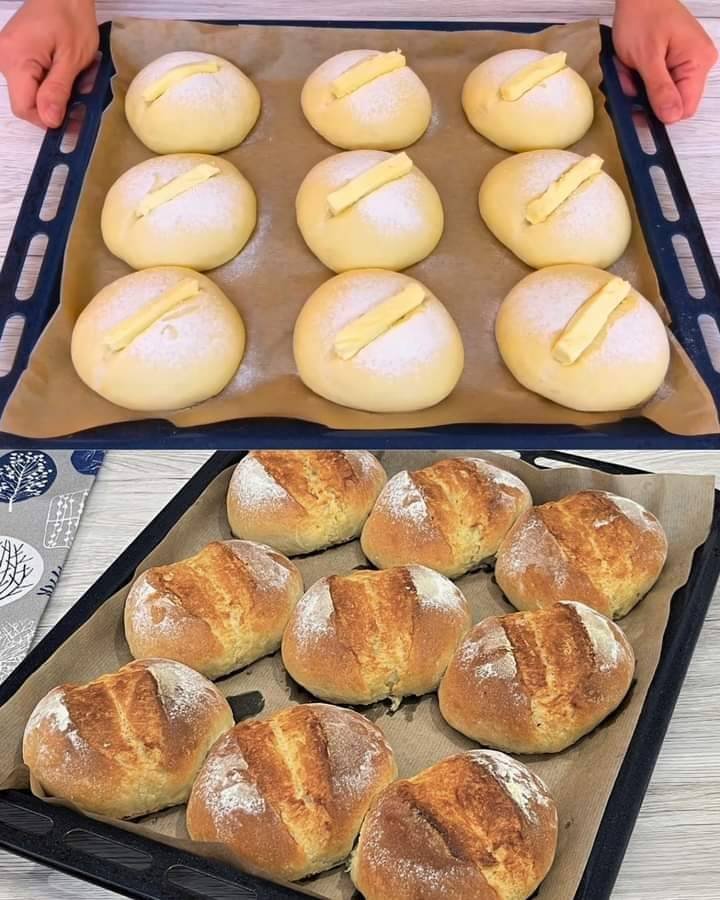
Soft, lightly golden rolls with a tender inside. Perfect for breakfast or serving with meals.


πŸ“ Ingredients

  • 1 cup (200 ml) warm water

  • 1 cup (200 ml) warm milk

  • 1 tablespoon sugar

  • 10 g dry yeast (about 2 teaspoons)

  • 1 teaspoon salt

  • 30 g butter (about 2 tablespoons), softened

  • 600 g all-purpose flour (about 4ΒΎ cups)

  • 40 g butter (about 3 tablespoons), chilled and cut into thin strips (for topping)


πŸ‘©β€πŸ³ Instructions

Step 1: Prepare the Yeast

In a large bowl, combine:

  • Warm water

  • Warm milk

  • Sugar

Stir in the yeast and let sit for 5–10 minutes until a light foam appears on the surface.


Step 2: Make the Dough

Add to the yeast mixture:

  • Softened butter

  • Salt

  • About half of the flour

Mix until a rough dough forms.
Gradually add the remaining flour while kneading.

Knead for 8–10 minutes until the dough becomes:

  • Smooth

  • Elastic

  • No longer sticky


Step 3: First Rise

Place the dough in a lightly greased bowl.
Cover with a clean cloth or plastic wrap.
Let rise in a warm place for about 1 hour, or until doubled in size.


Step 4: Shape the Rolls

Gently press down the dough to remove excess air.
Divide into 9–12 equal portions.
Roll each portion into a smooth ball.

Place on a parchment-lined baking tray.
Cover and let rise again for 20–30 minutes.


Step 5: Prepare for Baking

Preheat oven to 375Β°F (190Β°C).

Using a sharp knife or scissors, cut a deep line across the top of each roll.
Place a thin strip of chilled butter into each cut.
Lightly dust the tops with flour if desired.


Step 6: Bake

Bake for 20–25 minutes until:

  • The tops are golden

  • The rolls sound hollow when tapped underneath

The butter melts into the center while baking, adding moisture and flavor.


🌟 Tips for Best Results

  • Liquid temperature: Use lukewarm water and milk (about 100–110Β°F / 38–43Β°C).

  • Rising: Do not rush the rising time; this helps the rolls stay soft.

  • Serving: Best served warm with butter, honey, or jam.

  • Storage:

    • Store in a sealed container at room temperature for up to 3 days.

    • Reheat briefly before serving to refresh softness.

Simple Oat & Seed Bread (No Yeast, No Flour)

Simple Oat & Seed Bread (No Yeast, No Flour)

Prep Time: 10 minutes
Bake Time: 40–50 minutes
Total Time: About 1 hour
Yield: 1 small loaf

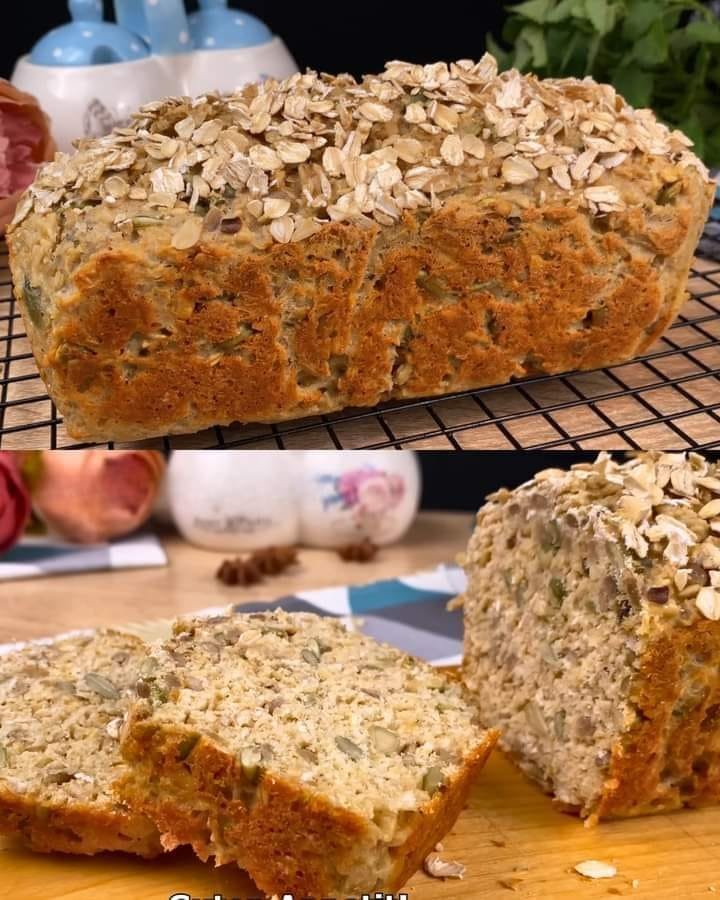
This bread is dense, hearty, and made with oats and seeds instead of flour. It is best sliced and toasted before serving.


πŸ“ Ingredients

Base

  • 280 g rolled oats (regular oats, not instant)

  • 2 large eggs

  • 200–250 ml plain yogurt

  • 10 g baking powder

Texture & Flavor

  • 50 g pumpkin seeds

  • 50 g sunflower seeds

  • Salt, to taste

  • Black pepper, to taste

For Baking

  • Olive oil (for greasing the pan)

  • Extra rolled oats (for topping)


πŸ‘©β€πŸ³ Instructions

Step 1: Prepare the Pan and Oven

Preheat the oven to 350Β°F (180Β°C).
Lightly grease a loaf pan or small baking dish with olive oil.
You may line the base with parchment paper for easier removal.


Step 2: Mix the Wet Ingredients

In a large bowl:

  • Whisk the eggs until smooth.

  • Add the yogurt and mix until creamy and fully combined.


Step 3: Add Oats, Seeds, and Seasoning

Add to the bowl:

  • Rolled oats

  • Pumpkin seeds

  • Sunflower seeds

  • Baking powder

  • Salt and black pepper

Mix with a spoon or spatula until all oats are evenly coated.

Tip: Let the mixture rest for 5 minutes so the oats absorb moisture and the texture improves.


Step 4: Transfer and Top

Pour the thick batter into the prepared pan.
Smooth the top with a spatula.
Sprinkle extra rolled oats over the surface for texture.


Step 5: Bake

Bake for 40–50 minutes, until:

  • The top is golden brown

  • The loaf feels firm when pressed

  • A knife inserted in the center comes out mostly clean


Step 6: Cool

Let the bread cool in the pan for 15 minutes.
Remove and place on a wire rack to cool completely before slicing.

Cooling helps the loaf hold its shape and slice neatly.


🌟 Tips for Best Results

  • Oats: Use rolled oats, not quick or steel-cut oats.

  • Texture: This bread is naturally dense and works best toasted.

  • Flavor options: Add herbs (oregano or rosemary) or a little garlic powder if desired.

  • Serving ideas: Toast and top with avocado, cheese, or serve alongside soups and salads.


πŸ“¦ Storage

  • Store in an airtight container in the refrigerator for up to 5 days.

  • Slice and freeze for up to 3 months.

  • Best enjoyed toasted after storing.

Soft Orange Sugar Cookie

Soft Orange Sugar Cookie

Prep Time: 15 minutes
Bake Time: 12–15 minutes
Yield: 20–24 cookies

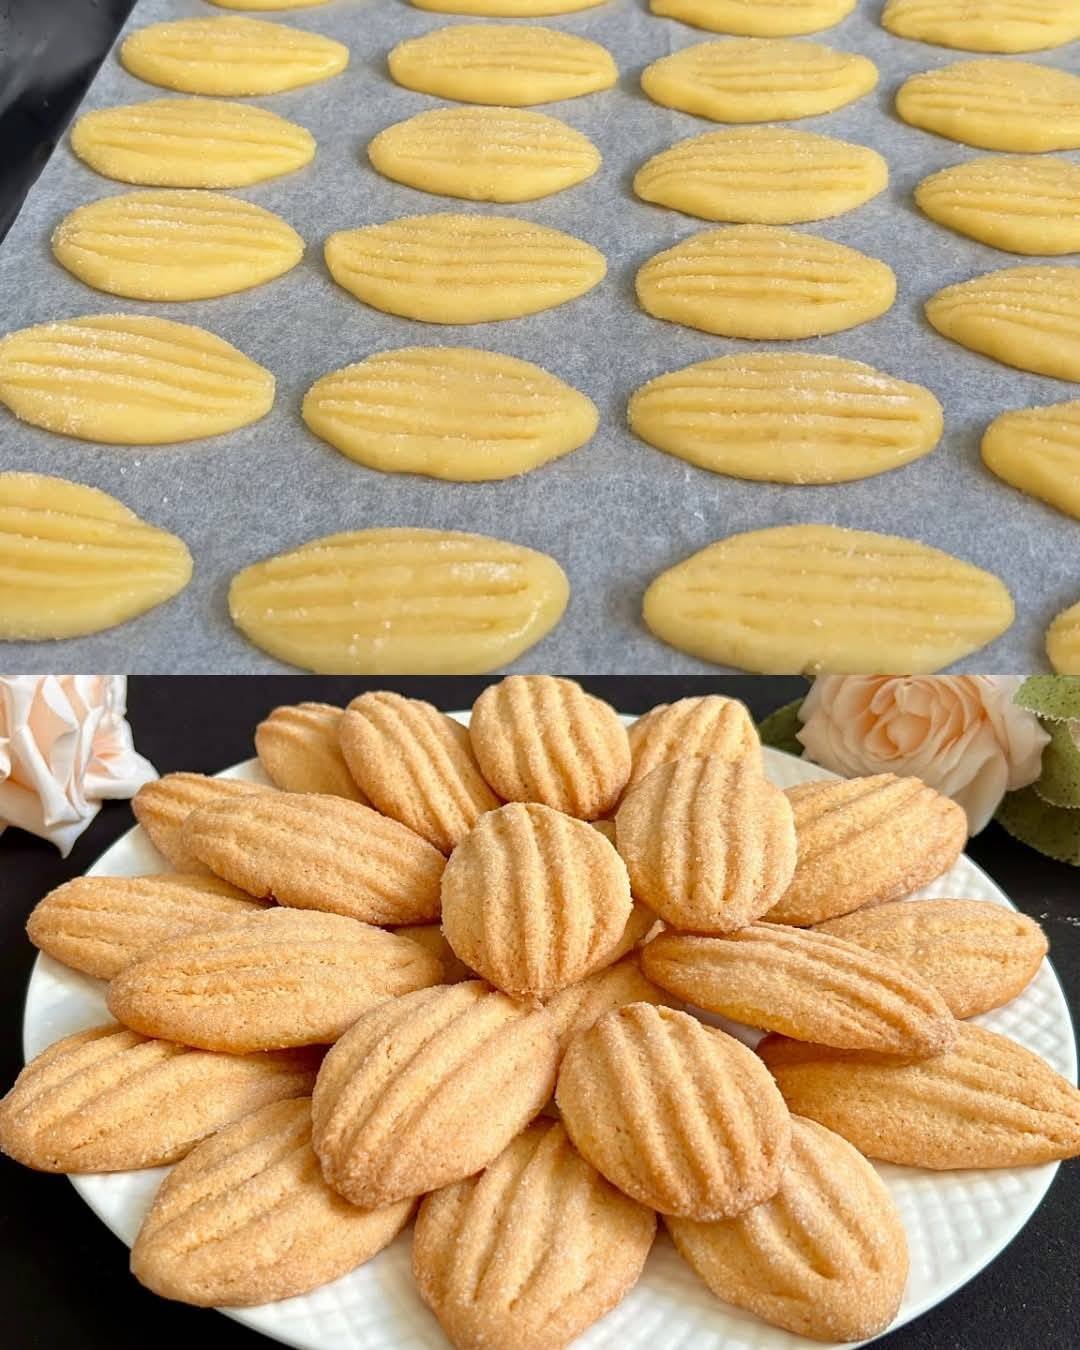
These cookies are lightly crisp on the outside and soft on the inside, with a fresh orange flavor and gentle sweetness.


πŸ“ Ingredients

  • 2 large eggs

  • 80 g sugar (plus extra for coating)

  • 120 ml sunflower oil (or any light vegetable oil)

  • 1 teaspoon vanilla extract

  • Zest of 1 orange, finely grated

  • 300 g all-purpose flour

  • 1 teaspoon baking powder

  • Pinch of salt


πŸ‘©β€πŸ³ Instructions

Step 1: Prepare the Wet Mixture

In a large bowl:

  1. Add the eggs and sugar.

  2. Whisk until the mixture becomes pale and slightly thick.

  3. Add sunflower oil, vanilla extract, and orange zest.

  4. Mix well until evenly combined.


Step 2: Mix the Dry Ingredients

In another bowl:

  • Add flour, baking powder, and salt.

  • Whisk or sift together to distribute evenly.


Step 3: Make the Dough

  • Gradually add the dry mixture into the wet mixture.

  • Stir with a spatula or spoon until a soft dough forms.

Tip: If the dough feels too soft or sticky, place it in the refrigerator for 15 minutes to make shaping easier.


Step 4: Shape the Cookies

Preheat oven to 350Β°F (175Β°C).
Line a baking tray with parchment paper.

  1. Take about 1 tablespoon of dough and roll into a ball.

  2. Gently shape into a small oval.

  3. Press one side into granulated sugar.

  4. Place sugar-side up on the tray.

  5. Lightly press with a fork to make a pattern.

Leave space between cookies.


Step 5: Bake

Bake for 12–15 minutes until the edges turn light golden while the tops remain pale.

Do not overbake, or cookies will become dry.


Step 6: Cool

Let cookies rest on the tray for 5 minutes, then move to a wire rack to cool completely.

They will firm slightly as they cool.


🌟 Tips for Best Results

  • Zesting: Only grate the orange-colored peel. Avoid the white layer underneath.

  • Oil: Use a neutral-flavored oil for best taste.

  • Texture: For extra softness, do not brown the tops.

  • Storage: Keep in an airtight container for up to 7 days at room temperature.

Creamy Homemade Filled Donuts

Creamy Homemade Filled Donuts

Yield: 12–15 donuts
Prep Time: 20 minutes + rising time
Cook Time: 15 minutes

Soft fried donuts filled with smooth vanilla cream and coated in sugar.


πŸ“ Ingredients

For the Dough

  • 500 g all-purpose or bread flour

  • 8 g dry yeast (or 12 g fresh yeast)

  • 200 g milk, lukewarm

  • 80 g sugar

  • 50 g butter, melted and cooled

  • 1 medium egg

  • 1 pinch salt

  • Oil for frying (vegetable or canola)

  • Granulated sugar (for coating)


For the Vanilla Cream Filling

  • 2 cups milk

  • Β½ cup sugar

  • ΒΌ cup cornstarch

  • 4 egg yolks

  • 1 teaspoon vanilla extract


πŸ‘©β€πŸ³ Instructions

Step 1: Activate the Yeast

In a large bowl, mix:

  • Lukewarm milk

  • Sugar

  • Yeast

Let sit for 5 minutes until slightly foamy.


Step 2: Make the Dough

Add to the yeast mixture:

  • Egg

  • Melted butter

Mix well.
Gradually add flour and salt.
Mix until a soft dough forms.

Transfer to a floured surface and knead for 8–10 minutes until smooth and elastic.


Step 3: First Rise

Place dough in a lightly greased bowl.
Cover with a clean cloth.
Let rise in a warm place for 1 to 1Β½ hours or until doubled in size.


Step 4: Shape the Donuts

Punch down the dough.
Roll out to Β½ inch thickness.
Cut into circles using a cutter or glass.

Place on parchment paper.
Cover and let rise again for 30–45 minutes.


Step 5: Prepare the Cream Filling

In a bowl, whisk:

  • Egg yolks

  • Sugar

  • Cornstarch

Heat milk in a pan until warm (not boiling).
Slowly whisk hot milk into egg mixture.
Return to pan and cook on medium heat, stirring constantly until thick.

Remove from heat.
Add vanilla extract.
Transfer to a bowl and cover with plastic wrap touching the surface.
Cool completely.


Step 6: Fry the Donuts

Heat oil to 350Β°F (175Β°C).
Fry donuts in batches for about 2 minutes per side until golden.

Remove and drain on paper towels.


Step 7: Coat and Fill

Roll warm donuts in granulated sugar.

Make a small hole on the side of each donut using a knife or straw.
Fill a piping bag with cooled cream.
Pipe cream into each donut until filled.


⭐ Tips for Best Results

  • Milk temperature: Should be warm, not hot.

  • Oil temperature: Keep steady for even frying.

  • Do not overcrowd when frying.

  • Filling options: Jam, chocolate cream, or custard work well.