Refreshing Ginger Lemon Wellness Water

Refreshing Ginger Lemon Wellness Water

Prep time: 10 minutes | Cook time: 10 minutes | Servings: Makes about 1 liter

Ingredients

  • 1 liter Water: The base for your infusion.

  • 1 large Ginger Root (about 3-4 inches): Thinly sliced or grated to release its natural properties.

  • 2 Fresh Lemons: Sliced into rounds or juiced, depending on your preference.

  • Optional: A small amount of honey or a few fresh mint leaves for flavor.


Detailed Directions

1. Prepare the Ginger

  • Wash the ginger root thoroughly.

  • You can leave the skin on for more nutrients or peel it if you prefer a milder taste.

  • Slice the ginger into very thin “coins” or grate it to increase the surface area for a stronger infusion.

2. Simmer the Mixture

  • In a medium pot, bring 1 liter of water to a gentle boil.

  • Add the sliced or grated ginger to the water.

  • Reduce the heat to low and let it simmer for about 10 minutes. This process helps extract the flavor and beneficial components from the ginger.

3. Add the Lemon

  • Remove the pot from the heat and let it cool slightly.

  • Add your fresh lemon slices or lemon juice.

    Tip: Adding lemon after the water has cooled slightly helps preserve the Vitamin C, which can be sensitive to high heat.

4. Infuse and Strain

  • Let the mixture sit for another 5–10 minutes to finish infusing.

  • Strain the liquid into a glass pitcher or bottles to remove the ginger pieces and lemon seeds.

5. Serve and Store

  • You can enjoy this drink warm like a tea, or let it cool completely and serve it over ice.

  • Store any leftovers in the refrigerator for up to 2 days.


Healthy Habits for Best Results

  • Consistency is Key: Enjoy a glass of this water in the morning or throughout the day to stay hydrated.

  • Balanced Approach: For the best wellness results, pair this drink with a balanced diet and regular physical activity.

Wholesome 4-Ingredient Fruit “Ice Cream”

Wholesome 4-Ingredient Fruit “Ice Cream”

Prep time: 5 minutes | Freeze time: 2–4 hours | Servings: 2

Ingredients

  • 2 cups Frozen Strawberries: These provide the vibrant color and tart base for your dessert.

  • 2 ripe Bananas: Best if sliced and frozen beforehand to ensure a thick, creamy consistency.

  • 1/2 cup Plain Greek Yogurt (or unsweetened almond milk): Adds protein and creaminess while helping the fruit blend.

  • 1 tsp Vanilla Extract: Enhances the natural sweetness of the fruit without adding sugar.


Detailed Directions

1. Prepare the Fruit

  • For the best results, use fruit that has been frozen solid. If you are using fresh bananas, peel and slice them, then freeze them on a tray for at least 2 hours.

2. Blend the Ingredients

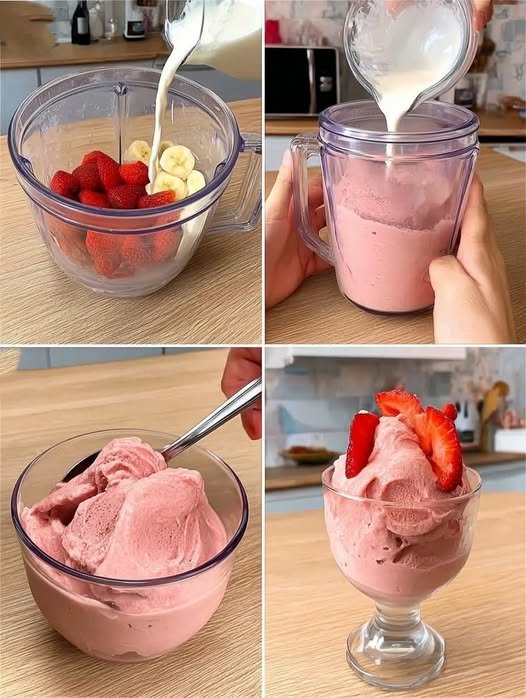
  • Place the frozen strawberries, frozen banana slices, Greek yogurt, and vanilla extract into a high-powered blender or food processor.

  • Start blending on a low speed, gradually increasing to high.

  • Note: You may need to stop and scrape down the sides with a spatula a few times to ensure everything is evenly incorporated.

3. Achieve the “Soft Serve” Texture

  • Continue blending until the mixture is completely smooth and reaches a thick, “soft serve” consistency.

  • If the mixture is too thick to blend, add an extra tablespoon of yogurt or milk at a time until it moves freely.

4. Set and Serve

  • You can enjoy this immediately as a soft-serve treat.

  • For a firmer, scoopable “ice cream” texture, transfer the mixture to a shallow, freezer-safe dish and freeze for an additional 1–2 hours.

5. Garnish

  • Serve in chilled bowls and top with a few fresh strawberry slices or a sprinkle of nuts for added crunch.


Success Tips

  • Natural Sweetness: If your fruit isn’t quite sweet enough, you can add a small teaspoon of honey or maple syrup during the blending process.

  • Storage: While best enjoyed fresh, you can store leftovers in an airtight container in the freezer. Let it sit at room temperature for 5–10 minutes before scooping again.

Cucumber and Mint Wellness Water

Cucumber and Mint Wellness Water

Prep time: 10 minutes | Servings: 1-2

Ingredients

  • 1 large Cucumber: Sliced into thin rounds. Cucumbers are highly hydrating and contain antioxidants.

  • 1 medium Lemon: Sliced into rounds. Lemons are a great source of Vitamin C.

  • 1 small piece of Fresh Ginger (1 inch): Peeled and thinly sliced. Ginger is often used to soothe the digestive system.

  • 5-10 Fresh Mint Leaves: Slightly bruised to release their natural oils.

  • 4 cups Filtered Water: The base for your infusion.

  • Ice cubes: For serving.


Detailed Directions

1. Prepare the Produce

  • Wash the cucumber, lemon, and mint leaves thoroughly under cold water.

  • Slice the cucumber and lemon into thin, even rounds.

  • Peel the ginger and slice it into thin coins to maximize the surface area for infusion.

2. Assemble the Drink

  • In a large glass pitcher or individual jars, add the cucumber slices, lemon slices, and ginger.

  • Take the fresh mint leaves and gently press or “clap” them between your hands before adding them to the container; this helps release the aromatic oils.

3. Infuse

  • Pour the 4 cups of filtered water over the ingredients.

  • Stir gently with a long spoon to combine.

  • For the best flavor, place the pitcher in the refrigerator and let it steep for at least 1 to 2 hours. For a more intense flavor, you can let it infuse overnight.

4. Serve

  • Fill a glass with ice cubes.

  • Pour the chilled water over the ice, ensuring a few slices of cucumber and lemon make it into the glass for a beautiful presentation.

  • Enjoy this refreshing drink throughout the day to stay hydrated.


Success Tips

  • Refill as You Go: You can refill the pitcher with water 2–3 times using the same ingredients before the flavor begins to fade.

  • Freshness: For the best taste and nutrient profile, prepare a fresh batch every 24 hours.

15-Minute Bang Bang Salmon

15-Minute Bang Bang Salmon

Prep time: 5 minutes | Cook time: 10 minutes | Servings: 4

Ingredients

For the Salmon:

  • 4 salmon fillets (6 oz each): Skin-on or skinless, depending on your preference.

  • 2 tablespoons olive oil: To achieve a perfect sear.

  • 1 teaspoon salt

  • 1/2 teaspoon black pepper

  • 1 tablespoon garlic powder

  • 1 teaspoon paprika: For color and a subtle smoky flavor.

For the Bang Bang Sauce:

  • 1/2 cup mayonnaise: The creamy base for the sauce.

  • 1/4 cup Thai sweet chili sauce: For sweetness and a mild kick.

  • 1-2 teaspoons Sriracha: Adjust this based on your preferred heat level.

  • 1 tablespoon honey: Adds a touch of extra sweetness.

For Garnish:

  • Chopped green onions or parsley: For a fresh finish.


Detailed Directions

1. Season the Salmon

  • Pat the salmon fillets dry with a paper towel. This ensures the seasoning sticks and helps create a better crust.

  • In a small bowl, mix the salt, black pepper, garlic powder, and paprika.

  • Rub the olive oil over the fillets, then generously coat both sides with the spice mixture.

2. Prepare the Sauce

  • While the salmon sits for a moment, whisk together the mayonnaise, sweet chili sauce, Sriracha, and honey in a small bowl until smooth.

  • Set aside about 1/4 of the sauce to use as a fresh drizzle after cooking.

3. Sear the Salmon

  • Heat a large non-stick skillet over medium-high heat.

  • Place the salmon fillets in the pan (skin-side down first if using skin-on). Cook for 4–5 minutes until the bottom is crispy and golden.

  • Carefully flip the fillets. Brush a generous layer of the Bang Bang sauce over the cooked side of the salmon.

  • Cook for another 3–4 minutes until the salmon is opaque throughout and flakes easily with a fork.

4. Finish and Serve

  • Remove the salmon from the heat.

  • Drizzle the remaining fresh sauce over the fillets and garnish with chopped green onions or parsley.


Serving Suggestions

  • Over Rice: Serve these fillets over a bed of jasmine rice or quinoa to soak up the extra sauce.

  • With Greens: Pair with steamed broccoli, roasted asparagus, or a crisp cucumber salad for a balanced meal.

Cranberry Pistachio Shortbread Cookies

Cranberry Pistachio Shortbread Cookies

Prep time: 15 minutes | Cook time: 10–12 minutes | Servings: Approx. 24 cookies

Ingredients

  • 1 cup (226g) olive oil: Provides a silky texture and subtle fruity notes.

  • 1/2 cup granulated sugar: Adds the perfect amount of sweetness.

  • 1 1/2 tsp vanilla extract: For a classic bakery aroma.

  • 1/4 tsp almond extract: (Optional) Adds a professional, nutty depth.

  • 2 cups all-purpose flour: The structure for your shortbread.

  • 1/2 cup dried cranberries: Finely chopped for tart bursts in every bite.

  • 1/2 cup shelled pistachios: Roughly chopped for color and crunch.

  • Optional: Powdered sugar for dusting.


Detailed Directions

1. Preparation

  • Preheat your oven to 350°F (175°C).

  • Line two large baking sheets with parchment paper or silicone mats to ensure the cookies don’t stick.

2. Mix the Wet Ingredients

  • In a large mixing bowl, combine the olive oil and granulated sugar.

  • Whisk vigorously for about 1–2 minutes until the sugar begins to dissolve and the mixture is well-combined.

  • Stir in the vanilla extract and the almond extract (if using).

3. Build the Dough

  • Sift the all-purpose flour into the wet mixture.

  • Use a spatula to fold the flour in until just combined. Be careful not to overmix, as this can make the shortbread tough.

  • Fold in the chopped cranberries and pistachios until they are evenly distributed throughout the dough.

4. Shape the Cookies

  • Scoop about 1 tablespoon of dough at a time and roll it into a ball between your palms.

  • Place the balls on the prepared baking sheet, spacing them about 2 inches apart.

  • Gently flatten each ball with the palm of your hand or the bottom of a glass to about 1/2-inch thickness.

5. Bake

  • Bake for 10–12 minutes.

  • The cookies are done when the edges are just barely golden. They will still feel quite soft to the touch, but they will firm up as they cool.

6. Cooling and Finishing

  • Let the cookies sit on the baking sheet for at least 5 minutes before transferring them to a wire rack.

  • Once completely cool, dust with a light coating of powdered sugar for a beautiful, festive finish.


Success Tips

  • Chop the Add-ins: Make sure to chop the cranberries and pistachios relatively small. Large chunks can cause the shortbread to crumble when you try to shape or eat them.

  • Storage: These cookies stay fresh in an airtight container at room temperature for up to 5 days.

Nut and Oat Energy Cookies

Nut and Oat Energy Cookies

Prep time: 10 minutes | Cook time: 12-15 minutes | Servings: 6-8 cookies

Ingredients

The Nut & Seed Base:

  • 30 g cashews: Roughly chopped.

  • 30 g pumpkin seeds: Whole for great texture.

  • 1 tbsp sunflower seeds: Provides a subtle nutty crunch.

  • 30 g almonds: Sliced or chopped.

  • 30 g dried cranberries or raisins: For natural sweetness.

  • 1/2 cup rolled oats: Ensure they are certified gluten-free if necessary.

The Binders:

  • 1 large egg, beaten: To hold the mixture together.

  • 1 tbsp honey or maple syrup: (Optional) If you prefer a bit of extra sweetness.

  • Pinch of salt: To balance the flavors.


Detailed Directions

1. Prep Your Space

Preheat your oven to 350°F (175°C). Line a baking sheet with parchment paper so the cookies don’t stick to the pan.

2. Mix the Dry Ingredients

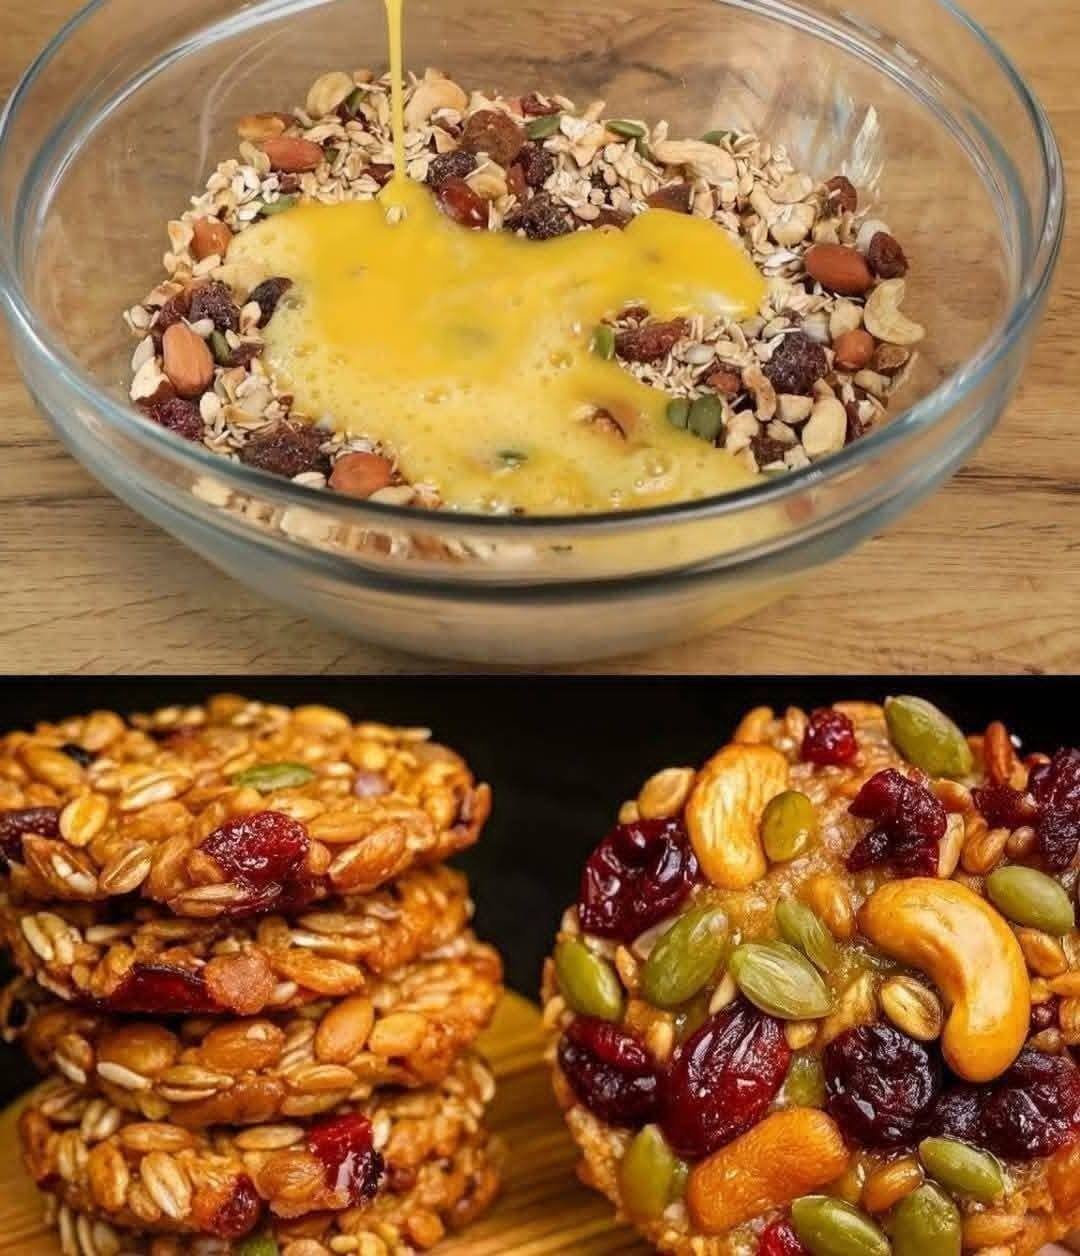
In a large glass bowl, combine the cashews, pumpkin seeds, sunflower seeds, almonds, dried fruit, and oats. Stir them together so the different textures are well distributed.

3. Bind the Mixture

Pour the beaten egg over the nut and seed mixture. If you are using honey or maple syrup, add it now. Stir thoroughly until every nut, seed, and oat is lightly coated in the egg mixture. This is what ensures the cookies don’t crumble apart after baking.

4. Shape the Cookies

Scoop about 2 tablespoons of the mixture at a time onto the baking sheet. Use the back of the spoon to flatten them into discs. Since there is no flour or leavening agent, they won’t spread much, so shape them exactly how you want them to look when finished.

5. Bake to Golden Perfection

Bake for 12–15 minutes. You are looking for the edges to turn a light golden brown and for the egg to be fully set.

6. The Cooling Rule

This is the most important step: Let the cookies cool completely on the baking sheet. As they cool, the ingredients will “set” and firm up. If you move them while they are hot, they may fall apart.


Storage Tip

Keep these in an airtight container for up to 5 days. They are a perfect “grab-and-go” breakfast or a pre-workout snack!