Nutrient-Dense Potato & Carrot Juice

Nutrient-Dense Potato & Carrot Juice

Prep time: 10 minutes | Servings: 1-2 cups

Ingredients

  • 1 medium Raw potato (organic preferred, well-scrubbed)

  • 2 large Carrots, peeled

  • 1 small Apple (optional, for natural sweetness)

  • ½ inch Fresh ginger (optional, for digestion support)

Instructions

  1. Prepare the Produce: Wash all vegetables thoroughly. If you are using a non-organic potato, be sure to peel it to remove any surface pesticides. Crucial: Remove any green parts or “eyes” from the potato, as these contain solanine, which is toxic.

  2. Chop: Cut the potato, carrots, and apple into small pieces that will fit into your juicer.

  3. Juice: Run the ingredients through a juicer. If you do not have a juicer, you can blend the ingredients with a half cup of water and then strain the mixture through a fine mesh cloth or nut milk bag.

  4. Drink Fresh: Stir the juice and drink it immediately. The nutrients in raw potato juice can oxidize quickly, so it is best consumed within 15 minutes of preparation.


💡 Important Safety Notes

  • Never Replace Treatment: This juice is a supplement to a healthy lifestyle, not a replacement for medication or therapies prescribed by your doctor.

  • Raw Potato Caution: Do not consume raw potato juice if the potato is green or sprouting, as it can cause stomach upset or more serious issues.

  • Consult a Professional: If you have diabetes, be mindful of the natural sugars in carrots and apples; if you have liver or kidney issues, consult your doctor before significantly increasing raw vegetable intake.

Flourless “Wonder” Crepes

Flourless “Wonder” Crepes

Prep time: 5 minutes | Cook time: 10 minutes | Servings: Makes about 6-8 crepes

Ingredients

  • 4 large Eggs (room temperature)

  • 4 oz Cream cheese, softened (this creates the “flourless” structure)

  • 1 tbsp Granulated monk fruit or erythritol (omit if making savory crepes)

  • ½ tsp Vanilla extract

  • 1 pinch Salt

  • Butter or coconut oil for the pan


Instructions

  1. Blend the Batter: Add the eggs, softened cream cheese, sweetener, vanilla, and salt into a blender. Blend on high for 30 seconds until completely smooth and frothy.

    • Tip: Letting the batter sit for 2 minutes allows the bubbles to settle for a smoother crepe.

  2. Heat the Pan: Heat a small non-stick skillet or crepe pan over medium-low heat. Add a tiny amount of butter or oil to coat the surface.

  3. Pour and Swirl: Pour about 2 to 3 tablespoons of batter into the center of the pan. Immediately tilt and swirl the pan in a circular motion so the batter coats the entire bottom in a very thin layer.

  4. Cook: Cook for about 60 to 90 seconds. You will know it is ready to flip when the edges start to turn golden brown and look “dry,” and the center is set.

  5. Flip: Carefully slide a thin spatula under the edge and flip the crepe. Cook the second side for only 15–20 seconds.

  6. Repeat: Transfer to a plate and repeat with the remaining batter.


Serving & Filling Ideas

  • Sweet (as seen in photo): Fill with sugar-free hazelnut spread, rolled up and drizzled with a little extra melted cocoa.

  • Fruit-Filled: Use fresh strawberries or raspberries with a dollop of the high-protein Greek yogurt “pudding” we discussed earlier.

  • Savory: Omit the sweetener/vanilla in the batter and fill with ham and Swiss cheese or sautéed spinach and mushrooms.


Pro-Tips

  • The Secret to Success: Ensure the cream cheese is very soft before blending. If it’s cold, you may end up with tiny white lumps in your crepes.

  • Storage: These keep beautifully in the fridge for up to 3 days. Place a piece of parchment paper between each crepe so they don’t stick together.

High-Protein Banana Pudding

High-Protein Banana Pudding

Prep time: 10 minutes | Chilling time: 1 hour | Servings: 4 individual cups

Ingredients

The Protein Base:

  • 2 cups Plain non-fat Greek yogurt (this provides the bulk of the protein)

  • 1 scoop (approx. 30g) Vanilla protein powder (whey or casein works best for a pudding texture)

  • 2 tbsp Sugar-free vanilla pudding mix (dry powder, for flavor and thickening)

  • ¼ cup Unsweetened almond milk (add more or less to reach your desired thickness)

  • Optional: 1 tbsp honey or maple syrup if you prefer extra sweetness

The Layers:

  • 2 large Bananas, sliced into rounds

  • 8-10 Low-sugar vanilla wafers or crushed graham crackers

  • Optional: A handful of mini dark chocolate chips for the top


Instructions

  1. Create the Pudding Base: In a large mixing bowl, whisk together the Greek yogurt, vanilla protein powder, and dry pudding mix.

  2. Adjust Consistency: Slowly stir in the almond milk one tablespoon at a time until the mixture is smooth and has the consistency of a thick pudding.

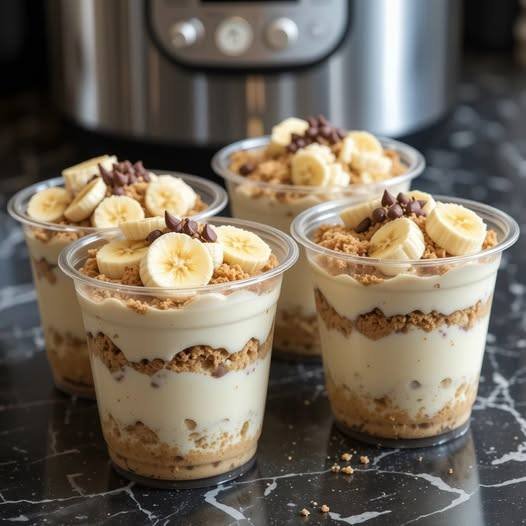
  3. Start Layering: In small glass jars or clear cups (like those in your photo), place a layer of crushed wafers at the bottom.

  4. Add Fruit and Cream: Follow the wafers with a layer of banana slices, then top with a generous dollop of the protein pudding mixture.

  5. Repeat: Repeat the layers (wafers, bananas, pudding) until the cups are full.

  6. Garnish: Top each cup with a few remaining banana slices and a sprinkle of mini chocolate chips or leftover wafer crumbs.

  7. Chill: Place the cups in the refrigerator for at least 1 hour. This allows the wafers to soften slightly and the flavors to meld into a classic “pudding” experience.


Why This Recipe Works

  • Satiety: The high protein content from the Greek yogurt and protein powder helps you feel full longer compared to standard desserts.

  • Natural Energy: Bananas provide potassium and a natural energy boost without the “crash” associated with refined sugars.

  • Meal Prep Friendly: These can be made in advance and stored in the fridge for up to 3 days, making them a perfect grab-and-go snack or healthy dessert.

Pro-Tip

If your protein powder is naturally very sweet, you may want to skip the extra honey or maple syrup. If you find the Greek yogurt too tangy, a drop of liquid stevia can help balance the flavor without adding calories.

The “Ultimate” Lean Chicken Salad

The “Ultimate” Lean Chicken Salad

Prep time: 15 minutes | Servings: 4–6 | Great for: Sandwiches, wraps, or over greens.

Ingredients

The Base:

  • 1 lb Chicken breast, cooked and shredded (poached or rotisserie-style works best)

  • ½ cup Celery, finely diced (adds a necessary crunch)

  • ¼ cup Red onion, finely minced

  • 2 tbsp Fresh cilantro or flat-leaf parsley, chopped

The Creamy Dressing:

  • 1 cup Non-fat plain Greek yogurt (this replaces mayo for a high-protein, tangy base)

  • 1 tbsp Dijon mustard

  • 1 tbsp Fresh lemon juice

  • ½ tsp Garlic powder

  • Salt and black pepper to taste

Optional Mix-ins:

  • ½ cup Grapes, halved (for a touch of sweetness)

  • 1 Small jalapeño, seeded and minced (if you like a little heat)


Instructions

  1. Prepare the Chicken: If you are cooking the chicken fresh, poach it in simmering water with a pinch of salt for 12–15 minutes until opaque throughout. Let it cool slightly, then shred using two forks or a hand mixer.

  2. Mix the Dressing: In a small bowl, whisk together the Greek yogurt, Dijon mustard, lemon juice, garlic powder, salt, and pepper until completely smooth.

  3. Combine: In a large mixing bowl, toss the shredded chicken with the celery, onion, and fresh herbs.

  4. Fold and Coat: Pour the dressing over the chicken mixture. Fold gently until everything is evenly coated. If the salad feels too dry, add an extra tablespoon of Greek yogurt.

  5. Chill: For the best flavor, cover and refrigerate for at least 30 minutes before serving. This allows the dressing to penetrate the chicken and the flavors to meld.


Meal Prep Tips

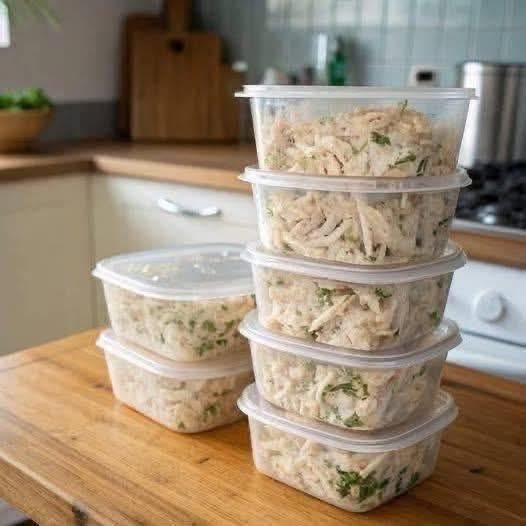
  • Storage: This salad stays fresh in airtight containers (like those in your photo) for up to 4 days in the refrigerator.

  • The “Zero Point” Secret: By using Greek yogurt instead of mayonnaise, you significantly reduce the fat and calorie content while adding a massive boost of protein.

  • Serving Ideas: Serve a scoop inside a large hollowed-out bell pepper, wrapped in large butter lettuce leaves, or simply on its own with a few whole-grain crackers.

Refreshing Lemon & Ginger Tonic

Refreshing Lemon & Ginger Tonic

Prep time: 5 minutes | Servings: 2 cups

Ingredients

  • 2 cups Water (filtered)

  • 1 inch Fresh ginger root, peeled and sliced or grated

  • 1 whole Lemon (half sliced, half juiced)

  • 1 tbsp Raw honey (optional, for natural sweetness)

  • Pinch of Cayenne pepper (optional, for a little heat)


Instructions

  1. Boil the Water: Bring 2 cups of water to a gentle boil in a small pot or kettle.

  2. Infuse the Ginger: Add the sliced ginger to the hot water. If you want a stronger flavor, let it simmer for 3–5 minutes. If you prefer it mild, simply let it steep off the heat for 5 minutes.

  3. Add Lemon: Stir in the fresh lemon juice and drop in a few lemon slices. Lemon is a great source of Vitamin C and adds a bright, clean flavor.

  4. Sweeten Naturally: Once the water has cooled slightly (to preserve the natural enzymes in the honey), stir in the honey until dissolved.

  5. Serve: Drink one cup in the morning and one in the evening, either warm or chilled over ice.


Why this is a “Healthy” Choice

  • Hydration: Many people mistake thirst for hunger; staying hydrated helps manage cravings.

  • Ginger: Known for aiding digestion and soothing the stomach.

  • Lemon: Adds antioxidants and a refreshing citrus burst without the sugar found in sodas or juices.

A quick note: Always check with a healthcare professional before starting any specific “cleanse” or “metabolism” regimen, especially if you have underlying health conditions.

Flourless “Million Dollar” Pound Cake

Flourless “Million Dollar” Pound Cake

Prep time: 10 minutes | Bake time: 45–50 minutes | Servings: 10–12 slices

Ingredients

The Dry Base:

  • 3 cups Super-fine almond flour (replaces traditional flour for a moist texture)

  • ¾ cup Powdered monk fruit or erythritol sweetener

  • 1 ½ tsp Baking powder

  • ¼ tsp Salt

The Wet Ingredients:

  • ¾ cup Unsalted butter, softened to room temperature

  • 8 oz Cream cheese, softened (this provides the “million dollar” richness)

  • 5 Large eggs, room temperature

  • 1 tbsp Vanilla extract

  • 1 tsp Almond extract (optional, for extra depth)


Instructions

  1. Preheat and Prep: Preheat your oven to 325°F (160°C). Grease a 9×5 inch loaf pan thoroughly or line it with parchment paper for easy removal.

  2. Cream the Fats: In a large bowl, beat the softened butter, cream cheese, and sweetener together until the mixture is very pale and fluffy (about 3 minutes). This aeration is key for a good rise.

  3. Add Eggs: Add the eggs one at a time, beating well after each addition. Mix in the vanilla and almond extracts.

  4. Incorporate Dry Ingredients: Gradually stir in the almond flour, baking powder, and salt. Mix until just combined—do not over-mix, as almond flour can release too much oil if over-worked.

  5. Bake: Pour the batter into the prepared loaf pan and smooth the top. Bake for 45 to 55 minutes.

    • Tip: Check at the 40-minute mark; if the top is browning too quickly, tent it loosely with foil.

    • Test: The cake is done when a toothpick inserted into the center comes out clean.

  6. Cool: Let the cake cool in the pan for at least 20 minutes before transferring to a wire rack. This cake is quite tender when warm and needs time to “set” its structure.


Pro-Tips for the Best Texture

  • Room Temp Ingredients: Ensure your eggs, butter, and cream cheese are all at room temperature to prevent the batter from curdling.

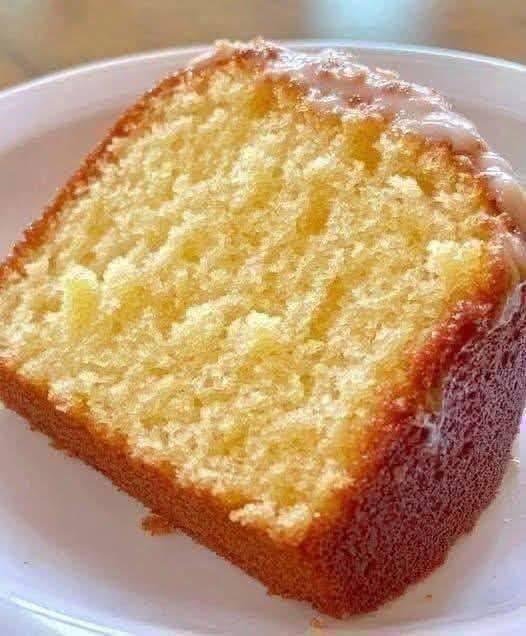
  • The Glaze: If you want the white drizzle seen in the photo, mix ½ cup powdered sweetener with 1-2 tablespoons of heavy cream and a drop of vanilla. Drizzle only once the cake is completely cool.

  • Storage: Because this uses almond flour and cream cheese, it stays incredibly moist. Store it in the fridge for up to 5 days, or slice and freeze it for a quick treat later.