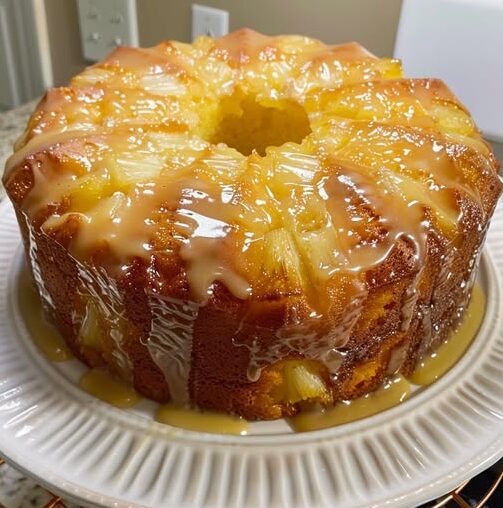
Pineapple Sour Cream Bundt Cake

A moist, tropical Bundt cake loaded with crushed pineapple and topped with a sweet pineapple glaze — perfect for holidays, potlucks, or just because.

Prep Time: 20 minutes
Cook Time: 60–70 minutes
Total Time: 1 hour 30 minutes
Servings: 12

Ingredients

For the Cake:

  • Unsalted butter – 1 cup (2 sticks), softened

  • Granulated sugar – 2 cups

  • Eggs – 4 large

  • Vanilla extract – 1 tsp

  • Almond extract – 1 tsp (optional for extra depth)

  • All-purpose flour – 3 cups

  • Baking powder – ½ tsp

  • Salt – ½ tsp

  • Sour cream – 1 cup

  • Crushed pineapple – 1 can (20 oz), well-drained

  • Pineapple juice – ¼ cup (reserved from can or added separately)

For the Glaze:

  • Powdered sugar – 1 cup

  • Pineapple juice – 2–3 tbsp (adjust for drizzling consistency)

  • Melted butter – 1 tbsp

  • Vanilla extract – ½ tsp

Instructions

  1. Prep the oven & pan:
    Preheat to 325°F (163°C). Grease and flour a 10-inch Bundt or tube pan thoroughly, making sure every crevice is coated.

  2. Cream the butter & sugar:
    In a large bowl, cream together softened butter and sugar until light and fluffy, about 4–5 minutes.

  3. Add eggs & extracts:
    Beat in eggs one at a time, mixing well after each. Stir in vanilla and almond extract.

  4. Mix dry ingredients:
    In a separate bowl, whisk together flour, baking powder, and salt.

  5. Combine wet & dry:
    Gradually add the dry mixture to the creamed butter mixture, alternating with sour cream. Begin and end with the dry mixture. Fold in drained crushed pineapple and pineapple juice gently.

  6. Bake:
    Pour batter into the prepared pan, tapping lightly to remove air bubbles. Bake for 60–70 minutes, or until a toothpick inserted in the center comes out clean.

  7. Cool & glaze:
    Let the cake cool in the pan for 10–15 minutes before inverting onto a wire rack. Cool completely. Whisk glaze ingredients until smooth, then drizzle over the cooled cake.

Quick Notes & Pro Tips

  • Avoid soggy cake: Be sure to drain pineapple well before adding.

  • Extra flavor: Toasted coconut or chopped macadamia nuts make a fantastic addition to the batter or glaze topping.

  • Bundt pan tip: Grease and flour thoroughly to prevent sticking, especially around intricate designs.

Why You’ll Love It

This cake is moist, fluffy, and tropical with a subtle tang from sour cream and the perfect amount of sweetness from the pineapple glaze.

Serving Suggestions

  • Serve as-is for a sweet treat with coffee or tea.

  • Add a dollop of whipped cream or a scoop of vanilla ice cream for a decadent dessert.

Storage & Make-Ahead

  • Room temp: Store covered for up to 3 days.

  • Refrigerate: Keeps up to 1 week in an airtight container.

  • Freeze: Wrap in plastic and foil for up to 3 months. Thaw in the fridge overnight before serving.

FAQs

Q: Can I use fresh pineapple instead of canned?
A: Yes! Finely chop fresh pineapple and use with ¼ cup added juice.

Q: Can I make this without sour cream?
A: Substitute with plain Greek yogurt for a similar texture and tang.

Q: How do I prevent the glaze from soaking in?
A: Make sure the cake is fully cooled before glazing.

Would you like me to create a “pina colada version” with coconut and rum glaze or a “cream cheese swirl version” for a richer twist?


Egg, Avocado & Cottage Cheese Breakfast Burrito

A protein-packed breakfast burrito featuring creamy cottage cheese, fluffy scrambled eggs, ripe avocado, and fresh veggies — perfect for busy mornings.

Prep Time: 5 minutes
Cook Time: 5 minutes
Total Time: 10 minutes
Servings: 2

Ingredients

  • Whole-wheat tortillas – 2 large

  • Cottage cheese – ½ cup (room temperature for best texture)

  • Eggs – 2 large, scrambled

  • Avocado – 1 ripe, sliced

  • Tomato – ¼ cup, diced

  • Cilantro – 2 tbsp, chopped

  • Salt & black pepper – to taste

  • Cooking spray – for the skillet

Instructions

  1. Cook the eggs:
    Lightly spray a nonstick skillet with cooking spray and heat over medium-high. Crack in the eggs and scramble until just set. Remove from the pan and set aside.

  2. Assemble the burrito:
    Lay a tortilla flat on a clean surface. Spread cottage cheese in the center. Layer on scrambled eggs, avocado slices, diced tomato, and chopped cilantro. Season with salt and pepper.

  3. Roll it up:
    Fold in the sides, then roll from the bottom up, tucking in the filling to form a tight burrito.

  4. Toast:
    Place seam-side down in the skillet over medium heat. Cook for 2 minutes per side, until golden brown and heated through.

  5. Serve:
    Slice in half and enjoy immediately.

Quick Notes & Pro Tips

  • Extra crisp: Brush the outside of the burrito lightly with olive oil before toasting.

  • Spice it up: Add chili flakes, hot sauce, or jalapeños for a kick.

  • Make it heartier: Add a handful of baby spinach or shredded cheese before rolling.

Why You’ll Love It

This burrito is quick, filling, and packed with protein — perfect for breakfast on the go or a light lunch.

Serving Suggestions

  • Pair with fresh fruit or a smoothie for a complete breakfast.

  • Serve with salsa or hot sauce for extra flavor.

Storage & Make-Ahead

  • Refrigerate: Store assembled burritos in an airtight container for up to 2 days.

  • Reheat: Warm in a skillet or oven for the best texture (avoid microwaving to prevent sogginess).

FAQs

Q: Can I make these ahead for meal prep?
A: Yes! Assemble and store in the fridge, then toast before eating.

Q: Can I swap the cottage cheese?
A: Absolutely. Use cream cheese, Greek yogurt, or hummus for a different flavor.

Q: Can I make it vegan?
A: Substitute scrambled eggs with tofu scramble and use a plant-based cottage cheese alternative.

Would you like me to create a “meal-prep freezer version” for batch cooking or a “southwest-style version” with black beans, corn, and spicy seasoning?

Ask ChatGPT

Cheesy Zucchini Breadsticks

A low-carb, cheesy delight made with fresh zucchini, melty mozzarella, and savory parmesan — the perfect alternative to traditional breadsticks.

Prep Time: 10 minutes
Cook Time: 20 minutes
Total Time: 30 minutes
Servings: 4–6

Ingredients

  • Zucchini – 4 cups, grated (about 1 lb)

  • Mozzarella cheese – ½ cup (plus 1 cup for topping)

  • Parmesan cheese – ⅓ cup, grated

  • Egg – 1 large

  • Garlic parsley salt – 1 tsp

  • Optional: Extra herbs like rosemary or Italian seasoning for added flavor

Instructions

  1. Prep the oven & zucchini:
    Preheat oven to 425°F (218°C). Use a clean kitchen towel or cheesecloth to squeeze as much liquid as possible from the grated zucchini.

  2. Mix the base:
    In a large bowl, combine the zucchini with ½ cup mozzarella, parmesan, egg, and garlic parsley salt. Stir until fully combined.

  3. Shape & bake:
    Line a baking sheet with parchment paper. Spread the zucchini mixture into a thin, even rectangle about ½ inch thick. Bake for 15 minutes, or until the crust begins to brown and set.

  4. Add cheese topping:
    Remove from oven, sprinkle the remaining 1 cup of cheese evenly over the top, and bake for another 2–5 minutes until melty and bubbly.

  5. Slice & serve:
    Cut into breadstick shapes and serve hot.

Quick Notes & Pro Tips

  • Drain thoroughly: Removing excess liquid is key for a firm, non-soggy crust.

  • Cheese swaps: Try a Mexican cheese blend or add a sprinkle of sharp cheddar for a flavor boost.

  • Make it fancy: Add dried rosemary, oregano, or crushed red pepper for extra depth.

Why You’ll Love It

These breadsticks are cheesy, gooey, and perfect for dipping — plus, they sneak in extra veggies without sacrificing flavor.

Serving Suggestions

  • Pair with marinara sauce or garlic butter for dipping.

  • Serve alongside grilled chicken or pasta for a full meal.

Storage & Make-Ahead

  • Refrigerate: Store in an airtight container for up to 3 days.

  • Reheat: Bake at 350°F for 5–7 minutes or use an air fryer to re-crisp.

FAQs

Q: Can I make these ahead of time?
A: Yes! Bake the crust, cool it, and store in the fridge. Add cheese and reheat when ready to serve.

Q: Can I make them dairy-free?
A: Use dairy-free mozzarella and parmesan substitutes — they work well here.

Q: Can I freeze them?
A: Absolutely. Freeze after the first bake, then add cheese and finish baking when ready.

Would you like me to make a “garlic butter version” (brushed with garlic-herb butter before serving) or a “pizza breadstick version” with pepperoni and marinara baked on top?

Cherry Banana Fruit Salad

A sweet, colorful fruit salad featuring juicy cherry pie filling, tropical pineapple, and fresh bananas — perfect for potlucks, barbecues, or a simple make-ahead dessert.

Prep Time: 10 minutes
Chill Time: 30 minutes
Total Time: 40 minutes
Servings: 8

Ingredients

Main Fruit Mix:

  • Mixed fruit cocktail – 1 can (15 oz), well drained

  • Crushed pineapple – 1 can (8 oz), thoroughly drained

  • Cherry pie filling – 1 can (21 oz)

  • Bananas – 2 medium, freshly sliced

Optional Add-ins:

  • Mini marshmallows – to taste

  • Shredded coconut flakes – as desired

  • Fresh whipped cream – for extra richness

Instructions

  1. Mix the fruit:
    In a large mixing bowl, combine drained fruit cocktail, crushed pineapple, and cherry pie filling. Stir gently until evenly blended.

  2. Add bananas:
    Just before serving, fold in freshly sliced bananas to keep them from browning or getting mushy.

  3. Customize:
    Toss in mini marshmallows for sweetness or sprinkle in coconut flakes for a tropical flair.

  4. Chill & serve:
    Cover the bowl and refrigerate for at least 30 minutes to let the flavors meld together. Serve cold.

Quick Notes & Pro Tips

  • Banana timing: Add bananas last to preserve their freshness and texture.

  • Make it creamy: Fold in whipped cream or a dollop of Cool Whip for a fluffier dessert-like salad.

  • Texture boost: Chopped nuts like pecans or walnuts add a nice crunch.

Why You’ll Love It

This no-fuss fruit salad is vibrant, refreshing, and easy to throw together in minutes — perfect for any gathering.

Serving Suggestions

  • Serve as a light dessert after a barbecue or holiday meal.

  • Pair with pound cake or angel food cake for a fun twist.

Storage & Make-Ahead

  • Refrigerate: Store covered for up to 2 days.

  • Bananas: If making ahead, add bananas right before serving to keep them fresh.

FAQs

Q: Can I make this ahead of time?
A: Yes, but wait to add the bananas until serving time to prevent browning.

Q: Can I use fresh fruit instead of canned?
A: Absolutely! Fresh pineapple, cherries, or seasonal fruits work wonderfully.

Q: Can I make it less sweet?
A: Use unsweetened fruit and swap cherry pie filling for fresh cherries with a light glaze.

Would you like me to create a “creamy ambrosia-style version” with Cool Whip and nuts or a “holiday version” with red and green cherries for a festive look?

One Pan Sausage, Green Beans, and Potatoes

A simple, hearty sheet pan dinner featuring tender baby potatoes, crisp green beans, and smoky sausage — ready in one pan with minimal cleanup.

Prep Time: 10 minutes
Cook Time: 35–40 minutes
Total Time: ~50 minutes
Servings: 4

Ingredients

  • Baby potatoes – 1 lb, halved or quartered

  • Green beans – 8 oz, washed & trimmed

  • Yellow onion – 1 small (about 1 cup), cut into wedges or slices

  • Pre-cooked andouille sausage or kielbasa – 1 lb, sliced into 1-inch pieces

  • Olive oil – ¼ cup

  • Garlic powder – 1 tsp

  • Salt – 1 tsp

  • Italian seasoning – 1 tsp

  • Black pepper – ½ tsp

Instructions

  1. Preheat the oven:
    Set to 400°F (200°C). Line a large sheet pan with parchment paper or lightly grease it.

  2. Prep the ingredients:
    Halve or quarter baby potatoes for even roasting. Slice sausage on the bias (angled cuts) into 1-inch pieces.

  3. Season everything:
    In a large bowl, toss potatoes, green beans, onion, and sausage with olive oil, garlic powder, Italian seasoning, salt, and pepper until evenly coated.

  4. Arrange on the pan:
    Spread mixture in a single layer on the sheet pan. Place potatoes cut-side down for crispier edges.

  5. Bake:
    Roast for 35–40 minutes, stirring halfway through, until potatoes are tender and slightly golden.

  6. Serve:
    Remove from the oven and serve hot.

Quick Notes & Pro Tips

  • Par-cook potatoes: If you like extra crispy edges, microwave or boil potatoes for 5 minutes before roasting.

  • Add a kick: Sprinkle with crushed red pepper or drizzle with hot sauce before serving.

  • Mix up the veggies: Swap in bell peppers, carrots, or broccoli for variety.

Why You’ll Love It

This dish delivers bold flavor with minimal prep and cleanup. It’s a complete meal on one pan — perfect for weeknights when time is short.

Serving Suggestions

  • Serve with crusty bread or a side salad for a full meal.

  • Drizzle with balsamic glaze or honey mustard for an extra layer of flavor.

Storage & Make-Ahead

  • Refrigerate: Store leftovers in an airtight container for up to 4 days.

  • Reheat: Warm in the oven at 350°F for 10–12 minutes or in an air fryer for extra crispiness.

FAQs

Q: Can I use raw sausage instead of pre-cooked?
A: Yes, but add 5–10 minutes to the cook time and ensure the sausage reaches a safe internal temperature (160°F for pork).

Q: Can I make this ahead of time?
A: Absolutely! Prep everything in the morning, cover, and refrigerate. Roast when ready.

Q: Can I double the recipe?
A: Yes — use two sheet pans to avoid overcrowding, which can prevent proper roasting.

Hearty Pinto Bean, Green Chile & Beef Soup

A rich, comforting soup loaded with seasoned ground beef, tender pinto beans, and zesty green chilies — the perfect bowl for chilly evenings or busy weeknights.

Prep Time: 10 minutes
Cook Time: 30 minutes
Total Time: ~40 minutes
Servings: 6

Ingredients

  • Ground beef – 1 lb

  • Onion – 1 medium, chopped

  • Garlic – 2 cloves, minced

  • Pinto beans – 2 cans (15 oz each), drained & rinsed

  • Beef broth – 2 cups

  • Green chilies – 1 can (4 oz), diced

  • Cumin – 1 tsp

  • Chili powder – 1 tsp

  • Olive oil – 1 tbsp

  • Salt & black pepper – to taste

  • Fresh cilantro – chopped, for garnish

Instructions

  1. Brown the beef:
    In a large pot, heat olive oil over medium heat. Add ground beef and cook until browned, breaking it apart with a spoon.

  2. Sauté aromatics:
    Add onion and garlic. Sauté for about 5 minutes until the onion becomes soft and fragrant.

  3. Season:
    Stir in green chilies, cumin, chili powder, salt, and pepper.

  4. Build the soup:
    Add pinto beans and beef broth. Stir to combine and bring to a simmer.

  5. Simmer:
    Cook for 20–25 minutes, allowing the flavors to meld together.

  6. Serve:
    Ladle into bowls, garnish with fresh cilantro, and enjoy hot.

Quick Notes & Pro Tips

  • Spice it up: Add a pinch of cayenne or a chopped jalapeño for more heat.

  • Make it thicker: Mash some of the beans in the pot for a creamier texture.

  • Stretch it: Add corn or diced tomatoes for more volume and flavor.

Why You’ll Love It

This soup is hearty, quick to make, and packed with protein and fiber. It’s a one-pot wonder that’s perfect for meal prepping or serving a crowd.

Serving Suggestions

  • Serve with warm cornbread or flour tortillas for dipping.

  • Top with sour cream, shredded cheese, or diced avocado for extra richness.

Storage & Make-Ahead

  • Refrigerate: Store in an airtight container for up to 4 days.

  • Freeze: Cool completely and freeze for up to 3 months.

  • Reheat: Warm on the stovetop or microwave until hot.

FAQs

Q: Can I use fresh green chilies?
A: Yes! Roast and dice them for extra flavor.

Q: Can I make it vegetarian?
A: Swap the beef for plant-based crumbles or add extra beans and veggies.

Q: Can I cook this in a slow cooker?
A: Yes — brown the beef first, then combine everything in the slow cooker on low for 4–6 hours.

Personal Note

This recipe was born on a cold night when I needed something hearty with pantry staples — it’s been on repeat ever since. The green chilies add just the right kick without overpowering the savory, beefy base.