Creamy Cheesy Broccoli and Potato Bake

Creamy Cheesy Broccoli and Potato Bake

Soft vegetables baked in a smooth, savory sauce with a golden cheese topping

This comforting broccoli and potato bake combines tender vegetables with a creamy, well-seasoned sauce and a lightly golden cheese layer. It works beautifully as a main dish with a salad or as a satisfying side for family meals. Every step is simple, and the result is rich, balanced, and comforting without being heavy.


Ingredients

For the Vegetable Base

  • Broccoli – 1 large head, cut into small florets
    Provides freshness, color, and a mild earthy flavor.

  • Potatoes – 2 to 3 medium, peeled and thinly sliced
    Create structure and softness once baked.

  • Onion – 1 medium, finely diced
    Adds gentle sweetness and depth.

  • Olive oil or butter – 2 tablespoons
    Used for sautéing and flavor.

  • Salt and black pepper – to taste


For the Creamy Sauce

  • Large eggs – 3
    Help the bake set into neat slices once cooked.

  • Heavy cream or Greek yogurt – 200 ml (about ¾ cup)
    Cream gives richness; yogurt gives a lighter, slightly tangy finish.

  • Garlic powder – ½ teaspoon
    or fresh garlic – 2 cloves, finely minced

  • Paprika – ½ teaspoon
    Adds gentle warmth and color.

  • Dried herbs – 1 teaspoon
    Thyme or oregano work especially well.


For the Topping

  • Shredded cheese – 150 g (about 1½ cups)
    Mozzarella for stretch, cheddar for flavor, or a mix of both.


Equipment Needed

  • Saucepan

  • Frying pan

  • Mixing bowl

  • Whisk

  • Baking dish (round or rectangular)


Step-by-Step Instructions


1. Prepare the Oven and Vegetables

  • Preheat your oven to 375°F (190°C).

  • Bring a large pot of lightly salted water to a gentle boil.


2. Pre-Cook the Potatoes and Broccoli

  • Add the sliced potatoes to the boiling water and cook for about 5 minutes until just tender.

  • Add the broccoli florets to the same pot during the last 2 minutes.

  • Drain everything thoroughly and set aside.

This step ensures the vegetables finish cooking evenly in the oven.


3. Cook the Onion

  • Heat the olive oil or butter in a pan over medium heat.

  • Add the diced onion and cook gently for 4–5 minutes, stirring occasionally, until soft and lightly golden.

  • Remove from heat.


4. Layer the Vegetables

  • Lightly grease your baking dish.

  • Arrange the potatoes and broccoli evenly in the dish.

  • Scatter the cooked onions throughout the layers.

  • Season lightly with salt and black pepper.


5. Make the Creamy Sauce

  • In a medium bowl, add the eggs, cream (or yogurt), garlic, paprika, and dried herbs.

  • Whisk until smooth, well blended, and lightly airy.


6. Bake the Dish

  • Pour the sauce evenly over the vegetables.

  • Gently tap the dish on the counter to help the sauce settle.

  • Cover with foil and bake for 20 minutes.


7. Add the Cheese Topping

  • Remove the foil.

  • Sprinkle the shredded cheese evenly over the surface.

  • Return to the oven uncovered and bake for 10–15 minutes, until the cheese is melted and lightly golden.


8. Rest and Serve

  • Remove from the oven and let the bake rest for 5 minutes.

  • This helps the layers settle and makes slicing easier.

  • Cut into portions and serve warm.


Serving Suggestions

  • Serve with a fresh green salad

  • Pair with roasted vegetables or crusty bread

  • Enjoy as a main dish or hearty side


Storage Tips

  • Store covered in the refrigerator for up to 3 days

  • Reheat gently in the oven or microwave until warmed through

Pan-Cooked Cheese and Potato Bread

Pan-Cooked Cheese and Potato Bread

Soft flatbread filled with creamy potato and melted cheese, cooked gently in a frying pan

This cheese and potato bread is made with a simple milk-based dough and cooked slowly in a frying pan until soft inside and lightly golden outside. The filling is smooth, comforting, and stretchy, making this bread perfect for breakfast, snacks, or a light meal.


Ingredients

For the Soft Bread Dough

  • Strong (bread) flour – 90 g
    Gives the bread structure while keeping it tender.

  • Milk – 55 g (about 4 tablespoons)
    Adds moisture and softness.

  • Unsalted butter – 10 g, melted
    Adds richness and flavor.

  • Salt – a small pinch
    Balances the taste.


For the Filling

  • Boiled potato – 1 medium, mashed until smooth
    Creates a soft, creamy center.

  • Shredded cheese – 80–100 g
    Mozzarella, mild cheddar, or a melting cheese works best.

  • Salt – a small pinch (optional)

  • Black pepper – optional, to taste


Equipment Needed

  • Mixing bowl

  • Spoon or spatula

  • Rolling pin or bottle

  • Non-stick frying pan with lid


Step-by-Step Instructions


1. Prepare the Dough

  1. In a bowl, add the flour and salt.

  2. Pour in the milk and melted butter.

  3. Mix with a spoon until a soft dough forms.

  4. Transfer to a clean surface and knead gently for 2–3 minutes until smooth.

The dough should feel soft, pliable, and not sticky.


2. Rest the Dough

  • Cover the dough and let it rest for 10 minutes.

  • This relaxes the dough and makes it easier to roll.


3. Prepare the Filling

  1. Mash the boiled potato until completely smooth.

  2. Add the shredded cheese and mix gently.

  3. Season lightly with salt and pepper if desired.

The filling should be thick and creamy, not runny.


4. Shape the Bread

  1. Roll the dough into a thin circle (about 18–20 cm wide).

  2. Spread the potato and cheese mixture evenly over the surface.

  3. Fold the dough inward from the edges to enclose the filling, forming a flat round shape.

  4. Gently flatten with your hands.


5. Cook in the Frying Pan

  1. Heat a non-stick frying pan over low to medium heat.

  2. Place the filled bread into the pan.

  3. Cover with a lid and cook for 4–5 minutes until the bottom is lightly golden.

  4. Flip carefully, cover again, and cook the other side for another 4–5 minutes.

Cooking slowly allows the cheese to melt fully and the bread to cook evenly.


6. Serve

  • Remove from the pan and let rest for 1–2 minutes.

  • Cut into wedges and serve warm.


Serving Ideas

  • Enjoy plain as a comforting snack

  • Serve with yogurt, sour cream, or a fresh salad

  • Pair with soup or tea for a simple meal


Storage Tips

  • Best enjoyed fresh and warm

  • Can be refrigerated for 1 day

  • Reheat gently in a frying pan for best texture

Crispy Potato and Tuna Tortilla Pockets

Crispy Potato and Tuna Tortilla Pockets

Warm, comforting tortilla pockets with a creamy filling and golden exterior

These tortilla pockets are filled with a smooth potato and tuna mixture, folded with melted cheese, and cooked until lightly golden on the outside. They are easy to prepare, satisfying, and perfect for lunch, snacks, or a simple dinner. The filling is soft and flavorful, while the tortillas provide a pleasant contrast in texture.


Ingredients

For the Filling

  • 1 large potato, boiled and mashed until smooth
    Forms the soft, comforting base of the filling.

  • Cream cheese – 1 tablespoon
    Adds creaminess and helps the filling blend smoothly.

  • Canned tuna – 1 can, well drained
    Provides protein and mild flavor.

  • Hard-boiled egg – 1, finely chopped
    Adds richness and texture.

  • Canned corn – 2 to 3 tablespoons, drained
    Brings gentle sweetness and color.

  • Fresh parsley – 2 tablespoons, chopped
    Adds freshness and aroma.

  • Chopped olives and gherkins (pickles) – a small handful
    Give balance and mild tang.

  • Salt and black pepper – optional, to taste


For Assembly and Cooking

  • Small tortillas – 4 to 6 (flour or corn)
    Soft tortillas work best for folding.

  • Shredded cheese – 1 cup (mozzarella or cheddar)
    Melts smoothly and adds richness.

  • Melted butter or olive oil – 2 tablespoons
    Helps the tortillas turn golden when cooked.

  • Optional seasoning:
    A small pinch of paprika or garlic powder for added flavor.


Equipment Needed

  • Mixing bowl

  • Spoon or spatula

  • Skillet, oven, or air fryer

  • Pastry brush (or spoon)


Step-by-Step Instructions


1. Prepare the Filling

  • While the potato is still warm, place it in a medium bowl.

  • Add the cream cheese and mix until completely smooth and well combined.

  • Add the tuna, chopped egg, corn, parsley, olives, and gherkins.

  • Stir gently until everything is evenly mixed.

  • Season lightly with salt and black pepper if desired.

The filling should be creamy, soft, and easy to spread.


2. Assemble the Tortilla Pockets

  • Place a tortilla flat on a clean surface.

  • Spoon 2–3 tablespoons of the filling onto one half of the tortilla.

  • Sprinkle a generous layer of shredded cheese over the filling.


3. Fold the Tortillas

  • Fold the tortilla over to form a half-moon shape.

  • Press gently along the edges to help it stay closed during cooking.

  • Repeat with the remaining tortillas.


4. Prepare the Exterior

  • In a small bowl, mix the melted butter or olive oil with the optional paprika or garlic powder.

  • Lightly brush both sides of each folded tortilla.

  • This helps the outside cook evenly and develop a light golden color.


5. Cook the Tortilla Pockets

Stovetop Method

  • Heat a dry skillet over medium heat.

  • Place the tortillas in the pan and cook for 2–3 minutes per side, until the cheese has melted and the outside is lightly golden.

Oven or Air Fryer Method

  • Preheat oven or air fryer to 400°F (200°C).

  • Arrange tortillas in a single layer.

  • Air fry for 5–7 minutes or bake for 10 minutes, turning once halfway through.


6. Serve

  • Remove from heat and let rest for a minute before serving.

  • Serve warm with sour cream, yogurt, salsa, or a fresh green salad on the side.


Storage and Reheating Tips

  • Best enjoyed fresh and warm

  • Refrigerate leftovers in a covered container for up to 2 days

  • Reheat in a skillet or air fryer to restore texture

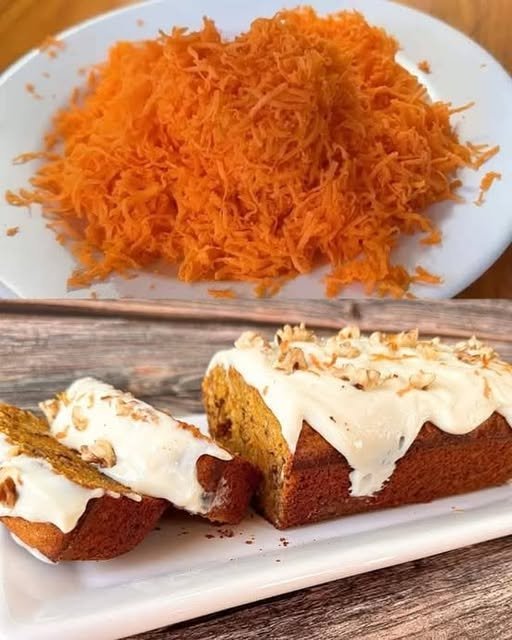
Quick and Delicious Carrot and Walnut Cake

Quick and Delicious Carrot and Walnut Cake

Soft, lightly spiced cake with natural sweetness and a smooth topping

This carrot and walnut cake is moist, fragrant, and easy to prepare. Finely grated carrots keep the crumb soft, while walnuts add a pleasant texture. The gentle citrus aroma from orange zest brightens the flavor, making this cake perfect for tea time, family gatherings, or everyday baking.


Ingredients

For the Cake Batter

  • Large eggs – 3
    Provide structure and help the cake rise evenly.

  • Granulated sugar – 150 g (¾ cup)
    Adds sweetness and keeps the cake tender.

  • Vegetable oil – 80 ml (⅓ cup)
    Ensures a soft texture that stays moist even after cooling.

  • All-purpose flour – 180 g (1½ cups)
    Gives the cake its shape while remaining light.

  • Carrots – 200 g (about 2 medium), finely grated
    Add natural moisture and mild sweetness.

  • Walnuts – 100 g (½ cup), chopped
    Bring gentle crunch and nutty flavor.

  • Orange zest – from 1 orange
    Adds freshness and aroma without extra liquid.

  • Baking powder – 2 teaspoons
    Helps the cake rise smoothly.

  • Cake spice mix – ½ teaspoon
    A blend of cinnamon, cloves, nutmeg, ginger, cardamom, vanilla, and anise.

  • Salt – a small pinch
    Balances flavors and enhances sweetness.


For the Creamy Topping (Optional but Recommended)

  • Cream cheese – 115 g (4 oz), softened
    Creates a smooth and lightly tangy topping.

  • Butter – 30 g (2 tablespoons), softened
    Adds richness and structure.

  • Powdered sugar – 120 g (1 cup)
    Sweetens and smooths the frosting.

  • Vanilla extract – ½ teaspoon
    Rounds out the flavor.


Equipment Needed

  • Loaf pan

  • Mixing bowls

  • Whisk or hand mixer

  • Spatula

  • Wire cooling rack


Step-by-Step Instructions


1. Prepare the Oven and Pan

  • Preheat the oven to 350°F (175°C).

  • Lightly grease a loaf pan with oil or butter.

  • Line the base with parchment paper for easy release.


2. Whisk Eggs and Sugar

  • In a large bowl, add the eggs and sugar.

  • Whisk or beat for 2–3 minutes until the mixture becomes pale, airy, and slightly thickened.


3. Add Oil and Orange Zest

  • Slowly pour in the vegetable oil while whisking gently.

  • Stir in the orange zest until evenly distributed.


4. Combine Dry Ingredients

  • Sift together the flour, baking powder, salt, and spice mix.

  • Add to the wet mixture and fold gently using a spatula.

  • Mix only until the flour disappears to keep the cake soft.


5. Fold in Carrots and Walnuts

  • Add the grated carrots and chopped walnuts.

  • Fold gently until evenly mixed.

  • The batter will be thick but smooth.


6. Bake the Cake

  • Pour the batter into the prepared pan and level the top.

  • Bake for 40–50 minutes, until the cake is set and lightly golden.

  • A toothpick inserted in the center should come out clean.


7. Cool the Cake

  • Let the cake rest in the pan for 10 minutes.

  • Carefully remove and transfer to a wire rack.

  • Allow to cool completely before adding any topping.


Prepare the Creamy Topping

8. Make the Frosting

  • In a bowl, combine the cream cheese and butter.

  • Whisk until smooth and creamy.

  • Add powdered sugar and vanilla extract.

  • Mix until soft, smooth, and spreadable.


9. Finish and Serve

  • Spread the topping evenly over the cooled cake.

  • Garnish with extra chopped walnuts or orange zest if desired.

  • Slice and serve.


Storage Tips

  • Keep covered at room temperature for 1 day

  • Refrigerate for up to 4 days

  • Bring to room temperature before serving for best texture

Creamy Caramel and Nut Chocolate Domes

Creamy Caramel and Nut Chocolate Domes

Smooth chocolate shells filled with rich caramel and crunchy nuts

These elegant chocolate domes combine a silky chocolate shell with a creamy caramel center and finely chopped nuts. They are perfect for special occasions, gifting, or whenever you want a dessert that looks impressive but is made with simple ingredients and thoughtful steps.


Ingredients

For the Caramel Filling

  • Granulated sugar – 250 g (about 1¼ cups)
    Forms the base of the caramel with deep sweetness.

  • Unsalted butter – 65 g (about 4½ tablespoons)
    Adds richness and smooth texture.

  • Heavy cream – 200 ml (about ¾ cup + 2 tablespoons)
    Creates a creamy, soft caramel consistency.


For the Chocolate Shells

  • Semi-sweet or milk chocolate – 160 g (5.6 oz)
    Choose good-quality chocolate for smooth shells and clean flavor.

  • Sunflower oil – 30 g (about 2 tablespoons)
    Helps the chocolate remain glossy and easy to bite.


For the Filling Add-in

  • Chopped nuts – 60 g (2 oz)
    Peanuts, hazelnuts, or walnuts work especially well. Chop finely for even texture.


Equipment Needed

  • Heavy-bottomed saucepan

  • Silicone dome mold

  • Heat-safe bowls

  • Whisk or spatula

  • Spoon or pastry brush


Step-by-Step Instructions


1. Make the Caramel Filling

  1. Place the sugar in a heavy-bottomed saucepan.

  2. Heat over medium heat and allow the sugar to melt naturally.

  3. As the sugar liquefies, gently swirl the pan occasionally to help it melt evenly.

  4. Continue heating until the sugar becomes a smooth amber-colored liquid.

  5. Add the butter and whisk until fully blended and smooth.

  6. Slowly pour in the cream while whisking continuously until the mixture becomes unified and glossy.

  7. Allow the caramel to cook gently for 2–3 minutes, stirring occasionally, until it thickens slightly.

  8. Remove from heat and stir in the chopped nuts until evenly distributed.

  9. Transfer the caramel to a bowl and let it cool completely.

    • The finished caramel should be thick, smooth, and easy to spoon or pipe.


2. Prepare the Chocolate Coating

  1. Place the chocolate in a heat-safe bowl.

  2. Melt it gently using a double boiler or microwave in 30-second intervals, stirring between each interval until smooth.

  3. Stir in the sunflower oil until fully combined.

    • This step ensures a smooth finish, soft bite, and professional shine.


3. Form the Chocolate Domes

  1. Spoon a small amount of melted chocolate into each cavity of the silicone mold.

  2. Use the back of a spoon or a pastry brush to spread the chocolate evenly across the base and up the sides.

  3. Place the mold in the freezer for 5–10 minutes until the chocolate firms up.

  4. If desired, apply a second thin layer of chocolate for extra strength.

  5. Chill again until set.


4. Fill and Seal the Domes

  1. Spoon or pipe the cooled caramel into each chocolate shell.

  2. Leave a small space at the top so the domes can be sealed neatly.

  3. Cover the caramel with the remaining melted chocolate, smoothing the surface with a spatula.

  4. Place the mold in the refrigerator or freezer for at least 30 minutes, until completely firm.


5. Unmold and Finish

  1. Gently release the domes from the silicone mold.

  2. Arrange on a serving plate.

Optional finishing touches:

  • Drizzle with extra melted chocolate

  • Sprinkle with finely crushed nuts

  • Dust lightly with cocoa powder


Storage Tips

  • Store in an airtight container

  • Keep refrigerated for up to 7 days

  • Bring to room temperature before serving for best texture and flavor

Super Moist 5-Minute Chocolate Cake

Super Moist 5-Minute Chocolate Cake

A soft, tender chocolate cake with a smooth chocolate topping

This easy chocolate cake comes together quickly using basic pantry ingredients. The batter is mixed in one bowl, bakes evenly, and stays soft and moist for days. It is ideal for everyday baking, family gatherings, or when you want a reliable chocolate dessert without complicated steps.


Ingredients

For the Cake

  • All-purpose flour – 1½ cups (180 g)
    Provides structure while keeping the cake soft.

  • Unsweetened cocoa powder – ½ cup (60 g)
    Use natural or Dutch-processed cocoa for a deep chocolate flavor.

  • Granulated sugar – 1 cup (200 g)
    Adds sweetness and helps retain moisture.

  • Baking powder – 1 teaspoon
    Helps the cake rise evenly.

  • Baking soda – ½ teaspoon
    Works with the cocoa to give the cake a light texture.

  • Salt – ½ teaspoon
    Balances the sweetness and enhances flavor.

  • Large eggs – 2
    Bind the ingredients and give structure
    OR
    Plain yogurt – ½ cup (for extra softness and moisture)

  • Milk – ½ cup (120 ml)
    Adds moisture and helps dissolve dry ingredients.

  • Vegetable or canola oil – ½ cup (120 ml)
    Keeps the cake tender even after cooling.

  • Vanilla extract – 2 teaspoons
    Enhances the chocolate flavor.

  • Boiling water or hot coffee – ½ cup (120 ml)
    Helps fully dissolve the cocoa powder and deepen the chocolate taste
    (Coffee does not make the cake taste like coffee)


For the Chocolate Topping

  • Semi-sweet chocolate chips or chopped chocolate – ½ cup
    Choose good-quality chocolate for smooth results.

  • Heavy cream – ⅓ cup
    Creates a soft, shiny chocolate topping.

  • Optional garnish: Chocolate shavings or cocoa powder


Equipment Needed

  • 8 × 8 inch (20 × 20 cm) square baking pan

  • Large mixing bowl

  • Whisk or hand mixer

  • Small heat-safe bowl

  • Spatula


Step-by-Step Instructions

1. Prepare the Oven and Pan

  • Preheat your oven to 350°F (175°C).

  • Grease the baking pan lightly with oil or butter.

  • For easy removal, line the pan with parchment paper, leaving a little overhang on the sides.


2. Combine Dry Ingredients

  • In a large bowl, add the flour, cocoa powder, sugar, baking powder, baking soda, and salt.

  • Sift if possible to remove lumps.

  • Whisk well until everything is evenly mixed and uniform in color.


3. Add Wet Ingredients

  • Add the eggs or yogurt, milk, oil, and vanilla extract to the bowl.

  • Whisk or beat on medium speed for 1–2 minutes until smooth and well combined.

  • Scrape the sides and bottom of the bowl to ensure no dry pockets remain.


4. Add Hot Liquid

  • Reduce mixing speed or switch to a spatula.

  • Slowly pour in the boiling water or hot coffee.

  • Mix gently until the batter becomes smooth and thin.

Important:
The batter will be runny. This is expected and helps create a soft texture after baking.


5. Bake the Cake

  • Pour the batter into the prepared pan.

  • Tap the pan gently on the counter to release air bubbles.

  • Bake for 30–35 minutes, or until:

    • A toothpick inserted in the center comes out clean or with a few moist crumbs.

  • Remove from the oven and let the cake cool completely in the pan.


Prepare the Chocolate Topping

6. Heat the Cream

  • Place the chocolate in a heat-safe bowl.

  • Heat the cream until very hot but not boiling (microwave or stovetop).


7. Melt the Chocolate

  • Pour the hot cream over the chocolate.

  • Let it sit undisturbed for 5 minutes.

  • Stir slowly from the center outward until smooth and glossy.

If needed, warm gently for a few seconds to fully melt.


Assemble the Cake

8. Finish and Serve

  • Pour the chocolate topping over the cooled cake.

  • Spread evenly using a spatula.

  • Add chocolate shavings or a light dusting of cocoa powder if desired.

  • Let the topping set for 15–20 minutes before slicing.


Storage Tips

  • Store covered at room temperature for 2 days

  • Refrigerate for up to 5 days

  • Bring to room temperature before serving for best texture