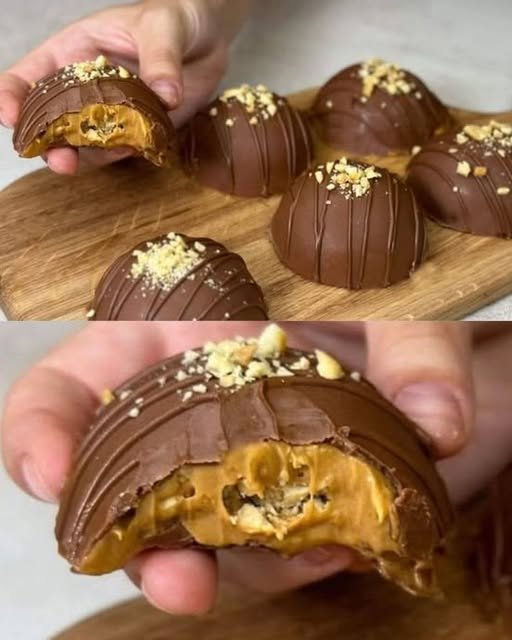
Creamy Caramel and Nut Chocolate Domes
Smooth chocolate shells filled with rich caramel and crunchy nuts
These elegant chocolate domes combine a silky chocolate shell with a creamy caramel center and finely chopped nuts. They are perfect for special occasions, gifting, or whenever you want a dessert that looks impressive but is made with simple ingredients and thoughtful steps.
Ingredients
For the Caramel Filling
-
Granulated sugar – 250 g (about 1¼ cups)
Forms the base of the caramel with deep sweetness. -
Unsalted butter – 65 g (about 4½ tablespoons)
Adds richness and smooth texture. -
Heavy cream – 200 ml (about ¾ cup + 2 tablespoons)
Creates a creamy, soft caramel consistency.
For the Chocolate Shells
-
Semi-sweet or milk chocolate – 160 g (5.6 oz)
Choose good-quality chocolate for smooth shells and clean flavor. -
Sunflower oil – 30 g (about 2 tablespoons)
Helps the chocolate remain glossy and easy to bite.
For the Filling Add-in
-
Chopped nuts – 60 g (2 oz)
Peanuts, hazelnuts, or walnuts work especially well. Chop finely for even texture.
Equipment Needed
-
Heavy-bottomed saucepan
-
Silicone dome mold
-
Heat-safe bowls
-
Whisk or spatula
-
Spoon or pastry brush
Step-by-Step Instructions
1. Make the Caramel Filling
-
Place the sugar in a heavy-bottomed saucepan.
-
Heat over medium heat and allow the sugar to melt naturally.
-
As the sugar liquefies, gently swirl the pan occasionally to help it melt evenly.
-
Continue heating until the sugar becomes a smooth amber-colored liquid.
-
Add the butter and whisk until fully blended and smooth.
-
Slowly pour in the cream while whisking continuously until the mixture becomes unified and glossy.
-
Allow the caramel to cook gently for 2–3 minutes, stirring occasionally, until it thickens slightly.
-
Remove from heat and stir in the chopped nuts until evenly distributed.
-
Transfer the caramel to a bowl and let it cool completely.
-
The finished caramel should be thick, smooth, and easy to spoon or pipe.
-
2. Prepare the Chocolate Coating
-
Place the chocolate in a heat-safe bowl.
-
Melt it gently using a double boiler or microwave in 30-second intervals, stirring between each interval until smooth.
-
Stir in the sunflower oil until fully combined.
-
This step ensures a smooth finish, soft bite, and professional shine.
-
3. Form the Chocolate Domes
-
Spoon a small amount of melted chocolate into each cavity of the silicone mold.
-
Use the back of a spoon or a pastry brush to spread the chocolate evenly across the base and up the sides.
-
Place the mold in the freezer for 5–10 minutes until the chocolate firms up.
-
If desired, apply a second thin layer of chocolate for extra strength.
-
Chill again until set.
4. Fill and Seal the Domes
-
Spoon or pipe the cooled caramel into each chocolate shell.
-
Leave a small space at the top so the domes can be sealed neatly.
-
Cover the caramel with the remaining melted chocolate, smoothing the surface with a spatula.
-
Place the mold in the refrigerator or freezer for at least 30 minutes, until completely firm.
5. Unmold and Finish
-
Gently release the domes from the silicone mold.
-
Arrange on a serving plate.
Optional finishing touches:
-
Drizzle with extra melted chocolate
-
Sprinkle with finely crushed nuts
-
Dust lightly with cocoa powder
Storage Tips
-
Store in an airtight container
-
Keep refrigerated for up to 7 days
-
Bring to room temperature before serving for best texture and flavor