Very Creamy Baked Broccoli & Chicken (Diabetic-Friendly)

Very Creamy Baked Broccoli & Chicken (Diabetic-Friendly)

4 Ingredients • High Protein • Low Carb • Yields Well

Ingredients

2 cups cooked chicken breast, diced or shredded

2 cups fresh broccoli florets (lightly steamed)

1 cup unsweetened heavy cream or cooking cream

1 cup shredded mozzarella cheese (or low-fat cheese)

(Optional seasonings – do not count as ingredients):

Salt, black pepper, garlic powder


Instructions

Preheat oven to 180°C / 350°F.

Lightly steam broccoli until just tender (do not overcook).

In a bowl, mix chicken, broccoli, cream, and half of the cheese.

Season lightly with salt, pepper, and garlic powder if desired.

Transfer mixture to a greased baking dish.

Sprinkle remaining cheese on top.

Bake uncovered for 25–30 minutes, until bubbly and golden.

Rest 5 minutes before serving — it thickens beautifully.


Why It’s Diabetic-Friendly

Low in carbohydrates

High in protein and healthy fats

No flour, pasta, or added sugar

Keeps blood sugar stable

Serving Tips

Serve with a side salad

Great for meal prep (keeps 3–4 days refrigerated)


Can be frozen after baking

Strawberry Banana Pudding

Strawberry Banana Pudding

Ingredients

Yield: 10 servings

Pudding Base:

1 can (14 oz) sweetened condensed milk

1 ½ cups cold water

1 box (3.4 oz) instant vanilla or strawberry pudding mix

Whipped Cream:

3 cups heavy cream (must be very cold)

The Layers:

1 box (11-12 oz) Nilla Wafers

3 large bananas, sliced into rounds (firm, slightly green bananas work best)

3 cups sliced fresh strawberries

Instructions

1. Prepare the Pudding

In a large bowl, use an electric mixer on low speed to combine the sweetened condensed milk and cold water. Add the instant pudding mix and beat for 2 minutes until smooth. Cover with plastic wrap and refrigerate for at least 4 hours (or overnight) to firm up.

2. Make the Whipped Cream

In a separate chilled bowl, whip the cold heavy cream until stiff peaks form.

3. Fold the Mixture

Gently fold the whipped cream into the set pudding using a rubber spatula until no streaks remain. Be careful not to over-mix, as you want to keep the filling light and airy.

4. Assemble the Jars

Using 8-ounce mason jars, create layers in the following order:

Bottom: A few Nilla Wafers.

Fruit: A layer of banana slices and strawberry slices.

Cream: A generous dollop of the pudding mixture.

Repeat: Continue layering until the jar is full.

5. Chill & Garnish

Refrigerate the jars for 2–4 hours before serving. This allows the cookies to soften into a cake-like texture. Just before serving, top with an extra cookie and fresh fruit slices.

Crispy Parmesan Zucchini Potato Muffins

Introduction


Crispy Parmesan Zucchini Potato Muffins are a savory, oven-baked delight that combine the comforting heartiness of potatoes with the fresh lightness of zucchini. Enhanced with nutty Parmesan cheese and baked to golden perfection, these muffins are ideal as a snack, side dish, or grab-and-go breakfast. They’re easy to prepare, family-friendly, and a clever way to enjoy more vegetables without sacrificing flavor.

Ingredients & Quantities (Makes 10–12 muffins)


2 medium potatoes, peeled and grated


1 medium zucchini, grated


½ teaspoon salt (for draining vegetables)


2 large eggs

½ cup grated Parmesan cheese


⅓ cup all-purpose flour (or oat flour for a lighter option)


2 tablespoons olive oil or melted butter


1 teaspoon baking powder


½ teaspoon garlic powder


½ teaspoon black pepper

½ teaspoon dried oregano or Italian seasoning


Optional: 2 tablespoons chopped fresh parsley or chives


Instructions


1. Preheat oven to 375°F (190°C) and lightly grease a muffin tin or line with paper cups.

2. Place grated potatoes and zucchini in a bowl, sprinkle with salt, and let sit for 10 minutes.


3. Squeeze out as much moisture as possible using a clean kitchen towel.Kitchen supplies


4. In a large bowl, whisk eggs, olive oil, and seasonings.


5. Add the drained vegetables, Parmesan cheese, flour, and baking powder. Mix until well combined

6. Spoon mixture evenly into muffin cups, pressing gently.


7. Bake for 25–30 minutes, until golden brown and crispy on top.


8. Let cool for 5 minutes before removing. Serve warm.


Origin & Cultural Significance


Inspired by European vegetable fritters and savory muffins commonly found in Mediterranean and Alpine cuisines, this recipe reflects a tradition of transforming simple vegetables into satisfying baked dishes. Parmesan cheese adds an Italian influence, while the muffin format modernizes the dish for busy lifestyles

Description


These muffins are crispy on the outside and tender inside, with a rich, cheesy aroma and subtle herb notes. The zucchini keeps them moist, while the potatoes provide structure and a comforting texture. Each bite delivers a perfect balance of savory goodness and vegetable freshness

Shredded mozzarella or cheddar for extra cheesiness

Finely chopped onions or shallots

Crumbled cooked bacon or turkey bits chili flakes for a spicy kick

Swap parmesan with feta for a mediterranean twist

Tips for Success


Drain vegetables thoroughly to avoid soggy muffins


Use freshly grated Parmesan for better flavor and crispiness


Lightly spray muffin tops with oil for extra crunch


Let muffins rest briefly before removing to maintain shape

Nutritional Information (Per muffin – approx.)


Calories: 120–140 kcal


Protein: 6 g


Carbohydrates: 12 g


Fat: 6 g


Fiber: 2 g

Calcium & Vitamin A-rich


Conclusion


Crispy Parmesan Zucchini Potato Muffins are a delicious way to elevate everyday vegetables into something special. Easy to make and endlessly versatile, they fit perfectly into breakfast spreads, lunchboxes, or dinner tables.

Serve these muffins with sour cream, Greek yogurt, or a light garlic sauce. Pair them with a fresh salad or grilled chicken for a complete, balanced meal.


Embracing Healthful Indulgence


This recipe proves that comfort food can still be wholesome. By baking instead of frying and using nutrient-rich vegetables, these muffins allow you to indulge mindfully—enjoying rich flavor, satisfying texture, and nourishing ingredients all in one bite


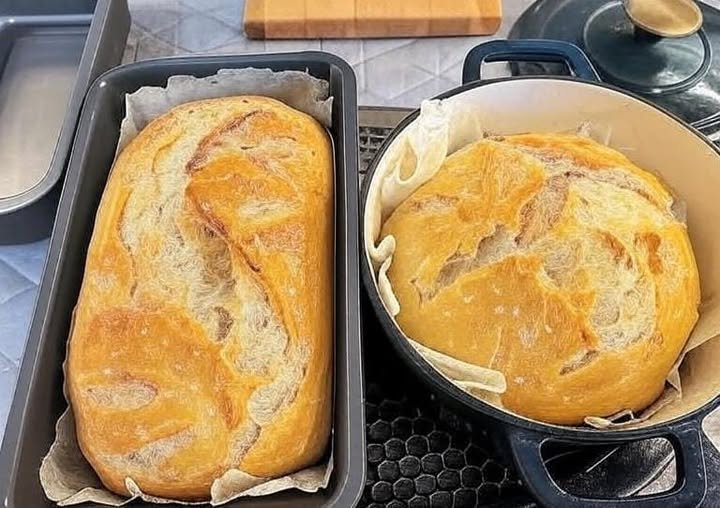
Unloaf Sourdough Bread: Rustic, Crusty, and Naturally Fermented

Sourdough baking doesn’t always have to be complicated. This Unloaf Sourdough Bread is a beginner-friendly, no-fuss recipe that skips the usual stretch-and-fold techniques but still delivers a beautiful, naturally leavened loaf with a satisfying crust and open crumb. Whether you’re new to sourdough or just want a simpler routine, this recipe is for you.

Made with just a handful of ingredients and no commercial yeast, this unloafed version keeps things rustic and straightforward. The dough is mixed and left to rise undisturbed—no kneading, no stretching, no folding. It’s proof that good bread doesn’t need to be high maintenance.

Perfect for everyday use, this sourdough loaf pairs well with soups, sandwiches, or simply toasted with butter. Its tangy flavor and airy structure make it a staple worth mastering.

🕒 Cooking Time and Serving

  • Prep Time: 15 minutes
  • Bulk Fermentation: 8–12 hours
  • Proofing Time: 1–2 hours
  • Bake Time: 45–50 minutes
  • Total Time: ~14–16 hours (mostly hands-off)
  • Servings: 1 large loaf (8–10 slices)

🧂 Ingredients

  • 500g bread flour (or a mix of 400g bread flour + 100g whole wheat flour)
  • 375g water (room temperature)
  • 100g active sourdough starter (fed and bubbly)
  • 10g salt

👨‍🍳 How to Make Unloaf Sourdough Bread

No stretch and folds, no fuss — just mix, rest, and bake.

1. Mix the Dough

In a large mixing bowl, combine:

  • 500g flour
  • 375g water
    Mix until no dry bits remain. It will be a shaggy dough. Cover and rest for 1 hour (this rest is called autolyse).

2. Add Starter and Salt

Add:

  • 100g active sourdough starter
  • 10g salt
    Mix thoroughly using your hands or a dough whisk until fully incorporated. The dough will be sticky and wet — that’s okay.

3. Bulk Fermentation (No Stretching!)

Cover the bowl with a damp towel or plastic wrap. Let it rise at room temperature for 8–12 hours, depending on room temperature. It should double in size and look bubbly on top.

4. Shape the Dough

Lightly flour a surface. Gently turn the dough out. Shape it into a rough round or oval using a bench scraper. Avoid deflating it too much.

Transfer the shaped dough to a proofing basket or bowl lined with a well-floured kitchen towel. Cover and proof for 1–2 hours at room temperature, or refrigerate overnight (8–12 hours) for extra flavor.

5. Bake the Bread

Preheat your oven to 450°F (230°C) with a Dutch oven inside.

Once hot, remove the Dutch oven, gently turn the dough onto parchment paper, score the top with a sharp blade, and transfer it into the pot. Cover with lid.

  • Bake covered for 25 minutes, then uncover and bake for 20–25 minutes more, until deep golden brown.

Let the bread cool for at least 1 hour before slicing.

📝 Notes

  • For a slightly lighter crumb, use all bread flour.
  • Your starter should be at peak activity: bubbly, doubling in size within 4–6 hours after feeding.
  • If your dough feels too wet to shape, lightly flour your hands and surface but avoid overdoing it.
  • No Dutch oven? Bake on a preheated baking sheet with a tray of hot water in the oven for steam.

❓FAQs

Q: Can I use all-purpose flour instead of bread flour?

Yes, but bread flour gives a chewier texture and better rise. All-purpose flour will result in a slightly denser loaf.

Q: Can I refrigerate the dough before baking?

Yes! After shaping, refrigerate the dough for up to 12 hours. Bake straight from the fridge.

Q: Why is there no kneading or folding?

This recipe relies on time and natural fermentation to develop gluten. It’s slower but still effective and beginner-friendly.

Q: My dough didn’t rise much. What went wrong?

Check your starter’s activity level. An underactive starter is usually the cause of poor fermentation.

🔢 Nutrition Information

Per Loaf (Whole Recipe)

Nutrient Amount
Calories ~1600 kcal
Carbohydrates ~320g
Protein ~50g
Fat ~5g
Fiber ~12g
Sodium ~2000mg

Per Slice (1/10 loaf)

Nutrient Amount
Calories ~160 kcal
Carbohydrates ~32g
Protein ~5g
Fat ~0.5g
Fiber ~1.2g
Sodium ~200mg

Values are approximate and vary based on ingredients and portion size.

⚠️ Disclaimer

Sourdough bread, while delicious and nutritious, should be enjoyed in moderation as part of a balanced diet. This recipe contains gluten and may not be suitable for those with celiac disease or gluten sensitivities. Always check with a healthcare professional if you have dietary restrictions or food allergies.

Dark Chocolate–Covered Blueberries (Sugar-Free & WW-Friendly)

Dark Chocolate Covered Blueberries

Simple, elegant, and perfectly portioned for a healthy lifestyle.

  • Prep time: 10 mins

  • Chill time: 20–30 mins

  • Yield: 1 cup (approx. 4 servings)

  • WW Points: 2–3 per serving (using sugar-free chocolate)

Ingredients

  • 1 cup Fresh blueberries (firm and ripe)

  • ½ cup Sugar-free dark chocolate (chopped or chips)

  • 1 tbsp Coconut oil (helps with shine and smooth coating)

  • Optional: A pinch of flaky sea salt for topping


Instructions

  1. Prep the Berries: Wash the blueberries thoroughly. Crucial Step: Pat them dry with paper towels and let them air-dry for another 10 minutes. If they are even slightly damp, the chocolate will “seize” and clump up.

  2. Melt the Chocolate: Create a double boiler by placing a heat-safe glass bowl over a pot of simmering water (ensure the bottom of the bowl doesn’t touch the water). Add the chocolate and coconut oil. Stir frequently until smooth and glossy.

  3. Coat: Drop the blueberries into the melted chocolate. Use a spoon to gently fold them until every berry is completely submerged.

  4. The Fork Lift: Using a fork, lift the berries out one or two at a time. Tap the fork against the side of the bowl to let excess chocolate drip through the tines.

  5. Set: Place the berries on a tray lined with parchment paper or a silicone mat. Ensure they aren’t touching so they don’t freeze into one giant clump.

    • Optional: Sprinkle a tiny bit of sea salt or crushed nuts over them now while the chocolate is wet.

  6. Chill: Refrigerate for 20–30 minutes until the shells are hard and matte.


Success Tips & Storage

  • The “Anti-Clump” Method: If you want individual berries, take the time to separate them on the parchment. If you’re in a hurry, you can drop small clusters (3–4 berries) together to make “blueberry clusters.”

  • Chocolate Choice: For the lowest WW points, use a stevia-sweetened brand like Lily’s.

  • Storage: Keep these in an airtight container in the refrigerator for up to 5 days. Do not store them at room temperature, as the coconut oil makes the chocolate melt faster than standard store-bought candy.


Quick Nutrition (Per Serving)

  • Calories: ~110

  • Net Carbs: ~5g

  • Fiber: 2g

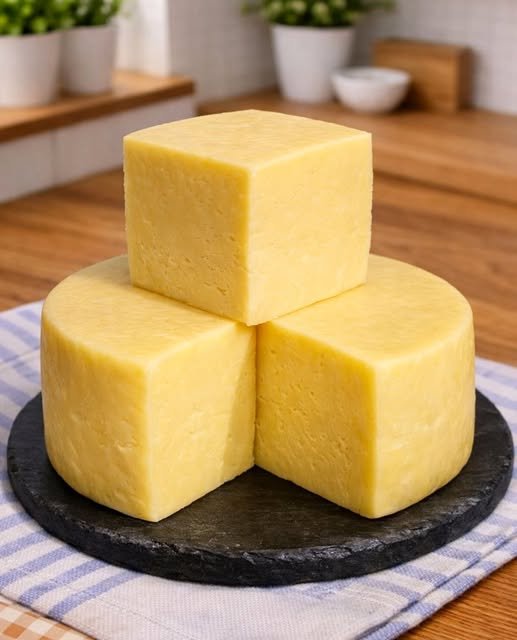
Luscious Homemade 4-Ingredient Cheese

This homemade vinegar cheese is a total game-changer. It’s essentially a cross between a creamy Ricotta and a soft Farmer’s Cheese, made decadent with that final addition of butter.

Per your request, here is the full, formatted recipe based on the guide you shared.


Luscious Homemade 4-Ingredient Cheese

Fresh, creamy, and ready in under 2 hours.

  • Prep time: 5 minutes

  • Cook/Wait time: 1.5 – 2 hours

  • Yield: Approx. 1 cup of fresh cheese

Ingredients

  • 1.5 Liters (6 1/3 cups) Whole Milk (Do not use UHT/Ultra-Pasteurized)

  • 2 tbsp (30 ml) Apple Cider Vinegar

  • 50g (1/4 cup) Unsalted Butter, melted

  • Salt, to taste


Instructions

  1. Heat the Milk: Pour the milk into a large, heavy-bottomed pot. Heat over medium, stirring occasionally to ensure the bottom doesn’t scorch. Bring it to a gentle simmer—do not let it reach a rolling boil.

  2. The “Magic” Split: Once simmering, remove the pot from the heat. Slowly pour in the apple cider vinegar and give it one gentle stir. Let it sit undisturbed for 5 minutes. You will see the cloudy yellow whey separate from the white curds.

  3. Strain: Line a colander with two layers of cheesecloth and place it over a large bowl (to catch the whey). Gently pour the mixture into the cloth.

  4. Drain and Hang: Gather the corners of the cheesecloth and tie them into a pouch. Hang the pouch over your sink or a bowl (you can tie it to a wooden spoon balanced over a deep pot).

    • For Spreadable Cheese: Drain for 30–60 minutes.

    • For Firmer Cheese: Drain for 1.5–2 hours.

  5. Enrich and Season: Transfer the drained curds to a mixing bowl. Pour in the melted butter and add your salt. Mix vigorously with a spoon until the cheese becomes creamy and uniform.

  6. Store: Use immediately while slightly warm, or transfer to an airtight container. It will firm up slightly more once chilled in the refrigerator.


The “Don’t Toss the Whey” Guide

You’ll be left with about a liter of yellowish liquid (whey). Here is how to use it:

  • Smoothie Boost: Use it as the liquid base for fruit smoothies for extra protein.

  • Superior Bread: Use it in place of water in pizza dough or bread recipes; the acidity makes the crumb extra tender.

  • Soups: Use it as a base for creamy vegetable soups.

  • Garden: Dilute it with water and use it to water acid-loving plants like tomatoes.