Easy & Healthy Oatmeal Apple Loaf

Easy & Healthy Oatmeal Apple Loaf

No Refined Sugar • No White Flour • Naturally Sweetened

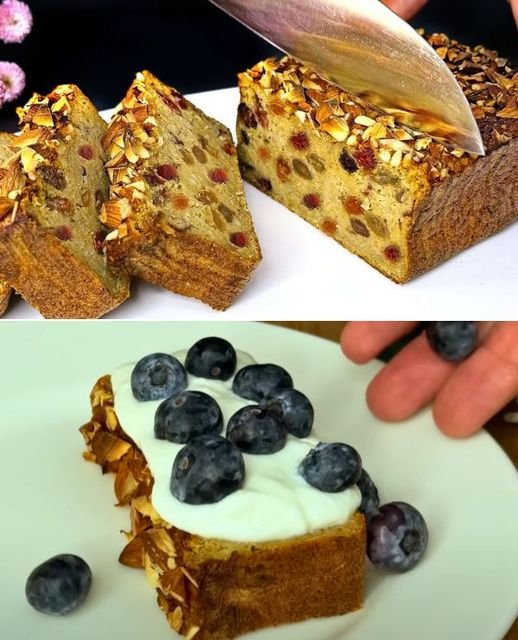
This wholesome oatmeal apple loaf is soft, moist, and naturally sweet from fruits alone. It’s perfect for breakfast, tea time, or a healthy snack. Packed with oats, apples, bananas, dried fruits, and nuts, it’s both nourishing and satisfying.


🥧 Ingredients

  • 1 cup fine rolled oats (or oat flour)

  • 3 medium apples, peeled and grated or finely chopped

  • ½ cup water

  • 1 ripe banana, mashed

  • 3.5 oz (100 g) dried blueberries

  • 3.5 oz (100 g) raisins

  • 2 large eggs

  • 1 teaspoon baking powder

  • 1 teaspoon cinnamon powder (optional, for warmth and flavor)

  • ½ cup mixed nuts, chopped (almonds, walnuts, or your choice)


🥣 Instructions

  1. Prepare the Oats
    If using rolled oats, blend them into a fine flour using a blender or food processor. Set aside.

  2. Cook the Apples
    Add the grated apples and water to a saucepan. Cook on medium heat for 5–7 minutes until soft and slightly thick. Remove from heat and let cool slightly.

  3. Mix Wet Ingredients
    In a large bowl, mash the banana. Add the eggs and whisk well. Stir in the cooked apples.

  4. Combine Dry Ingredients
    Add oat flour, baking powder, cinnamon, dried blueberries, raisins, and chopped nuts to the wet mixture. Mix until fully combined.

  5. Prepare for Baking
    Line or lightly grease a loaf pan. Pour in the batter and smooth the top. Sprinkle extra nuts on top if desired.

  6. Bake
    Bake in a preheated oven at 180°C (350°F) for 40–45 minutes, or until a toothpick inserted in the center comes out clean.

  7. Cool & Serve
    Let the loaf cool in the pan for 10 minutes, then transfer to a wire rack. Slice and enjoy!


🍽 Serving Suggestions

  • Serve warm with yogurt and fresh blueberries

  • Enjoy plain with tea or coffee

  • Store in the refrigerator for up to 5 days

Air Fryer Poached Eggs

Air Fryer Poached Eggs

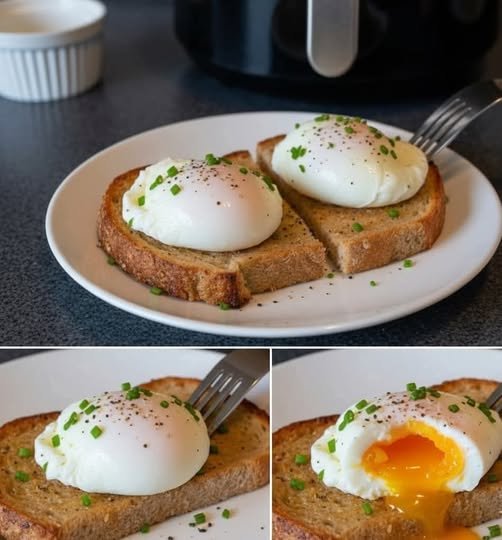
These “poached” eggs are technically steamed in the air fryer, resulting in a tender white and a perfectly runny yolk. It is a hands-off, mess-free alternative to the stovetop.

  • Prep time: 2 minutes

  • Cook time: 5–7 minutes

  • Total time: Under 10 minutes

Equipment

  • Air Fryer

  • Heat-proof ramekins or small ceramic bowls

Ingredients

  • Eggs: Large, fresh eggs (as many as your basket can fit)

  • Water: 3 tbsp hot water per ramekin

  • Oil Spray: Optional (non-stick spray or olive oil)

  • Seasoning: Salt and black pepper to taste

Instructions

  1. Preheat: Set your air fryer to 340°F (170°C) and let it preheat for about 3 minutes.

  2. Prep Ramekins: Lightly spray the inside of each ramekin with oil to prevent sticking. Add 3 tablespoons of hot water into each ramekin.

  3. Add Eggs: Carefully crack one egg into each ramekin, being careful not to break the yolk.

  4. Air Fry: Place the ramekins into the air fryer basket. Cook at 340°F (170°C) according to your preferred doneness:

    • 5 Minutes: Very runny yolk and soft whites.

    • 6 Minutes: Classic poached (jammy yolk, set whites).

    • 7 Minutes: Firm yolk and fully set whites.

  5. Serve: Using oven mitts, carefully remove the hot ramekins. Use a slotted spoon to lift the egg out of the water. Drain on a paper towel for a second if desired, then serve immediately

Simple 10-Minute Prep Apple Sponge Cake

Simple 10-Minute Prep Apple Sponge Cake

This recipe is prized for its “high rise” and the way the sugar creates a slightly crunchy meringue-like top.

Ingredients

  • Apples: 3–4 large (Tart varieties like Granny Smith or Honeycrisp work best)

  • Eggs: 3 large

  • Sugar: 200 g

  • Butter: 120 g (melted and slightly cooled)

  • All-Purpose Flour: 200 g

  • Baking Powder: 1 tsp

  • Vanilla Extract: 1 tsp

  • Cinnamon: 1 tsp (optional, for tossing with apples)

  • Pinch of salt


Instructions

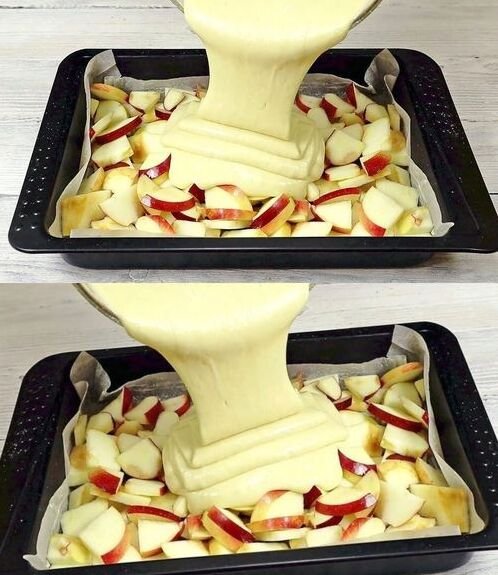
  1. Prepare the Oven and Pan: Preheat your oven to 180°C (350°F). Line a baking pan (approx. 9×9 inch or similar) with parchment paper, just like in your photo.

  2. Prepare the Apples: Core and slice the apples into bite-sized chunks or thin wedges. Spread them evenly across the bottom of the lined baking pan. If you like extra flavor, toss them with a little cinnamon beforehand.

  3. Mix the Batter:

    • In a large bowl, beat the eggs and sugar together with a mixer for about 3–5 minutes until the mixture is pale, thick, and has doubled in volume. This is the secret to the “husband-approved” fluffiness!

    • Slowly pour in the melted butter and vanilla, whisking gently.

    • Sift in the flour, baking powder, and salt. Fold gently with a spatula until just combined so you don’t deflate the eggs.

  4. Bake: Pour the batter over the apples (as shown in your image), ensuring it seeps down into the gaps. Bake for 30–40 minutes, or until a toothpick inserted into the center comes out clean and the top is golden brown.

  5. Serve: Let it cool for at least 10 minutes before slicing. It is excellent served warm with a scoop of vanilla ice cream.

The Ginger Bug

The Ginger Bug

This acts like a sourdough starter, capturing wild yeast from the ginger skin.

Ingredients

  • 2 cups filtered or spring water (chlorine-free)

  • 1 inch fresh organic ginger, grated or finely chopped (keep skin on for more natural yeast)

  • 2 tbsp granulated sugar

Instructions

  1. Day 1: Mix the water, sugar, and ginger in a glass jar. Stir until sugar is dissolved. Cover with cheesecloth and a rubber band to let it breathe while keeping out dust.

  2. Days 2–5 (Feeding): Every 24 hours, add 1 tbsp of fresh ginger and 1 tbsp of sugar. Stir well.

  3. Check for Readiness: Around day 3 to 7, you should see small bubbles forming at the top and hear a light fizz when you stir it. It should smell yeasty and slightly sweet.


Part 2: Brewing the Ginger Beer

Once your bug is active, you can make the final beverage.

Ingredients

  • 1/2 cup strained ginger bug liquid

  • 2 liters (approx. 8 cups) filtered water

  • 150 g (3/4 cup) brown or cane sugar

  • 100 g (4-inch piece) fresh ginger, grated

  • Juice of 2–3 lemons

Instructions

  1. Make the Ginger Tea: Bring 500 ml of water, the 100 g of grated ginger, and the sugar to a boil in a pot. Simmer for 10–20 minutes to extract the spice.

  2. Cool Completely: Remove from heat and stir in the remaining 1.5 liters of cold water. Crucial: You must let this mixture reach room temperature before adding the bug, or the heat will kill your wild yeast.

  3. Combine: Strain the ginger solids out of your tea. Add the lemon juice and the 1/2 cup of strained liquid from your ginger bug.

  4. Bottle: Pour the mixture into clean flip-top (Grolsch-style) bottles, leaving at least 2 inches of headspace at the top.

  5. Secondary Fermentation: Leave bottles at room temperature in a dark place for 2 to 5 days.

    • Tip: Gently squeeze plastic bottles or briefly “burp” a glass bottle daily to check carbonation levels and prevent too much pressure from building up.

  6. Chill: Once it is as fizzy as you like, move it to the refrigerator. This slows down the fermentation and makes it ready to serve.

Hobo Hash Brown Casserole

Hobo Hash Brown Casserole

There’s nothing quite like the warm embrace of comfort food on a chilly day, and my Hobo Hash Brown Casserole has become the go-to dish for family gatherings, cozy breakfasts, and hearty dinners. This recipe is not just another hash brown casserole recipe—it’s a celebration of crispy potatoes, melty cheese, and a medley of savory spices that transport you straight to the heart of homestyle cooking.


I still remember that brisk autumn morning when I stumbled upon the idea of creating a dish that could compete with the classics. As I sipped my coffee and flipped through a vintage cookbook, I recalled tales of how hobos, on their long travels, would whip up simple yet incredibly satisfying meals with whatever ingredients they had on hand. That day, inspiration struck, and I decided to craft my own version of a hobo hash brown casserole.

In my kitchen, where the aroma of sizzling onions and fresh herbs always mingles with memories of family recipes passed down through generations, I began experimenting. The result? A dish that’s both rustic and refined—a true comfort food casserole that has quickly climbed the ranks as one of the best casserole recipes in my collection. Whether you’re searching for an easy dinner recipe or a show-stopping side dish for your next holiday meal, this savory hash brown casserole is bound to impress.


What makes this comfort food casserole so irresistible is not just its delightful flavor, but also the story behind it. Imagine a time when cooks had to be inventive—using every resource at hand to create a meal that could lift spirits during hard times. That spirit of creativity is alive in every bite of this casserole. The rich, velvety layers of creamy sour cream and melted cheddar merge with the crispy, golden edges of perfectly cooked hash browns to evoke a sense of nostalgia and warmth. It’s a recipe that’s as versatile as it is satisfying, perfect for any meal of the day—be it a cozy breakfast to start your day off right or a hearty dinner to gather around with loved ones.

This dish is a celebration of homestyle cooking at its best. It invites you to step back from the hustle and bustle of modern life and appreciate the art of simple, soulful cooking. Whether you’re a seasoned chef or just starting out in the kitchen, the Hobo Hash Brown Casserole is an accessible yet impressive recipe that promises to become a new favorite. With every layer of flavor, you’ll experience the essence of comfort food that transforms a simple mix of ingredients into a timeless classic.


WHY YOU’LL LOVE THIS HOBO HASH BROWN CASSEROLE

Crispy Meets Cheesy: Enjoy the irresistible crunch of perfectly browned hash browns paired with melty, gooey cheese in every bite.

Comfort Food Elevated: This dish takes your classic comfort food up a notch with a blend of savory spices and textures that feel like a warm hug.

Versatile Vibes: Whether it’s brunch, dinner, or a hearty side at your next potluck, it’s a dish that adapts to any meal.

Easy-Peasy Preparation: A simple, fuss-free recipe that delivers big on flavor, making it ideal for busy weeknights.

Leftover Magic: Prepare a big batch and enjoy even more of its deliciousness the next day—because some dishes are just too good not to repeat!

INGREDIENTS FOR HOBO HASH BROWN CASSEROLE

Frozen Hash Browns – Thawed to ensure even cooking and a crispy texture.

Ground Sausage – Use your favorite variety (pork, turkey, or chicken) for rich, savory flavor.

Onion – Finely chopped to blend well and add depth to the dish.

Red Bell Pepper – Diced for a pop of color and natural sweetness.

Shredded Cheddar Cheese – Adds creamy, melty goodness. Sharp cheddar enhances flavor best.

Eggs – The binding ingredient that gives the casserole its classic breakfast texture.

Milk – Helps create a fluffy egg mixture. Whole milk works best, but any variety can be used.

Salt & Pepper – Season to taste for perfect balance.

Fresh Parsley (Optional) – A fresh garnish for a hint of color and brightness.

HOW TO MAKE THIS HOBO HASH BROWN CASSEROLE

Step 1: Preheat the oven to 375°F (190°C) to ensure even baking.

Step 2: In a large skillet over medium heat, cook the sausage until fully browned and no longer pink. Break it up as it cooks.

Step 3: Add the chopped onion and diced red bell pepper to the skillet. Sauté for about 5 minutes until the vegetables are soft and fragrant.

Step 4: In a large mixing bowl, whisk together eggs, milk, salt, and pepper until smooth and well combined.

Step 5: Grease a 9×13-inch baking dish and evenly spread the thawed hash browns in the bottom.

Step 6: Layer the cooked sausage and sautéed vegetables over the hash browns.

Step 7: Sprinkle half of the shredded cheddar cheese over the sausage mixture for extra cheesiness.

Step 8: Pour the egg mixture evenly over the entire casserole to bind everything together.

Step 9: Top with the remaining shredded cheddar cheese for a golden, bubbly crust.

Step 10: Bake in the preheated oven for 35-40 minutes or until the eggs are fully set, and the cheese is melted and golden.

Step 11: Let the casserole cool for a few minutes before slicing. If desired, garnish with chopped fresh parsley for a finishing touch.

Step 12: Serve warm and enjoy a delicious, hearty breakfast casserole!

STORAGE OPTIONS

In the Refrigerator

Once your casserole has cooled to room temperature (pro tip: let it rest for about 20–30 minutes to avoid condensation), transfer it to an airtight container or cover your baking dish tightly with plastic wrap. Pop it into your refrigerator and enjoy it within 3 to 4 days. This method keeps all those scrumptious layers intact and ensures every bite tastes as comforting as the first. When reheating, consider warming it in the oven at 350°F for about 15–20 minutes to restore that crispy top!
Banana and Cookie Dessert

Banana and Cookie Dessert

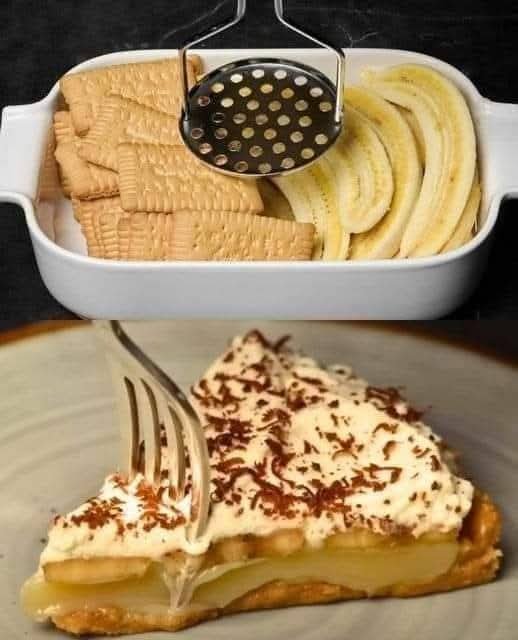
This Banana and Cookie Dessert recipe is a perfect example of a simple yet indulgent treat that you can whip up quickly. The combination of crunchy cookies, sweet bananas, and creamy filling makes it irresistible.

Ingredients:

2 bananas

120g (about 1 cup) of cookies

35g (2.5 tablespoons) of butter

75g (1/3 cup) whipped cream

200g (about 3/4 cup) sweetened condensed milk

35g (2.5 tablespoons) of sugar

Fine sugar (for whipping the cream)

Chocolate flakes (for topping)

Directions:

Crush the Cookies:

Place cookies in a plastic bag and crush into fine crumbs using a rolling pin.

Prepare the Base:

In a mixing bowl, mash 1 banana.

Combine the mashed banana with the crushed cookies until well mixed.

Press the mixture into a round cake pan to form an even base.

Make the Creamy Filling:

In a saucepan, melt the butter and sugar over medium heat.

Add the sweetened condensed milk, stirring well.

Cook for about 5 minutes, stirring continuously until it thickens slightly.

Assemble the Dessert:

Pour the creamy filling over the cookie and banana base.

Slice the remaining banana and arrange the slices on top of the filling.

Decorate with Whipped Cream and Chocolate Flakes:

In a separate bowl, whip the cream with a teaspoon of fine sugar until stiff peaks form.

Spread the whipped cream over the dessert.

Sprinkle with chocolate flakes.

Serve:

Refrigerate for at least 30 minutes before serving to allow it to set.

Why It Stands Out:


Quick Prep: Only 10 minutes to prepare, no baking needed.

Versatile: You can customize the base and toppings with different cookies, fruits, or flavors.

Accessible Ingredients: Uses common pantry items like bananas, cookies, and condensed milk.

Satisfying Texture: The crunch of the cookies contrasts beautifully with the creaminess of the filling and the softness of the bananas.

Serving Suggestions:

Chilled for Best Results: Refrigerating it allows the flavors to meld together and the dessert to set perfectly.

Pairing: It pairs wonderfully with coffee or tea, making it a great afternoon treat or a simple dessert for entertaining guests.

Cooking Tips:


Firm Base: If you prefer a firmer base, refrigerate the cookie mixture before adding the filling.

Ripe Bananas: Use ripe bananas for the best flavor and a naturally sweet base.

Nutritional Benefits:


Bananas add potassium and fiber, balancing the dessert’s rich, sweet flavors.

Whipped cream contributes calcium and vitamin D, although it’s best enjoyed in moderation due to the dessert’s sugar content.

Dietary Info:

The recipe includes dairy and gluten, so it may not be suitable for those with allergies or dietary restrictions. However, it can easily be adapted for vegetarian and even vegan diets by substituting certain ingredients.

Storage Tips:


Store in the fridge for up to 3 days, or freeze for longer storage. Remember to cover it well to prevent it from absorbing fridge odors.

FAQ Highlights:


Custom Cookies: Use your favorite cookies—anything from graham crackers to chocolate biscuits.

Cream Alternatives: Substitute with non-dairy whipped topping or Greek yogurt.

Prevent Browning: Use lemon juice on banana slices to keep them fresh and vibrant.

This Banana and Cookie Dessert is a delightful mix of flavors and textures that’s sure to impress with minimal effort. Whether you’re looking for a quick treat for yourself or something to share, this recipe is a go-to option for any occasion. Enjoy your slice of indulgence!