Air Fryer Stuffed Sweet Potato

Air Fryer Stuffed Sweet Potato

Air Fryer Loaded Stuffed Sweet Potato with Black Beans & Feta is a delicious, colorful meal packed with bold flavors and satisfying ingredients. Sweet potatoes become tender on the inside with lightly crisp skins, while black beans, creamy feta cheese, and fresh toppings create a filling combination in every bite.

This easy recipe is perfect for busy weeknight dinners, healthy lunches, or meatless meal days. The air fryer cooks sweet potatoes faster than a traditional oven, making it a convenient choice when you want a homemade meal without spending hours in the kitchen.

The filling combines seasoned black beans, crumbled feta, fresh tomatoes, red onion, and a squeeze of lime juice. Each ingredient adds a different texture and flavor, from the creamy saltiness of feta to the fresh, zesty taste of lime.

You can also customize the toppings with avocado, fresh cilantro, jalapeños, or your favorite vegetables. Whether you serve these stuffed sweet potatoes as a main dish or a hearty side, they are easy to prepare and simple to enjoy.

Why You’ll Love This Recipe

  • Easy preparation: Simple ingredients and straightforward steps make this recipe beginner-friendly.
  • Quick cooking: The air fryer helps cook sweet potatoes without heating up your entire kitchen.
  • Plant-based protein: Black beans provide plant-based protein and fiber.
  • Naturally flavorful: Sweet potatoes, feta, beans, and lime create a delicious balance of flavors.
  • Easy to customize: Add avocado, corn, salsa, or fresh herbs to change the toppings.
  • Great for meal prep: Prepare the potatoes and filling ahead of time for convenient meals.
  • Naturally gluten-free: The basic ingredients are gluten-free, but check packaged seasonings and toppings for cross-contact or added ingredients.

Ingredients for Air Fryer Loaded Stuffed Sweet Potato

You only need a few everyday ingredients to prepare these loaded sweet potatoes. Choose fresh vegetables and good-quality feta for the best flavor.

Main Ingredients

1. Sweet Potatoes

Choose 2 medium-sized sweet potatoes of similar size. They provide a naturally sweet, soft center and hold the toppings well after cooking.

2. Black Beans

Use 1 cup of cooked black beans or canned black beans that have been rinsed and drained. They add a hearty texture and make the filling more satisfying.

3. Feta Cheese

Use ½ cup of crumbled feta cheese. Its salty, tangy flavor balances the natural sweetness of the potatoes.

4. Olive Oil

Use 1 tablespoon of olive oil to coat the sweet potato skins. It helps the outside develop a lightly crisp texture.

5. Cherry Tomatoes

Add ½ cup of chopped cherry tomatoes for freshness, color, and juicy flavor.

6. Red Onion

Use ¼ cup of finely chopped red onion. It adds a mild sharpness that works well with the creamy feta.

7. Fresh Cilantro

Add 2 tablespoons of chopped cilantro for a fresh, herbal finish.

8. Lime Juice

Use 1 tablespoon of fresh lime juice to brighten the bean filling and balance the other ingredients.

Seasonings

  • ½ teaspoon garlic powder
  • ½ teaspoon smoked paprika
  • ¼ teaspoon ground cumin
  • ¼ teaspoon salt, or to taste
  • ⅛ teaspoon black pepper

Optional Toppings

  • ½ ripe avocado, diced
  • 1 small jalapeño, thinly sliced
  • 2 tablespoons plain Greek yogurt
  • Extra crumbled feta
  • Fresh cilantro leaves
  • Lime wedges

Step-by-Step Instructions

Follow these simple steps to make perfectly cooked sweet potatoes with a flavorful black bean and feta filling.

Prepare the Sweet Potatoes

  • Wash the sweet potatoes thoroughly under running water.
  • Scrub away any dirt from the skins.
  • Pat them completely dry with a clean kitchen towel.
  • Trim any damaged areas if needed.
  • Pierce each potato 5–6 times with a fork to allow steam to escape.
  • Rub the skins with olive oil.
  • Sprinkle lightly with salt and black pepper.

Preheat the Air Fryer

  • Preheat your air fryer to 380°F for approximately 3 minutes.
  • Check that the air fryer basket is clean and dry.
  • Arrange the sweet potatoes in a single layer.
  • Leave enough space between them for hot air to circulate.

Air Fry the Sweet Potatoes

  • Place the prepared potatoes in the air fryer basket.
  • Cook at 380°F for approximately 35–45 minutes.
  • Turn the potatoes halfway through cooking.
  • Check their tenderness by inserting a fork or small knife into the thickest part.
  • Continue cooking in 5-minute intervals if the centers are still firm.
  • Remove the potatoes once the flesh is soft and easily pierced.

Cooking time depends on the size and thickness of your sweet potatoes. Larger potatoes may need additional time.

 Prepare the Black Bean Filling

While the potatoes cook, prepare the filling.

  • Add the rinsed and drained black beans to a medium mixing bowl.
  • Add smoked paprika, garlic powder, ground cumin, salt, and black pepper.
  • Pour in the fresh lime juice.
  • Add the chopped red onion and cherry tomatoes.
  • Add the chopped cilantro.
  • Gently mix until the ingredients are evenly combined.
  • Taste the mixture and adjust the seasoning if needed.

Avoid mashing the beans completely because keeping them whole gives the filling a better texture.

Prepare the Sweet Potatoes for Stuffing

  • Carefully remove the cooked potatoes from the air fryer.
  • Allow them to cool for 3–5 minutes.
  • Place each potato on a serving plate or cutting board.
  • Slice lengthwise down the center without cutting all the way through.
  • Gently press both ends to open the potato.
  • Use a fork to fluff the soft flesh inside.
  • Keep the potato skins intact so they can hold the filling.

 Add the Black Bean Mixture

  • Spoon the seasoned black bean mixture into each potato.
  • Divide the filling evenly between the two potatoes.
  • Spread the beans and vegetables over the fluffy sweet potato flesh.
  • Avoid pressing the filling too firmly.
  • Add a little extra filling on top if desired.

Add Feta Cheese and Toppings

  • Sprinkle crumbled feta cheese generously over the filling.
  • Add diced avocado if using.
  • Sprinkle fresh cilantro over the top.
  • Add sliced jalapeños for extra heat.
  • Finish with a little fresh lime juice.
  • Add a spoonful of Greek yogurt for a creamy topping if desired.

Serve and Enjoy

  • Serve the stuffed sweet potatoes while warm.
  • Add extra lime wedges on the side.
  • Sprinkle additional feta over the top if desired.
  • Serve immediately for the best texture and flavor.

Your air fryer stuffed sweet potatoes are ready to enjoy!

Best Tips for Perfect Stuffed Sweet Potatoes

A few simple techniques can make a big difference in the final result.

1. Choose Similar-Sized Potatoes

Use sweet potatoes with similar thickness so they cook at roughly the same rate. Very large potatoes may require more cooking time.

2. Dry the Potato Skins

After washing, dry the potatoes thoroughly before adding olive oil. Dry skins help develop a better exterior texture.

3. Do Not Skip Fork Punctures

Piercing the potatoes allows steam to escape during cooking. This helps prevent pressure from building inside the skins.

4. Drain the Black Beans

Excess liquid from canned beans can make the filling watery. Rinse and drain them before mixing with the seasonings.

5. Add Feta at the End

Sprinkle feta over the filling just before serving. This keeps its crumbly texture and fresh flavor.

6. Adjust the Seasoning

Taste the black bean mixture before stuffing the potatoes. Add extra lime, cumin, or black pepper to suit your preference.

7. Avoid Overcrowding

Keep the potatoes in a single layer in the air fryer basket. Proper airflow helps them cook evenly.

Variations and Substitutions

This recipe is easy to customize with ingredients you already have in your kitchen.

1. Black Bean and Corn Stuffed Sweet Potatoes

Add ½ cup of cooked sweet corn to the black bean mixture. Corn adds a pleasant sweetness and a slightly crunchy texture.

2. Mexican-Style Stuffed Sweet Potatoes

Add taco seasoning, diced avocado, salsa, and fresh jalapeños. Finish with lime juice for a bold Mexican-inspired flavor.

3. Mediterranean Stuffed Sweet Potatoes

Add chopped cucumber, Kalamata olives, red onion, parsley, and feta cheese. This combination creates a fresh Mediterranean-style filling.

4. Spicy Black Bean Sweet Potatoes

Mix in chili powder, cayenne pepper, or chopped jalapeños. Adjust the amount depending on how spicy you like your food.

5. Creamy Avocado Stuffed Sweet Potatoes

Top each potato with mashed avocado and a spoonful of plain Greek yogurt. Add lime juice and black pepper for extra flavor.

6. Extra Protein Version

Add cooked shredded chicken or extra black beans to make the filling more substantial. Season the chicken with cumin, garlic, and paprika before adding it.

What to Serve with Loaded Stuffed Sweet Potatoes

These stuffed potatoes can work as a complete meal, but simple sides make them even more satisfying.

  • Fresh green salad: Serve with lettuce, cucumber, tomatoes, and a light lemon dressing.
  • Grilled vegetables: Zucchini, bell peppers, and asparagus complement the sweet potato filling.
  • Avocado salad: Fresh avocado with lime and cilantro adds a creamy, refreshing side.
  • Brown rice: A small serving of brown rice makes the meal more filling.
  • Homemade salsa: Fresh tomato salsa adds extra flavor without making the meal heavy.
  • Greek yogurt dip: A simple yogurt dip with garlic and lemon works well with the seasoned beans.

How to Store Leftover Stuffed Sweet Potatoes

Proper storage helps maintain the flavor and quality of your leftovers.

Refrigerator Storage

  • Allow the cooked potatoes to cool completely.
  • Store them in an airtight food storage container.
  • Refrigerate for up to 3–4 days.
  • Keep fresh toppings such as avocado and cilantro separate.
  • Store leftover black bean filling in a separate airtight container when possible.

Freezer Storage

  • Allow the cooked sweet potatoes to cool completely.
  • Remove fresh toppings and store them separately.
  • Wrap each potato individually or place them in a freezer-safe container.
  • Freeze for up to 2–3 months for best quality.
  • Thaw overnight in the refrigerator before reheating.

For the best texture, add fresh feta, tomatoes, avocado, and cilantro after reheating.

How to Reheat Stuffed Sweet Potatoes

The air fryer is a convenient way to reheat leftover sweet potatoes without making the skins too soft.

Reheating in the Air Fryer

  • Preheat the air fryer to 350°F.
  • Place refrigerated stuffed potatoes in the basket.
  • Heat for approximately 5–8 minutes.
  • Check that the center is heated through.
  • Add fresh toppings after reheating.

Reheating in the Microwave

  • Place the potato on a microwave-safe plate.
  • Cover loosely with a microwave-safe cover.
  • Heat for 1–2 minutes.
  • Continue in short intervals until heated through.
  • Add fresh feta, avocado, and cilantro before serving.

Always reheat leftovers to an internal temperature of 165°F.

Common Mistakes to Avoid

Avoid these mistakes to get better results from your air fryer recipe.

  • Using very large potatoes: Extra-large potatoes need more cooking time and may cook unevenly.
  • Not drying the potatoes: Wet skins may not become as crisp.
  • Adding wet beans: Undrained beans can make the filling watery.
  • Overloading the potatoes: Too much filling can make them difficult to serve.
  • Adding feta too early: Fresh feta tastes best when added after the potatoes are cooked.
  • Skipping the temperature check: Always make sure the potatoes are soft in the center.
  • Adding avocado before storage: Avocado can brown and lose its fresh texture.

Frequently Asked Questions

1. How long do sweet potatoes take in an air fryer?

Medium sweet potatoes usually take 35–45 minutes at 380°F, depending on their size and thickness.

2. Do I need to peel sweet potatoes before air frying?

No, you can leave the skins on because they become tender and help hold the black bean and feta filling.

3. Can I use canned black beans?

Yes, canned black beans work perfectly; rinse and drain them before adding the seasonings.

4. Can I make stuffed sweet potatoes ahead of time?

Yes, cook the potatoes and prepare the filling separately, then refrigerate and assemble when ready to serve.

5. Can I replace feta cheese with another cheese?

Yes, goat cheese, queso fresco, or crumbled cotija can replace feta, although the flavor will be slightly different.

6. Why are my air fryer sweet potatoes still hard?

They may need more cooking time, especially if they are large or thick; continue cooking in 5-minute intervals.

7. Are stuffed sweet potatoes good for meal prep?

Yes, store the cooked potatoes and black bean filling separately and add fresh toppings just before serving.

8. Can I make this recipe without an air fryer?

Yes, bake the sweet potatoes in a conventional oven at 400°F for approximately 45–60 minutes or until fork-tender.

Final Thoughts

Air Fryer Loaded Stuffed Sweet Potato with Black Beans & Feta is a simple, flavorful meal that combines naturally sweet potatoes with seasoned beans, tangy feta, and fresh vegetables.

The recipe is easy to prepare, flexible enough for different toppings, and convenient for busy weeknights or meal prep. You can keep it simple with black beans and feta or add avocado, corn, salsa, and fresh herbs to create your own combination.

Serve these loaded sweet potatoes warm with fresh lime wedges and enjoy a satisfying homemade meal that brings together delicious flavors and textures.


Air Fryer Mini Calzones

Air Fryer Mini Calzones

Air Fryer Mini Calzones with Ricotta & Marinara are a delicious way to enjoy homemade pizza flavors in a crispy, hand-held snack. These golden pockets are filled with creamy ricotta cheese, melted mozzarella, Italian seasoning, and rich marinara sauce. Each bite has a soft, cheesy center wrapped in a lightly crisp crust.

This easy recipe is perfect for busy weeknights, family snacks, game-day appetizers, or a quick lunch. Using an air fryer helps the dough turn golden and crisp without needing a large amount of oil. You also get evenly cooked mini calzones in less time than traditional oven baking.

The best part is that you can prepare these little pizza pockets with simple ingredients from your local grocery store. You can also customize the filling with your favorite vegetables, cooked chicken, or other pizza toppings.

Whether you serve them with warm marinara for dipping or pack them for a quick meal, these homemade mini calzones are sure to become a family favorite.

Why You’ll Love This Recipe

  • Quick and easy: These mini calzones come together with simple ingredients and require minimal preparation.

  • Crispy outside: The air fryer creates a golden crust with a lightly crunchy texture.

  • Creamy cheese filling: Ricotta and mozzarella create a rich, soft, and cheesy center.

  • Perfect for sharing: Their small size makes them ideal for parties, snacks, and family gatherings.

  • Easy to customize: Add cooked chicken, spinach, mushrooms, or your favorite pizza toppings.

  • Less oil needed: Air frying gives the dough a crispy finish without deep frying.

  • Kid-friendly: Small pizza pockets are easy to hold and fun to eat.

Ingredients for Air Fryer Mini Calzones with Ricotta & Marinara

You only need a handful of everyday ingredients to prepare these cheesy pizza pockets.

1. Pizza Dough

Use refrigerated pizza dough from the grocery store or homemade pizza dough. It provides a soft inside and crispy outside when air fried.

2. Ricotta Cheese

Ricotta gives the filling a creamy texture and mild flavor. Drain excess liquid before mixing to prevent soggy calzones.

3. Shredded Mozzarella Cheese

Mozzarella melts beautifully and gives the filling that classic stretchy cheese texture.

4. Marinara Sauce

Marinara adds tomato flavor and Italian seasoning notes. Use a thick sauce and avoid adding too much inside each calzone.

5. Grated Parmesan Cheese

Parmesan adds a salty, savory flavor that balances the creamy ricotta.

6. Italian Seasoning

A small amount of Italian seasoning adds a blend of herbs such as oregano, basil, and thyme.

7. Garlic Powder

Garlic powder gives the cheese mixture a delicious savory taste.

8. Egg

A beaten egg helps seal the dough edges and creates a golden finish when brushed over the tops.

9. Olive Oil

A light coating of olive oil helps the outside develop a crisp texture.

10. Salt and Black Pepper

Use a small amount to season the cheese filling according to your taste.

Ingredient Measurements

  • 1 pound refrigerated pizza dough

  • 1 cup ricotta cheese, drained

  • 1 cup shredded mozzarella cheese

  • ¼ cup grated Parmesan cheese

  • ½ teaspoon Italian seasoning

  • ¼ teaspoon garlic powder

  • ¼ teaspoon salt

  • ⅛ teaspoon black pepper

  • ½ cup thick marinara sauce, divided

  • 1 egg, beaten

  • 1 tablespoon olive oil

For serving:

  • ½ cup warm marinara sauce

  • Extra grated Parmesan cheese

  • Fresh chopped parsley or basil

Step-by-Step Instructions

Follow these simple steps to prepare crispy mini calzones with a creamy cheese filling.

Prepare the Cheese Filling

  • Add ricotta cheese to a medium mixing bowl.

  • Add shredded mozzarella and grated Parmesan.

  • Sprinkle in Italian seasoning, garlic powder, salt, and black pepper.

  • Mix everything until the ingredients are evenly combined.

  • Keep the filling refrigerated while preparing the dough.

Prepare the Pizza Dough

  • Remove the pizza dough from its packaging.

  • Place it on a lightly floured countertop.

  • Allow refrigerated dough to rest for about 10 minutes if it feels difficult to stretch.

  • Roll the dough into an even layer about ¼ inch thick.

  • Use a 4-inch round cutter or the rim of a small bowl to cut circles.

  • Gather leftover dough, roll it again, and cut additional circles.

Add the Filling

  • Place one dough circle on a clean work surface.

  • Spoon about 1 tablespoon of the ricotta mixture onto one half of the circle.

  • Add approximately 1 teaspoon of marinara sauce over the cheese.

  • Leave a small border around the edges.

  • Avoid overfilling because too much filling can cause the dough to open during cooking.

 Fold and Seal the Calzones

  • Fold the empty half of the dough over the filling.

  • Bring the edges together to create a half-moon shape.

  • Press the edges firmly with your fingertips.

  • Use a fork to crimp the sealed edges.

  • Check each calzone carefully to make sure there are no open sections.

Prepare for Air Frying

  • Preheat your air fryer to 350°F for about 3 minutes.

  • Lightly brush the air fryer basket with olive oil or use a suitable parchment liner.

  • Place the prepared calzones in the basket.

  • Leave space between each piece so hot air can circulate.

  • Brush the tops lightly with beaten egg.

  • Make two small slits on top of each calzone to release steam.

Air Fry Until Golden

  • Cook the mini calzones at 350°F for approximately 8–10 minutes.

  • Check them after 7 minutes because air fryer models can cook differently.

  • Continue cooking until the dough is golden brown and fully cooked.

  • If needed, add another 1–2 minutes.

  • Use a food thermometer to check that the center reaches 165°F for a properly heated cheese filling.

Rest and Serve

  • Carefully remove the calzones from the air fryer using tongs.

  • Let them rest for about 3–5 minutes.

  • Warm the remaining marinara sauce in a small bowl.

  • Sprinkle extra Parmesan or fresh parsley over the calzones.

  • Serve warm with marinara sauce for dipping.

Best Tips for Crispy Mini Calzones

A few simple techniques can help you get better results every time.

1. Drain the Ricotta Properly

Excess moisture can make the dough wet and difficult to cook. Drain watery ricotta before mixing the filling.

2. Avoid Overfilling

One tablespoon of cheese filling is usually enough for a 4-inch dough circle. Too much filling can cause the edges to open.

3. Seal the Edges Firmly

Press the dough together with your fingers before using a fork. A tight seal helps keep the cheese inside during cooking.

4. Do Not Skip the Steam Vents

Small slits on top allow steam to escape and help prevent the calzones from bursting.

5. Leave Space Between Each Calzone

Arrange them in a single layer without overcrowding the basket. Good airflow helps create an evenly browned crust.

6. Check Cooking Time Early

Smaller calzones may cook faster than larger ones. Start checking around the 7-minute mark.

7. Let Them Rest Before Serving

The filling becomes very hot during air frying. Resting for a few minutes helps prevent burns and allows the cheese to settle.

Variations and Substitutions

You can easily change the filling to create different flavors while keeping the same cooking method.

1. Spinach and Ricotta Calzones

Add ½ cup of cooked, squeezed-dry spinach to the cheese mixture. This creates a classic spinach and cheese filling.

2. Pepperoni Mini Calzones

Add small pieces of pepperoni to the ricotta and mozzarella mixture for a pizza-inspired flavor.

3. Chicken and Cheese Calzones

Mix ½ cup of cooked, shredded chicken into the filling. Add a little extra Italian seasoning for more flavor.

4. Mushroom and Mozzarella Calzones

Add finely chopped, cooked mushrooms. Cook them first to remove excess moisture.

5. Vegetable Mini Calzones

Use finely chopped bell peppers, onions, and spinach. Cook watery vegetables before adding them to the filling.

6. Spicy Calzones

Add red pepper flakes or a small amount of chopped jalapeño for a spicy kick.

What to Serve with Mini Calzones

These little pizza pockets taste delicious on their own, but you can serve them with simple sides to make a complete meal.

  • Warm marinara sauce: A classic dipping option that adds extra tomato flavor.

  • Caesar salad: Fresh lettuce, Parmesan, and creamy dressing balance the cheesy filling.

  • Garlic bread: Serve with toasted garlic bread for a satisfying Italian-inspired meal.

  • Roasted vegetables: Broccoli, zucchini, or bell peppers make easy side dishes.

  • Fresh garden salad: A simple salad with tomatoes and cucumbers adds freshness.

  • Ranch dressing: A creamy dipping sauce for anyone who enjoys a different flavor.

For parties, arrange the mini calzones on a serving platter with small bowls of marinara and ranch dressing.

How to Store Leftover Mini Calzones

Proper storage helps keep leftover calzones fresh and makes reheating easier.

Refrigerator Storage

  • Allow the cooked calzones to cool completely.

  • Place them in an airtight food storage container.

  • Refrigerate for up to 3–4 days.

  • Keep the marinara dipping sauce in a separate container.

Freezer Storage

  • Let the calzones cool completely.

  • Arrange them in a single layer on a baking sheet.

  • Freeze until firm.

  • Transfer them to a freezer-safe bag or airtight container.

  • Store for up to 2 months for best quality.

Label the container with the preparation date so you can keep track of storage time.

How to Reheat Air Fryer Mini Calzones

The air fryer is one of the best ways to reheat leftover calzones because it helps restore their crispy crust.

Reheating in an Air Fryer

  • Preheat the air fryer to 325°F.

  • Place refrigerated calzones in a single layer.

  • Heat for approximately 3–5 minutes.

  • Check the center and continue heating if needed.

  • Make sure leftovers reach 165°F before serving.

Reheating from Frozen

  • Place frozen cooked calzones in the air fryer basket.

  • Set the temperature to 325°F.

  • Heat for approximately 8–12 minutes.

  • Check that the center reaches 165°F before eating.

Cooking time can vary depending on the size of the calzones and your air fryer model.

Avoid microwaving when possible because it can make the crust soft instead of crispy.

Common Mistakes to Avoid

Even a simple recipe can become difficult if a few important details are overlooked.

  • Using watery ricotta: Excess moisture can make the bottom crust soggy.

  • Adding too much marinara: Extra sauce can leak out and weaken the dough seal.

  • Overfilling the dough: Too much cheese can cause the pockets to split.

  • Skipping edge sealing: Poorly sealed edges allow the filling to escape.

  • Overcrowding the basket: Calzones need enough room for hot air to circulate.

  • Using too much oil: A light coating is enough to help brown the crust.

  • Serving immediately: Very hot filling can burn your mouth, so allow a short resting period.

Frequently Asked Questions

1. How long do mini calzones take in the air fryer?

Mini calzones generally take 8–10 minutes at 350°F, depending on their size and your air fryer model.

2. Can I use store-bought pizza dough?

Yes, refrigerated store-bought pizza dough works well and makes preparation faster and easier.

3. Can I make mini calzones ahead of time?

Yes, assemble them a few hours ahead, cover, and refrigerate until you are ready to air fry.

4. Why are my mini calzones leaking cheese?

Overfilling, excess moisture, or poorly sealed edges can cause the filling to leak during cooking.

5. Can I cook frozen mini calzones in an air fryer?

Yes, cook them at 350°F and check regularly until the crust is golden and the center is fully heated.

6. Do I need to preheat the air fryer?

Preheating for about 3 minutes helps the dough begin cooking evenly and develop a crisp exterior.

7. Can I make these mini calzones without ricotta?

Yes, substitute ricotta with cottage cheese that has been drained well, or use additional mozzarella and Parmesan.

8. What is the best dipping sauce for mini calzones?

Warm marinara is the classic choice, but ranch dressing and garlic sauce also taste delicious.

Final Thoughts

Air Fryer Mini Calzones with Ricotta & Marinara are an easy homemade snack that combines crispy pizza dough with a creamy, cheesy filling. They use simple ingredients, require little preparation, and cook quickly in the air fryer.

You can keep the filling classic with ricotta and mozzarella or experiment with chicken, spinach, pepperoni, and vegetables. Serve them fresh with warm marinara sauce for a delicious snack, lunch, or party appetizer.

Once you try this easy recipe, these bite-sized pizza pockets may become a regular favorite in your kitchen.

Air Fryer Crispy Greek Lemon Oregano Chicken

Air Fryer Greek Lemon Oregano Chicken

Craving something crispy, juicy, and packed with fresh Mediterranean flavor? These Air Fryer Crispy Greek Lemon Oregano Chicken Crisps are an easy way to enjoy crunchy chicken bites without deep frying. Each piece is coated with a flavorful mixture of lemon, garlic, oregano, and simple seasonings, then air-fried until golden on the outside and tender inside.

The combination of fresh lemon juice, aromatic oregano, and garlic gives these chicken crisps a delicious Greek-inspired flavor. A light coating of cornstarch and breadcrumbs helps create a crunchy exterior while keeping the chicken juicy.

The best part is that you can prepare this recipe with everyday ingredients in less time than traditional fried chicken. Serve these crispy chicken bites with homemade tzatziki, Greek yogurt dip, or a squeeze of fresh lemon for extra flavor.

Whether you’re planning a quick family dinner, preparing a high-protein snack, or looking for something different for game day, these Greek lemon oregano chicken crisps are worth adding to your recipe collection.

Why You’ll Love This Recipe

  • Crispy without deep frying: The air fryer creates a golden coating using much less oil than traditional frying.
  • Fresh Greek-inspired flavor: Lemon, oregano, and garlic give every bite a bright Mediterranean taste.
  • Juicy chicken: A short lemon-garlic marinade helps keep the chicken flavorful and tender.
  • Easy ingredients: You can make this recipe with common pantry seasonings and fresh chicken.
  • Perfect for busy days: The preparation is simple, and the air fryer handles most of the cooking.
  • Great for sharing: Serve these bite-sized chicken pieces as a party appetizer, lunch, or family snack.
  • Easy to customize: Adjust the herbs, spices, and dipping sauces to match your taste.

Ingredients You’ll Need

These simple ingredients create flavorful chicken bites with a crunchy outside and juicy center.

  • 1 pound boneless skinless chicken breasts: Cut into small, evenly sized pieces for quick and even cooking.
  • 2 tablespoons fresh lemon juice: Adds a bright citrus flavor and helps season the chicken.
  • 1 tablespoon olive oil: Helps the seasoning stick and supports even browning.
  • 2 cloves garlic, minced: Provides a fresh, savory garlic flavor.
  • 1 teaspoon dried oregano: Gives the chicken its classic Greek-inspired herbal taste.
  • 1/2 teaspoon paprika: Adds mild warmth and a golden color.
  • 1/2 teaspoon onion powder: Brings extra savory flavor.
  • 1/2 teaspoon salt: Enhances the taste of the chicken and seasonings.
  • 1/4 teaspoon black pepper: Adds a gentle peppery kick.
  • 1/3 cup plain breadcrumbs: Creates a light, crunchy coating.
  • 2 tablespoons cornstarch: Helps the outside become crisp during air frying.
  • 1 tablespoon chopped fresh parsley: Adds freshness and color.
  • Cooking spray: Helps prevent sticking and promotes browning.

Optional Ingredients for Serving

  • Fresh lemon wedges.
  • Tzatziki sauce.
  • Plain Greek yogurt dip.
  • Crumbled feta cheese.
  • Extra chopped parsley.
  • A pinch of red pepper flakes.

Equipment You’ll Need

  • Air fryer (basket-style or oven-style).
  • Cutting board and sharp knife.
  • Two mixing bowls.
  • Measuring spoons and cups.
  • Whisk or mixing spoon.
  • Tongs for turning the chicken.
  • Meat thermometer for checking doneness.

How to Make Air Fryer Crispy Greek Lemon Oregano Chicken Crisps

Follow these easy steps to make crispy, golden chicken bites with fresh lemon and oregano flavor.

Step 1: Prepare the Chicken

  • Place the chicken breasts on a clean cutting board.
  • Pat the chicken dry with paper towels.
  • Trim away any excess fat.
  • Cut the chicken into bite-sized pieces, approximately 1 inch each.
  • Keep the pieces similar in size so they cook evenly.
  • Transfer the chicken pieces to a large mixing bowl.

Tip: Cutting the chicken into even pieces helps prevent smaller pieces from drying out while larger pieces finish cooking.

Step 2: Prepare the Greek Lemon Marinade

  • Add two tablespoons of fresh lemon juice to a small bowl.
  • Pour in one tablespoon of olive oil.
  • Add the minced garlic.
  • Sprinkle in the dried oregano, paprika, onion powder, salt, and black pepper.
  • Whisk everything until the ingredients are evenly combined.

Tip: Fresh lemon juice gives the chicken a brighter flavor than bottled lemon juice. Avoid adding too much lemon juice because a very acidic marinade can affect the chicken’s texture.

Step 3: Marinate the Chicken

  • Pour the prepared lemon mixture over the chicken pieces.
  • Toss gently until every piece is coated.
  • Cover the bowl and refrigerate for 15–20 minutes.
  • Remove the chicken from the refrigerator when ready to prepare the coating.

Tip: A short marinade gives the chicken enough time to absorb the garlic, oregano, and lemon flavors without making the preparation complicated.

Step 4: Prepare the Crispy Coating

  • Add 1/3 cup breadcrumbs to a clean bowl.
  • Add two tablespoons of cornstarch.
  • Mix until both ingredients are evenly combined.
  • Check that there are no large cornstarch lumps.

Tip: Cornstarch helps create a lighter, crispier coating, while breadcrumbs add a crunchy texture.

Step 5: Coat the Chicken Pieces

  • Remove one chicken piece from the marinade.
  • Allow excess liquid to drip off.
  • Place it in the breadcrumb mixture.
  • Turn it gently until all sides are coated.
  • Repeat with the remaining chicken pieces.
  • Arrange the coated pieces on a clean plate.

Tip: Press the coating gently onto the chicken so it stays in place during air frying. Avoid adding too much coating, as thick layers may not cook evenly.

Step 6: Preheat the Air Fryer

  • Preheat your air fryer to 390°F (200°C) for approximately 3 minutes, if your model requires preheating.
  • Lightly spray the air fryer basket with cooking spray.
  • Make sure the basket is clean and dry before adding the chicken.

Tip: A preheated air fryer helps the coating begin crisping quickly.

Step 7: Arrange the Chicken in the Basket

  • Place the coated chicken pieces in the air fryer basket.
  • Arrange them in a single layer.
  • Leave space between the pieces for proper airflow.
  • Lightly spray the tops with cooking spray.
  • Cook in batches if your basket is small.

Tip: Avoid stacking the chicken pieces. Overcrowding can create steam and prevent the coating from becoming crispy.

Step 8: Air Fry Until Golden and Crispy

  • Air fry at 390°F (200°C) for approximately 10–14 minutes.
  • Turn the chicken pieces halfway through cooking.
  • Lightly spray any dry-looking areas if needed.
  • Check the thickest pieces with a food thermometer.
  • Continue cooking if necessary until the internal temperature reaches 165°F (74°C).
  • Remove the chicken when the coating is golden and the centers are fully cooked.

Tip: Cooking time depends on the size of the chicken pieces and your air fryer model. Always use a food thermometer rather than relying only on color.

Step 9: Garnish and Serve

  • Transfer the cooked chicken crisps to a serving plate.
  • Sprinkle fresh chopped parsley over the top.
  • Add a few lemon wedges for serving.
  • Sprinkle a little extra oregano if desired.
  • Serve immediately with tzatziki or your favorite dipping sauce.

Your homemade Air Fryer Crispy Greek Lemon Oregano Chicken Crisps are ready to enjoy!

Tips for the Best Crispy Greek Chicken

A few small details can make a big difference in the final texture and flavor.

  • Use fresh chicken: Fresh boneless chicken breasts provide a tender texture and cook evenly when cut into similar pieces.
  • Pat the chicken dry: Removing excess surface moisture helps the coating stick.
  • Don’t skip the cornstarch: It helps create a crisp exterior without requiring deep frying.
  • Use fresh lemon: Fresh juice gives the marinade a clean citrus flavor.
  • Keep the coating light: A thin, even layer cooks more evenly than a thick coating.
  • Leave space in the basket: Good airflow helps the chicken brown on all sides.
  • Turn halfway through: This helps both sides develop a golden finish.
  • Check the internal temperature: Chicken must reach 165°F (74°C) for safe consumption.
  • Serve immediately: The coating tastes best while freshly cooked.

Variations and Substitutions

You can easily adjust this recipe with different herbs, seasonings, and coatings.

Spicy Greek Chicken Crisps

Add 1/2 teaspoon red pepper flakes or cayenne pepper to the seasoning mixture. This gives the chicken a little extra heat without hiding the lemon and oregano flavor.

Parmesan Greek Chicken Crisps

Add two tablespoons of finely grated Parmesan cheese to the breadcrumb coating. The cheese adds a savory flavor and helps create a delicious golden crust.

Gluten-Free Greek Chicken Crisps

Replace regular breadcrumbs with certified gluten-free breadcrumbs. Check all seasoning and coating labels if you need to avoid gluten completely.

Extra Lemon Garlic Chicken

Add a little extra lemon zest and one additional minced garlic clove to the marinade. This creates a stronger citrus and garlic flavor.

Italian Herb Chicken Crisps

Replace the oregano with an equal mixture of dried basil, thyme, and oregano. Serve with a little grated Parmesan for an Italian-inspired variation.

Panko-Crusted Chicken Crisps

Use panko breadcrumbs instead of regular breadcrumbs. Their larger flakes create a lighter, crunchier coating.

What to Serve With Greek Lemon Oregano Chicken Crisps

These crispy chicken bites pair well with fresh vegetables, Mediterranean sides, and simple dipping sauces.

  • Tzatziki sauce: Cool Greek yogurt, cucumber, garlic, and dill create a refreshing dip.
  • Greek salad: Combine tomatoes, cucumber, red onion, olives, and feta for a fresh side.
  • Lemon rice: Serve the chicken over fluffy rice seasoned with lemon and parsley.
  • Roasted potatoes: Crispy potatoes with oregano and garlic make a satisfying combination.
  • Pita bread: Warm pita bread works well for making easy chicken wraps.
  • Roasted vegetables: Serve with zucchini, bell peppers, or broccoli.
  • Hummus: Creamy hummus adds a Mediterranean touch and makes a great dipping option.

How to Store Leftovers

Proper storage helps keep leftover chicken fresh and safe to enjoy.

Refrigerator:

  • Allow the cooked chicken to cool slightly.
  • Transfer it to an airtight food storage container.
  • Refrigerate within 2 hours of cooking.
  • Store for up to 3–4 days.
  • Keep dipping sauces in a separate container.

Freezer:

  • Allow the chicken pieces to cool completely.
  • Arrange them in a single layer on a baking sheet.
  • Freeze until firm.
  • Transfer the pieces to a freezer-safe bag or container.
  • Label with the storage date.
  • Use within 2–3 months for best quality.

Important: Refrigeration and freezing can soften the crispy coating. Reheating in the air fryer helps bring back some of its crunch.

How to Reheat Greek Lemon Chicken Crisps

The air fryer is a great way to warm leftover chicken while improving its texture.

  • Air fryer: Reheat at 350°F (175°C) for approximately 3–5 minutes, until heated through.
  • Oven: Arrange the chicken on a baking sheet and heat at 375°F (190°C) until hot.
  • Microwave: Heat in short intervals until the center is hot, but expect a softer coating.

For food safety, reheated chicken should reach an internal temperature of 165°F (74°C).

Frequently Asked Questions

1. How do you make Greek lemon oregano chicken crispy in an air fryer?

Coat marinated chicken pieces with breadcrumbs and cornstarch, spray lightly with oil, and air fry at 390°F (200°C) until golden and fully cooked.

2. What temperature should I use for air fryer chicken crisps?

Cook bite-sized chicken pieces at 390°F (200°C) for approximately 10–14 minutes, checking that the center reaches 165°F (74°C).

3. Can I use chicken thighs instead of chicken breasts?

Yes, boneless skinless chicken thighs work well and provide a slightly richer, juicier texture.

4. Why is my air fryer chicken coating not crispy?

Excess moisture, overcrowding, and insufficient airflow can prevent the coating from becoming golden and crunchy.

5. Can I prepare Greek lemon chicken ahead of time?

Yes, marinate the chicken in the refrigerator for up to 2 hours and coat it shortly before air frying.

6. Can I make this recipe without breadcrumbs?

Yes, use cornstarch with a little extra seasoning for a lighter coating, although the texture will be different.

7. What dipping sauce goes best with Greek lemon chicken?

Tzatziki is an excellent choice because its cool, creamy yogurt and cucumber flavor balances the lemon and oregano seasoning.

8. How long can I store cooked chicken crisps?

Store them in an airtight container in the refrigerator for 3–4 days and reheat thoroughly before serving.

Final Thoughts

These Air Fryer Crispy Greek Lemon Oregano Chicken Crisps are a simple way to bring fresh Mediterranean flavors into your kitchen. The combination of juicy chicken, crunchy coating, fresh lemon, garlic, and aromatic oregano makes every bite delicious.

They are easy to prepare, simple to customize, and perfect for everything from quick family meals to party appetizers. Serve them with homemade tzatziki, fresh vegetables, or warm pita bread for a satisfying meal.

Give this Greek-inspired chicken recipe a try, and enjoy crispy, flavorful chicken straight from your air fryer!

Air-Fryer Crispy Salt & Pepper Tofu Bites

Air-Fryer Crispy Salt & Pepper Tofu Bites

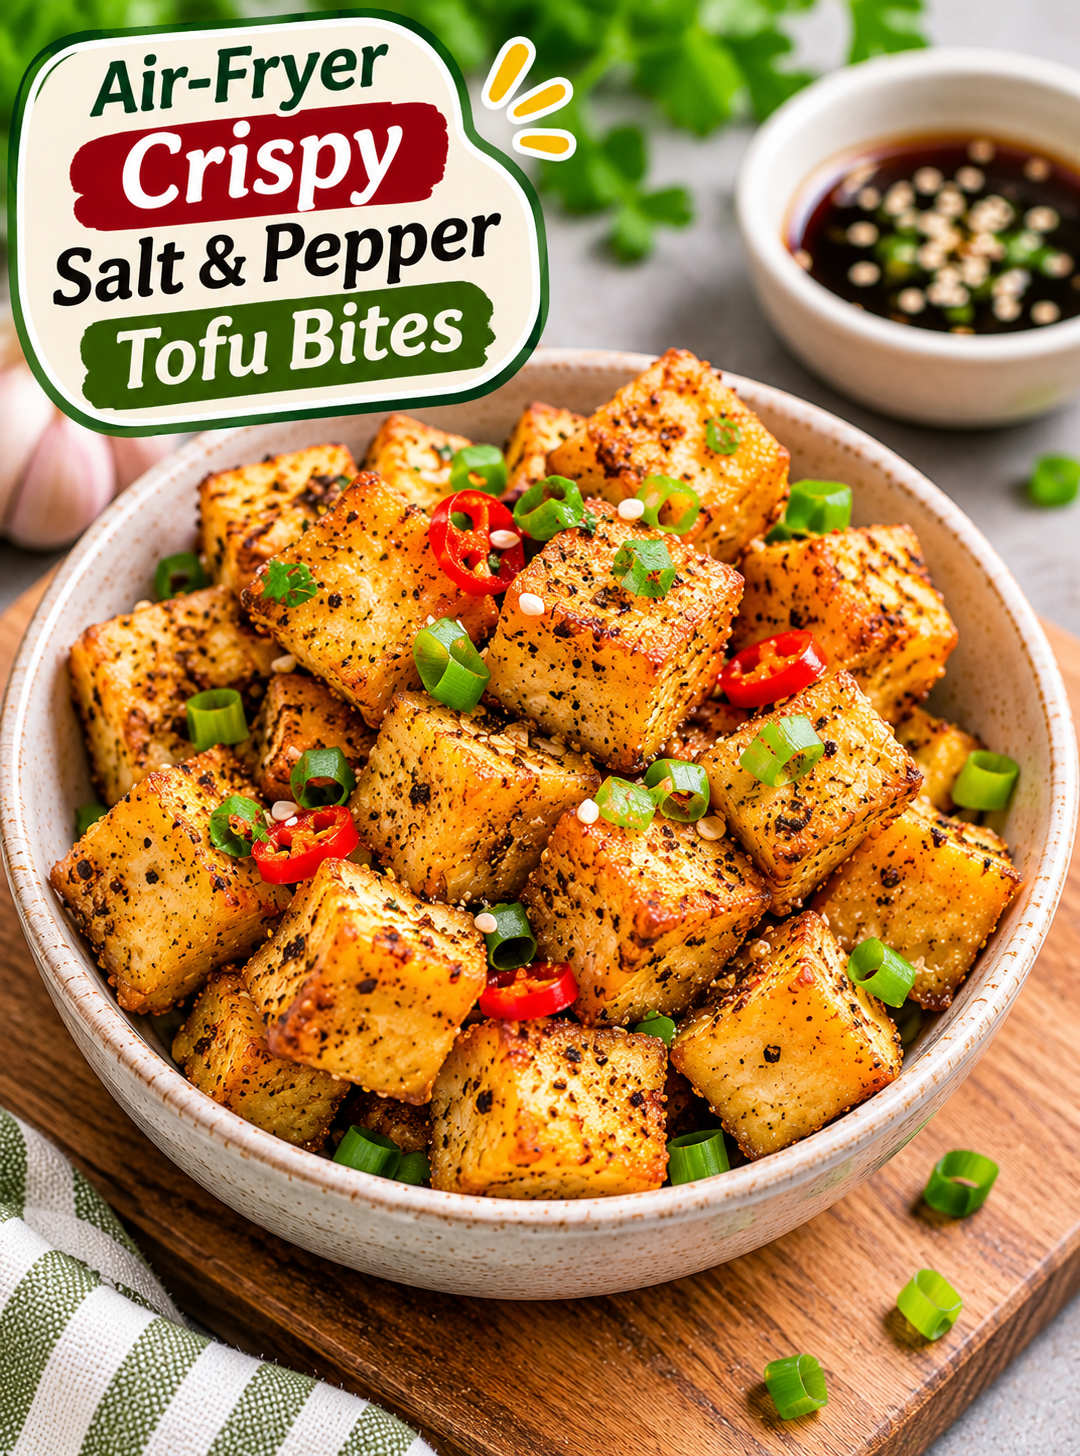
Want a crunchy, savory snack without deep-frying? These Air-Fryer Crispy Salt & Pepper Tofu Bites are an easy way to enjoy restaurant-style flavor at home. They feature golden tofu cubes with a lightly crisp coating, bold black pepper, garlic, and fresh green onions.

The secret to getting crispy tofu is removing excess moisture before cooking. Extra-firm tofu holds its shape, while a light coating of cornstarch creates a crunchy outside in the air fryer.

A simple seasoning blend of salt, black pepper, white pepper, garlic powder, and onion powder gives every bite a savory flavor. Fresh green onions and red chili add color and a little extra kick.

You only need a handful of everyday ingredients and about 25 minutes to prepare this delicious snack. Serve these tofu bites as an appetizer, a quick lunch addition, or a flavorful side dish with rice and vegetables.

Whether you follow a plant-based diet or simply want to try something different, this easy air fryer recipe is a great addition to your weekly menu.

Why You’ll Love These Delicious Air-Fryer Salt & Pepper Tofu Bites

These homemade tofu bites offer plenty of flavor without requiring a deep fryer or complicated cooking techniques.

Here are some reasons to try this recipe:

  • Crispy Texture: Cornstarch creates a lightly crunchy coating around the tofu cubes.
  • Plant-Based Protein: Extra-firm tofu provides protein in a convenient, meat-free snack.
  • Simple Ingredients: Most ingredients are basic pantry staples available at American grocery stores.
  • Less Oil Needed: Air frying requires only a small amount of oil compared with traditional deep-frying.
  • Bold Seasoning: Black pepper, white pepper, garlic, and salt create a savory flavor.
  • Quick Preparation: The recipe takes approximately 25 minutes of active preparation and cooking, excluding optional tofu pressing time.
  • Easy Customization: Adjust the spice level and seasonings according to your taste.
  • Versatile Serving: Enjoy these bites as a snack, appetizer, lunch, or dinner side.

The combination of crunchy tofu and aromatic seasoning makes this recipe satisfying and easy to repeat.

Essential Ingredients for the Best Crispy Salt & Pepper Tofu

Choose extra-firm tofu for the best texture. Softer tofu contains more moisture and may break apart when tossed with the seasoning.

Main Ingredients

  • 14 ounces extra-firm tofu: Provides a firm texture and holds its shape during air frying.
  • 1 tablespoon cornstarch: Creates a light coating that helps the tofu develop crispy edges.
  • 1 tablespoon avocado oil or olive oil: Helps the seasoning stick and encourages even browning.
  • ½ teaspoon fine sea salt: Enhances the natural flavor of the tofu.
  • 1 teaspoon freshly ground black pepper: Provides the main peppery flavor.
  • ½ teaspoon white pepper: Adds a warm, slightly earthy heat.
  • ½ teaspoon garlic powder: Gives the tofu a savory garlic flavor.
  • ¼ teaspoon onion powder: Adds mild sweetness and depth.
  • ¼ teaspoon smoked paprika: Adds subtle smokiness and color.

Fresh Garnishes

  • 2 green onions: Thinly sliced for a fresh, mild onion flavor.
  • 1 small red chili: Finely sliced for extra heat, if desired.
  • 1 teaspoon sesame seeds: Adds a light nutty finish.
  • 1 teaspoon fresh lemon juice: Optional, for a bright finishing flavor.

You can adjust the black pepper and white pepper depending on how strong you want the seasoning to taste.

Helpful Kitchen Tools for Perfect Air-Fried Tofu

A few basic kitchen tools make this recipe easier to prepare.

  • Air fryer: A basket-style air fryer works well for cooking tofu evenly.
  • Tofu press or heavy plate: Helps remove excess moisture before seasoning.
  • Clean kitchen towel: Absorbs water from the tofu surface.
  • Large mixing bowl: Provides enough room to coat the tofu cubes.
  • Small mixing bowl: Makes it easier to combine the dry seasonings.
  • Measuring spoons: Help maintain consistent seasoning.
  • Silicone spatula: Gently tosses the tofu without breaking the cubes.
  • Kitchen tongs: Help turn or remove the cooked tofu.

How to Make Air-Fryer Crispy Salt & Pepper Tofu Bites Step by Step

Follow these seven simple steps to prepare golden, flavorful tofu with a crunchy outside and tender center.

Step 1: Press and Drain the Tofu Properly

Remove the tofu from its package and drain all the liquid.

Place the tofu block between several layers of paper towels or a clean kitchen towel.

Set a heavy plate or another flat object on top and allow the tofu to press for approximately 15–20 minutes.

If you own a tofu press, follow its instructions to remove the excess moisture.

Once pressed, pat the tofu dry again.

Removing moisture is one of the most important steps because wet tofu can become soft instead of crispy during air frying.

Step 2: Cut the Tofu Into Even-Sized Cubes

Place the pressed tofu on a clean cutting board.

Cut it into approximately 1-inch cubes using a sharp kitchen knife.

Try to keep the pieces similar in size so they cook evenly.

Avoid cutting the cubes too small because they may become dry during air frying.

Transfer the tofu pieces to a large mixing bowl.

Step 3: Prepare the Delicious Salt and Pepper Seasoning

In a small mixing bowl, combine the sea salt, black pepper, white pepper, garlic powder, onion powder, and smoked paprika.

Stir until the seasonings are evenly mixed.

Freshly ground black pepper provides a stronger aroma than pre-ground pepper, so use it if available.

Set the seasoning mixture aside.

Step 4: Coat the Tofu With Oil and Cornstarch

Drizzle the avocado oil or olive oil over the tofu cubes.

Gently toss the pieces until they receive a light coating.

Sprinkle the cornstarch over the tofu.

Use a silicone spatula to toss again until the cubes are lightly covered.

Avoid adding too much cornstarch because a thick coating can taste powdery.

The tofu should have a thin, even layer rather than a heavy white coating.

Step 5: Add the Salt and Pepper Seasoning

Sprinkle the prepared seasoning mixture over the coated tofu.

Gently toss until the spices cover the cubes evenly.

Make sure the seasoning reaches the sides of the tofu pieces.

If you prefer a milder flavor, reserve a small amount of the black pepper mixture and add it after cooking.

Avoid pressing the tofu while mixing because the cubes can break apart.

Step 6: Air Fry Until Golden and Crispy

Preheat your air fryer to 400°F (200°C) for approximately 3 minutes if your model requires preheating.

Arrange the seasoned tofu cubes in a single layer inside the air fryer basket.

Leave space between the pieces to allow hot air to circulate.

Air fry at 400°F for approximately 12–15 minutes.

At the halfway point, around 6–7 minutes, shake the basket or carefully turn the tofu cubes with tongs.

Continue cooking until the edges look golden and the outside feels crisp.

Cooking time can vary depending on your air fryer and the size of the tofu cubes.

If the tofu needs more color, cook for another 1–2 minutes while checking frequently.

Step 7: Garnish, Serve, and Enjoy

Remove the crispy tofu bites from the air fryer and transfer them to a serving plate.

Sprinkle the sliced green onions and sesame seeds over the top.

Add finely sliced red chili if you enjoy extra heat.

For a fresh finish, add a small squeeze of lemon juice.

Serve immediately while the outside is still crispy.

These tofu bites taste delicious on their own or with a dipping sauce such as sweet chili sauce, soy-ginger sauce, or a light garlic dipping sauce.

Expert Tips for the Most Crispy Salt & Pepper Tofu

Small preparation details can make a noticeable difference in the final texture.

  • Use Extra-Firm Tofu: It holds its shape better and contains less moisture than softer varieties.
  • Press Thoroughly: Removing excess water helps the outside become crisp.
  • Use a Light Cornstarch Coating: A thin layer creates better texture without leaving a powdery taste.
  • Avoid Overcrowding: Cook in batches if necessary so hot air can reach every piece.
  • Turn Halfway Through: Shaking the basket helps the tofu brown more evenly.
  • Season Evenly: Distribute the pepper mixture across all sides of the cubes.
  • Serve Immediately: Tofu gradually loses its crispness as it cools.
  • Add Fresh Garnishes Last: Green onions and sesame seeds taste fresher when added after cooking.

For the best results, avoid adding wet sauces before air frying. Serve dipping sauces separately to protect the crispy coating.

Easy Variations to Customize Your Air-Fryer Tofu Bites

This recipe is flexible, so you can change the seasonings to create different flavors.

Make Extra Spicy Tofu Bites

Add ½ teaspoon of red pepper flakes or a little cayenne pepper to the seasoning mixture.

You can also serve the tofu with spicy chili sauce.

Try a Garlic Parmesan Version

Add 1–2 tablespoons of finely grated Parmesan after air frying.

The cheese adds a salty, savory flavor that pairs well with garlic and black pepper.

Make a Gluten-Free Version

Use certified gluten-free cornstarch and check the labels on your seasonings and dipping sauces.

Tofu itself is naturally gluten-free, but flavored or processed varieties may contain additional ingredients.

Create an Asian-Inspired Sesame Version

Add toasted sesame seeds and thinly sliced green onions after cooking.

Serve with a small bowl of soy sauce mixed with fresh lime juice and ginger.

Make Lemon Pepper Tofu

Reduce the white pepper slightly and add ½ teaspoon of lemon zest to the seasoning.

Finish with a little fresh lemon juice after cooking.

Prepare a Mild Family-Friendly Version

Reduce the black pepper and skip the red chili.

The garlic and onion powder will still provide plenty of savory flavor without excessive heat.

Delicious Ways to Serve Crispy Salt & Pepper Tofu

These golden tofu bites work well with many everyday meals.

  • With Steamed Rice: Serve over jasmine or brown rice with steamed vegetables.
  • As an Appetizer: Arrange the bites on a platter with sweet chili dipping sauce.
  • In a Salad: Add crispy tofu to a fresh cabbage, cucumber, and carrot salad.
  • Inside Wraps: Place the tofu in a tortilla with lettuce and a creamy garlic dressing.
  • With Noodles: Pair with stir-fried noodles and colorful vegetables.
  • As a Snack: Enjoy a small serving between meals when you want something savory.

For a complete meal, combine the tofu with rice, broccoli, carrots, and a simple sesame dressing.

Smart Storage Tips to Keep Leftover Tofu Fresh

These tofu bites are best served fresh, but you can store leftovers for later.

Refrigerator Storage

Allow the cooked tofu to cool slightly before transferring it to an airtight container.

Refrigerate within 2 hours of cooking.

Store at 40°F (4°C) or below and enjoy within 3–4 days.

For better texture, keep dipping sauces and fresh garnishes separate.

Freezer Storage

You can freeze cooked tofu, although its texture may change after thawing.

Arrange cooled pieces in a single layer on a freezer-safe tray until firm.

Transfer them to an airtight freezer bag or container and label with the preparation date.

Use within approximately 2 months for the best quality.

How to Reheat Leftover Tofu

Preheat your air fryer to 375°F (190°C).

Arrange refrigerated tofu pieces in a single layer.

Reheat for approximately 3–5 minutes, checking regularly until heated through.

Avoid adding sauce before reheating because it can soften the coating.

Common Mistakes to Avoid When Making Air-Fryer Tofu

Avoid these common problems to get better results every time.

  • Skipping the Pressing Step: Excess moisture makes the tofu harder to crisp.
  • Using Soft Tofu: Silken and soft tofu can break apart during preparation.
  • Adding Too Much Cornstarch: A heavy coating may taste dry or powdery.
  • Overcrowding the Basket: Poor air circulation creates uneven browning.
  • Using Too Much Oil: Excess oil can make the coating greasy.
  • Forgetting to Turn the Tofu: Moving the cubes halfway through helps them cook evenly.
  • Adding Sauce Too Early: Wet sauce can soften the crispy exterior.
  • Leaving Cooked Tofu Uncovered: Air exposure can dry out refrigerated leftovers.

Frequently Asked Questions About Air-Fryer Crispy Salt & Pepper Tofu Bites

1. How Do You Make Tofu Crispy in an Air Fryer?

Press extra-firm tofu, coat it lightly with cornstarch and oil, and air fry at 400°F until golden and crisp.

2. Which Type of Tofu Is Best for Air Frying?

Extra-firm tofu works best because it contains less moisture and holds its shape during cooking.

3. Why Is My Air-Fryer Tofu Not Crispy?

Excess moisture, overcrowding, or too much oil can prevent tofu from developing a crisp exterior.

4. Can I Make Salt and Pepper Tofu Without Cornstarch?

Yes. Arrowroot starch or potato starch can be used as alternatives, although the texture may differ slightly.

5. How Long Should I Air Fry Tofu Bites?

Air fry 1-inch tofu cubes at 400°F for approximately 12–15 minutes, turning them halfway through.

6. Is Air-Fryer Salt and Pepper Tofu Healthy?

Tofu provides plant-based protein, and air frying uses less oil than traditional deep-frying.

7. Can I Prepare Tofu Bites Ahead of Time?

Yes. Press and cut the tofu ahead of time, then refrigerate it until you are ready to season and cook.

8. What Dipping Sauce Goes Best With Salt and Pepper Tofu?

Sweet chili sauce, garlic soy sauce, and sesame-ginger dipping sauce all pair well with these crispy tofu bites.

Final Thoughts: Enjoy These Amazing Crispy Salt & Pepper Tofu Bites

These Air-Fryer Crispy Salt & Pepper Tofu Bites are a simple way to turn everyday tofu into a flavorful, crunchy snack.

The extra-firm tofu creates a tender center, while cornstarch helps develop golden edges. Black pepper, white pepper, garlic, and fresh green onions bring the bold seasoning that makes this recipe special.

You can adjust the spice level, try different garnishes, or serve the bites with your favorite dipping sauce.

Whether you need a quick appetizer, a plant-based snack, or a tasty addition to dinner, this recipe is easy to prepare with basic kitchen ingredients.

Ready to give tofu a crispy makeover? Grab a block of extra-firm tofu, fire up your air fryer, and make these delicious bites. Share your favorite seasoning combination and let us know whether you prefer classic black pepper or an extra-spicy version!


Air Fryer Parmesan Crusted Meatball Sliders

Air Fryer Parmesan Crusted Meatball Sliders

These Air Fryer Parmesan Crusted Meatball Sliders bring together juicy, seasoned meatballs, rich marinara sauce, melted mozzarella, and buttery Parmesan-crusted rolls. Each slider has a golden, crisp top with a soft, cheesy center that makes every bite satisfying.

They are easy to prepare for busy weeknights, game-day snacks, family dinners, or casual gatherings. The air fryer cooks the meatballs quickly and gives the slider buns a delicious toasted finish without heating up the whole kitchen.

If you love classic meatball subs but want something smaller and easier to serve, these sliders are a great choice. You can prepare the meatballs ahead of time, assemble the rolls, and air fry them just before serving.

Why You’ll Love These Air Fryer Parmesan Crusted Meatball Sliders

  • Crispy Parmesan topping: Butter, garlic, and grated Parmesan create a golden crust on the slider buns.
  • Juicy meatballs: Breadcrumbs, milk, and seasonings help keep the meatballs tender.
  • Cheesy center: Melted mozzarella adds a creamy texture that pairs well with marinara sauce.
  • Easy preparation: The ingredients are simple, affordable, and easy to find at most U.S. grocery stores.
  • Perfect party food: Their small size makes them convenient for game days, potlucks, and family gatherings.
  • Quick cooking: The air fryer cooks the meatballs and toasts the assembled sliders in less time than many traditional oven methods.

Recipe Overview

  • Prep Time: 15 minutes
  • Cook Time: 15–18 minutes
  • Total Time: 30–33 minutes
  • Servings: 12 sliders
  • Course: Appetizer, Lunch, or Dinner
  • Cuisine: American-Italian
  • Cooking Method: Air Fryer
  • Temperature: 375°F for meatballs; 320°F for assembled sliders

Ingredients for Air Fryer Parmesan Crusted Meatball Sliders

For the Meatballs

  • 1 pound lean ground beef (80/20 works well)
  • 1/3 cup Italian-style breadcrumbs
  • 1/4 cup finely grated Parmesan cheese
  • 1 large egg
  • 2 tablespoons milk
  • 2 cloves garlic, minced
  • 1 teaspoon Italian seasoning
  • 1/2 teaspoon onion powder
  • 1/2 teaspoon salt
  • 1/4 teaspoon black pepper

The Sliders

  • 12-count Hawaiian rolls or soft slider buns
  • 1 cup marinara sauce
  • 1 1/2 cups shredded mozzarella cheese
  • 2 tablespoons chopped fresh parsley (optional)

Parmesan Garlic Topping

  • 3 tablespoons unsalted butter, melted
  • 1/4 cup finely grated Parmesan cheese
  • 1/2 teaspoon garlic powder
  • 1/2 teaspoon dried Italian seasoning

Equipment You’ll Need

  • Air fryer
  • Large mixing bowl
  • Small microwave-safe bowl
  • Measuring cups and spoons
  • Parchment liner suitable for your air fryer, if needed
  • Silicone brush
  • Meat thermometer
  • Small baking dish or air-fryer-safe pan that fits your basket

Step-by-Step Instructions

Prepare the Meatball Mixture

  1. Add the ground beef to a large mixing bowl.
  2. Add the Italian breadcrumbs, grated Parmesan, egg, and milk.
  3. Mix in the minced garlic, Italian seasoning, onion powder, salt, and black pepper.
  4. Gently combine everything with clean hands or a fork until the ingredients are evenly distributed.
  5. Avoid overmixing because it can make the meatballs firm and dense.

Tip: If the mixture feels too wet, add one tablespoon of breadcrumbs at a time. If it feels dry, add one teaspoon of milk.

Shape the Meatballs

  1. Divide the mixture into 12 equal portions.
  2. Roll each portion gently between your palms to form a small meatball.
  3. Aim for meatballs about 1 to 1 1/4 inches wide.
  4. Place them on a clean plate while you prepare the air fryer.

Keeping the meatballs close to the same size helps them cook evenly. Avoid making them too large because they need to fit comfortably inside the slider rolls.

Preheat the Air Fryer

  1. Preheat your air fryer to 375°F for about 3 minutes, if your model requires preheating.
  2. Lightly grease the air fryer basket or use a suitable perforated parchment liner.
  3. Make sure the liner does not block the airflow or extend beyond the food area.

Do not place loose parchment paper in the air fryer during preheating. The circulating air can lift it toward the heating element.

Air Fry the Meatballs

  1. Arrange the meatballs in a single layer in the air fryer basket.
  2. Leave a little space between each meatball so hot air can circulate.
  3. Cook at 375°F for approximately 10–12 minutes.
  4. Turn the meatballs halfway through cooking for more even browning.
  5. Check the center of the largest meatball with a meat thermometer.
  6. Continue cooking if needed until the ground beef reaches an internal temperature of 160°F.

Cooking time can vary depending on your air fryer and the size of the meatballs. Always use the internal temperature rather than appearance alone to confirm doneness.

Prepare the Parmesan Garlic Butter

  1. Melt the unsalted butter in a small microwave-safe bowl.
  2. Add the grated Parmesan cheese.
  3. Stir in the garlic powder and dried Italian seasoning.
  4. Mix until the topping is evenly combined.
  5. Set the bowl aside while you assemble the sliders.

This buttery mixture gives the rolls their savory flavor and helps create a crisp, golden Parmesan crust.

Prepare the Slider Rolls

  1. Keep the 12 Hawaiian rolls connected if they come in one sheet.
  2. Use a serrated knife to slice the entire sheet horizontally.
  3. Place the bottom half of the rolls in an air-fryer-safe pan that fits your basket.
  4. Spread a thin layer of marinara sauce over the bottom rolls.
  5. Sprinkle half of the shredded mozzarella over the sauce.

Keeping the rolls connected makes assembly easier and helps the sliders stay together when serving.

Add the Meatballs and Sauce

  1. Place one cooked meatball on each slider roll.
  2. Spoon a little marinara sauce over each meatball.
  3. Avoid adding too much sauce because excess moisture can make the bottom buns soggy.
  4. Sprinkle the remaining mozzarella cheese evenly over the meatballs.
  5. Add the chopped parsley if you want a fresh herb flavor.

Make sure each slider gets a similar amount of sauce and cheese so every serving tastes balanced.

Add the Top Rolls and Parmesan Topping

  1. Place the top half of the rolls over the meatballs.
  2. Brush the Parmesan garlic butter mixture evenly over the tops.
  3. Make sure the edges receive some of the mixture for a flavorful crust.
  4. Sprinkle a little extra Parmesan over the rolls if desired.

The butter helps the tops turn golden while the Parmesan creates a savory, crisp finish.

Air Fry the Assembled Sliders

  1. Carefully place the pan in the air fryer basket.
  2. Set the temperature to 320°F.
  3. Cook for approximately 3–5 minutes.
  4. Check after 3 minutes to see whether the cheese has melted and the tops are lightly golden.
  5. Add another minute or two if needed, keeping a close eye on the rolls.
  6. Remove the pan carefully using heat-safe gloves.

Avoid cooking the sliders too long because the Hawaiian rolls can brown quickly. If your air fryer has a strong fan, check them even earlier.

Rest and Serve

  1. Let the sliders rest for about 2 minutes.
  2. Cut along the lines between the rolls if they are still connected.
  3. Transfer them to a serving plate.
  4. Sprinkle with fresh parsley if desired.
  5. Serve warm with extra marinara sauce for dipping.

The finished sliders should have a golden Parmesan top, melted cheese, warm marinara, and tender meatballs inside.

Tips for the Best Parmesan Crusted Meatball Sliders

  • Use similar-sized meatballs: Even sizing helps all the meatballs cook at the same rate.
  • Do not overmix: Gently combine the meatball ingredients to keep the texture tender.
  • Check the internal temperature: Ground beef meatballs should reach 160°F before serving.
  • Use a thicker marinara sauce: A thick sauce adds flavor without making the buns overly wet.
  • Grate Parmesan finely: Finely grated cheese spreads more evenly over the rolls.
  • Watch the final cooking stage: The slider tops can brown quickly at 320°F.
  • Leave room for airflow: Do not overcrowd the air fryer basket.
  • Choose a pan that fits: A suitable air-fryer-safe pan makes it easier to assemble and remove the sliders.

Easy Variations to Try

Use Ground Turkey

Replace the ground beef with ground turkey for a different flavor. Make sure the turkey meatballs reach an internal temperature of 165°F.

Add Pepperoni

Place a small piece of pepperoni on each meatball before adding the mozzarella. This gives the sliders a pizza-inspired flavor.

Make Them Extra Cheesy

Add a little provolone or sliced mozzarella along with the shredded mozzarella. Avoid adding too much cheese because it can spill over the rolls.

Add Red Pepper Flakes

Mix a pinch of red pepper flakes into the marinara sauce for a mild spicy kick.

Use Different Slider Buns

Hawaiian rolls add a slightly sweet flavor, but regular dinner rolls or soft potato slider buns also work well.

What to Serve with Meatball Sliders

These sliders pair well with simple sides that balance their rich, cheesy filling.

  • Air fryer French fries: A crispy side that works well for casual dinners.
  • Garden salad: Fresh lettuce, tomatoes, and cucumber add a refreshing contrast.
  • Roasted vegetables: Broccoli, zucchini, or bell peppers make an easy side.
  • Garlic green beans: Their savory flavor complements the Parmesan topping.
  • Marinara dipping sauce: Serve extra warm sauce on the side for dipping.
  • Potato wedges: Seasoned wedges make the meal more filling.

How to Store and Reheat Leftovers

Refrigerating

  1. Let the leftover sliders cool slightly.
  2. Place them in an airtight container.
  3. Refrigerate within 2 hours of cooking.
  4. Store for up to 3–4 days.

Reheating in the Air Fryer

  1. Preheat the air fryer to 300°F.
  2. Place the sliders in the basket in a single layer.
  3. Heat for approximately 3–5 minutes.
  4. Check that the center is hot before serving.

Add a small amount of extra marinara sauce if the meatballs seem dry. Reheating time may vary depending on slider size and whether the sliders are cold or frozen.

Can You Freeze Them?

You can freeze cooked meatballs separately for easier preparation later. Cool them, place them in a freezer-safe container, and freeze for up to 3 months for best quality. Thaw safely in the refrigerator before assembling and reheating the sliders.

Frequently Asked Questions

1. Can I use frozen meatballs for this recipe?

Yes. Use fully cooked frozen meatballs, heat them according to the package directions, and make sure they are hot before assembling the sliders.

2. What temperature should I use for air fryer meatballs?

Cook raw ground beef meatballs at 375°F until their centers reach 160°F.

3. Can I make these sliders ahead of time?

Yes. Cook the meatballs in advance and refrigerate them; assemble and air fry the sliders shortly before serving for the best texture.

4. Why are my slider buns soggy?

Too much marinara sauce can make the bottom rolls soggy, so use a thin layer and serve extra sauce on the side.

5. Can I use ground turkey instead of beef?

Yes. Ground turkey works well, but cook the meatballs to an internal temperature of 165°F.

6. Which cheese works best for meatball sliders?

Mozzarella melts smoothly, while Parmesan adds a salty, savory crust; provolone is another good option.

7. How do I keep the tops from burning?

Cook the assembled sliders at 320°F and begin checking them after 3 minutes because air fryer models vary.

8. How long do leftover meatball sliders last?

Store them in an airtight container in the refrigerator for 3–4 days and reheat until the center is hot.

Final Thoughts

Air Fryer Parmesan Crusted Meatball Sliders are a simple way to enjoy the flavor of a classic meatball sub in a smaller, easy-to-serve package. Tender meatballs, rich marinara, melted mozzarella, and golden Parmesan garlic rolls make them a satisfying choice for lunch, dinner, or a party snack.

Prepare the meatballs ahead of time to make assembly quicker, and add the buttery topping just before air frying. Serve them warm with extra marinara sauce, crispy fries, or a fresh salad for a meal everyone can enjoy.

Air Fryer Garlic Butter Steak Bites

Air Fryer Garlic Butter Steak Bites


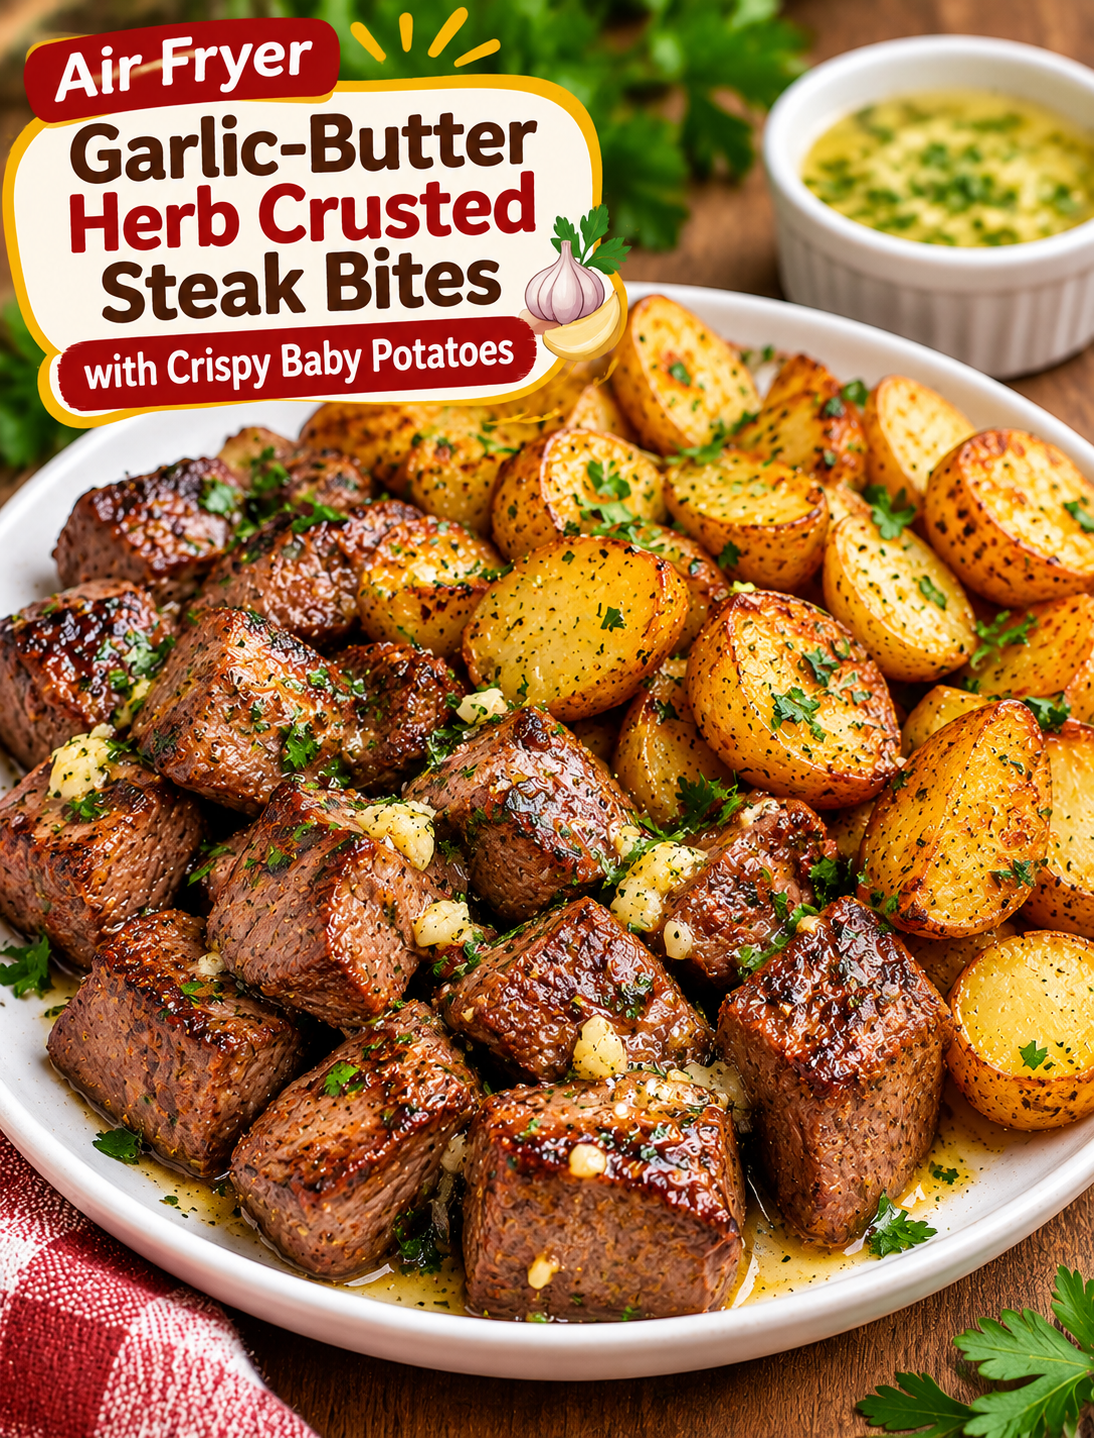
Want a steakhouse-style dinner without spending hours in the kitchen? These Air Fryer Garlic-Butter Herb Crusted Steak Bites with Crispy Baby Potatoes bring tender beef, golden potatoes, and rich garlic butter together in one delicious meal.

Each piece of steak is seasoned with garlic, smoked paprika, black pepper, and dried herbs before being air fried until nicely browned. The baby potatoes develop crisp edges while staying soft and fluffy inside. A warm garlic-herb butter sauce brings everything together with a rich, savory finish.

The air fryer makes this recipe convenient for busy weeknights. You can cook the potatoes first, then prepare the steak bites while the potatoes rest. Both parts come together quickly without heating your entire kitchen.

This easy steak and potato dinner is perfect for family meals, weekend dinners, or nights when you want something satisfying with simple ingredients. Serve it straight from the air fryer with fresh parsley and an extra spoonful of garlic butter.

Why You’ll Love This Recipe

  • Steakhouse flavor at home: Garlic butter, fresh herbs, and seasoned beef create a rich and savory combination.
  • Crispy potatoes: Baby potatoes develop golden edges while keeping a soft center.
  • Quick preparation: Simple ingredients and straightforward cooking steps make dinner easier.
  • Air fryer convenience: Cook the potatoes and steak without using several pans.
  • Customizable seasoning: Adjust the garlic, herbs, and pepper to match your taste.
  • Perfect for dinner: Steak and potatoes make a satisfying meal without complicated side dishes.
  • Easy cleanup: The air fryer basket reduces the amount of cookware needed.

Ingredients You’ll Need

These ingredients create juicy steak bites, crispy potatoes, and a flavorful garlic-herb butter coating.

  1. 1 pound sirloin steak: Choose a well-trimmed sirloin steak and cut it into evenly sized 1-inch cubes. Sirloin is flavorful and works well for quick air frying.
  2. 1 pound baby potatoes: Use baby Yukon Gold or red potatoes. Their small size makes them easy to cook and serve.
  3. 2 tablespoons olive oil: Helps the potatoes brown and allows the steak seasoning to coat evenly.
  4. 1 teaspoon garlic powder: Adds savory garlic flavor to both the steak and potatoes.
  5. 1/2 teaspoon smoked paprika: Gives the steak a warm, smoky taste and attractive color.
  6. 1/2 teaspoon dried rosemary: Adds a fragrant herbal flavor that pairs well with beef.
  7. 1/2 teaspoon dried thyme: Brings an earthy flavor to the seasoning mixture.
  8. 1/2 teaspoon black pepper: Adds mild heat and balances the garlic butter.
  9. 3/4 teaspoon salt: Enhances the natural flavor of the steak and potatoes.
  10. 3 tablespoons unsalted butter: Creates a rich coating for the cooked steak bites and potatoes.
  11. 3 garlic cloves, minced: Fresh garlic gives the butter sauce a stronger, more aromatic flavor.
  12. 1 tablespoon chopped fresh parsley: Adds fresh color and a light herbal finish.
  13. 1 teaspoon fresh lemon juice: Optional, for a little brightness in the garlic butter.

Equipment You’ll Need

  • Air fryer
  • Sharp kitchen knife
  • Cutting board
  • Mixing bowls
  • Measuring spoons
  • Small microwave-safe bowl or saucepan
  • Silicone spatula or kitchen tongs
  • Instant-read meat thermometer

How to Make Air Fryer Garlic-Butter Herb Crusted Steak Bites with Crispy Baby Potatoes

Follow these simple steps to prepare tender steak bites and golden potatoes with a flavorful garlic butter finish.

Step 1: Prepare the Baby Potatoes

Wash the baby potatoes under cool running water and dry them with a clean kitchen towel.

Cut each potato in half. If some potatoes are larger, cut them into quarters so the pieces cook evenly.

Place the potatoes in a mixing bowl and drizzle with olive oil.

Add garlic powder, smoked paprika, half of the salt, and a little black pepper. Toss until all the potato pieces are evenly coated.

Step 2: Preheat the Air Fryer

Preheat your air fryer to 400°F for approximately 3 minutes if your model requires preheating.

Preheating helps the potatoes begin cooking at a consistent temperature.

Check your air fryer manufacturer’s instructions because preheating settings can vary.

Step 3: Air Fry the Baby Potatoes

Place the seasoned potatoes in the air fryer basket with the cut sides facing down where possible.

Arrange them in a single layer and avoid overcrowding the basket.

Air fry at 400°F for 12–15 minutes, shaking the basket halfway through cooking.

Check the potatoes with a fork. They should have golden edges and a tender center.

If they need more time, cook for another 2–3 minutes.

Step 4: Prepare the Steak Bites

While the potatoes cook, pat the sirloin steak dry with paper towels.

Cut the steak into evenly sized 1-inch cubes. Removing excess surface moisture helps the beef brown during air frying.

Place the steak pieces in a clean mixing bowl.

Add the remaining salt, black pepper, rosemary, thyme, and a light drizzle of olive oil.

Toss gently until each piece is coated with the seasoning.

Step 5: Air Fry the Steak Bites

Remove the cooked potatoes and set them aside.

Arrange the steak bites in a single layer inside the air fryer basket. Leave space between the pieces so hot air can circulate.

Air fry at 400°F for approximately 4–6 minutes, turning or shaking the basket halfway through.

Cooking time depends on the steak thickness, air fryer model, and desired doneness.

For food safety, check the thickest steak pieces with an instant-read thermometer. Whole beef cuts should reach at least 145°F, followed by a 3-minute rest.

Avoid overcrowding the basket. Cook the steak in batches if needed.

Step 6: Prepare the Garlic-Herb Butter

While the steak cooks, melt the unsalted butter in a small microwave-safe bowl or saucepan.

Add the minced garlic, chopped parsley, and dried herbs.

Stir until the garlic and herbs are evenly mixed into the butter.

Add fresh lemon juice if you want a slightly brighter flavor.

Keep the butter warm but do not let the garlic burn.

Step 7: Coat the Steak Bites

Transfer the cooked steak bites to a clean serving bowl.

Pour most of the warm garlic-herb butter over the steak.

Toss gently until the butter coats the steak pieces.

Allow the steak to rest for 3 minutes after reaching the recommended temperature before serving.

Step 8: Toss the Crispy Potatoes

Return the cooked baby potatoes to a mixing bowl.

Add the remaining garlic butter and toss until the potatoes are lightly coated.

For extra crispness, you can return the potatoes to the air fryer at 375°F for another 1–2 minutes. Watch closely to prevent the garlic from burning.

Step 9: Combine and Serve

Arrange the crispy baby potatoes and garlic-butter steak bites on a serving plate.

Drizzle any remaining garlic-herb butter over the top.

Finish with freshly chopped parsley and a little black pepper.

Serve immediately while the steak is warm and the potatoes still have their crispy edges.

Tips for the Best Steak Bites and Crispy Potatoes

Use these practical tips to get better flavor and texture from your air fryer dinner.

  • Choose sirloin steak: Sirloin offers a good balance of flavor, tenderness, and value.
  • Cut evenly sized pieces: Similar steak cubes cook more evenly.
  • Dry the steak before seasoning: Removing surface moisture helps the beef brown.
  • Don’t overcrowd the basket: Air needs room to circulate around the steak and potatoes.
  • Cook potatoes first: They need more time than small steak pieces.
  • Add garlic butter after cooking: Fresh garlic can burn at high air fryer temperatures.
  • Use an instant-read thermometer: Check the internal temperature instead of relying only on cooking time.
  • Rest the steak: A short rest allows the juices to settle before serving.
  • Serve immediately: The potatoes taste best while their edges are still crisp.

Best Variations to Try

You can easily change the seasoning and ingredients to create different versions of this steak and potato dinner.

1. Spicy Garlic Butter Steak Bites

Add 1/4 teaspoon cayenne pepper and a pinch of red pepper flakes to the steak seasoning. This creates a warmer flavor without changing the cooking method.

2. Parmesan Herb Potatoes

Sprinkle 2 tablespoons of grated Parmesan over the cooked baby potatoes. Toss with parsley and a little garlic butter for a savory finish.

3. Lemon Garlic Steak Bites

Add extra lemon zest and a small squeeze of fresh lemon juice to the finished garlic butter. The citrus balances the rich flavor of the beef.

4. Cajun Steak and Potatoes

Replace the rosemary and thyme with 1 teaspoon of Cajun seasoning. Check the salt level because some Cajun blends already contain salt.

5. Butter Mushroom Steak Bites

Cook sliced mushrooms separately in a skillet with butter and garlic. Spoon them over the finished steak and potatoes for a hearty dinner.

6. Parmesan Garlic Steak Bites

Add finely grated Parmesan and extra fresh parsley to the garlic butter after cooking. Toss lightly for a richer, cheesy flavor.

What to Serve with Garlic-Butter Steak Bites

Steak and potatoes make a satisfying meal, but a fresh side dish can add color and balance.

  • Roasted broccoli: Adds a fresh vegetable side with slightly crisp edges.
  • Garlic green beans: Their mild flavor pairs well with seasoned steak.
  • Garden salad: Serve lettuce, cucumber, tomatoes, and a light vinaigrette.
  • Roasted asparagus: Its fresh flavor works well with garlic and herbs.
  • Creamy coleslaw: Adds a cool and crunchy contrast to the warm steak.
  • Sautéed mushrooms: Bring an earthy flavor that complements the beef.

How to Store Leftovers

Allow the steak and potatoes to cool slightly before storing them.

Transfer leftovers to an airtight container and refrigerate within 2 hours of cooking.

Store the steak and potatoes separately if possible to help maintain their texture.

Refrigerate leftovers for up to 3–4 days.

For the best flavor, add a little fresh garlic butter when reheating rather than pouring all the butter over the food before storage.

How to Reheat Steak Bites and Potatoes in the Air Fryer

The air fryer helps bring back some of the crispness in leftover potatoes.

  1. Preheat the air fryer to 325°F if required by your model.
  2. Place the potatoes in the basket and heat for approximately 3–4 minutes.
  3. Add the steak bites and continue heating for another 2–3 minutes.
  4. Check that leftovers reach 165°F throughout.
  5. Add a small amount of warm garlic butter before serving.

Avoid reheating the steak for too long because it can become dry and tough.

Can You Prepare This Recipe Ahead of Time?

Yes. You can complete several preparation steps before cooking.

Wash and cut the baby potatoes a few hours ahead. Keep them submerged in cold water in the refrigerator, then drain and dry thoroughly before seasoning.

You can also cut the steak into cubes and store it in a covered container in the refrigerator.

Measure the herbs and spices in advance, and prepare the garlic butter shortly before serving.

For the best texture, air fry the steak and potatoes just before mealtime.

Common Mistakes to Avoid

Avoid these mistakes to get a better result from your air fryer steak dinner.

  • Cutting steak pieces too large: Large cubes need more cooking time and may cook unevenly.
  • Using wet steak: Moisture on the surface can prevent proper browning.
  • Adding potatoes and steak at the same time: Potatoes generally need more cooking time.
  • Overcrowding the basket: Crowded food may steam instead of browning properly.
  • Burning fresh garlic: Add garlic butter after air frying rather than cooking fresh garlic at 400°F.
  • Skipping the meat thermometer: Cooking time alone cannot confirm a safe internal temperature.
  • Reheating steak for too long: Excess heat can make leftover beef tough.

Frequently Asked Questions

1. How long do steak bites take in the air fryer?

One-inch steak cubes usually take approximately 4–6 minutes at 400°F, but check their internal temperature with a thermometer.

2. What is the best steak for air fryer steak bites?

Sirloin is a great choice because it has good beef flavor, a tender texture, and cooks quickly when cut into small cubes.

3. How long do baby potatoes take in the air fryer?

Halved baby potatoes usually take 12–15 minutes at 400°F, depending on their size and your air fryer model.

4. Can I cook steak and potatoes together?

Yes, but potatoes need a longer cooking time, so cook them first before adding the steak.

5. How do I keep steak bites juicy?

Use evenly cut steak, avoid overcrowding, monitor the internal temperature, and allow the cooked beef to rest before serving.

6. Can I use frozen baby potatoes?

Yes, but adjust the cooking time according to the package instructions and check that the potatoes are heated through and crisp.

7. Can I make garlic butter steak bites without fresh garlic?

Yes. Replace the minced garlic with approximately 1 teaspoon of garlic powder mixed into the melted butter.

8. What temperature should steak bites reach?

For food safety, whole-cut beef should reach at least 145°F internally and rest for 3 minutes before serving.

Final Thoughts

These Air Fryer Garlic-Butter Herb Crusted Steak Bites with Crispy Baby Potatoes are a delicious way to enjoy a steakhouse-inspired dinner at home. Tender sirloin, golden potatoes, fresh herbs, and rich garlic butter create a combination that feels special without requiring complicated preparation.

The recipe is easy to customize with different seasonings, vegetables, and herbs. Cook the potatoes first, prepare the steak in a single layer, and finish everything with warm garlic butter for the best results.

Serve this meal on a busy weeknight or make it for a relaxed weekend dinner.