Soft Custard & Chocolate Chip Spirals

Soft Custard & Chocolate Chip Spirals

Pillowy Dough • Creamy Vanilla Custard • Melting Chocolate Chips

Prep Time: 30 minutes
Rising Time: About 1½ hours
Bake Time: 20–25 minutes
Yield: 12–15 soft spirals


Ingredients

For the Soft Dough

  • 500 g all-purpose flour or bread flour

  • 250 ml warm milk (comfortably warm, not hot)

  • 70 g sugar

  • 7 g dry yeast (1 standard packet)

  • 1 egg, at room temperature

  • 60 g unsalted butter, softened

  • ½ teaspoon salt

For the Vanilla Custard (Pastry Cream)

  • 250 ml milk

  • 2 egg yolks

  • 50 g sugar

  • 20 g cornstarch

  • 1 teaspoon vanilla extract

Filling & Finish

  • ½ cup mini chocolate chips

  • 1 egg, lightly beaten (for brushing the tops)


Step-by-Step Instructions

1. Prepare the Dough

Activate the Yeast

In a large mixing bowl, combine the warm milk, sugar, and yeast. Stir gently.

Let the mixture rest for 5–10 minutes, until the surface looks foamy and slightly bubbly. This indicates the yeast is active.

Mix the Dough

Add the egg and salt to the yeast mixture. Stir well.

Gradually add the flour, mixing until a soft dough begins to form.

Knead

Add the softened butter to the dough.

Knead by hand for about 10 minutes, or in a stand mixer for 5–7 minutes, until the dough becomes smooth, stretchy, and easy to handle.

The dough should feel soft and slightly elastic, not dry.

First Rise

Place the dough in a lightly greased bowl. Cover with a clean cloth.

Let it rest in a warm place for about 1 hour, or until it has noticeably increased in size.


2. Make the Custard Filling

Mix

In a small saucepan (off the heat), whisk together the egg yolks, sugar, and cornstarch until smooth.

Slowly pour in the milk while whisking, ensuring there are no lumps.

Cook

Place the saucepan over medium heat. Stir continuously with a whisk or spatula.

As the mixture warms, it will gradually thicken into a smooth, creamy texture similar to thick pudding.

Cool

Remove from heat and stir in the vanilla extract.

Transfer the custard to a bowl. Cover the surface directly with plastic wrap to keep it smooth.

Allow it to cool completely before using.


3. Shape the Spirals

Lightly press the risen dough to release excess air.

On a floured surface, roll the dough into a large rectangle, about ¼ inch (½ cm) thick.

Spread the cooled custard evenly over the dough, leaving a small border along one long edge.

Sprinkle the mini chocolate chips evenly over the custard.

Starting from the opposite edge, roll the dough gently but firmly into a long log.

Using a sharp knife or plain dental floss, slice into 12–15 equal spirals.


4. Second Rise & Baking

Place the spirals on a baking tray lined with parchment paper, leaving space between each piece.

Cover lightly and let them rest for 30 minutes, allowing them to puff up slightly.

Brush the tops gently with the beaten egg for a golden finish.

Bake in a preheated oven at 180°C (350°F) for 20–25 minutes, until the spirals are evenly golden and baked through.


Helpful Tips for Best Results

  • Custard Temperature: Ensure the custard is fully cooled before spreading to keep the dough easy to roll.

  • Neat Spirals: If the dough feels very soft, chill the rolled log for 10 minutes before slicing.

  • Even Baking: Rotate the tray halfway through baking if your oven heats unevenly.

  • Storage: Store in a sealed container at room temperature for up to 2 days. Warm briefly before serving to refresh the softness.
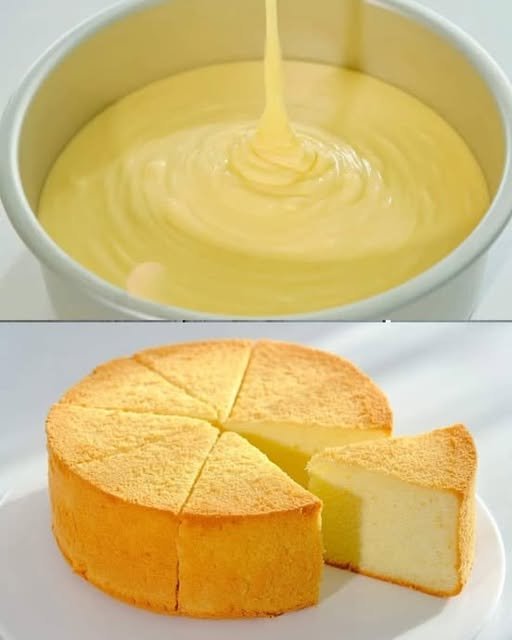
Cloud-Like Basic Chiffon Cake

Cloud-Like Basic Chiffon Cake

Ultra-Soft • Light as Air • Delicate Crumb

Prep Time: 20 minutes
Bake Time: 50–60 minutes
Pan Size: 7-inch (18 cm) chiffon tube pan or round pan
Yield: 6–8 slices


Ingredients

Egg Base

  • 5 large eggs, cold, separated into yolks and whites

  • 50 g milk, at room temperature

  • 50 g vegetable oil (or any neutral-flavored oil)

  • 84 g cake flour, sifted

  • 20 g granulated sugar (for egg yolks)

  • 2 g salt

  • 1 teaspoon vanilla extract

Meringue

  • 5 egg whites

  • 50 g granulated sugar

  • 2 ml lemon juice (or ¼ teaspoon cream of tartar)


Step-by-Step Instructions

1. Prepare the Egg Yolk Batter

Place the egg yolks into a large mixing bowl. Add the 20 g sugar, salt, and vanilla extract.

Whisk until the mixture looks smooth, pale, and well blended.

Slowly pour in the milk and vegetable oil. Whisk steadily until everything combines into a glossy, slightly thick mixture.

Sift the cake flour directly into the bowl. Using a whisk or spatula, gently mix in a zigzag or “Z” motion until the batter is smooth and free of lumps.
Mix only until combined to keep the texture light.


2. Whip the Egg Whites (Meringue)

In a separate clean bowl, add the egg whites and lemon juice.

Using an electric mixer on medium speed, beat until the whites become foamy and bubbly.

Add the sugar gradually in three portions, beating between each addition.

Increase to medium-high speed and continue beating until stiff peaks form.
When you lift the beaters, the peaks should stand upright and look glossy.


3. Combine the Batter Gently

Add about one-third of the whipped egg whites to the yolk batter. Fold gently with a spatula to loosen the mixture.

Pour the lightened yolk batter into the remaining egg whites.

Using a gentle folding motion, combine everything:

  • Cut through the center

  • Scrape the bottom

  • Lift and fold over

Continue until the batter looks evenly blended with no white streaks.


4. Bake the Cake

Pour the batter into an ungreased 7-inch chiffon pan or round pan.

Lightly tap the pan on the counter 2–3 times to release large air bubbles.

Place the pan on the middle rack of a preheated oven.

Bake at 150°C (300°F) for 50–60 minutes, until:

  • The top turns light golden

  • The surface springs back gently when touched


5. Cool the Cake Properly

Once baked, remove the pan from the oven and immediately turn it upside down on a wire rack or bottle neck.

Allow the cake to cool fully in this position for 1–2 hours.
This helps the cake keep its airy structure.

When completely cool, run a thin knife around the edges and gently release the cake.


Helpful Baking Tips

  • Pan Choice: Leave the pan ungreased so the batter can rise evenly.

  • Clean Equipment: Make sure bowls and beaters are completely clean for the best meringue volume.

  • Sugar Control: Adding sugar slowly helps create a smooth, stable foam.

  • Flour Substitute:
    If cake flour is unavailable:

    • Measure 84 g all-purpose flour

    • Remove 1½ tablespoons

    • Replace with 1½ tablespoons cornstarch

    • Sift well before using


Texture & Flavor

This chiffon cake is:

  • Soft and airy

  • Lightly sweet

  • Moist without being heavy

  • Perfect on its own or with fruit, whipped cream, or a light glaze

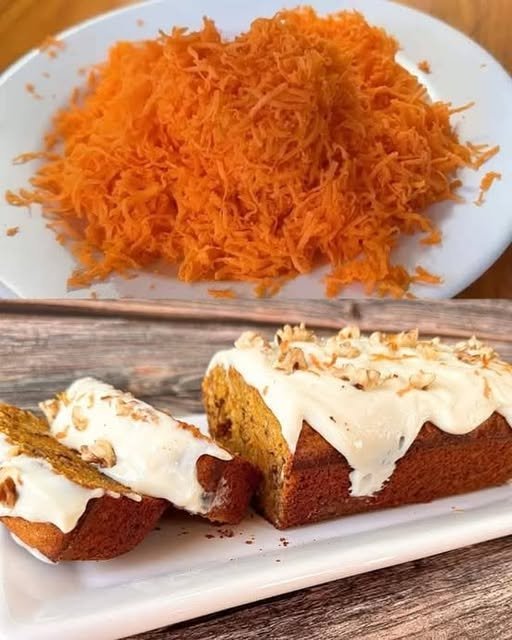
Quick and Delicious Carrot and Walnut Cake

Quick and Delicious Carrot and Walnut Cake

Soft, lightly spiced cake with natural sweetness and a smooth topping

This carrot and walnut cake is moist, fragrant, and easy to prepare. Finely grated carrots keep the crumb soft, while walnuts add a pleasant texture. The gentle citrus aroma from orange zest brightens the flavor, making this cake perfect for tea time, family gatherings, or everyday baking.


Ingredients

For the Cake Batter

  • Large eggs – 3
    Provide structure and help the cake rise evenly.

  • Granulated sugar – 150 g (¾ cup)
    Adds sweetness and keeps the cake tender.

  • Vegetable oil – 80 ml (⅓ cup)
    Ensures a soft texture that stays moist even after cooling.

  • All-purpose flour – 180 g (1½ cups)
    Gives the cake its shape while remaining light.

  • Carrots – 200 g (about 2 medium), finely grated
    Add natural moisture and mild sweetness.

  • Walnuts – 100 g (½ cup), chopped
    Bring gentle crunch and nutty flavor.

  • Orange zest – from 1 orange
    Adds freshness and aroma without extra liquid.

  • Baking powder – 2 teaspoons
    Helps the cake rise smoothly.

  • Cake spice mix – ½ teaspoon
    A blend of cinnamon, cloves, nutmeg, ginger, cardamom, vanilla, and anise.

  • Salt – a small pinch
    Balances flavors and enhances sweetness.


For the Creamy Topping (Optional but Recommended)

  • Cream cheese – 115 g (4 oz), softened
    Creates a smooth and lightly tangy topping.

  • Butter – 30 g (2 tablespoons), softened
    Adds richness and structure.

  • Powdered sugar – 120 g (1 cup)
    Sweetens and smooths the frosting.

  • Vanilla extract – ½ teaspoon
    Rounds out the flavor.


Equipment Needed

  • Loaf pan

  • Mixing bowls

  • Whisk or hand mixer

  • Spatula

  • Wire cooling rack


Step-by-Step Instructions


1. Prepare the Oven and Pan

  • Preheat the oven to 350°F (175°C).

  • Lightly grease a loaf pan with oil or butter.

  • Line the base with parchment paper for easy release.


2. Whisk Eggs and Sugar

  • In a large bowl, add the eggs and sugar.

  • Whisk or beat for 2–3 minutes until the mixture becomes pale, airy, and slightly thickened.


3. Add Oil and Orange Zest

  • Slowly pour in the vegetable oil while whisking gently.

  • Stir in the orange zest until evenly distributed.


4. Combine Dry Ingredients

  • Sift together the flour, baking powder, salt, and spice mix.

  • Add to the wet mixture and fold gently using a spatula.

  • Mix only until the flour disappears to keep the cake soft.


5. Fold in Carrots and Walnuts

  • Add the grated carrots and chopped walnuts.

  • Fold gently until evenly mixed.

  • The batter will be thick but smooth.


6. Bake the Cake

  • Pour the batter into the prepared pan and level the top.

  • Bake for 40–50 minutes, until the cake is set and lightly golden.

  • A toothpick inserted in the center should come out clean.


7. Cool the Cake

  • Let the cake rest in the pan for 10 minutes.

  • Carefully remove and transfer to a wire rack.

  • Allow to cool completely before adding any topping.


Prepare the Creamy Topping

8. Make the Frosting

  • In a bowl, combine the cream cheese and butter.

  • Whisk until smooth and creamy.

  • Add powdered sugar and vanilla extract.

  • Mix until soft, smooth, and spreadable.


9. Finish and Serve

  • Spread the topping evenly over the cooled cake.

  • Garnish with extra chopped walnuts or orange zest if desired.

  • Slice and serve.


Storage Tips

  • Keep covered at room temperature for 1 day

  • Refrigerate for up to 4 days

  • Bring to room temperature before serving for best texture

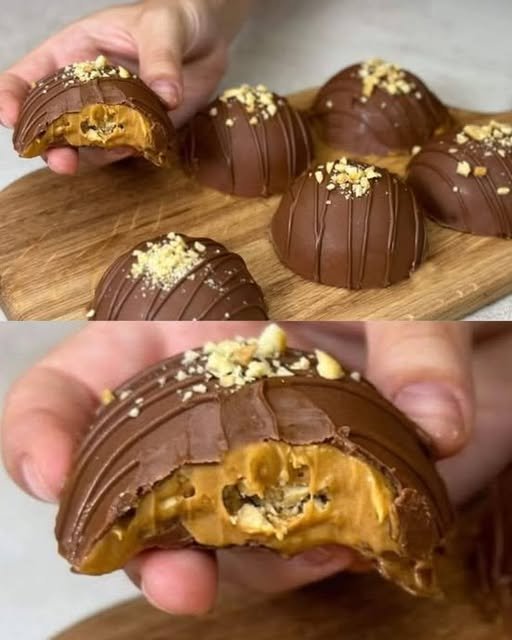
Creamy Caramel and Nut Chocolate Domes

Creamy Caramel and Nut Chocolate Domes

Smooth chocolate shells filled with rich caramel and crunchy nuts

These elegant chocolate domes combine a silky chocolate shell with a creamy caramel center and finely chopped nuts. They are perfect for special occasions, gifting, or whenever you want a dessert that looks impressive but is made with simple ingredients and thoughtful steps.


Ingredients

For the Caramel Filling

  • Granulated sugar – 250 g (about 1¼ cups)
    Forms the base of the caramel with deep sweetness.

  • Unsalted butter – 65 g (about 4½ tablespoons)
    Adds richness and smooth texture.

  • Heavy cream – 200 ml (about ¾ cup + 2 tablespoons)
    Creates a creamy, soft caramel consistency.


For the Chocolate Shells

  • Semi-sweet or milk chocolate – 160 g (5.6 oz)
    Choose good-quality chocolate for smooth shells and clean flavor.

  • Sunflower oil – 30 g (about 2 tablespoons)
    Helps the chocolate remain glossy and easy to bite.


For the Filling Add-in

  • Chopped nuts – 60 g (2 oz)
    Peanuts, hazelnuts, or walnuts work especially well. Chop finely for even texture.


Equipment Needed

  • Heavy-bottomed saucepan

  • Silicone dome mold

  • Heat-safe bowls

  • Whisk or spatula

  • Spoon or pastry brush


Step-by-Step Instructions


1. Make the Caramel Filling

  1. Place the sugar in a heavy-bottomed saucepan.

  2. Heat over medium heat and allow the sugar to melt naturally.

  3. As the sugar liquefies, gently swirl the pan occasionally to help it melt evenly.

  4. Continue heating until the sugar becomes a smooth amber-colored liquid.

  5. Add the butter and whisk until fully blended and smooth.

  6. Slowly pour in the cream while whisking continuously until the mixture becomes unified and glossy.

  7. Allow the caramel to cook gently for 2–3 minutes, stirring occasionally, until it thickens slightly.

  8. Remove from heat and stir in the chopped nuts until evenly distributed.

  9. Transfer the caramel to a bowl and let it cool completely.

    • The finished caramel should be thick, smooth, and easy to spoon or pipe.


2. Prepare the Chocolate Coating

  1. Place the chocolate in a heat-safe bowl.

  2. Melt it gently using a double boiler or microwave in 30-second intervals, stirring between each interval until smooth.

  3. Stir in the sunflower oil until fully combined.

    • This step ensures a smooth finish, soft bite, and professional shine.


3. Form the Chocolate Domes

  1. Spoon a small amount of melted chocolate into each cavity of the silicone mold.

  2. Use the back of a spoon or a pastry brush to spread the chocolate evenly across the base and up the sides.

  3. Place the mold in the freezer for 5–10 minutes until the chocolate firms up.

  4. If desired, apply a second thin layer of chocolate for extra strength.

  5. Chill again until set.


4. Fill and Seal the Domes

  1. Spoon or pipe the cooled caramel into each chocolate shell.

  2. Leave a small space at the top so the domes can be sealed neatly.

  3. Cover the caramel with the remaining melted chocolate, smoothing the surface with a spatula.

  4. Place the mold in the refrigerator or freezer for at least 30 minutes, until completely firm.


5. Unmold and Finish

  1. Gently release the domes from the silicone mold.

  2. Arrange on a serving plate.

Optional finishing touches:

  • Drizzle with extra melted chocolate

  • Sprinkle with finely crushed nuts

  • Dust lightly with cocoa powder


Storage Tips

  • Store in an airtight container

  • Keep refrigerated for up to 7 days

  • Bring to room temperature before serving for best texture and flavor

Super Moist 5-Minute Chocolate Cake

Super Moist 5-Minute Chocolate Cake

A soft, tender chocolate cake with a smooth chocolate topping

This easy chocolate cake comes together quickly using basic pantry ingredients. The batter is mixed in one bowl, bakes evenly, and stays soft and moist for days. It is ideal for everyday baking, family gatherings, or when you want a reliable chocolate dessert without complicated steps.


Ingredients

For the Cake

  • All-purpose flour – 1½ cups (180 g)
    Provides structure while keeping the cake soft.

  • Unsweetened cocoa powder – ½ cup (60 g)
    Use natural or Dutch-processed cocoa for a deep chocolate flavor.

  • Granulated sugar – 1 cup (200 g)
    Adds sweetness and helps retain moisture.

  • Baking powder – 1 teaspoon
    Helps the cake rise evenly.

  • Baking soda – ½ teaspoon
    Works with the cocoa to give the cake a light texture.

  • Salt – ½ teaspoon
    Balances the sweetness and enhances flavor.

  • Large eggs – 2
    Bind the ingredients and give structure
    OR
    Plain yogurt – ½ cup (for extra softness and moisture)

  • Milk – ½ cup (120 ml)
    Adds moisture and helps dissolve dry ingredients.

  • Vegetable or canola oil – ½ cup (120 ml)
    Keeps the cake tender even after cooling.

  • Vanilla extract – 2 teaspoons
    Enhances the chocolate flavor.

  • Boiling water or hot coffee – ½ cup (120 ml)
    Helps fully dissolve the cocoa powder and deepen the chocolate taste
    (Coffee does not make the cake taste like coffee)


For the Chocolate Topping

  • Semi-sweet chocolate chips or chopped chocolate – ½ cup
    Choose good-quality chocolate for smooth results.

  • Heavy cream – ⅓ cup
    Creates a soft, shiny chocolate topping.

  • Optional garnish: Chocolate shavings or cocoa powder


Equipment Needed

  • 8 × 8 inch (20 × 20 cm) square baking pan

  • Large mixing bowl

  • Whisk or hand mixer

  • Small heat-safe bowl

  • Spatula


Step-by-Step Instructions

1. Prepare the Oven and Pan

  • Preheat your oven to 350°F (175°C).

  • Grease the baking pan lightly with oil or butter.

  • For easy removal, line the pan with parchment paper, leaving a little overhang on the sides.


2. Combine Dry Ingredients

  • In a large bowl, add the flour, cocoa powder, sugar, baking powder, baking soda, and salt.

  • Sift if possible to remove lumps.

  • Whisk well until everything is evenly mixed and uniform in color.


3. Add Wet Ingredients

  • Add the eggs or yogurt, milk, oil, and vanilla extract to the bowl.

  • Whisk or beat on medium speed for 1–2 minutes until smooth and well combined.

  • Scrape the sides and bottom of the bowl to ensure no dry pockets remain.


4. Add Hot Liquid

  • Reduce mixing speed or switch to a spatula.

  • Slowly pour in the boiling water or hot coffee.

  • Mix gently until the batter becomes smooth and thin.

Important:
The batter will be runny. This is expected and helps create a soft texture after baking.


5. Bake the Cake

  • Pour the batter into the prepared pan.

  • Tap the pan gently on the counter to release air bubbles.

  • Bake for 30–35 minutes, or until:

    • A toothpick inserted in the center comes out clean or with a few moist crumbs.

  • Remove from the oven and let the cake cool completely in the pan.


Prepare the Chocolate Topping

6. Heat the Cream

  • Place the chocolate in a heat-safe bowl.

  • Heat the cream until very hot but not boiling (microwave or stovetop).


7. Melt the Chocolate

  • Pour the hot cream over the chocolate.

  • Let it sit undisturbed for 5 minutes.

  • Stir slowly from the center outward until smooth and glossy.

If needed, warm gently for a few seconds to fully melt.


Assemble the Cake

8. Finish and Serve

  • Pour the chocolate topping over the cooled cake.

  • Spread evenly using a spatula.

  • Add chocolate shavings or a light dusting of cocoa powder if desired.

  • Let the topping set for 15–20 minutes before slicing.


Storage Tips

  • Store covered at room temperature for 2 days

  • Refrigerate for up to 5 days

  • Bring to room temperature before serving for best texture

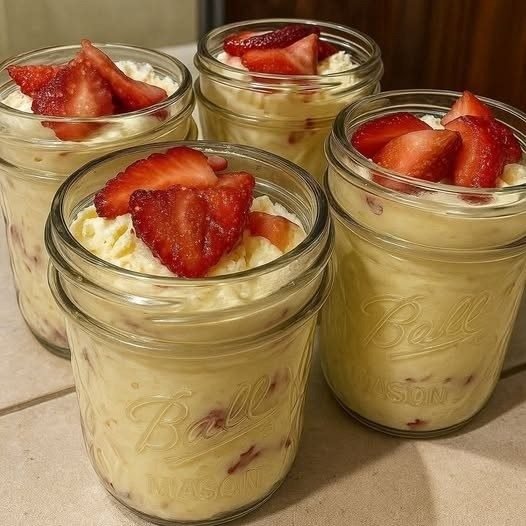
No-Bake Strawberry Cheesecake Jars

These No-Bake Strawberry Cheesecake Jars are the ultimate easy dessert—creamy, fruity, and beautifully layered with zero oven time required. Perfect for warm days, dinner parties, or make-ahead treats, these individual jars deliver all the flavor of classic cheesecake in a lighter, faster format. The buttery graham cracker crust, fluffy vanilla cheesecake filling, and juicy fresh strawberries come together in a dessert that looks elegant but is incredibly simple to prepare.

Serves: 4–6 jars
Prep Time: 15 minutes
Chill Time: 1–2 hours (optional but recommended)

Ingredients

Crust Layer

  • 1 cup graham cracker crumbs
  • 2 tablespoons sugar
  • 4 tablespoons butter, melted

Cheesecake Filling

  • 8 oz (225 g) cream cheese, softened
  • ½ cup powdered sugar
  • 1 teaspoon vanilla extract
  • 1 cup heavy whipping cream, cold

Strawberry Layer

  • 1½ cups fresh strawberries, diced
  • 1–2 tablespoons sugar (optional, depending on sweetness)

Toppings (Optional)

  • Sliced fresh strawberries
  • Whipped cream

Instructions

1. Prepare the Crust
In a small bowl, combine the graham cracker crumbs and sugar. Pour in the melted butter and mix until the crumbs are evenly coated and resemble wet sand. Spoon 2–3 tablespoons of the mixture into the bottom of each jar or glass. Gently press down with the back of a spoon to create a compact base. Set aside.

2. Prepare the Strawberries
Place the diced strawberries in a bowl and toss with sugar if desired. Let them sit for 10–15 minutes to release their natural juices. This step enhances the flavor and creates a light strawberry syrup that pairs beautifully with the cheesecake layer.

See also  Better Than Meat: Delicious Zucchini with Mushrooms Recipe

3. Make the Cheesecake Filling
In a medium mixing bowl, beat the softened cream cheese with powdered sugar and vanilla extract until completely smooth and creamy. In a separate chilled bowl, whip the cold heavy cream until stiff peaks form. Gently fold the whipped cream into the cream cheese mixture using a spatula, working slowly to keep the filling light, airy, and fluffy.

4. Assemble the Jars
Spoon a generous layer of cheesecake filling over the crust. Add a layer of juicy strawberries, including some of their released juices. Repeat the layers until the jars are full, finishing with a cheesecake or strawberry layer depending on your preference.

5. Chill and Serve
Top each jar with sliced strawberries and a swirl of whipped cream if desired. Chill the jars for at least 1 hour to allow the flavors to meld and the texture to set. Serve chilled for the best taste and consistency.

Tips & Variations

  • Substitute strawberries with blueberries, raspberries, or mango for variety
  • Add lemon zest to the cheesecake filling for extra freshness
  • Use digestive biscuits or vanilla wafers instead of graham crackers

These No-Bake Strawberry Cheesecake Jars are creamy, refreshing, and irresistibly indulgent—perfect for any occasion, with minimal effort and maximum flavor 🍓🍰