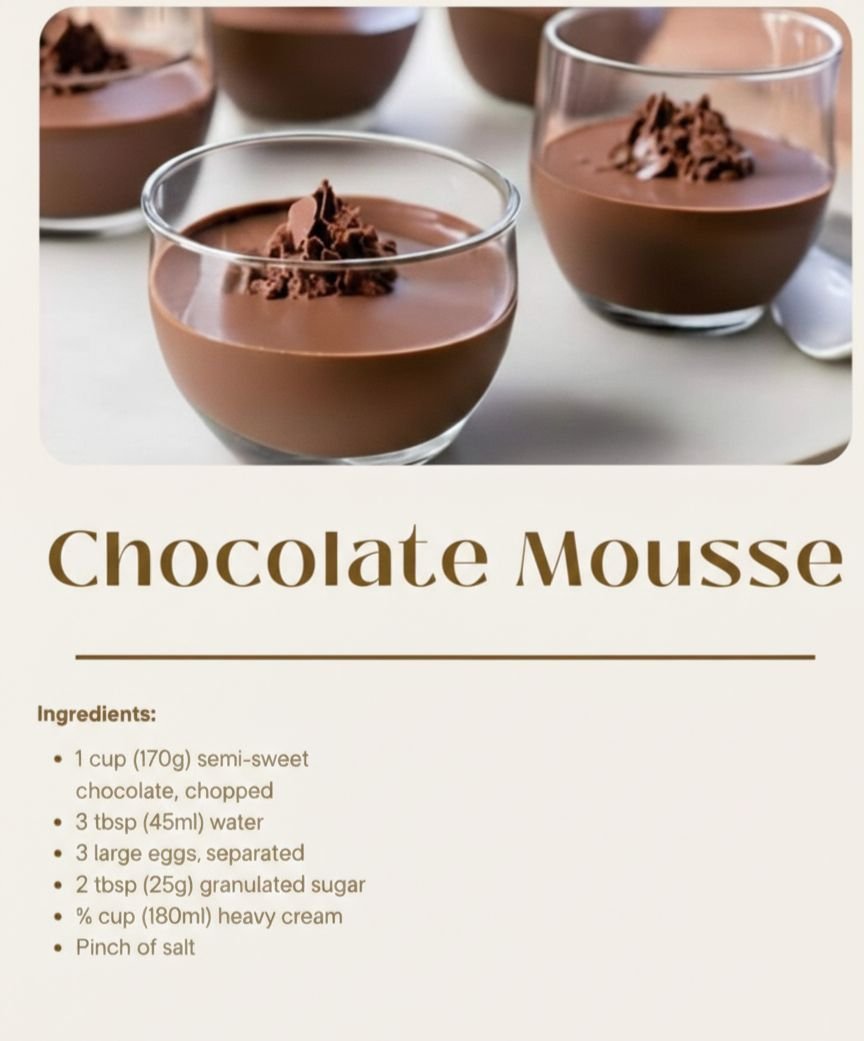
Classic Airy Chocolate Mousse (Light & Creamy)

šŸ« Classic Airy Chocolate Mousse (Light & Creamy)

This chocolate mousse is smooth, fluffy, and rich in flavor, made with simple ingredients and gentle folding to keep it airy.


šŸ“ Ingredients

  • 1 cup (170 g) semi-sweet chocolate, finely chopped

  • 3 tablespoons (45 ml) water

  • 3 large eggs, separated

  • 2 tablespoons (25 g) granulated sugar

  • ¾ cup (180 ml) heavy cream (cold)

  • A small pinch of salt


šŸ‘©ā€šŸ³ Step-by-Step Instructions

1ļøāƒ£ Melt the Chocolate

Place the chopped chocolate and water into a heat-safe bowl.
Melt using one of these methods:

  • Double boiler: Set the bowl over gently heated water and stir until smooth.

  • Microwave: Heat in 20-second intervals, stirring each time until fully melted.

Set aside and allow the chocolate to cool slightly so it is warm, not hot.


2ļøāƒ£ Add the Egg Yolks

Add the egg yolks to the melted chocolate one at a time, whisking well after each addition.
The mixture should become smooth and glossy.


3ļøāƒ£ Whip the Cream

In a separate bowl, beat the cold heavy cream until stiff peaks form.
This means the cream holds its shape when you lift the whisk.

Gently fold the whipped cream into the chocolate mixture using a spatula.
Use light movements to keep the texture fluffy.


4ļøāƒ£ Whip the Egg Whites

In a clean, dry bowl, beat the egg whites with a pinch of salt until they become foamy.
Slowly add the sugar and continue beating until stiff, shiny peaks form.


5ļøāƒ£ Fold the Mixture

Add the whipped egg whites to the chocolate mixture in two portions.
Fold gently using a cut-and-fold motion until just combined.
Do not stir, as this removes the air and makes the mousse heavy.


6ļøāƒ£ Chill and Set

Spoon the mousse into serving cups or glasses.
Cover and refrigerate for at least 2 to 4 hours until set and creamy.


🌱 Bonus: Basil Seed Chocolate Mousse Topping

Basil seeds (Sabja) add a refreshing texture and visual beauty.

How to Prepare Basil Seeds

  • Soak 1 tablespoon basil seeds in ½ cup water for 15 minutes

  • They will swell and form a gel-like coating

  • Drain excess water before using

How to Use

āœ” As a topping: Spoon soaked seeds over chilled mousse
āœ” As a layer: Add seeds to the bottom of the glass before filling with mousse


⭐ Helpful Tips

  • Eggs whip better at room temperature

  • Always fold gently to keep mousse light

  • Chill thoroughly for best texture

  • Use good-quality chocolate for richer taste
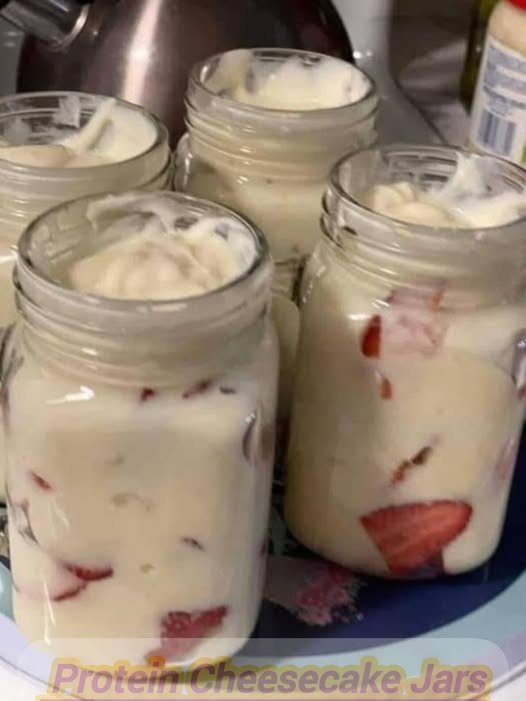
High-Protein Cheesecake Jars (No-Bake & Meal-Prep Friendly)

TheseĀ High-Protein Cheesecake JarsĀ are rich, creamy, and surprisingly close to classic cheesecake—without the heavy sugar, butter, or baking. Made with Greek yogurt and cottage cheese, they’re packed with protein and perfect for dessert, post-workout fuel, or a satisfying snack that won’t derail your goals. Best of all, they come together in minutes and set beautifully in the fridge.

If you’re looking for a cheesecake-style treat that supports weight loss, muscle recovery, or balanced eating, this recipe delivers big flavor with smart ingredients.

Ā Ingredients

Base Cheesecake

  • 1 cup low-fat or fat-free cottage cheese
  • 1 cup plain Greek yogurt (non-fat or low-fat)
  • 2–3 tablespoons sugar-free cheesecake or vanilla pudding mix
    OR
    2 tablespoons honey or maple syrup + 1 teaspoon vanilla extract
  • 1–2 tablespoons milk (as needed for blending)
  • Optional: 2 oz light cream cheese (for extra richness)

Add-Ins & Toppings

  • Fresh strawberries, sliced
    (blueberries, raspberries, or cherries also work well.)
  • Graham cracker crumbs (optional)
  • Sugar-free chocolate chips, caramel drizzle, or lemon zest (optional)

Ā Instructions

  1. Blend the cottage cheese first
    Add the cottage cheese to a blender or food processor and blend until completely smooth. This step is essential for achieving a silky, cheesecake-like texture.
  2. Build the cheesecake base
    Add the Greek yogurt, pudding mix (or sweetener and vanilla), and 1 tablespoon of milk. Blend again until thick, creamy, and lump-free. Add more milk only if needed.
  3. Adjust and customize
    Taste the mixture and adjust sweetness if desired. For extra protein, blend in ½ scoop vanilla protein powder. For a richer texture, add the optional light cream cheese.
  4. Assemble the jars
    Spoon the cheesecake mixture evenly into four small jars or containers. Fold in chopped strawberries if you want fruit throughout, or leave the base plain.
  5. Top and chill
    Add fresh fruit, graham crumbs, or optional toppings. Cover and refrigerate for at leastĀ 1 hourĀ to allow the cheesecake to thicken and set.
See alsoĀ Ā Banana Oatmeal Chocolate Cake with Walnuts

Ā Pro Tips

  • Less milk = thicker cheesecake
  • Chill overnight for the best texture
  • Add a graham layer at the bottom for a crust-style jar
  • Lemon zest adds a bright, classic cheesecake flavor

Ā Storage & Nutrition

  • KeepsĀ 4–5 daysĀ refrigerated in sealed jars
  • Approx.Ā 150–180 calories and 14–18 g ofĀ protein per jar
  • Lower sugar, high protein, and no baking required

Creamy, satisfying, and shockingly close to real cheesecake—these jars prove that healthy desserts don’t have to taste ā€œhealthy.ā€ šŸ˜

⭐ Keto-Friendly Chocolate Mousse (Rich, Creamy & Sugar-Free)

⭐ Keto-Friendly Chocolate Mousse (Rich, Creamy & Sugar-Free)

Servings: 4
Prep Time: 10 minutes
Chill Time: 1 hour
Total Time: 1 hour 10 minutes
Diet: Keto, Low-Carb, Gluten-Free, Sugar-Free, WW Friendly


šŸ« Introduction

Keto-Friendly Chocolate Mousse is a rich and creamy low-carb dessert made with simple ingredients and easy steps. This smooth and fluffy mousse delivers full chocolate flavor without added sugar or flour, making it a great option for low-carb lifestyles.

This recipe is quick to prepare and requires only a few basic ingredients. It works well for family desserts, special occasions, or whenever you want a chocolate treat that fits into your meal plan.

Traditional chocolate mousse usually contains sugar and high-carb ingredients. This version uses sugar-free chocolate, low-carb sweetener, and fresh cream to create a dessert that is light, smooth, and satisfying.

The texture is soft, airy, and creamy, giving it a classic mousse consistency. It looks elegant when served and tastes rich without being heavy.

One of the best features of this recipe is how flexible it is. You can adjust the sweetness, chocolate level, and toppings based on your preference.

This mousse stores well in the refrigerator, making it useful for preparing ahead of time. You can enjoy it over several days while keeping its creamy texture.

It is also a good dessert choice for guests, including those who are not following a low-carb plan. Many people enjoy it without realizing it is sugar-free.

For WW users, this dessert stays moderate in SmartPoints because the main ingredient is cream, while the sweetener and chocolate contain no added sugar.

The combination of fats and low carbohydrates helps keep the dessert filling and enjoyable as part of a balanced plan.


šŸ“ Ingredients

Base Mousse

  • 1 cup heavy whipping cream

  • ½ cup sugar-free dark chocolate chips

  • 2 tablespoons powdered erythritol (or keto-approved sweetener)

Extra Chocolate Option

Choose one:

  • 1 tablespoon unsweetened cocoa powder
    OR

  • 2 tablespoons shaved sugar-free chocolate

Optional Toppings

  • Sugar-free whipped cream

  • Fresh berries

  • Mint leaves

  • Extra cocoa powder

  • Sugar-free chocolate curls


šŸ‘©ā€šŸ³ Instructions

Step 1: Melt the chocolate
Place the chocolate chips in a microwave-safe bowl. Heat in 20-second intervals, stirring each time, until smooth. Set aside to cool slightly.

Step 2: Whip the cream
Add the cream and powdered sweetener to a chilled bowl. Beat until stiff peaks form. Do not overmix.

Step 3: Mix in the chocolate
Slowly drizzle the melted chocolate into the whipped cream while mixing on low speed.

Step 4: Add extra chocolate flavor
Gently fold in cocoa powder or shaved chocolate.

Step 5: Chill the mousse
Divide into serving cups and refrigerate for 1 hour.

Step 6: Garnish and serve
Top with whipped cream, berries, mint, or chocolate curls before serving.


šŸ½ Serving Suggestions

Serve alone or with low-carb berries such as raspberries or blackberries.
It can also be used as a filling for keto crepes or low-carb cakes.


🧊 Storage

Store in an airtight container in the refrigerator for up to 4 days.
Freezing is not recommended because the texture may change.


šŸ“Š Nutrition (Per Serving – Approximate)

Calories: 210
Fat: 20g
Net Carbs: 4g
Fiber: 2g
Sugar: 0g
Protein: 3g

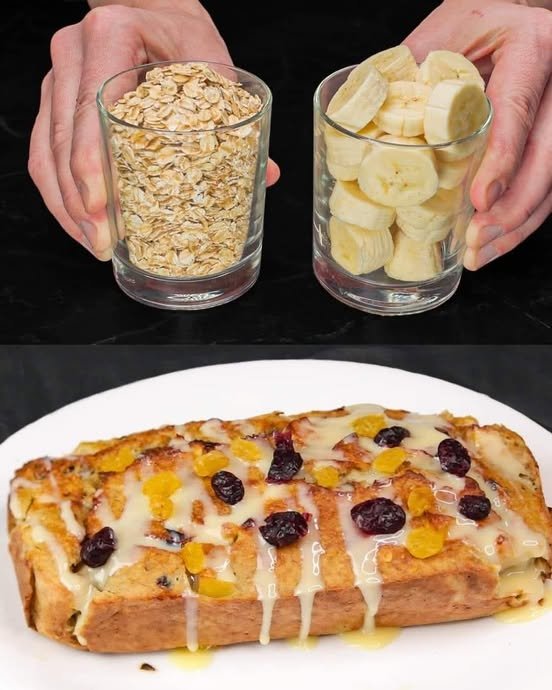
Banana Oat Breakfast Bread

Banana Oat Breakfast Bread

Prep Time: 10 minutes
Bake Time: 35–40 minutes
Servings: 1 loaf (about 8 slices)


Ingredients

  • 2 cups (200g) rolled oats

  • 2 ripe bananas (approx. 200g)

  • 2 eggs

  • ½ cup (70g) dried cranberries

  • ½ cup (75g) raisins

Optional for extra flavor:

  • 1 tsp cinnamon

  • 1 tsp vanilla extract

Optional for texture:

  • 1 tsp baking powder (helps the bread rise slightly)


Instructions

Step 1: Prepare the Pan

  1. Preheat your oven to 180°C (350°F).

  2. Grease a loaf pan with butter or oil, or line it with parchment paper for easy removal after baking.


Step 2: Blend or Mash the Base

Option A – Smooth, cake-like texture:

  1. Place the rolled oats, bananas, and eggs in a blender or food processor.

  2. Blend until smooth and well combined.

Option B – Rustic, hearty texture:

  1. Mash the bananas in a large bowl until they become liquidy.

  2. Stir in the eggs until fully incorporated.

  3. Fold in the rolled oats gently; do not overmix to maintain texture.


Step 3: Add Flavor and Fruit

  1. If using, mix in the cinnamon, vanilla extract, and baking powder.

  2. Gently fold in the dried cranberries and raisins, ensuring they are evenly distributed in the batter.


Step 4: Bake the Bread

  1. Pour the batter into your prepared loaf pan and smooth the top.

  2. Optional: Sprinkle a few extra raisins or cranberries on top for decoration.

  3. Bake in the preheated oven for 35–40 minutes, or until a toothpick inserted into the center comes out clean.


Step 5: Cool and Serve

  1. Let the bread cool in the pan for 10 minutes.

  2. Carefully transfer it to a wire rack to cool completely before slicing.

  3. Optional: Drizzle a small amount of yogurt or honey over slices before serving for extra flavor.


Tips for Success

  • Use very ripe bananas: The riper, the sweeter, and more flavorful the bread will be without any added sugar.

  • Moisture matters: This bread is naturally moist. Store leftovers in an airtight container in the refrigerator for up to 5 days.

  • Customize: Add chopped nuts, seeds, or even a handful of chocolate chips for variety.

  • Texture preference: Blend for smooth bread or fold for rustic, hearty slices.

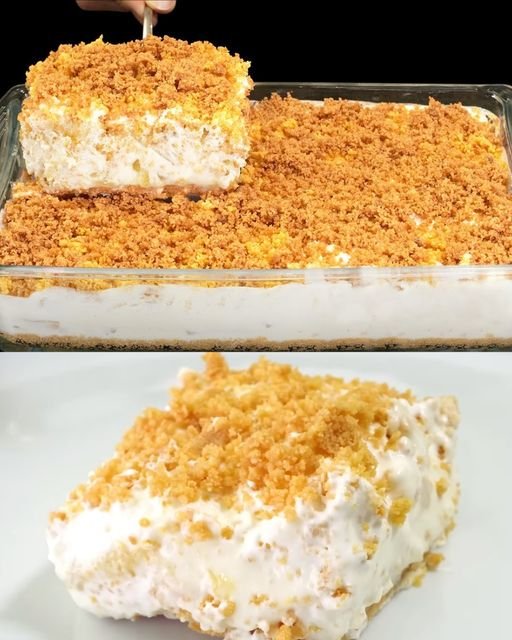
Pineapple Dream Dessert

Pineapple Dream Dessert

Prep Time: 15 minutes
Chill Time: 4 hours minimum (overnight is ideal)
Servings: 12–15

Ingredients

For the Crust & Topping:

  • 2 ½ cups graham cracker crumbs (divided)

  • ½ cup unsalted butter, melted

For the Creamy Filling:

  • ½ cup unsalted butter, softened to room temperature

  • 2 cups powdered sugar

  • 1 package (8 oz) cream cheese, softened to room temperature

  • 1 can (20 oz) crushed pineapple, well-drained

  • 1 container (8 oz) whipped topping (like Cool Whip) or 2 cups stiffly whipped heavy cream


Instructions

Step 1: Prepare the Crust

  1. Preheat your oven to 350°F (175°C) if you prefer a slightly firmer crust. (Optional: You can skip baking for a softer crust.)

  2. In a medium bowl, combine 2 cups of graham cracker crumbs with the ½ cup melted butter. Mix until the texture resembles wet sand.

  3. Reserve ½ cup of this crumb mixture for the topping later.

  4. Firmly press the remaining crumbs into the bottom of a 9×13 inch baking dish to form an even crust layer.

  5. Optional: Bake for 8–10 minutes for a slightly crisp crust. Let it cool completely before adding the filling.


Step 2: Make the Creamy Base

  1. In a large mixing bowl, add the softened butter and cream cheese. Beat with an electric mixer on medium speed until smooth and creamy (about 2–3 minutes).

  2. Gradually add powdered sugar and continue to beat until the mixture is fluffy and well combined (about 3–5 minutes).


Step 3: Fold in the Pineapple

  1. Drain the crushed pineapple very well. Press through a fine-mesh strainer with a spoon to remove excess juice, which could make the dessert runny.

  2. Gently fold the drained pineapple into the cream cheese mixture using a spatula, ensuring it is evenly distributed.


Step 4: Add the Whipped Topping

  1. Gently fold in the whipped topping or stiffly whipped heavy cream until fully combined.

  2. Be careful not to overmix; you want to keep as much air in the mixture as possible for a light, fluffy texture.


Step 5: Assemble the Dessert

  1. Spread the creamy pineapple filling evenly over the graham cracker crust.

  2. Sprinkle the reserved ½ cup of graham cracker crumbs evenly on top as a finishing touch.


Step 6: Chill

  1. Cover the dish with plastic wrap or a lid.

  2. Refrigerate for at least 4 hours, but for best results, chill overnight. This allows the layers to firm up and the flavors to meld beautifully.


Tips for Perfect Pineapple Dream Dessert

  • Drain the pineapple thoroughly: Use a fine-mesh strainer and press gently with a spoon to remove extra juice.

  • Room temperature ingredients: Make sure your butter and cream cheese are soft before mixing to avoid lumps in the filling.

  • Gentle folding: Folding preserves the air in the whipped topping, keeping the dessert light and airy.

  • Optional garnishes: Top with toasted coconut, chopped nuts, or extra pineapple chunks for a decorative touch.

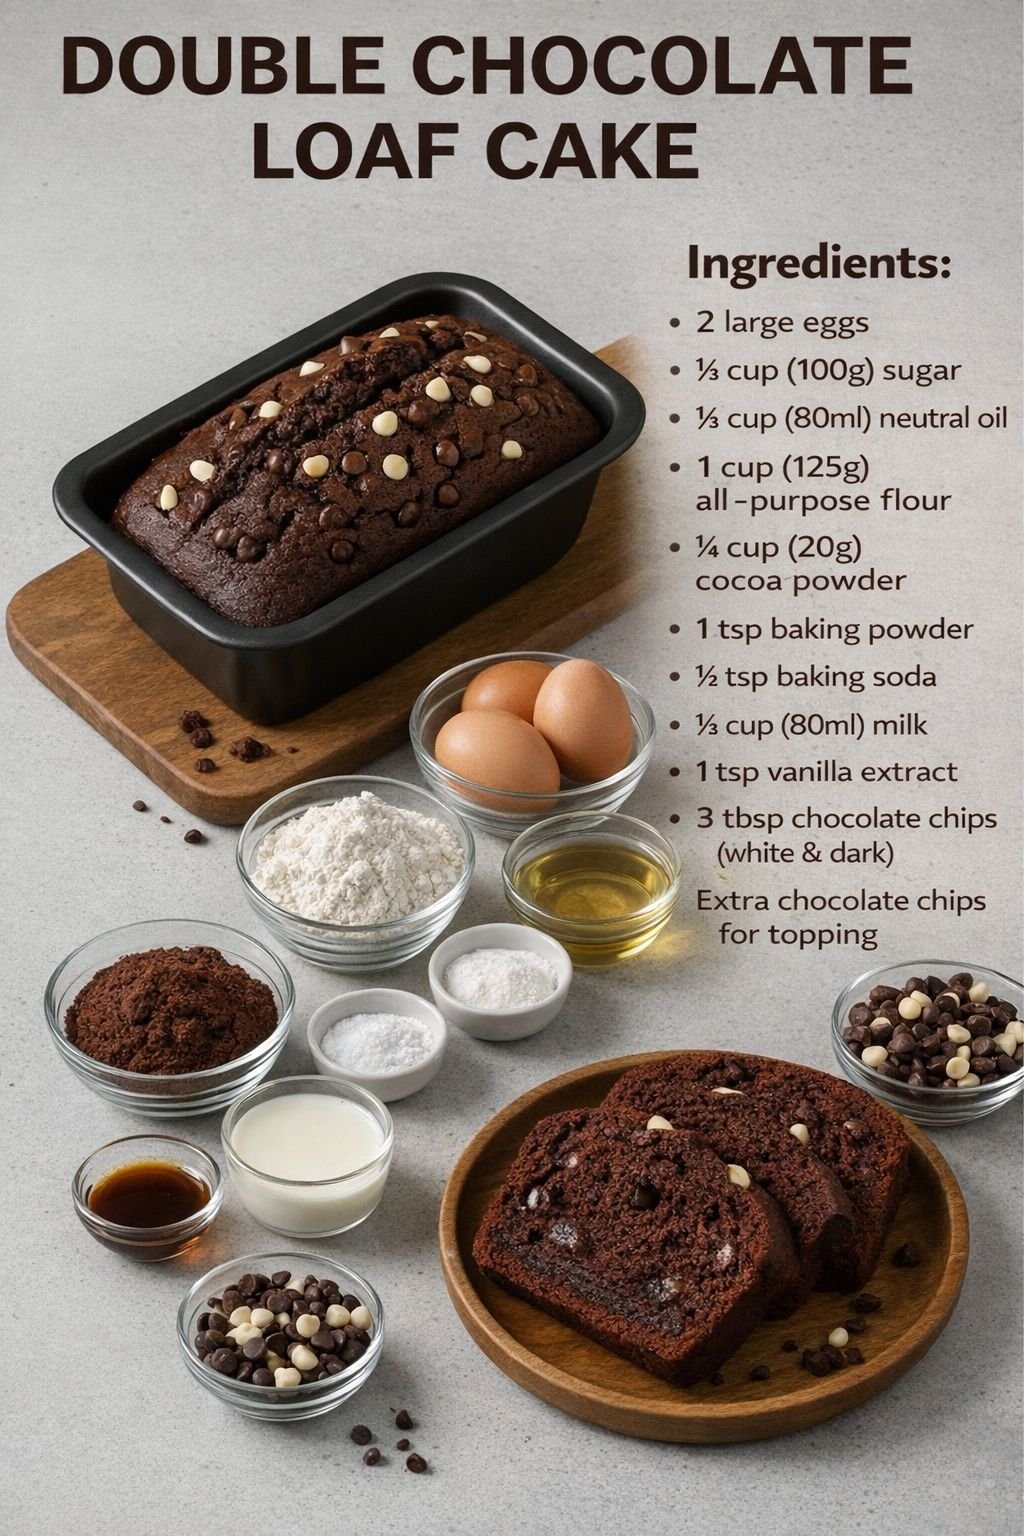
Double Chocolate Loaf Cake

šŸ« Double Chocolate Loaf Cake

A rich, moist chocolate loaf packed with chocolate chips. Perfect for breakfast, dessert, or an afternoon treat.


šŸ“ Ingredients

  • 2 large eggs

  • ā…“ cup (100 g) sugar

  • ā…“ cup (80 ml) neutral oil (vegetable or canola)

  • ā…“ cup (80 ml) milk

  • 1 teaspoon vanilla extract

  • 1 cup (125 g) all-purpose flour

  • ¼ cup (20 g) cocoa powder

  • 1 teaspoon baking powder

  • ½ teaspoon baking soda

  • 3 tablespoons chocolate chips (white or dark, or a mix)

  • Extra chocolate chips for topping


šŸ‘©ā€šŸ³ Instructions

1ļøāƒ£ Mix the Wet Ingredients

  1. In a medium bowl, whisk the eggs and sugar until slightly pale and well combined.

  2. Add the oil, milk, and vanilla extract. Stir until smooth.


2ļøāƒ£ Combine with Dry Ingredients

  1. Sift together the flour, cocoa powder, baking powder, and baking soda.

  2. Gently fold the dry ingredients into the wet mixture until just combined. Avoid overmixing to keep the cake tender.

  3. Fold in 3 tablespoons of chocolate chips.


3ļøāƒ£ Prepare for Baking

  1. Preheat the oven to 175°C (350°F).

  2. Grease a standard loaf pan or line it with parchment paper.

  3. Pour the batter into the pan and smooth the top with a spatula.

  4. Sprinkle extra chocolate chips over the surface.


4ļøāƒ£ Bake

  1. Bake for 35–45 minutes.

  2. Test doneness by inserting a toothpick into the center; it should come out clean or with a few moist crumbs.

  3. Let the cake cool in the pan for 10 minutes, then transfer to a wire rack to cool completely.


šŸ½ Serving Suggestions

  • Serve slightly warm so chocolate chips are melty

  • Pair with a cold glass of milk or a cup of coffee

  • Slice thick for an indulgent snack


🧁 Tips

āœ”ļø Use high-quality cocoa powder for deeper flavor
āœ”ļø Fold gently to keep the cake soft and airy
āœ”ļø Store in an airtight container for 2–3 days
āœ”ļø Freeze slices for up to 1 month