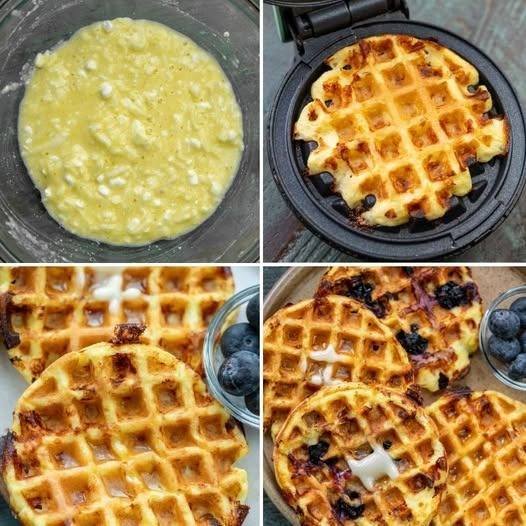
Cottage Cheese Chaffles

Cottage Cheese Chaffles

A quick, savory or sweet low-carb breakfast.


Ingredients

  • 1/2 cup Cottage Cheese: Small curd works best for a smoother texture.

  • 1 Large Egg: Acts as the binder for the batter.

  • 1/2 cup Shredded Mozzarella Cheese: Provides the “chaffle” structure and a crispy exterior.

  • 2 tbsp Almond Flour: (Optional) Adds a bit of heartiness to the texture.

  • Seasoning:

    • For Savory: A pinch of garlic powder and dried chives.

    • For Sweet: A drop of vanilla extract and a pinch of cinnamon.


Instructions

  1. Preheat the Iron: Plug in your mini waffle maker (or standard waffle iron) and let it heat up until the indicator light goes off. Lightly spray with a non-stick cooking oil if needed.

  2. Mix the Batter: In a medium bowl, whisk the egg thoroughly. Fold in the cottage cheese, shredded mozzarella, and your choice of seasoning. If you prefer a smoother waffle, you can pulse these ingredients in a blender for 5 seconds.

  3. Cook: Pour about half of the mixture (roughly 1/4 to 1/3 cup) onto the center of the waffle iron. Close the lid and cook for 3–5 minutes.

    • Tip: Resist the urge to open the lid early! Wait until the steam stops rising to ensure the cheese has crisped up enough to release from the iron.

  4. Cool and Crisp: Remove the chaffle carefully and let it sit on a wire rack or plate for 1–2 minutes. It will become crispier as it cools slightly.

  5. Serve: Enjoy plain, or top with avocado and a fried egg (savory) or fresh berries and a dollop of Greek yogurt (sweet).


Why This Recipe is a Keeper

  • Low Carb: By replacing flour with cheese and egg, you significantly reduce the glycemic impact of your breakfast.

  • High Protein: Between the cottage cheese and the egg, this meal provides sustained energy to keep you full until lunch.

  • Versatile: You can make a large batch and toast them later in the week for an even faster morning routine.


Flourless “Wonder” Crepes

Flourless “Wonder” Crepes

Prep time: 5 minutes | Cook time: 10 minutes | Servings: Makes about 6-8 crepes

Ingredients

  • 4 large Eggs (room temperature)

  • 4 oz Cream cheese, softened (this creates the “flourless” structure)

  • 1 tbsp Granulated monk fruit or erythritol (omit if making savory crepes)

  • ½ tsp Vanilla extract

  • 1 pinch Salt

  • Butter or coconut oil for the pan


Instructions

  1. Blend the Batter: Add the eggs, softened cream cheese, sweetener, vanilla, and salt into a blender. Blend on high for 30 seconds until completely smooth and frothy.

    • Tip: Letting the batter sit for 2 minutes allows the bubbles to settle for a smoother crepe.

  2. Heat the Pan: Heat a small non-stick skillet or crepe pan over medium-low heat. Add a tiny amount of butter or oil to coat the surface.

  3. Pour and Swirl: Pour about 2 to 3 tablespoons of batter into the center of the pan. Immediately tilt and swirl the pan in a circular motion so the batter coats the entire bottom in a very thin layer.

  4. Cook: Cook for about 60 to 90 seconds. You will know it is ready to flip when the edges start to turn golden brown and look “dry,” and the center is set.

  5. Flip: Carefully slide a thin spatula under the edge and flip the crepe. Cook the second side for only 15–20 seconds.

  6. Repeat: Transfer to a plate and repeat with the remaining batter.


Serving & Filling Ideas

  • Sweet (as seen in photo): Fill with sugar-free hazelnut spread, rolled up and drizzled with a little extra melted cocoa.

  • Fruit-Filled: Use fresh strawberries or raspberries with a dollop of the high-protein Greek yogurt “pudding” we discussed earlier.

  • Savory: Omit the sweetener/vanilla in the batter and fill with ham and Swiss cheese or sautéed spinach and mushrooms.


Pro-Tips

  • The Secret to Success: Ensure the cream cheese is very soft before blending. If it’s cold, you may end up with tiny white lumps in your crepes.

  • Storage: These keep beautifully in the fridge for up to 3 days. Place a piece of parchment paper between each crepe so they don’t stick together.

Refreshing Lemon & Ginger Tonic

Refreshing Lemon & Ginger Tonic

Prep time: 5 minutes | Servings: 2 cups

Ingredients

  • 2 cups Water (filtered)

  • 1 inch Fresh ginger root, peeled and sliced or grated

  • 1 whole Lemon (half sliced, half juiced)

  • 1 tbsp Raw honey (optional, for natural sweetness)

  • Pinch of Cayenne pepper (optional, for a little heat)


Instructions

  1. Boil the Water: Bring 2 cups of water to a gentle boil in a small pot or kettle.

  2. Infuse the Ginger: Add the sliced ginger to the hot water. If you want a stronger flavor, let it simmer for 3–5 minutes. If you prefer it mild, simply let it steep off the heat for 5 minutes.

  3. Add Lemon: Stir in the fresh lemon juice and drop in a few lemon slices. Lemon is a great source of Vitamin C and adds a bright, clean flavor.

  4. Sweeten Naturally: Once the water has cooled slightly (to preserve the natural enzymes in the honey), stir in the honey until dissolved.

  5. Serve: Drink one cup in the morning and one in the evening, either warm or chilled over ice.


Why this is a “Healthy” Choice

  • Hydration: Many people mistake thirst for hunger; staying hydrated helps manage cravings.

  • Ginger: Known for aiding digestion and soothing the stomach.

  • Lemon: Adds antioxidants and a refreshing citrus burst without the sugar found in sodas or juices.

A quick note: Always check with a healthcare professional before starting any specific “cleanse” or “metabolism” regimen, especially if you have underlying health conditions.

Low-Carb “No-Bake” Coconut Cream Pie

Low-Carb “No-Bake” Coconut Cream Pie

Prep time: 5–10 minutes (plus chilling) | Servings: 8 slices

Ingredients

For the Crust:

  • 1 ½ cups Almond flour (a great low-carb alternative to graham crackers)

  • ¼ cup Butter, melted

  • 2 tbsp Granulated monk fruit or erythritol sweetener

  • Optional: A pinch of cinnamon

For the Filling:

  • 8 oz Cream cheese, softened (low-fat or regular)

  • 1 cup Heavy whipping cream (chilled)

  • ½ cup Powdered monk fruit or erythritol sweetener

  • 1 tsp Coconut extract (or vanilla extract)

  • ½ cup Unsweetened shredded coconut

  • ½ cup Fresh raspberries or sliced strawberries (for the “red” bits seen in your photo)

For the Topping:

  • ¼ cup Toasted unsweetened coconut flakes

  • Extra whipped cream (sugar-free)


Instructions

  1. Prepare the Base: In a medium bowl, mix the almond flour, melted butter, and sweetener until it looks like wet sand. Press this firmly into the bottom and sides of a 9-inch pie dish. (Tip: If you prefer a sturdier crust, you can bake this at 350°F for 8 minutes, but for a true “no-bake” version, just chill it in the freezer while you make the filling).

  2. Whip the Cream: In a chilled bowl, beat the heavy whipping cream until stiff peaks form. Set this aside.

  3. Cream the Filling: In a separate large bowl, beat the softened cream cheese, powdered sweetener, and extract until smooth and fluffy.

  4. Fold it Together: Gently fold the whipped cream into the cream cheese mixture. Once combined, fold in the shredded coconut and the fresh berries.

  5. Assemble: Pour the filling into your prepared crust and smooth the top with a spatula.

  6. Garnish and Chill: Sprinkle the toasted coconut flakes over the top. Let the pie set in the refrigerator for at least 2–4 hours (or 1 hour in the freezer if you’re in a hurry) to get that “melt-in-your-mouth” consistency.


Helpful Tips

  • Consistency: Make sure your cream cheese is truly at room temperature before mixing, or you’ll end up with tiny lumps.

  • Toasting Coconut: To get that golden look from the photo, toss unsweetened coconut flakes in a dry pan over medium heat for 2–3 minutes until fragrant and brown.

  • Sweetener Note: I recommend powdered sweetener for the filling so it isn’t “gritty.” If you only have granulated, you can pulse it in a blender for a few seconds first.

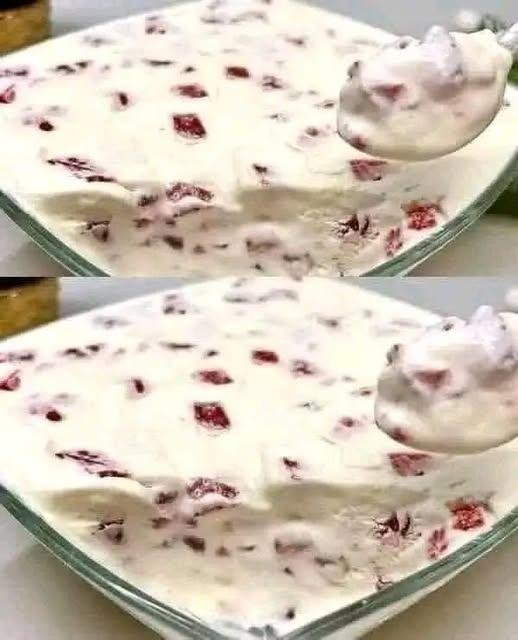
Three-ingredient homemade ice cream

Components:

What You Require:

500 milliliters of mascarpone cheese, or 2.5 cups;

Roughly two-thirds of a cup; or 150 grams of mixed milk

This is equivalent to about 100 grams,

or 3/4 cup. chopped strawberries into little pieces

Ingredients for ice cream:

Getting ready:

Before you begin assembling the components, make sure the whipped cream is cold. You can chill it in the refrigerator for a few hours before you begin. Additionally, chop the strawberries into little pieces after washing and removing the stems.

In a large mixing basin, beat the cold whipped cream until firm peaks form. The speed of your mixer will dictate how long this procedure takes.

When the whipped cream is room temperature, use a spatula to toss in the condensed milk. Be careful not to deflate the whipped cream too much to prevent altering the final product’s texture.

When the condensed milk and whipped cream are well combined, add the diced strawberries. Sprinkle them evenly over the mixture for a well-rounded flavor.

Before putting the ice cream mixture in a freezer-safe container, check sure the lid fits tightly. Smooth down the top with a spatula to make it even.

Place the container in the freezer and let the ice cream freeze for at least 6 hours, or better yet, overnight. After then, it might solidify and acquire that smooth texture.

Savor the Delight: After the ice cream has fully frozen, pour it into serving dishes or ice cream cones. Add more fresh strawberries or chocolate sauce on top for an even more delicious touch.

See also  Lentil and Seed Bread

Advice and Techniques for the Kitchen:

Texture: If you like a smoother texture, puree the strawberries before combining them with the condensed milk and whipped cream. As a result, the ice cream will be smoother and more uniform throughout.

Alternatives: You are welcome to try various mix-ins, such as crushed cookies, chocolate chips, or almonds. Don’t fold them in too lightly so as not to overmix.

Flavor Variations: Strawberries are a classic fruit for homemade ice cream, but for a unique taste profile, try adding blueberries, raspberries, or even peaches.

Keto and Low-Carb Substitutes:

Those following a ketogenic or low-carb diet can utilize the following substitutes:

Use heavy whipping cream and a keto-friendly sweetener, such as erythritol or stevia, to make your own whipped cream.

Seek out a low-carb alternative to conventional condensed milk, or make your own by boiling heavy cream and a keto-friendly sweetener until it thickens.

Fruit: Use berries or other low-carb fruits sparingly for a simpler, lower-carb ice cream recipe.

You can make a tasty batch of homemade ice cream with just a few basic ingredients. If you follow this simple recipe, you can have a rich and luscious dessert. Any time of year is a good time to make homemade ice cream, but it’s particularly good on hot summer days or as a rich dessert after a memorable supper. Gather the necessary components, prepare a batch, and savor the satisfaction of creating something delicious from scratch. Give your taste buds a treat.

Baked Coconut Custard Pie


Baked Coconut Custard Pie


🧾 Ingredients

  • ½ cup Bisquick or 1 cup all-purpose flour
  • ¾ cup sugar
  • 4 large eggs
  • 2 cups milk
  • 1 cup flaked coconut
  • 1 teaspoon vanilla extract
  • 1 tablespoon butter (softened)

👩‍🍳 Step-By-Step Instructions

1️⃣ Preheat the Oven

  • Preheat your oven to 400°F (200°C).
  • Grease a 9-inch round pie pan or baking dish with butter or oil.

2️⃣ Mix the Ingredients

  • In a large mixing bowl, add:
    • Bisquick (or flour)
    • Sugar
    • Eggs
    • Milk
    • Flaked coconut
    • Vanilla extract
    • Softened butter
  • Beat everything together using a whisk or hand mixer.
  • Mix until the batter becomes smooth and lump-free.

3️⃣ Pour into Pan

  • Pour the smooth batter into the greased pie pan.
  • Do not stir after pouring.

4️⃣ Bake

  • Place the pan in the preheated oven.
  • Bake for 30 minutes.
  • The top should turn light golden brown.
  • The center should be set but slightly jiggle when gently shaken.

5️⃣ Cool Completely

  • Remove from oven.
  • Let it cool at room temperature for at least 1 hour.
  • As it cools, it will firm up properly.

6️⃣ Slice & Serve

  • Cut into slices.
  • Serve plain or sprinkle with powdered sugar.

✨ Tips

✔ It creates its own soft crust while baking.

✔ Tastes even better after chilling in the fridge.

✔ You can add a pinch of cinnamon for extra flavor.