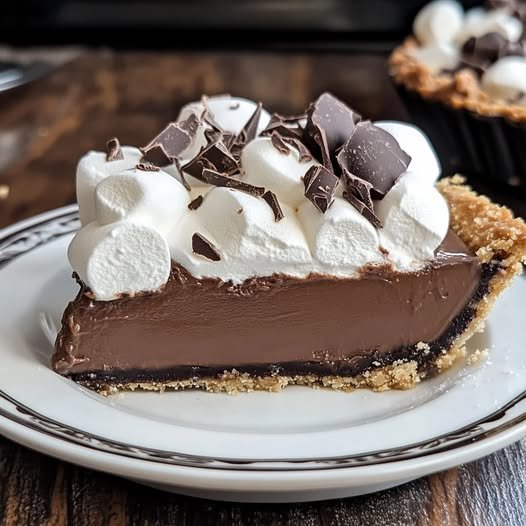
No-Bake Chocolate Marshmallow Pie

Why Is This Pie Called An “Easy” No-Bake Dessert?
This luscious chocolate pie comes together in just 30 minutes of active prep time. Aside from letting the filling chill for a few hours to set up, you’ll have this rich, dreamy dessert ready to dig into in no time. No need to turn on the oven during hot summer days or when you’re pressed for time around the holidays.

Whipping up the Oreo crust is a cinch in the food processor, while the silky chocolate-marshmallow filling beats together in just minutes. Before you know it, you’ll be topping buttery crisp crust and smooth mousse-like filling with fluffy sweet cream and pretty chocolate shavings. Simple ingredients come together for major decadence!

What Are The Key Ingredients That Make This Pie Ultra-Rich?
A trio of powerhouse ingredients gives this pie its ultra-rich flavor and luscious texture. High-quality dark chocolate lends deep, complex cocoa notes. Using a bar like Ghirardelli or Lindt makes a difference, so spring for the good stuff!

Sweet marshmallow crème intensifies the chocolate while making the filling light as air. And tangy cream cheese adds body and heightens the mouthwatering flavors. Using full-fat brick cream cheese instead of a tub leads to the best texture and taste.

And of course, Oreo cookies provide that signature flavor in the crust and give a fun nod with the crushed cookie garnish. This mighty trio of ingredients transforms simple pantry items into chocolate bliss!

How Do You Put Together This Showstopping Pie?
Crafting this beauty is surprisingly easy! Start by blitzing Oreos into fine crumbs for the crust. After pressing them into the springform pan and chilling, it’s time for the fun part.

Melt bittersweet chocolate bars until smooth for the filling. Then whip some cream to soft peaks before beating in cream cheese and marshmallow crème. Fold in the melted chocolate, followed by the airy sweet cream, until no streaks remain.

Pour this rich mixture over the Oreo crust, smoothing the top. Chill for at least 4 hours so flavors meld and it sets up. Finally, whip more cream and dollop it over the top of the pie. Finish off with crushed cookies or chocolate shavings if desired. Easy as (chocolate) pie!

How Can I Get The Perfect Sliceable Consistency?
The key to nailing that lush yet stable texture is in the whipped cream. Whip the heavy cream until it forms very stiff peaks with an airy, spreadable texture. This light and lofty whipped cream gives structure to the filling when folded together.

Using blocks of full-fat cream cheese instead of tubs also lends stability, tang, and richness. And be sure not to skip the long chill time to allow the filling to completely firm up. Follow those tips, and slicing beautiful wedges will be a breeze!

What Tips Help Streamline Prep?
I highly recommend using a springform pan here. Not only do the removable sides make serving a cinch, but you can also press the Oreo crust up the sides for a pretty presentation. Chilling that crust first gives it a head startdo on firming up too.

When melting chocolate, use 50% microwave power to prevent scorching. Check and stir every 30 seconds until smooth. And don’t forget to give yourself a few hours for the pie to chill and set—resisting sampling can be hard, but patience pays off in perfect slices!

How Should I Store Any Leftover Pie?
You likely won’t have to worry about leftovers with this vanishingly rich dessert! But if you do, it stores nicely covered in the fridge for 2-3 days. The crust retains its crunchy texture while the silky filling holds beautifully.

If making more than a day ahead, assemble the pie but wait to add the sweet whipped cream topping right before serving. A fresh, fluffy layer of sweet cream takes this treat over the top!

So now there’s no excuse not to dive into this easy yet elegant pie on your dessert table! In no time at all, you can be enjoying chocolate marshmallow decadence.

No-Bake Chocolate Marshmallow Pie Recipe
Ingredients:
Crust Components:
Oreos, 1 package (14 oz)—keep 2 aside for garnishing
Unsalted butter, 1/2 cup, melted
Mousse Filling:
Dark chocolate bars (your choice), Two 4 ounces (113g each)
Heavy whipping cream (cold), 1 cup (236 ml)
Cocoa powder, 3 tablespoons (15g)
Full-fat cream cheese (room temperature), 8 ounces (226g)
Granulated sugar, 2 tablespoons (24g)
Jet-Puffed Marshmallow Crème, 1 jar (7 oz)
Whipped Cream Topping:
Heavy whipping cream, 1 cup (236 ml)
Powdered sugar, 1/2 cup (65g)
Optional: Hot fudge sauce for drizzling
Optional: 2 crushed Oreos for garnish
Preparation Steps:
Crust Assembly:
Lightly grease a 9-inch springform pan with cooking spray, then wipe with a paper towel. Line with parchment paper.
Finely crush Oreos (using a food processor or blender).
Combine melted butter with crushed cookies until well mixed.
Press the mixture firmly into the pan’s bottom and sides. Chill while preparing the filling.
Mousse Filling:
Break one chocolate bar into pieces; melt in the microwave (60-90 seconds), stirring until smooth.
In a chilled metal bowl, beat cold whipping cream to stiff peaks. Gradually add cocoa powder; continue beating.
In a separate bowl, blend cream cheese and sugar until smooth. Add melted chocolate, then marshmallow crème. Mix well.
Fold whipped cream into the cream cheese mixture.
Chop the second chocolate bar; fold into filling.
Pour filling over crust. Refrigerate for 3-4 hours.
Whipped Cream Topping:
Beat heavy whipping cream in a chilled bowl to soft peaks. Gradually add powdered sugar; beat to stiff peaks.
Spread or pipe onto chilled pie. Garnish with crushed Oreos and hot fudge sauce (optional).
Storage Note: Keep pie covered in the refrigerator for 2-3 days for optimal freshness.

Enjoy this blissful, no-bake delight that’s perfect for any occasion!
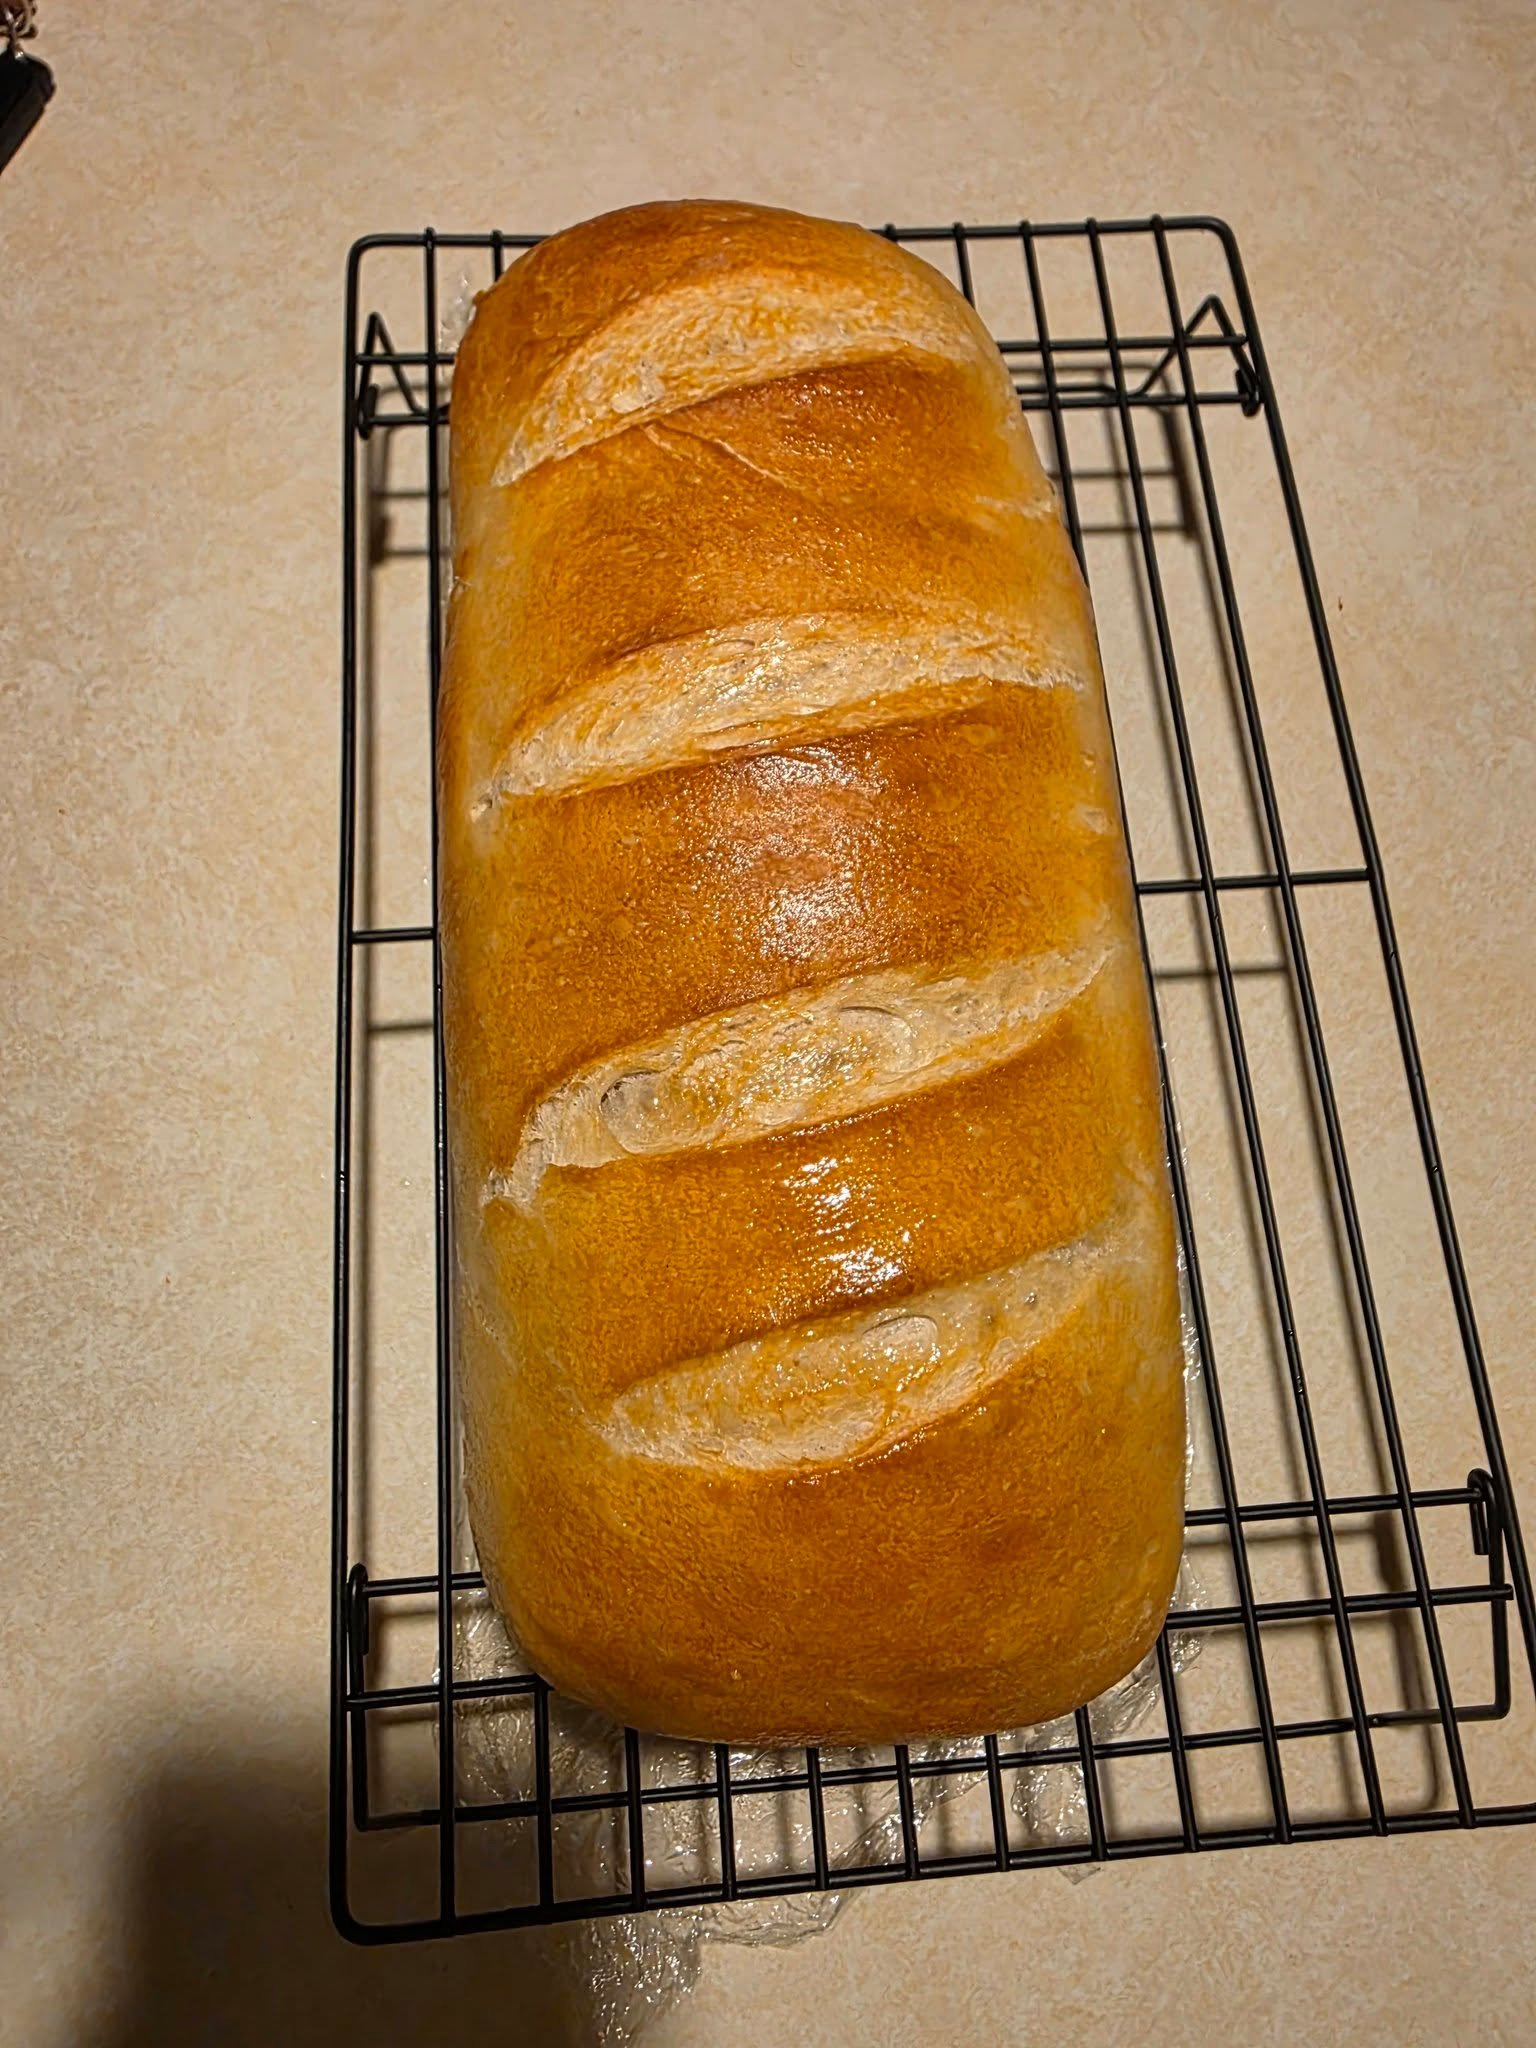
 

Classic Homemade French Bread

Classic Homemade French Bread

This recipe yields a loaf with a crisp, golden exterior and a soft, airy crumb, much like the one you’ve shared.

  • Prep time: 20 minutes

  • Rise time: 1.5–2 hours

  • Bake time: 25–30 minutes

  • Yields: 1 large loaf

Ingredients

  • 2 ¼ tsp Active Dry Yeast (1 packet)

  • 1 ½ cups Warm water (approx. 110°F)

  • 1 tbsp Honey or sugar

  • 1 ½ tsp Salt

  • 3 ½ to 4 cups Bread flour (all-purpose works, but bread flour provides better chew)

  • 1 Egg white + 1 tbsp water (for the egg wash)

Instructions

1. Bloom the Yeast

In a large mixing bowl or the bowl of a stand mixer, combine the warm water, honey, and yeast. Let it sit for about 5–10 minutes until it becomes foamy.

2. Mix the Dough

Add the salt and 2 cups of flour. Stir until a shaggy dough forms. Gradually add the remaining flour, half a cup at a time, until the dough begins to pull away from the sides of the bowl.

3. Knead

  • By Hand: Turn the dough onto a floured surface and knead for 8–10 minutes until smooth and elastic.

  • Stand Mixer: Use the dough hook on medium-low speed for about 5–7 minutes. The dough should be slightly tacky but not sticky.

4. First Rise

Place the dough in a lightly oiled bowl, cover with a damp cloth, and let it rise in a warm, draft-free spot for 1 hour, or until it has doubled in size.

5. Shape and Score

Gently punch the dough down to release air. On a lightly floured surface, shape it into a long, tapered rectangle and roll it up tightly into a loaf shape. Place it on a baking sheet lined with parchment paper. Use a sharp knife or a lame to create 3–4 diagonal slashes across the top (just like in your photo!).

6. Second Rise

Cover the loaf loosely and let it rise again for 30–45 minutes. While it rises, preheat your oven to 375°F (190°C).

7. The Secret to the Crust

Whisk the egg white and water together. Generously brush the top and sides of the loaf with the egg wash—this creates that beautiful shiny, golden-brown finish. For an extra-crispy crust, you can place a shallow pan of water on the bottom rack of the oven to create steam.

8. Bake

Bake for 25–30 minutes. The bread is done when it is deep golden brown and sounds hollow when tapped on the bottom.


Perfect Pairing

To elevate your Monterey Sausage Pie experience, try slicing this bread warm and brushing it with a little garlic butter. It’s the perfect tool for cleaning up every last bit of that savory egg and cheese filling!

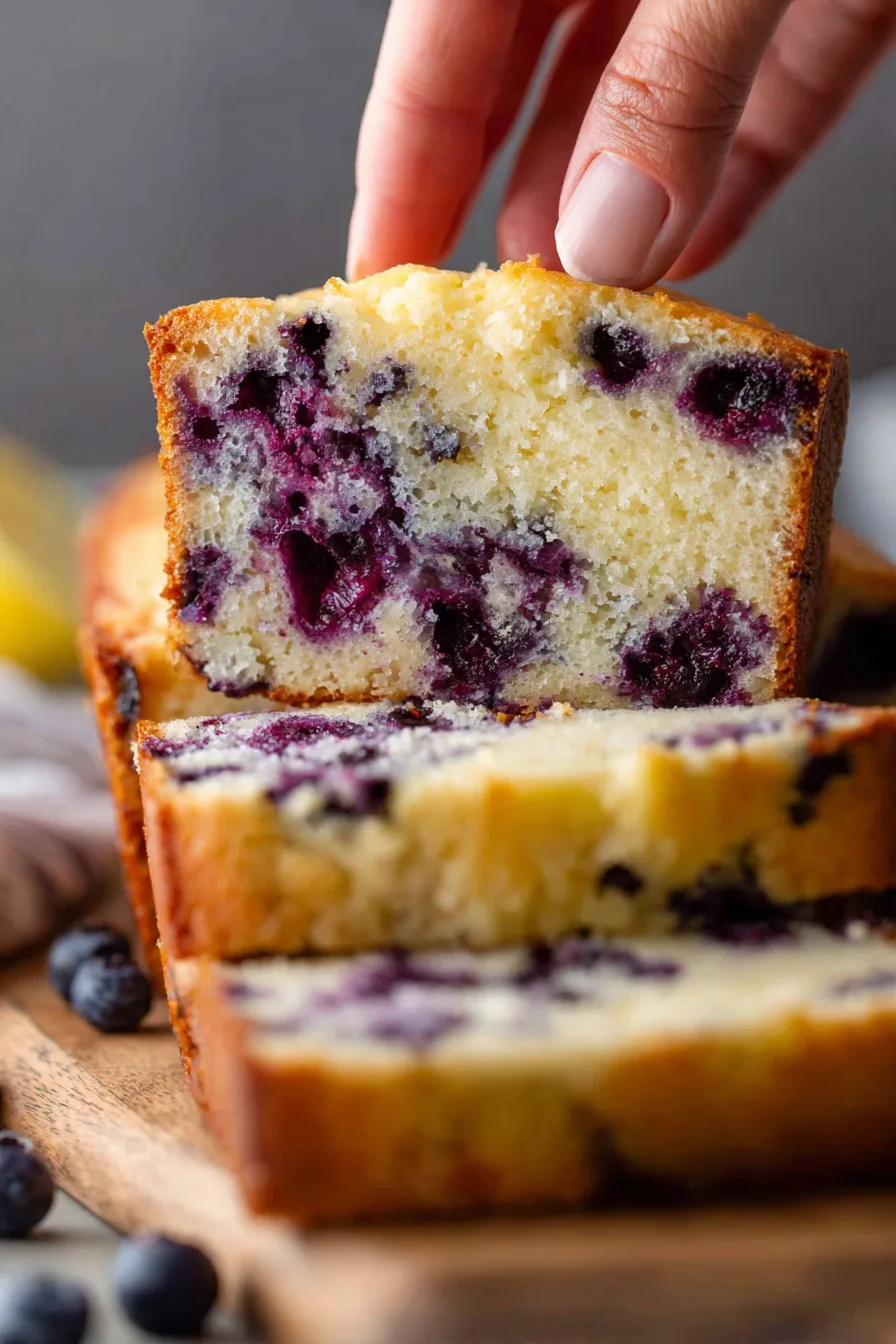
🍋 Lemon Blueberry Bread (Moist & Glazed)

🍋 Lemon Blueberry Bread (Moist & Glazed)

A soft, tender loaf bursting with juicy blueberries and fresh lemon flavor, finished with a simple lemon glaze.

⏱ Prep Time: 15 minutes

⏱ Bake Time: 50–55 minutes

🍞 Servings: 12 slices


🧾 Ingredients

For the Bread:

  • 1½ cups all-purpose flour

  • 1 teaspoon baking powder

  • ¼ teaspoon baking soda

  • ¼ teaspoon salt

  • ½ cup unsalted butter, softened

  • ¾ cup granulated sugar

  • 2 large eggs

  • 1 tablespoon lemon zest (from about 1 lemon)

  • 2 tablespoons fresh lemon juice

  • ½ cup plain yogurt or sour cream

  • 1 teaspoon vanilla extract

  • 1 cup blueberries (fresh or frozen—do not thaw)

  • 1 tablespoon flour (for coating blueberries)

For the Lemon Glaze (optional):

  • ½ cup powdered sugar

  • 1–2 tablespoons fresh lemon juice


👩‍🍳 Instructions

1. Preheat Oven

Preheat oven to 350°F (175°C).
Grease a 9×5-inch loaf pan and line with parchment paper.


2. Mix Dry Ingredients

In a bowl, whisk together:

  • flour

  • baking powder

  • baking soda

  • salt
    Set aside.


3. Cream Butter & Sugar

In a large bowl, beat butter and sugar until light and fluffy (2–3 minutes).
Add eggs one at a time, mixing well.

Mix in:

  • lemon zest

  • lemon juice

  • vanilla extract


4. Combine Wet & Dry

Add dry ingredients in two parts, alternating with yogurt.
Mix gently just until combined.
Do not overmix.


5. Add Blueberries

Toss blueberries with 1 tablespoon of flour.
Gently fold into batter.


6. Bake

Pour batter into pan and smooth the top.
Bake 50–55 minutes, or until a toothpick comes out clean.
If the top browns too fast, loosely cover with foil.


7. Cool

Cool in pan for 10 minutes, then remove and cool completely on a rack.


8. Make Glaze

Mix powdered sugar with lemon juice until smooth.


9. Glaze & Serve

Drizzle glaze over cooled loaf.
Slice and enjoy!


📦 Storage

  • Room temp: 3 days (airtight container)

  • Fridge: up to 5 days

  • Freezer: up to 2 months (unglazed)


🔄 Variations

  • Add 1 tbsp poppy seeds

  • Use oil instead of butter

  • Make mini loaves (bake 25–30 min)

  • Use gluten-free 1:1 flour blend

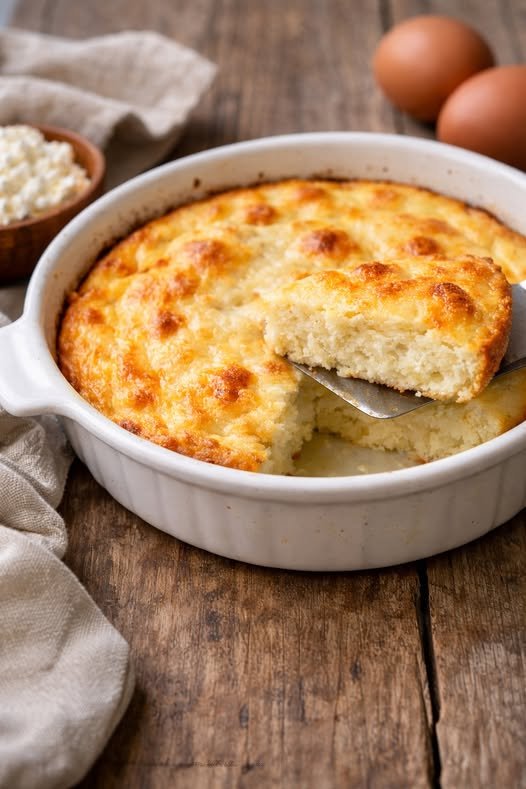
Carnivore Egg & Cottage Cheese Bake

 Carnivore Egg & Cottage Cheese Bake

Description

This Carnivore Egg & Cottage Cheese Bake is a soft, fluffy, and protein-packed dish made with just a few simple, animal-based ingredients. The cottage cheese melts into the eggs as it bakes, creating a creamy, custard-like texture that’s both filling and comforting. Perfect for breakfast, meal prep, or a quick dinner when you want something warm and nourishing.


Ingredients

  • 6 large eggs

  • 1½ cups full-fat cottage cheese

  • 1 cup shredded mozzarella or cheddar cheese (optional)

  • 1 tbsp melted butter or beef tallow

  • 1 tsp sea salt (or to taste)

  • ½ tsp black pepper (optional)


Instructions

  1. Preheat Oven
    Preheat oven to 375°F (190°C). Grease a small baking dish with butter or tallow.

  2. Mix the Base
    In a bowl, whisk eggs until smooth. Stir in cottage cheese, melted butter, salt, and pepper.

  3. Add Cheese (Optional)
    Fold in shredded cheese for extra richness.

  4. Bake
    Pour mixture into baking dish. Bake for 30–35 minutes, or until the center is set and the top is lightly golden.

  5. Rest & Serve
    Let rest 5–10 minutes before slicing. Serve warm.


Serving Suggestions

  • Top with a pat of butter for extra richness

  • Serve alongside crispy bacon or sausage patties

  • Pair with bone broth for a complete carnivore meal


Variations

  • Extra Fluffy: Blend the mixture before baking for a soufflé-style texture

  • Higher Fat: Add 2–3 tbsp heavy cream or cream cheese

  • Meaty Version: Mix in cooked ground beef or chopped bacon


Nutrition (Approx. Per Serving – 4 servings)

  • Calories: 300–350

  • Protein: 25–30g

  • Fat: 22–28g

  • Carbs: 2–4g

  • Sugar: 1–2g


Final Thoughts

This Carnivore Egg & Cottage Cheese Bake is simple, satisfying, and endlessly customizable. It’s a great way to pack in protein and healthy fats while keeping your meals comforting and easy—perfect for busy days or weekly meal prep.

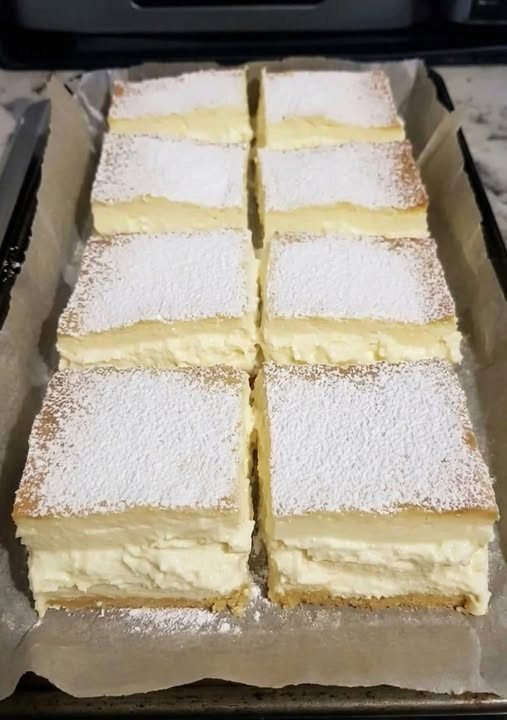
Vanilla Custard Slice

Vanilla Custard Slice

A baked dessert that naturally forms three textures while cooking: a soft base, a creamy custard center, and a light sponge top.

Prep Time: 15 minutes
Bake Time: 45–50 minutes
Chill Time: Minimum 3 hours
Yield: 12 squares


🧾 Ingredients

• 4 large eggs, separated (room temperature)
• 150 g (¾ cup) granulated sugar
• 125 g (½ cup) unsalted butter, melted and slightly cooled
• 115 g (¾ cup) all-purpose flour
• 500 ml (2 cups) whole milk, lukewarm
• 1 tablespoon vanilla extract or vanilla bean paste
• Pinch of salt

For topping:
• Powdered sugar, for dusting


👩‍🍳 Instructions

1. Prepare the Pan and Oven

Preheat oven to 160°C (325°F).

Grease an 8 × 8 inch (20 × 20 cm) baking pan.
Line with parchment paper, leaving excess paper hanging over the sides to help lift the dessert out later.


2. Beat the Egg Whites

Place egg whites and a pinch of salt in a clean, dry bowl.

Beat with a mixer until stiff peaks form (the whites should stand upright when the whisk is lifted).

Set aside.


3. Mix Egg Yolks and Sugar

In a separate large bowl, beat egg yolks and granulated sugar together for about 2 minutes, until:
• Pale in color
• Thickened slightly
• Smooth in texture


4. Add Butter and Vanilla

Add melted butter and vanilla extract to the yolk mixture.

Beat for 1 minute until fully blended.


5. Add Flour

Sift flour into the bowl.

Mix gently until just combined and no dry flour remains.


6. Add Milk

Slowly pour in the lukewarm milk while mixing on low speed.

The batter will be very thin and liquid-like — this is expected.


7. Fold in Egg Whites

Add the beaten egg whites in 2–3 portions.

Using a spatula, gently fold them into the batter.
Do not mix until fully smooth — small lumps or “clouds” of egg white should remain floating.

These help create the light top layer during baking.


8. Bake

Pour batter into the prepared pan.

Bake for 45–50 minutes, until:
• Top is light golden
• Center jiggles slightly when shaken
• Surface is set, not wet

If the top browns too quickly, loosely cover with foil during the last 10 minutes.


9. Cool and Chill

Let the pan cool completely at room temperature.

Then refrigerate for at least 3 hours (overnight is best) so the layers can fully firm up.


10. Finish and Slice

Lift the dessert out using parchment paper.

Dust generously with powdered sugar.

Slice into 12 even squares using a sharp knife.


⭐ Helpful Tips

✔ Eggs should be at room temperature for smoother mixing
✔ Milk should be lukewarm, not hot
✔ Do not overmix after adding egg whites
✔ Chill fully before cutting for clean layers


🧊 Storage

• Store covered in the refrigerator
• Best within 2–3 days
• Serve chilled

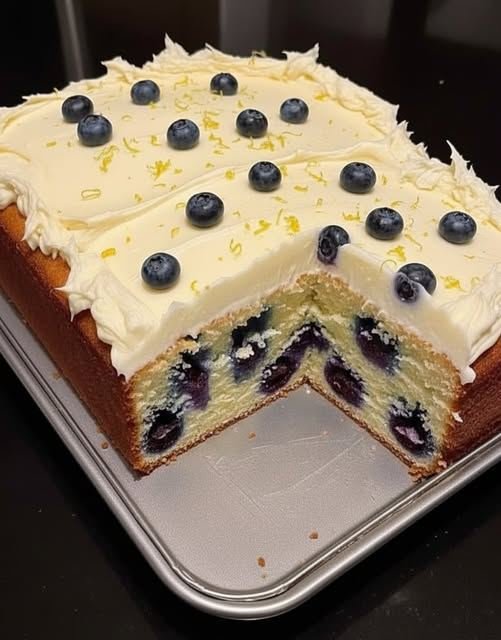
Lemon Blueberry Cream Cheese Pound Cake

Spring has definitely arrived with this Lemon Blueberry Cream Cheese Pound Cake! This recipe balances zesty citrus with a rich, protein-friendly almond flour base for a dessert that feels indulgent but stays light.


Lemon Blueberry Cream Cheese Pound Cake

Zesty, moist, and perfectly topped with a tangy cream cheese frosting.

Prep time: 15 mins | Cook time: 35–40 mins | Yields: 1 loaf cake

Ingredients

The Cake Base

  • 4 Large Eggs

  • 4 oz Cream Cheese: Softened to room temperature.

  • 4 tbsp Unsalted Butter: Softened.

  • 2 tsp Vanilla Extract

  • 1 Lemon: Both the zest and the juice.

  • 1 ¼ cups Almond Flour

  • 3–4 tbsp powdered monk fruit or your preferred sugar-free sweetener.

  • 2 tsp Baking Powder

  • Pinch of Salt

  • ½ cup Blueberries: Fresh or frozen.

Tangy Lemon Frosting

  • 4 oz Cream Cheese: Softened.

  • 3 tbsp butter: softened.

  • ¼ cup Sweetener of choice

  • 1 tsp Vanilla Extract

  • 1–2 tsp Lemon Juice


Instructions

  1. Mix the Wet Base: In a large bowl, whisk together the eggs, softened cream cheese, butter, vanilla, lemon juice, and zest until the mixture is creamy and smooth.

  2. Incorporate Dry Ingredients: Add the almond flour, baking powder, salt, and sweetener one at a time. Stir gently until just combined.

  3. Prepare the Berries: Toss your blueberries lightly in a teaspoon of extra almond flour. This “secret” step keeps the blueberries from sinking to the bottom of your cake! Gently fold them into the batter.

  4. Bake: Pour the batter into a buttered loaf pan. Bake at 175°C (350°F) for 35–40 minutes until the top is golden and a toothpick comes out clean.

  5. Cool: Allow the cake to cool fully before frosting; otherwise, the cream cheese topping will melt!

  6. Frosting and Garnish: Beat the frosting ingredients until fluffy. Spread generously over the cake and garnish with extra blueberries and lemon zest for a professional finish.


Success Tip

For the best texture, ensure your cream cheese and butter are truly softened before mixing. This prevents lumps and ensures that beautiful, even crumb seen in the photo!