Crispy Potato & Egg Nest Muffins

🥔🍳 Crispy Potato & Egg Nest Muffins

Yields: 12 muffins
Prep Time: 15 minutes
Bake Time: 25–30 minutes

These Crispy Potato & Egg Nest Muffins are a comforting and satisfying dish made with simple ingredients. Grated potatoes form a crisp outer layer, while the inside stays soft and flavorful. They are perfect for breakfast, brunch, or light meals and are easy to prepare ahead of time.


📋 Ingredients

  • 3 large potatoes, peeled and grated

  • 4–5 large eggs, well beaten

  • 1 cup shredded cheese (cheddar or mozzarella works well)

  • 12 cherry tomatoes (one per muffin)

  • 2 green onions, finely chopped

  • Salt, to taste

  • Black pepper, to taste

  • A small pinch of garlic powder or paprika (optional)

  • Vegetable oil or butter, for greasing the muffin tin


👩‍🍳 Step-by-Step Instructions

Step 1: Prepare the Potatoes

  1. Preheat your oven to 400°F (200°C).

  2. Place the grated potatoes into a bowl of cold water.

  3. Rinse well to remove excess starch.

  4. Drain and squeeze the potatoes firmly using a clean kitchen towel until they are as dry as possible.
    Dry potatoes help create a crisp texture during baking.


Step 2: Make the Potato Nests

  1. Transfer the dried potatoes to a mixing bowl.

  2. Add salt, black pepper, and half of the shredded cheese.

  3. Mix gently until evenly combined.

  4. Grease a 12-cup muffin tin thoroughly.

  5. Divide the potato mixture evenly among the cups.

  6. Press the mixture firmly into the bottom and up the sides of each cup to form a nest shape.


Step 3: Prepare the Egg Mixture

  1. In a separate bowl or jug, whisk the eggs until smooth.

  2. Add chopped green onions and any remaining seasoning.

  3. Stir gently to combine.


Step 4: Assemble and Bake

  1. Carefully pour the egg mixture into the center of each potato nest.

  2. Place one cherry tomato in the center of each muffin.

  3. Sprinkle the remaining shredded cheese evenly on top.

  4. Bake for 25–30 minutes, or until:

    • The potato edges are golden and crisp

    • The egg filling is fully set


Step 5: Cool and Serve

  1. Remove the muffin tin from the oven.

  2. Allow the muffins to rest for 5 minutes.

  3. Use a small knife to gently loosen the edges.

  4. Lift the muffins out carefully.

Serve warm for the best texture and flavor.


🌟 Why You’ll Love This Recipe

  • Crispy Outside, Soft Inside: The potato base becomes golden and crunchy while the egg stays tender.

  • Easy to Customize: Add extra vegetables like spinach, bell peppers, or mushrooms for variety.

  • Great for Planning Ahead: These muffins can be prepared in advance and reheated while keeping their texture.
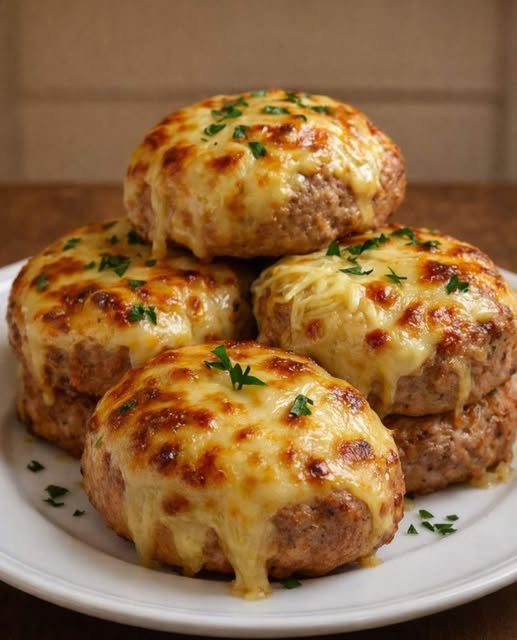
Cheesy Baked Meat & Potato “Pillows”

Cheesy Baked Meat & Potato “Pillows”

Yields: 6–8 individual portions | Prep time: 20 mins | Bake time: 40 mins

Ingredients

The Meat Base:

  • 2.2 lb (1 kg) Ground beef (lean is best to avoid excess grease)

  • 2 oz (60 g) Breadcrumbs

  • 1 Large egg

  • 1 Carrot, finely grated

  • 1 Green onion, chopped

  • 1 Red onion, finely diced

  • 1 Garlic clove, minced

  • 2 tbsp Fresh dill, chopped

  • Seasoning: Salt, ground black pepper, and dried garlic (to taste)

The Topping & Layers:

  • 3.5 oz (100 g) Sour cream

  • 2.8 oz (80 g) Mayonnaise

  • 10.6 oz (300 g) Mushrooms, finely sliced or chopped

  • 2 Tomatoes, thinly sliced

  • 7 oz (200 g) Mozzarella cheese, shredded

  • Garnish: Paprika and fresh parsley


Step-by-Step Instructions

1. Prepare the Meat Mixture

Preheat your oven to 375°F (190°C). In a large mixing bowl, combine the ground beef, breadcrumbs, egg, grated carrot, onions, garlic, and dill. Season generously with salt, pepper, and dried garlic. Mix by hand until well combined but do not overwork the meat (this keeps them tender).

2. Shape the Portions

Instead of a flat layer, shape the meat into large, thick patties (about 1.5 inches thick) and place them on a greased baking sheet or in a large baking dish with space between them. Use your thumb to make a slight indentation in the center of each patty—this creates a “well” for the toppings.

3. Layer the Flavor

  • Cream Base: Mix the sour cream and mayonnaise in a small bowl. Spread a dollop onto each meat patty.

  • Vegetables: Press a few mushroom slices and a slice of tomato into the cream on top of each patty.

  • The Cheese: Pile a generous mound of mozzarella over the top of each portion.

  • Final Touch: Spread a tiny bit more of the cream mixture over the cheese (this helps it brown without burning) and sprinkle with paprika.

4. The Bake

Cover the tray loosely with foil (try not to let it touch the cheese). Bake for 30 minutes. Remove the foil and bake for another 10–15 minutes until the cheese is bubbly and has those characteristic golden-brown spots seen in your photo.

5. Rest and Serve

Let the dish rest for 5–10 minutes before serving. This allows the juices to redistribute so the meat stays moist. Garnish with fresh parsley.


Chef’s Pro-Tips

  • Moisture Control: If your mushrooms are very fresh/watery, sauté them for 3 minutes in a pan before putting them on the meat to prevent the “pillows” from sitting in too much liquid.

  • The “Picky Eater” Hack: If someone dislikes mushrooms, swap them for a thin layer of pre-boiled potato slices or even a spoonful of caramelized onions.

Air Fryer Poached Eggs: A Game-Changer in the Kitchen

This air fryer method is a fantastic shortcut! Traditional poaching can be so finicky with the “whirlpool” method, so using the air fryer to steam them in ramekins is a clever way to get that silky texture without the stress.

Following your preference, here is the full recipe formatted for easy reference.


Air Fryer Poached Eggs

These “poached” eggs are technically steamed in the air fryer, resulting in a tender white and a perfectly runny yolk. It is a hands-off, mess-free alternative to the stovetop.

  • Prep time: 2 minutes

  • Cook time: 5–7 minutes

  • Total time: Under 10 minutes

Equipment

  • Air Fryer

  • Heat-proof ramekins or small ceramic bowls

Ingredients

  • Eggs: Large, fresh eggs (as many as your basket can fit)

  • Water: 3 tbsp hot water per ramekin

  • Oil Spray: Optional (non-stick spray or olive oil)

  • Seasoning: Salt and black pepper to taste

Instructions

  1. Preheat: Set your air fryer to 340°F (170°C) and let it preheat for about 3 minutes.

  2. Prep Ramekins: Lightly spray the inside of each ramekin with oil to prevent sticking. Add 3 tablespoons of hot water into each ramekin.

  3. Add Eggs: Carefully crack one egg into each ramekin, being careful not to break the yolk.

  4. Air Fry: Place the ramekins into the air fryer basket. Cook at 340°F (170°C) according to your preferred doneness:

    • 5 Minutes: Very runny yolk and soft whites.

    • 6 Minutes: Classic poached (jammy yolk, set whites).

    • 7 Minutes: Firm yolk and fully set whites.

  5. Serve: Using oven mitts, carefully remove the hot ramekins. Use a slotted spoon to lift the egg out of the water. Drain on a paper towel for a second if desired, then serve immediately

Crispy Golden Fried Shrimp

Crispy Golden Fried Shrimp

  • Prep time: 20 minutes

  • Cook time: 10 minutes

  • Serves: 3–4 people

Ingredients

The Shrimp & Marinade

  • 1 lb Large shrimp (peeled and deveined, tails on or off per preference)

  • 1 cup Buttermilk

  • 1 tsp Hot sauce (optional, for a tiny kick)

  • 1/2 tsp Garlic powder

The Breading (The “Secret” for Crunch)

  • 1 ½ cups All-purpose flour

  • ½ cup Cornstarch (this makes it extra crispy)

  • 1 tsp Baking powder

  • 1 tbsp Cajun or Old Bay seasoning

  • 1 tsp Salt

  • ½ tsp Black pepper

  • ½ tsp Dried parsley (for those green flecks seen in the photo)

For Frying

  • Neutral oil (Vegetable, Canola, or Peanut oil)

  • Lemon wedges and fresh parsley for garnish


Instructions

  1. Marinate: In a bowl, whisk together the buttermilk, hot sauce, and garlic powder. Add the shrimp and toss to coat. Let them sit for at least 15 minutes (this helps the breading stick).

  2. Prepare the Dredge: In a separate shallow dish or a large Ziploc bag, whisk together the flour, cornstarch, baking powder, Cajun seasoning, salt, pepper, and dried parsley.

  3. Heat the Oil: Fill a heavy-bottomed pot or deep skillet with about 2 inches of oil. Heat to 350°F (175°C).

    Tip: If you don’t have a thermometer, dip the end of a wooden spoon in; if it bubbles steadily, it’s ready.

  4. Bread the Shrimp: Remove a few shrimp from the buttermilk, letting the excess drip off. Toss them in the flour mixture, pressing firmly so the coating sticks to every nook and cranny. Shake off the heavy excess.

  5. Fry in Batches: Carefully drop the shrimp into the hot oil. Do not overcrowd the pan. Fry for 2–3 minutes until they are a deep golden brown and curled into a “C” shape.

  6. Drain: Remove with a slotted spoon and place on a wire rack (preferable for air circulation) or paper towels to drain.

  7. Serve: Dust with a little extra fresh parsley and serve immediately with lemon wedges and your favorite dipping sauce.

Crispy Baked Cabbage Steaks

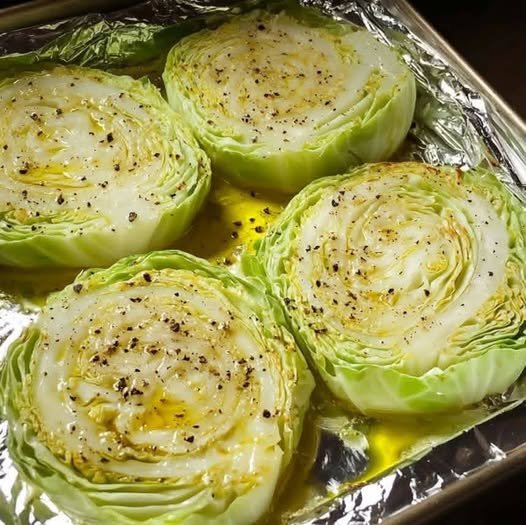
Crispy Baked Cabbage Steaks are thick slices of fresh cabbage brushed with olive oil, seasoned simply, and oven-roasted until the edges are golden and caramelized while the centers stay tender. This easy, budget-friendly dish works beautifully as a healthy side, a vegetarian main, or a base for flavorful toppings.


⏱️ Prep & Cook Time

  • Prep Time: 10 minutes

  • Cook Time: 30–35 minutes

  • Total Time: 40–45 minutes


🍽️ Servings

Serves: 4 people
(1 cabbage yields 4 thick steaks)


🧾 Ingredients

  • 1 large green cabbage

  • 3–4 tablespoons olive oil

  • ½ teaspoon salt (or to taste)

  • ½ teaspoon black pepper

  • ½ teaspoon garlic powder (optional)

  • ½ teaspoon smoked paprika (optional)

  • Optional toppings:

    • Parmesan cheese

    • Lemon zest or juice

    • Red pepper flakes

    • Fresh herbs (parsley, thyme)


👩‍🍳 Instructions

  1. Preheat Oven
    Preheat oven to 425°F (220°C). Line a baking sheet with foil or parchment paper.

  2. Slice the Cabbage
    Remove loose outer leaves. Slice cabbage into ¾–1 inch thick steaks, keeping the core intact to hold them together.

  3. Season
    Arrange cabbage steaks on the baking sheet. Brush both sides generously with olive oil. Sprinkle with salt, pepper, and optional seasonings.

  4. Bake
    Roast for 30–35 minutes, flipping once halfway through, until edges are browned and crispy.

  5. Finish & Serve
    Add optional toppings and serve hot.


⭐ Recipe Notes

  • Thicker slices stay intact and develop better texture.

  • Don’t overcrowd the pan—space helps crisping.

  • Olive oil is key for caramelization.


🔥 Pro Tips for Extra Crispiness

  • Use high heat (425°F+)

  • Flip gently using a wide spatula

  • Add a final 2–3 minutes under the broiler

  • Sprinkle cheese during the last 5 minutes


🧮 Nutritional Information (Per Serving – Approximate)

  • Calories: 120

  • Carbohydrates: 10g

  • Protein: 2g

  • Fat: 9g

  • Fiber: 4g

  • Sodium: 230mg


💚 Health Benefits

  • Rich in fiber for digestion

  • High in vitamin C & K

  • Low-calorie and heart-healthy

  • Contains antioxidants that support immunity

  • Naturally gluten-free & vegan


❓ Q & A

Q: Can I use red cabbage?
Yes! Red cabbage works well but may need 5 extra minutes to soften.

Q: Can I make this in an air fryer?
Yes. Cook at 375°F for 12–15 minutes, flipping halfway.

Q: How do I store leftovers?
Store in an airtight container for up to 3 days in the fridge.

Q: Can I add protein?
Absolutely—top with chickpeas, tofu, or a fried egg.

Q: Why isn’t my cabbage crispy?
Likely overcrowding, low heat, or not enough oil.

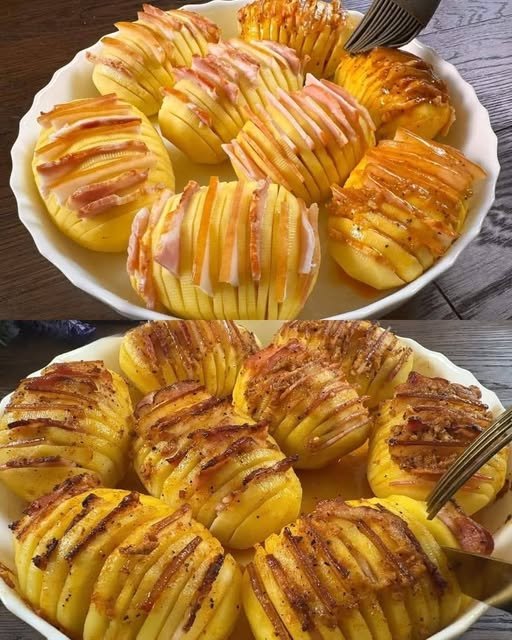
Crispy Garlic & Bacon Hasselback Potatoes

Crispy Garlic & Bacon Hasselback Potatoes

Ingredients

  • Potatoes: 8 medium-sized (Yukon Gold or Russets work best)

  • Bacon: 230 g (thinly sliced)

  • Butter: 40 g (melted)

  • Garlic: 3 cloves (minced)

  • Seasonings: Paprika, salt, and black pepper (to taste)

  • Optional: Fresh parsley or chives for garnish


Instructions

  1. Prepare the Potatoes:

    • Wash and scrub the potatoes thoroughly.

    • To slice them without cutting all the way through, place a potato between two wooden spoons or chopsticks. Slice the potato into thin layers (about 3–5 mm apart); the spoons will act as a guard to keep the base intact.

  2. Stuff with Bacon:

    • Cut the bacon strips into small squares or rectangles that fit the width of your potato slices.

    • Carefully tuck a piece of bacon into every second or third slit of the potato.

  3. Prepare the Garlic Butter:

    • In a small bowl, combine the 40 g of melted butter, minced garlic, paprika, salt, and black pepper.

    • Mix well to ensure the spices are evenly distributed.

  4. Brush and Bake:

    • Place the potatoes in a baking dish.

    • Using a pastry brush (as seen in your photo), generously coat the top of each potato with the garlic butter mixture, making sure some drips into the slits.

    • Bake in a preheated oven at 200°C (400°F) for 45–60 minutes. The exact time depends on the size of your potatoes; they are done when the edges are crispy and the center is soft when pierced with a fork.

  5. Finish:

    • For extra crispiness, you can brush them with the juices from the bottom of the pan halfway through cooking.

    • Garnish with fresh herbs before serving.