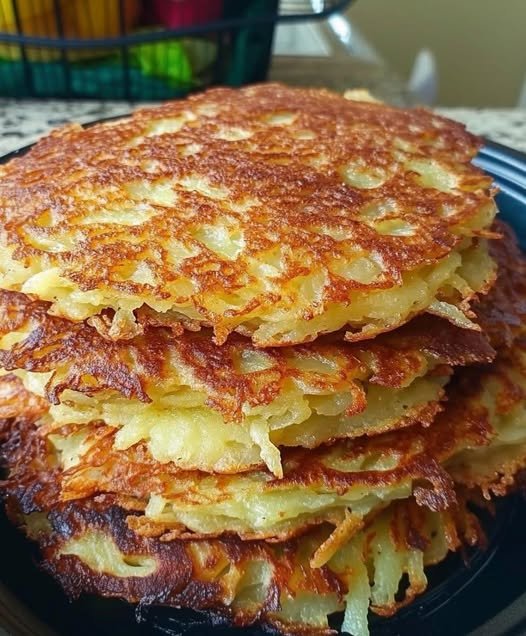
German Potato Pancakes

There are so many potato pancake recipes out there, and they are all claiming to be the original German Potato Pancakes. These are really fun to make and eat. They are crispy, slightly crunchy, and overly tasty. These cakes are truly loved worldwide. Of course, each locale has their own recipe. For instance, Swedish pancakes are also quite popular and eerily similar to the German potato pancakes.

Ingredients

  • 2 ½ pounds Russet potatoes, or any starchy potato, peeled and grated very finely
  • 1 yellow onion, grated very fine
  • 2 large eggs
  • 1 tsp salt
  • ¼ cup all-purpose flour
  • Oil for frying

How To Make German Potato Pancakes

FIRST STEP:

After grating the potatoes, using a towel, thoroughly wring out all the liquid from the potatoes

Place the drained potatoes into a large bowl with the grated onion, salt, eggs, and flour.

Mix it thoroughly with your hands; you want it to be somewhat tacky. Add a little more flour if it is too sticky

SECOND STEP:

Heat 3 tbsp oil in a skillet

Place ⅓ to ½ a cup of mixture into the hot skillet

THIRD STEP:

Fry for three to five minutes on each side, until they are golden.

Briefly drain on paper towels

FOURTH STEP:

Serve immediately, while hot, with applesauce and a sprinkle of powdered sugar, sour cream, or even yogurt.

These could also be served with meat and a gravy, using these as a side dish.

Enjoy!

Cheesy Air Fryer Hasselback Potatoes

Cheesy Air Fryer Hasselback Potatoes

Prep time: 10 mins | Cook time: 45 mins | Servings: 2

Ingredients

  • 2 russet potatoes

  • 4 tbsp butter, melted

  • 1 tbsp garlic paste or minced garlic

  • 3 to 5 slices Colby Jack cheese (cut into fourths)

  • Kosher salt and black pepper to taste

  • Optional toppings: Sour cream and fresh chives


Instructions

  1. Prep the Potatoes: * Cut a thin slice from the bottom of each potato to create a flat, stable base.

    • Place the potato between two chopsticks. Use a sharp knife to cut 1/4-inch slices across the potato; the chopsticks will stop your knife from cutting all the way through.

  2. The “Lift” Trick: * Place the small slices you cut from the bottom into the air fryer basket.

    • Set the large sliced potatoes on top of these bottom slices. This helps the Hasselback layers fan open during cooking.

  3. Seasoning: * Mix the melted butter, garlic, salt, and pepper.

    • Gently fan out the potato slices and brush the garlic butter over the top, making sure it gets between the layers.

    • Sprinkle with a little extra salt and pepper.

  4. First Stage Air Fry: * Set your air fryer to 370°F and cook for 20 minutes.

  5. Second Stage Air Fry: * Brush any remaining garlic butter over the potatoes.

    • Cook for an additional 20 to 25 minutes at 370°F until the edges are crispy and golden.

  6. Add the Cheese: * Slide the small cheese pieces into the gaps between the potato slices (either every gap or every other gap depending on your preference).

    • Cook for 1 to 2 more minutes until the cheese is bubbling and melted.

  7. Serve: * Top with a dollop of sour cream and a sprinkle of fresh chives.


Pro Tips for the Best Hasselbacks

  • Butter is Key: Don’t be shy with the garlic butter; it’s what creates the “salty” and “cheesy” experience mentioned in your notes.

  • Potato Size: Try to choose russet potatoes of a similar size so they cook evenly at the same time.

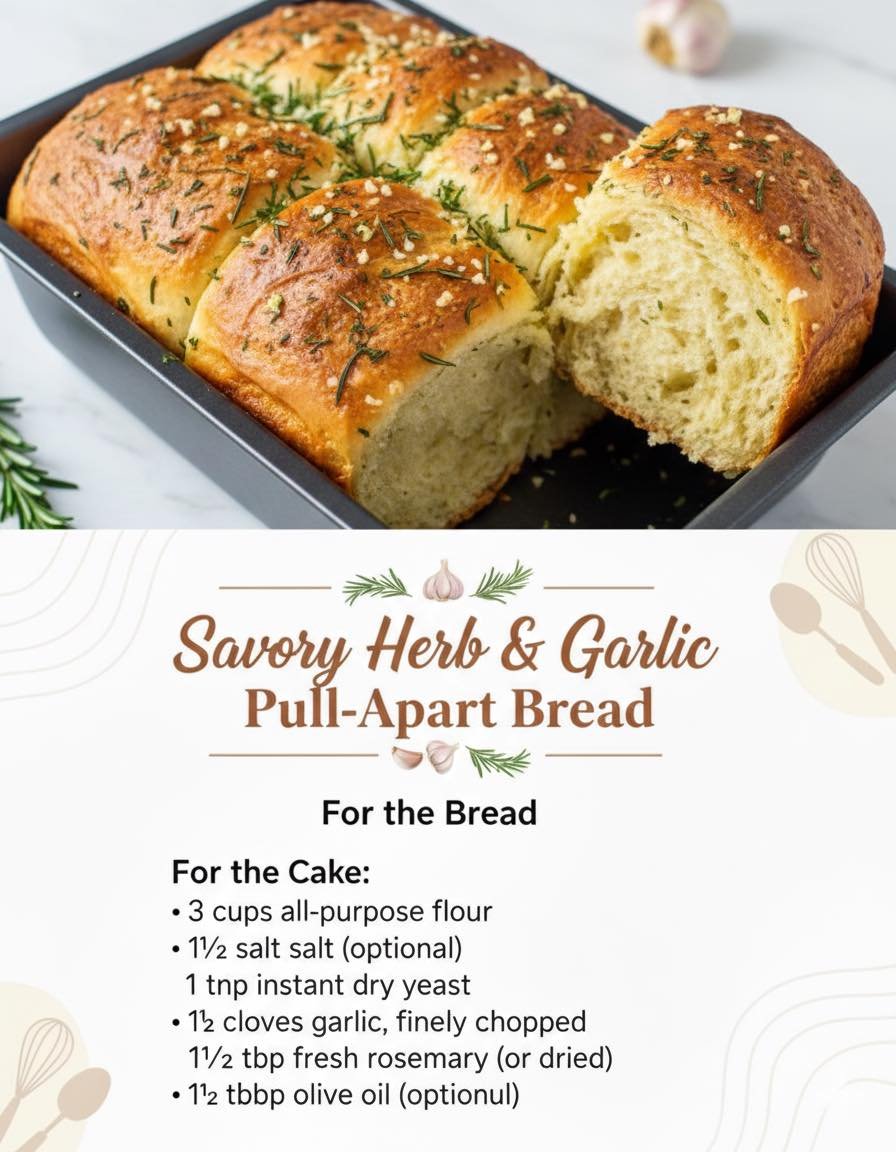
🧀 Savory Herb & Garlic Pull-Apart Bread

🧀 Savory Herb & Garlic Pull-Apart Bread

Soft • Aromatic • Golden • Perfect for Sharing

This Savory Herb & Garlic Bread is fluffy on the inside with a lightly crisp, golden top. Fresh garlic and herbs infuse every bite, while olive oil keeps the crumb tender and flavorful. Designed as a pull-apart loaf, it’s ideal for serving warm at the table.


Why This Recipe Works

  • Proper yeast activation ensures a light, airy texture

  • Olive oil adds softness and rich flavor

  • Fresh garlic and herbs create deep aroma

  • Two rises give excellent structure and fluffiness

  • Pull-apart shaping makes it easy to serve


Ingredients

For the Dough

  • 3 cups all-purpose flour, plus extra for dusting

  • 1 teaspoon salt

  • 2 teaspoons sugar

  • 2¼ teaspoons instant dry yeast (1 standard packet)

  • 1 cup warm water (about 105–110°F / 40–43°C)

  • 3 tablespoons olive oil

Flavor Add-Ins

  • 3 cloves garlic, finely minced

  • 1½ tablespoons fresh rosemary, finely chopped
    (or 1 teaspoon dried rosemary)

For the Top (Optional but Recommended)

  • 1–2 tablespoons olive oil or melted butter

  • Optional: pinch of salt or grated cheese


Step-by-Step Instructions

1. Activate the Yeast

  • In a small bowl, combine:

    • Warm water

    • Sugar

    • Yeast

  • Stir gently and let sit for 5–10 minutes

  • The mixture should become slightly foamy

Tip: If it doesn’t foam, the yeast may be inactive—start again for best results.


2. Mix the Dough

  • In a large bowl, whisk together:

    • Flour

    • Salt

    • Minced garlic

    • Chopped rosemary

  • Make a well in the center

  • Pour in:

    • Yeast mixture

    • Olive oil

  • Mix with a spoon or your hands until a shaggy dough forms


3. Knead the Dough

  • Transfer dough to a lightly floured surface

  • Knead for 5–8 minutes until:

    • Smooth

    • Elastic

    • Slightly tacky but not sticky

Adjustment Tip:
If the dough sticks, add flour 1 tablespoon at a time.


4. First Rise

  • Lightly oil a clean bowl

  • Place dough inside and turn once to coat

  • Cover with a damp cloth or plastic wrap

  • Let rise in a warm place for about 1 hour, or until doubled in size


5. Shape the Pull-Apart Pieces

  • Gently punch down the dough to release air

  • Divide into 8–10 equal portions

  • Roll each portion into a smooth ball

  • Arrange balls snugly in a greased loaf pan


6. Second Rise

  • Cover the pan loosely

  • Let rise again for 30 minutes

This step ensures a light, fluffy final texture.


7. Bake

  • Preheat oven to 375°F (190°C)

  • Brush the top with olive oil or melted butter

  • Bake for 25–30 minutes, until:

    • Top is golden brown

    • Bread sounds hollow when tapped


8. Cool and Serve

  • Let bread cool in the pan for 10 minutes

  • Remove gently and serve warm

  • Pull apart and enjoy the soft, herbed layers


Texture & Flavor Notes

  • Interior: soft, fluffy, and aromatic

  • Exterior: lightly crisp and golden

  • Flavor: savory garlic with fresh herb warmth


Storage Tips

  • Room temperature: Wrap and store up to 2 days

  • Refrigerator: Up to 4 days (reheat before serving)

  • Freezer: Freeze baked bread up to 2 months


Optional Variations

  • Add grated cheese between dough balls

  • Mix in parsley or thyme

  • Sprinkle sesame or herb seasoning on top

  • Brush with garlic-infused butter after baking

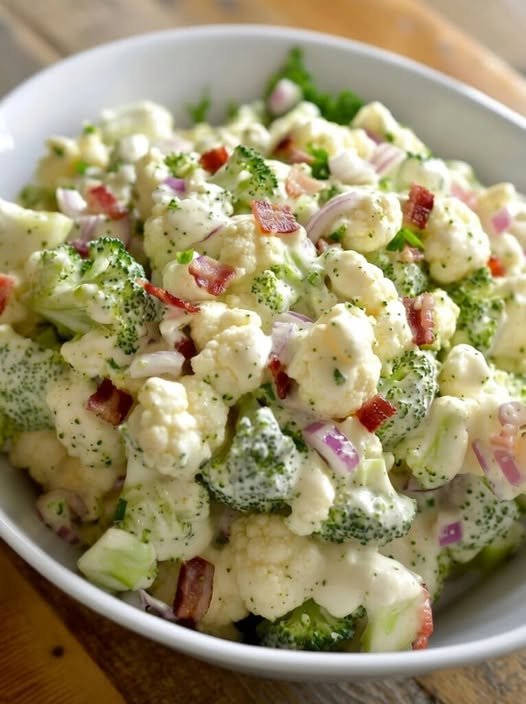
Creamy Broccoli Cauliflower Salad

Creamy Broccoli Cauliflower Salad

Crunchy • Creamy • Savory-Sweet • Perfect for Gatherings

This classic Creamy Broccoli Cauliflower Salad is a well-loved favorite for potlucks, picnics, and family meals. Crisp fresh vegetables are paired with smoky, crunchy bacon, sharp cheese, and a tangy-sweet dressing that coats every bite beautifully. It improves with time, making it ideal for preparing ahead.


Why This Recipe Works

  • Raw broccoli and cauliflower stay crisp and refreshing

  • Creamy dressing balances tang and sweetness

  • Bacon adds depth and crunch

  • Chilling time allows flavors to blend perfectly

  • Easy to customize for different diets


Ingredients

The Salad Base

  • 3 cups fresh broccoli florets, chopped into bite-sized pieces

  • 3 cups fresh cauliflower florets, chopped small

  • 6 slices bacon, cooked until crisp and crumbled

  • ¾ cup sharp cheddar cheese, freshly grated

  • ⅓ cup red onion, finely diced

  • ½ cup roasted sunflower seeds
    (or chopped almonds for a nutty variation)

  • Optional: ½ cup dried cranberries or raisins for gentle sweetness


The Creamy Dressing

  • ¾ cup mayonnaise, good quality

  • ¼ cup sour cream or plain Greek yogurt

  • 2 tablespoons apple cider vinegar

  • 2 tablespoons granulated sugar
    (or honey or maple syrup)

  • ½ teaspoon salt

  • ¼ teaspoon black pepper


Step-by-Step Instructions

1. Prepare the Vegetables

  • Wash broccoli and cauliflower thoroughly

  • Pat completely dry using a clean kitchen towel

Important Tip: Dry vegetables allow the dressing to cling properly instead of sliding off.

  • Chop into small, evenly sized pieces for the best texture and flavor in every bite


2. Cook the Bacon

  • Cook bacon in a skillet or oven until deeply crisp

  • Transfer to paper towels to cool

  • Crumble into small pieces

Make-Ahead Tip: Store bacon separately and add just before serving to keep it crunchy.


3. Make the Dressing

  • In a medium bowl, whisk together:

    • Mayonnaise

    • Sour cream (or yogurt)

    • Apple cider vinegar

    • Sugar

    • Salt

    • Black pepper

  • Whisk until smooth and creamy

  • Taste and adjust:

    • Add more vinegar for tang

    • Add a touch more sweetener if desired


4. Assemble the Salad

  • In a large mixing bowl, combine:

    • Broccoli

    • Cauliflower

    • Red onion

    • Cheddar cheese

    • Sunflower seeds

  • Pour dressing over the salad

  • Fold gently until all vegetables are evenly coated


5. Chill for Best Flavor

  • Cover and refrigerate for at least 30 minutes

  • For best results, chill 3–4 hours to allow flavors to blend

  • Stir in the crumbled bacon just before serving
    (or sprinkle on top for presentation)


Texture & Flavor Notes

  • Crisp vegetables with creamy coating

  • Savory, slightly sweet, and tangy balance

  • Bacon adds crunch and smoky depth


Customization & Variations

Lighter Version

  • Replace half the mayonnaise with Greek yogurt

  • Use honey or reduce sweetener

Low-Carb Version

  • Omit sugar and dried fruit

  • Add extra bacon or chopped hard-boiled eggs

Plant-Based Version

  • Use dairy-free mayonnaise

  • Replace bacon with toasted seeds or smoked seasoning


Storage & Make-Ahead Tips

  • Make Ahead:

    • Chop vegetables and prepare dressing up to 24 hours in advance

    • Store separately and combine 1–2 hours before serving

  • Leftovers:

    • Store in an airtight container in the refrigerator

    • Keeps well for up to 3 days

    • Stir before serving as some moisture may release

  • Freezing:

    • Not recommended due to texture changes

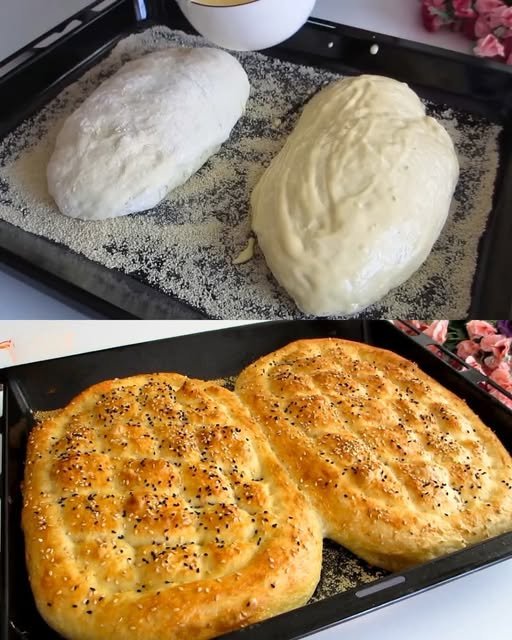
Soft Oven-Baked Tray Bread (Bakery-Style)

Soft Oven-Baked Tray Bread (Bakery-Style)

Yield: 2 large flatbreads
Prep Time: 25 minutes
Resting Time: 1½–2 hours
Bake Time: 18–22 minutes
Difficulty: Easy–Intermediate


🧾 INGREDIENTS

For the Dough

  • All-purpose flour – 4½ cups (560 g)

  • Warm milk – 1 cup (240 ml)

  • Warm water – ½ cup (120 ml)

  • Instant yeast – 2¼ teaspoons (1 sachet)

  • Sugar – 2 tablespoons

  • Salt – 1½ teaspoons

  • Oil or melted butter – 4 tablespoons

  • Yogurt – 3 tablespoons (for softness)


For Topping

  • Egg yolk – 1

  • Milk – 2 tablespoons

  • Sesame seeds – 1½ tablespoons

  • Nigella seeds (kalonji) – 1 tablespoon


For Tray

  • Semolina or cornmeal – 2 tablespoons (prevents sticking)


👩‍🍳 STEP-BY-STEP METHOD


🔹 Step 1: Activate the Yeast

  1. In a bowl, mix warm milk + warm water + sugar

  2. Sprinkle yeast on top

  3. Let rest 8–10 minutes until foamy

✔️ If it bubbles, yeast is active


🔹 Step 2: Make the Dough

  1. In a large bowl add:

    • Flour

    • Salt

  2. Pour in:

    • Yeast mixture

    • Oil

    • Yogurt

  3. Mix with a spoon, then knead by hand 10–12 minutes

➡️ Dough should be soft, slightly sticky, elastic

(Add 1–2 tbsp flour only if needed.)


🔹 Step 3: First Rise

  1. Lightly oil the bowl

  2. Place dough inside and cover

  3. Let rise in warm place 1–1½ hours

✔️ Dough should double in size


🔹 Step 4: Shape the Bread

  1. Punch down dough gently

  2. Divide into 2 equal portions

  3. Shape each into an oval or round loaf

  4. Place on baking tray dusted with semolina


🔹 Step 5: Second Rest

Cover loosely and let rest 20–25 minutes

This step gives extra fluffiness


🔹 Step 6: Topping & Design

  1. Mix egg yolk and milk.

  2. Brush generously over dough

  3. Sprinkle sesame and nigella seeds

  4. Press shallow finger lines or crisscross pattern on top

(This is traditional and helps even baking.)


🔹 Step 7: Bake

  • Preheat oven to 200°C (390°F)

  • Bake 18–22 minutes

  • Bread should be:

    • Deep golden

    • Soft when pressed

    • Lightly crisp on top


🔹 Step 8: Finish

  • Brush lightly with butter (optional)

  • Cover with cloth for 5 minutes to soften crust


🫓 FINAL RESULT

  • Golden bakery-style bread

  • Soft, airy crumb

  • Slight crunch from seeds

  • Perfect for dipping, wraps, or sandwiches


💡 PRO TIPS

✔ Yogurt makes it extra soft
✔ Semolina prevents soggy bottoms
✔ Do not overbake
✔ Can be frozen after cooling


🍽 SERVING IDEAS

  • With butter & honey

  • With curry or daal

  • As sandwich bread

  • With tea or soup

Soft Cheese-Stuffed Bread Boats with Herb Tomato Glaze

Soft Cheese-Stuffed Bread Boats with Herb Tomato Glaze

Yields: 10–12 Boats | Prep time: 20 mins (+1 hour rising) | Cook time: 20–25 mins

Ingredients

The Dough:

  • 200 ml Lukewarm milk

  • 200 ml Lukewarm water

  • 1 tbsp Sugar

  • 7 g (1 packet) Active dry yeast

  • 600-650 g All-purpose flour

  • 1 tsp Salt

  • 50 ml Vegetable oil

The Filling:

  • 300 g Feta cheese or soft white cheese, crumbled

  • 1 cup Shredded mozzarella

  • 1 Egg (optional, to bind)

  • Fresh parsley, chopped

The Herb Tomato Glaze:

  • 2 tbsp Tomato paste

  • 3 tbsp Olive oil

  • 1 tsp Dried oregano or Italian herbs

  • 1 clove Garlic, minced

  • Fresh parsley, finely chopped


Detailed Instructions

1. Prepare the Yeast Base

  • In a large mixing bowl, combine the 200 ml lukewarm milk, 200 ml lukewarm water, and 1 tbsp sugar.

  • Sprinkle 7 g of active dry yeast over the top and stir gently.

  • Let the mixture sit for about 5–10 minutes until it becomes foamy.

2. Mix and Knead the Dough

  • Add 50 ml vegetable oil and 1 tsp salt to the yeast mixture.

  • Gradually add 600-650 g of flour, mixing until a soft dough forms.

  • Knead the dough on a floured surface for 8–10 minutes until it is smooth and elastic.

3. First Rise

  • Place the dough in a lightly greased bowl and cover it with a warm, damp cloth.

  • Let it rise in a warm, draft-free spot for 1 hour or until it has doubled in size.

4. Shape the Boats

  • Punch the dough down to release air and divide it into 10–12 equal pieces.

  • Roll each piece into an oval shape.

  • Place a generous amount of the cheese filling (the crumbled feta, mozzarella, and parsley) in the center.

  • Fold the edges of the dough over the cheese and twist the ends to create a “boat” or twisted loaf shape.

5. Apply the Herb Tomato Glaze

  • Whisk together the 2 tbsp tomato paste, 3 tbsp olive oil, 1 tsp herbs, 1 clove minced garlic, and fresh parsley.

  • Use a pastry brush to coat the tops of the dough boats generously with this savory glaze.

6. Bake

  • Preheat your oven to 375°F (190°C).

  • Arrange the boats on a baking sheet lined with parchment paper.

  • Bake for 20–25 minutes until the bread is golden brown and the cheese is melted and bubbly.

7. Serve

  • Let the bread boats cool for a few minutes so the cheese sets slightly.

  • These are best served warm when the bread is at its softest.