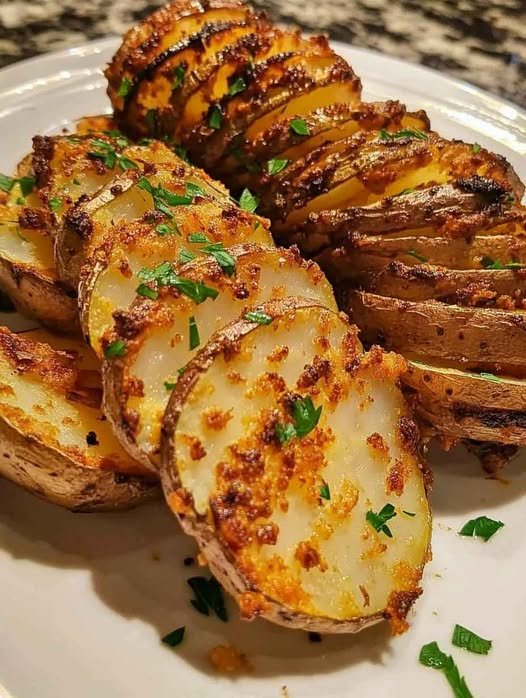
Cheesy Air Fryer Hasselback Potatoes

Cheesy Air Fryer Hasselback Potatoes

Crispy edges, soft centers, and melty cheese in every bite

These Cheesy Air Fryer Hasselback Potatoes are a comforting side dish made with simple ingredients and big flavor. Thinly sliced potatoes fan open as they cook, allowing buttery garlic seasoning and cheese to melt into every layer. The air fryer creates a crisp exterior while keeping the inside tender and fluffy.


Recipe Overview

  • Prep Time: 10 minutes

  • Cook Time: 45 minutes

  • Total Time: 55 minutes

  • Servings: 2


Ingredients

  • 2 medium russet potatoes, scrubbed clean

  • 4 tablespoons butter, melted

  • 1 tablespoon garlic paste or finely minced garlic

  • Kosher salt, to taste

  • Black pepper, to taste

  • 3–5 slices Colby Jack cheese, each slice cut into fourths

Optional Toppings

  • Sour cream

  • Fresh chives, finely chopped


Step-by-Step Instructions

1. Prepare the Potatoes

  • Rinse and scrub the potatoes thoroughly.

  • Slice a very thin piece off the bottom of each potato so it sits flat and stable.


2. Create the Hasselback Cuts

  • Place one potato between two chopsticks or wooden spoons.

  • Using a sharp knife, slice across the potato at ¼-inch intervals.

  • The chopsticks will prevent cutting all the way through, keeping the base intact.

  • Repeat with the second potato.


3. Prepare the Air Fryer Basket (Layer-Lifting Method)

  • Place the small potato slices removed from the bottoms into the air fryer basket.

  • Set the sliced potatoes on top of these pieces.

  • This helps the slices fan open during cooking, allowing better crisping and seasoning.


4. Season the Potatoes

  • In a small bowl, combine:

    • Melted butter

    • Garlic

    • Salt

    • Black pepper

  • Gently fan open the potato slices with your fingers.

  • Brush the garlic butter generously over the tops and into the gaps.

  • Sprinkle lightly with additional salt and pepper.


5. First Air Fry Stage

  • Set the air fryer to 370°F (188°C).

  • Cook the potatoes for 20 minutes.


6. Second Air Fry Stage

  • Remove the basket and brush the potatoes with any remaining garlic butter.

  • Return to the air fryer and cook for 20–25 minutes, until:

    • The edges are crisp

    • The centers are fork-tender

    • The slices are fully opened


7. Add the Cheese

  • Carefully tuck the cheese pieces between the potato slices.

  • You can add cheese to every slice or every other slice, depending on preference.

  • Return to the air fryer and cook for 1–2 minutes, just until the cheese melts and becomes lightly bubbly.


8. Serve

  • Remove from the air fryer and let rest for 2–3 minutes.

  • Top with sour cream and fresh chives if desired.

  • Serve hot as a side dish or light meal.


Helpful Tips & Variations

  • Even cooking: Choose potatoes similar in size.

  • Extra flavor: Add paprika, onion powder, or dried herbs to the butter.

  • Cheese swaps: Cheddar, mozzarella, or Monterey Jack work well.

  • Crispier texture: Brush a little butter between slices halfway through cooking.
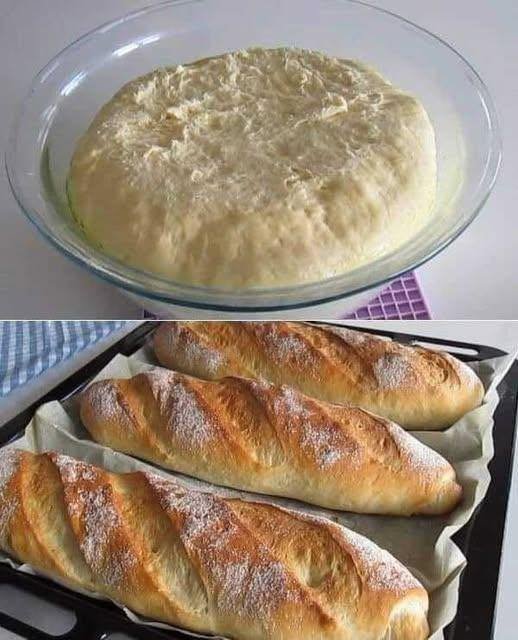
Homemade White Bread

Homemade White Bread

Soft, fluffy loaf with a tender golden crust

Prep Time: 20 minutes
Rise Time: 1½–2½ hours
Bake Time: 30–35 minutes
Total Time: About 3 hours
Yield: 1 standard loaf

This homemade white bread is light, soft, and versatile. It works well for sandwiches, toast, or serving warm with butter. The recipe uses simple pantry ingredients and straightforward techniques suitable for beginners.


Ingredients

For the Bread

  • 4 cups all-purpose flour

  • 2 teaspoons instant yeast

  • 2 teaspoons salt

  • 2 tablespoons sugar

  • 2 tablespoons unsalted butter, softened

  • 1½ cups warm water (about 105–110°F / 40–43°C)

Optional Topping

  • 1 tablespoon milk

  • 1 tablespoon unsalted butter, melted


Step-by-Step Instructions

1. Activate the Yeast

In a small bowl, combine the warm water, sugar, and yeast. Stir gently and let sit for 5–10 minutes, until the mixture becomes foamy. This indicates the yeast is active.


2. Prepare the Dough

In a large mixing bowl, add:

  • Flour

  • Salt

  • Softened butter

Pour in the yeast mixture. Mix until a shaggy dough forms.

Transfer the dough to a lightly floured surface and knead for 8–10 minutes, until smooth, elastic, and slightly tacky but not sticky.

(If using a stand mixer, knead with a dough hook on medium speed for 6–7 minutes.)


3. First Rise

Lightly grease a clean bowl and place the dough inside, turning once to coat. Cover with a clean kitchen towel or plastic wrap.

Let rise in a warm, draft-free place for 1–2 hours, or until doubled in size.


4. Shape the Loaf

Gently press the dough to release excess air. Shape it into a loaf by rolling it tightly and pinching the seam closed.

Place the shaped dough seam-side down into a greased 9 × 5-inch loaf pan.


5. Second Rise

Cover the pan and allow the dough to rise again for 30–45 minutes, until it rises slightly above the edge of the pan.


6. Preheat the Oven

Preheat oven to 375°F (190°C).

If using the topping, mix the milk and melted butter in a small bowl.


7. Bake

Brush the top of the loaf with the milk-butter mixture if desired.

Bake for 30–35 minutes, until:

  • The top is golden brown

  • The loaf sounds hollow when tapped

For accuracy, the internal temperature should reach 190–200°F (88–93°C).


8. Cool

Remove the bread from the pan and place it on a wire rack. Allow to cool completely before slicing to ensure the best texture.


Storage

  • Store at room temperature in an airtight container for 2–3 days

  • Refrigeration is not recommended

  • Freeze sliced bread for up to 2 months


Helpful Tips

  • Warm water should not be hot, as high heat can damage yeast.

  • For a softer crust, brush the loaf with butter after baking.

  • Measure flour accurately by spooning into the cup and leveling off.

Crispy Oven-Baked Potato Slices

Crispy Oven-Baked Potato Slices

These slices are designed to be a healthier, versatile side dish that works for everything from a casual snack to a dinner party.

  • Prep time: 10 mins

  • Cook time: 30 mins

  • Total time: 40 mins

  • Servings: 4

Equipment

  • Large mixing bowl

  • Large baking tray (oven tray)

  • Parchment paper or aluminum foil

  • Mandolin or sharp chef’s knife

Ingredients

  • 500 g (approx. 1 lb) Potatoes: Starchy varieties like Russet, Maris Piper, or King Edward are best.

  • 1 tbsp Oil: Vegetable, sunflower, or olive oil.

  • ¼ tsp Garlic Powder

  • ¼ tsp Onion Granules

  • ¼ tsp Dried Parsley

  • ⅛ tsp Dried Rosemary

  • ⅛ tsp Black Pepper

  • Salt: To taste.

Instructions

  1. Prepare the Potatoes: Scrub the potatoes thoroughly. You can peel them if you prefer, but leaving the skin on adds extra texture and nutrients. Pat them completely dry with a paper towel—moisture is the enemy of crispiness!

  2. Slice Uniformly: Slice the potatoes into even rounds, approximately 1/8 to 1/4 inch thick. Using a mandolin will help ensure they all cook at the exact same rate.

  3. Season: In a large mixing bowl, toss the potato slices with the oil and all the herbs and spices. Mix well until every slice has a thin, even coating of oil and seasoning.

  4. Arrange: Line your baking tray with parchment paper. Lay the slices out in a single layer. Do not let them overlap, as this creates steam and will make the potatoes soggy.

  5. Bake: Place in a preheated oven at 400°F (200°C). Bake for 25–30 minutes. For maximum crunch, flip the slices halfway through the cooking time.

  6. Finish: They are ready when the edges are golden brown and the centers are tender. Serve immediately while hot.


Quick Tips for Success

  • The “Crowding” Rule: If you are cooking for a large group, use two trays rather than piling potatoes onto one. Space is what allows the hot air to circulate and crisp the edges.

  • Flavor Boost: For a “Cheesy Twist,” sprinkle grated Parmesan over the slices during the last 5–10 minutes of baking.

  • Dip Ideas: These pair excellently with a garlic aioli, spicy sriracha mayo, or a fresh Greek yogurt and chive dip.

Egg Muffins – Quick & Nutritious Breakfast

Egg Muffins – Quick & Nutritious Breakfast

High in protein, low in carbs, and fully customizable

Prep Time: 10 minutes
Cook Time: 18–22 minutes
Total Time: 30 minutes
Yield: 6 muffins

Egg muffins are a versatile breakfast or snack option. You can add your favorite vegetables, meats, or cheeses, making them ideal for low-carb, keto, or meal-prep-friendly diets.


Ingredients

  • 6 large eggs

  • ¼ cup (60 ml) milk (or unsweetened almond/oat milk for dairy-free)

  • ½ cup shredded cheese (cheddar, feta, or your choice; optional for dairy-free)

  • ½ cup chopped vegetables (bell peppers, spinach, green onions, mushrooms, zucchini, etc.)

  • ¼ cup cooked bacon or ham (optional)

  • Salt and pepper to taste

  • ½ teaspoon garlic powder (optional)

  • ½ teaspoon paprika (optional)


Step-by-Step Instructions

1. Preheat the Oven

Preheat your oven to 375°F (190°C).
Lightly grease a 6-cup muffin tin with cooking spray, oil, or butter. Silicone muffin cups can also be used.


2. Prepare Ingredients

  • Chop your vegetables into small pieces.

  • Dice cooked bacon or ham if using.

  • Pre-sauté watery vegetables (like mushrooms or spinach) for 2–3 minutes to prevent soggy muffins.


3. Whisk the Eggs

In a large bowl, whisk together the eggs, milk, salt, pepper, garlic powder, and paprika until smooth and slightly frothy.
This ensures fluffy muffins with evenly distributed seasoning.


4. Assemble the Muffins

  • Divide the chopped vegetables and cooked meat evenly among the muffin cups.

  • Pour the egg mixture over the fillings, filling each cup about ¾ full.

  • Top each with shredded cheese, if using.


5. Bake

Place the muffin tin in the preheated oven.
Bake for 18–22 minutes, or until the egg muffins are set and lightly golden on top.
A toothpick inserted in the center should come out clean.


6. Cool and Serve

  • Allow the muffins to cool for a few minutes before removing them from the tin.

  • Serve warm, or store for meal prep.


Tips for Perfect Egg Muffins

  • Grease Well: Prevents sticking; silicone cups work best.

  • Whisk Thoroughly: Ensures light, fluffy muffins.

  • Do Not Overfill: Fill ¾ full to prevent overflow.

  • Cool Slightly Before Removing: Prevents breaking.

  • Storage & Reheating: Refrigerate in an airtight container for up to 5 days; microwave for 30–45 seconds to reheat.

  • Freezing: Let muffins cool completely, then freeze in airtight containers or freezer bags for up to 3 months. Reheat 1–2 minutes in the microwave.

Spinach Artichoke Crescent Roll Bake

🥬 Spinach Artichoke Crescent Roll Bake

Yields: 8–10 rolls
Prep Time: 20 minutes
Bake Time: 18–22 minutes

A warm, cheesy appetizer that combines creamy spinach and artichokes inside golden, buttery crescent rolls. Perfect for parties, snacks, or cozy meals.


📝 Ingredients

For the Filling:

  • 1 cup frozen chopped spinach, thawed and well-drained

  • 1 cup canned artichoke hearts, chopped and well-drained

  • 4 oz (115 g) cream cheese, softened

  • ¼ cup sour cream

  • ¼ cup mayonnaise

  • ½ cup shredded mozzarella cheese

  • ¼ cup grated Parmesan cheese

  • 1 clove garlic, minced

  • Salt & pepper, to taste

For the Rolls:

  • 1 can (8 oz / 225 g) refrigerated crescent roll dough (sheet or regular)

  • 1 egg, beaten (optional, for brushing tops)

  • Extra mozzarella or Parmesan for topping (optional)

  • Fresh parsley, chopped (for garnish, optional)


👩‍🍳 Step-by-Step Instructions

Step 1 — Preheat & Prepare the Dish

  1. Preheat oven to 375°F (190°C).

  2. Lightly grease a baking dish or oven-safe skillet with butter or cooking spray.


Step 2 — Make the Filling

  1. In a medium bowl, combine cream cheese, sour cream, and mayonnaise. Mix until smooth.

  2. Stir in mozzarella, Parmesan, and garlic.

  3. Add the spinach and artichokes, mixing until evenly combined.

  4. Season with salt and pepper to taste.

Optional: Add a pinch of red pepper flakes or Italian seasoning for extra flavor.


Step 3 — Prepare the Dough

  1. Unroll the crescent dough onto a clean surface. If using perforated crescent rolls, pinch the seams to form a solid rectangle.

  2. Spread the spinach artichoke filling evenly over the dough, leaving about ½ inch from the edges.

  3. Starting from one long edge, roll the dough into a log (like a jelly roll).

  4. Using a sharp knife or unflavored dental floss, slice the log into 1-inch rolls (about 8–10 pieces).


Step 4 — Assemble & Bake

  1. Place the rolls cut side up in the prepared baking dish.

  2. Optional: Brush tops with beaten egg for a golden finish.

  3. Optional: Sprinkle extra mozzarella or Parmesan on top.

  4. Bake for 18–22 minutes or until golden brown and puffed.


Step 5 — Garnish & Serve

  1. Remove from oven and let cool for 5 minutes.

  2. Garnish with fresh parsley if desired.

  3. Serve warm as an appetizer, snack, or side dish.


💡 Tips for Success

  • Drain Well: Squeeze out excess liquid from spinach and artichokes to avoid soggy rolls.

  • Cheese Variations: Try Monterey Jack, cheddar, or Gruyère for different flavors.

  • Make Ahead: Assemble rolls and refrigerate for up to 8 hours before baking. Add 2–3 minutes to baking time.

  • Freezing: Bake, cool, and freeze in an airtight container for up to 1 month. Reheat at 350°F until warmed through.


🍴 Serving Ideas

  • Pair with tomato soup for a cozy meal.

  • Serve alongside a fresh garden salad for lunch.

  • Offer with marinara or garlic dip for extra indulgence.


⏱ Summary Table

Step Time Key Notes
Preheat Oven 5 min Grease baking dish
Make Filling 10 min Drain spinach well
Prepare Dough 5 min Roll tightly for neat slices
Bake 18–22 min Golden brown top
Serve — Best served warm

The Best Air Fryer Grilled Cheese Sandwich

The Best Air Fryer Grilled Cheese Sandwich

Serves: 1–2 people
Preparation Time: 5 minutes
Cooking Time: 8–10 minutes

This Air Fryer Grilled Cheese Sandwich delivers a perfectly crisp outside with a warm, creamy cheese center—all made quickly and easily. Using an air fryer allows even browning with minimal effort, making this a reliable go-to meal any time of day.


📋 Ingredients

  • 2 slices bread (white, sourdough, whole wheat, or preferred type)

  • 2–3 slices cheese (cheddar, mozzarella, American, or a combination)

  • 1–2 tablespoons butter, softened
    or mayonnaise for a crisp finish

Optional Add-Ins

  • Thinly sliced tomatoes

  • Cooked bacon or ham

  • Avocado slices

  • Jalapeños or red pepper flakes (optional)


👩‍🍳 Step-by-Step Instructions

Step 1: Preheat the Air Fryer

  1. Preheat the air fryer to 375°F (190°C).

  2. Allow it to warm for 2–3 minutes to ensure even cooking.


Step 2: Prepare the Bread

  1. Spread a thin, even layer of butter or mayonnaise on one side of each slice of bread.

  2. This coated side will become the outer, crispy surface.


Step 3: Assemble the Sandwich

  1. Place one slice of bread on a plate, coated side down.

  2. Layer the cheese evenly over the bread.

  3. Add any optional ingredients if desired.

  4. Top with the second slice of bread, coated side facing up.


Step 4: Cook

  1. Place the sandwich carefully into the air fryer basket.

  2. Cook for 4–5 minutes, then gently flip the sandwich.

  3. Continue cooking for another 4–5 minutes, or until:

    • The bread is golden and crisp

    • The cheese is fully melted


Step 5: Serve

  1. Remove the sandwich from the air fryer.

  2. Let it rest for 1 minute.

  3. Slice in half and serve warm.


🌟 Why This Recipe Works

  • Even Crisping: Hot air circulates evenly for consistent browning.

  • Smooth Melting: The closed air fryer environment helps melt the cheese evenly.

  • Simple Technique: Butter or mayonnaise creates a beautifully crisp texture.


🔄 Variations to Try

  • Cheese Upgrade: Use gouda, brie, or a cheese blend

  • Vegetable Option: Add spinach, roasted peppers, or caramelized onions

  • Spicy Style: Try pepper jack cheese or mild chili flakes

  • Gluten-Free: Use gluten-free bread

  • Sweet Version: Use chocolate spread with banana slices for a dessert-style sandwich


💡 Helpful Tips

  • Do not overfill the sandwich to keep it easy to flip

  • Flip gently using a spatula or tongs

  • Best enjoyed fresh, but leftovers can be reheated in the air fryer for 1–2 minutes


🍽️ Serving Ideas

  • Pair with tomato soup for a comforting meal

  • Serve with a fresh salad or sliced fruit

  • Cut into smaller portions for sharing