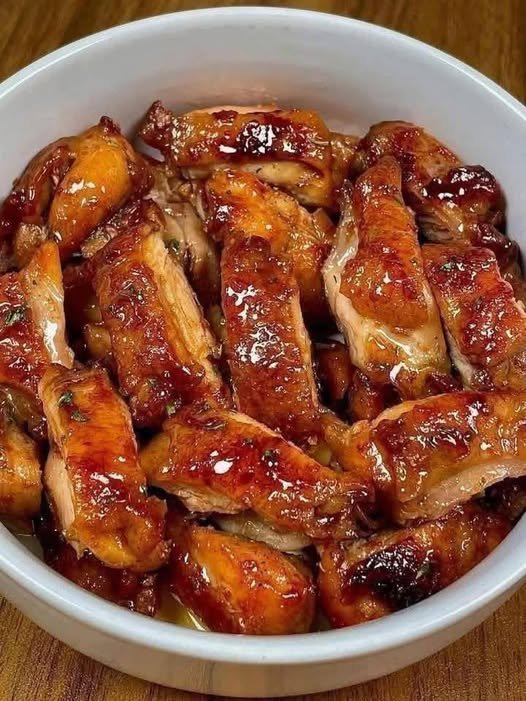
Honey Glazed Chicken (Weight-Loss & WW Friendly)

Exceptional Honey Glazed Chicken (Weight-Loss & WW Friendly)

A lean, high-protein dish featuring a glossy, flavorful glaze without the excess sugar or fats found in restaurant versions.

  • Prep time: 10 minutes

  • Cook time: 15 minutes

  • Servings: 4

  • Calories: ~230 kcal per serving

Ingredients

For the Chicken:

  • 1 ½ lbs boneless, skinless chicken breast

  • 1 tsp olive oil

  • ½ tsp salt

  • ½ tsp black pepper

  • ½ tsp garlic powder

  • ½ tsp paprika

For the Honey Glaze:

  • 3 tbsp pure honey

  • 2 tbsp low-sodium soy sauce

  • 1 tbsp fresh lemon juice

  • 2 tsp Dijon mustard

  • 2 cloves garlic, finely minced

  • ¼ cup low-sodium chicken broth

  • 1 tsp cornstarch (optional, for a thicker glaze)


Instructions

  1. Season the Chicken: Pat the chicken breasts dry with paper towels. Season both sides evenly with salt, black pepper, garlic powder, and paprika.

  2. Sear: Heat the olive oil in a large nonstick skillet over medium heat. Add the chicken and cook for 5–6 minutes per side until golden brown and the internal temperature reaches 165°F (74°C). Remove chicken from the pan and set aside.

  3. Whisk the Glaze: In a small bowl, whisk together the honey, soy sauce, lemon juice, Dijon mustard, minced garlic, and chicken broth.

  4. Deglaze & Simmer: Pour the mixture into the same skillet used for the chicken. Bring to a gentle simmer, scraping up any browned bits from the bottom of the pan to incorporate that extra flavor.

  5. Thicken (Optional): If you prefer a thicker sauce, whisk the cornstarch with 1 tablespoon of water to create a slurry. Stir it into the simmering sauce for 1–2 minutes until glossy.

  6. Coat: Return the chicken to the skillet. Spoon the glaze over the meat and simmer for 2–3 minutes, turning the chicken to ensure every inch is coated in the sticky sauce.

  7. Rest: Remove from heat and let the chicken rest for 2 minutes. This allows the juices to redistribute and the glaze to fully set.


Nutritional Breakdown (Per Serving)

Metric Amount
Protein 32g
Fat 5g
Carbs 14g
Sugar 10g
WW Blue 4 Points
WW Green 5 Points
WW Purple 3 Points

Chef’s Tips for Success

  • Heat Control: Keep the pan at medium heat. Honey has a high sugar content and can burn quickly if the flame is too high.1


  • Flavor Boost: For a kick of heat, add a pinch of red chili flakes to the sauce. For an Asian-inspired twist, add 1 tsp of freshly grated ginger.

  • Meal Prep: This stores beautifully in airtight containers for up to 3 days. To keep the chicken moist when reheating, add a tiny splash of water or broth before microwaving.
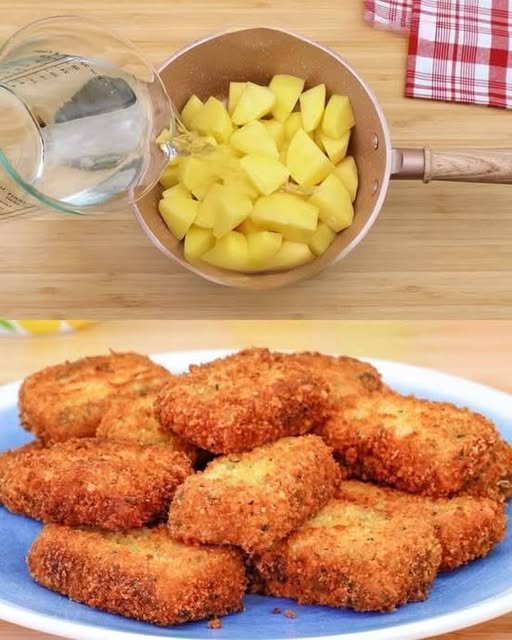

🥔 Crispy Parmesan and Herb Potato Bites

These Crispy Parmesan and Herb Potato Bites are a fantastic addition to your growing collection of easy, high-impact snacks. They perfectly bridge the gap between a classic potato side and a savory “Italian bread snack” thanks to the crunchy herb and cheese crust.

Following your request, here is the full, detailed recipe for these bite-sized treats.


🥔 Crispy Parmesan and Herb Potato Bites

Tender potato chunks roasted on a savory “frico” crust of Italian herbs, garlic, and golden Parmesan cheese.

  • Prep time: 15 minutes

  • Cook time: 30–35 minutes

  • Yields: 4 servings

Ingredients

The Base:

  • 2 large potatoes (approx. 500 grams), peeled and cut into 1-inch chunks

  • 2 pinches of salt (for boiling)

The Herb & Cheese Coating:

  • 1 cup (approx. 2 oz) Parmesan cheese, finely grated

  • 1 tsp Paprika (smoked or regular)

  • 1 tsp Dried Italian herb seasoning

  • 1 tsp Garlic powder

  • 1 tsp Onion powder

  • 1/2 tsp Salt and black pepper

The Fats:

  • 2 tbsp Unsalted butter, melted

  • 1–2 tbsp Extra-virgin olive oil


Instructions

  1. Parboil the Potatoes: Place your potato chunks in a pot of cold water with two pinches of salt. Bring to a boil and cook for only 5–8 minutes. They should be slightly softened but still firm (not falling apart). Drain well and pat dry with a paper towel.

  2. Preheat the Oven: Set your oven to 400°F (200°C).

  3. Prepare the “Crisp.” Paste: In a small bowl, whisk together the finely grated Parmesan, paprika, Italian herbs, garlic powder, onion powder, salt, and pepper.

  4. Coat the Pan: Drizzle the olive oil and half of the melted butter into a 9×13-inch baking dish (glass works best so you can see the crust forming). Tilt the pan to coat it evenly.

  5. Create the Cheese Layer: Sprinkle about 3/4 of your Parmesan-herb mixture evenly over the bottom of the oiled pan to create a solid layer.

  6. Assemble: Press each potato chunk firmly into the cheese layer, flat-side down. Drizzle the remaining melted butter over the tops of the potatoes and sprinkle with the remaining cheese mixture.

  7. Roast: Bake for 30–35 minutes without flipping. You are looking for a deep golden-brown crust on the bottom.

  8. The “Set” Phase: Remove from the oven and let rest for 5 minutes. This allows the cheese to harden into a crispy “snack” texture.

  9. Serve: Use a spatula to lift the potatoes and their attached crispy cheese crusts out of the pan.


Pro-Tips for Maximum Crunch

  • The Cheese Texture: Use the “sand-like” grated Parmesan from a jar or grate a block very finely on a microplane. Larger shreds won’t form a solid, cracker-like crust.

  • Don’t Flip: The secret to the “Italian herb bread snack” vibe is leaving them face-down so the cheese fries in the butter/oil against the pan.

  • Dip It: These are excellent dipped in a cool crème fraîche ranch or a spicy marinara.

Texas Trash Dip

Texas Trash Dip

This warm, creamy bean dip is a legendary potluck favorite. It combines the heartiness of refried beans with a silky, seasoned cream cheese base and a thick blanket of melted cheese.

  • Prep time: 15 minutes

  • Cook time: 25 minutes

  • Total time: 40 minutes

  • Servings: 6–8 (large party portion)

Ingredients

The Base:

  • 1 pkg (8 oz) Cream cheese, softened to room temperature

  • 1 cup Sour cream (full-fat recommended)

  • 2 cans (16 oz each) Refried beans

  • 1 packet (1 oz) Taco seasoning

  • 1 can (4 oz) Diced green chilies, drained (optional, for a mild kick)

The Cheese:

  • 2 cups Shredded Mexican blend cheese, divided

  • 1 cup Shredded sharp cheddar cheese

The Toppings (Optional):

  • ½ cup Sliced black olives

  • ½ cup Chopped green onions

  • ½ cup Diced tomatoes or Pico de Gallo

  • Fresh cilantro


Instructions

  1. Preheat and Prep: Set your oven to 350°F (175°C). Lightly grease a 9×13-inch baking dish with non-stick spray.

  2. Cream the Base: In a large mixing bowl, beat together the softened cream cheese and sour cream until the mixture is smooth and no large lumps remain.

  3. Mix in Flavors: Add the refried beans, taco seasoning, and drained green chilies. Stir until the beans are fully incorporated into the cream base.

  4. Add Cheese: Fold in 1 cup of the Mexican blend cheese into the bean mixture. This ensures every bite is cheesy, not just the top layer.

  5. Assemble: Spread the bean mixture evenly into your prepared 9×13 baking dish using a spatula.

  6. Top it Off: Sprinkle the remaining 1 cup of Mexican blend cheese and the 1 cup of cheddar cheese evenly over the top.

  7. Bake: Bake uncovered for 20–25 minutes. You are looking for the cheese to be completely melted and the edges of the dip to be bubbling.

  8. Garnish and Serve: Remove from the oven and let it sit for about 5 minutes (this helps it thicken slightly). Top with olives, green onions, and tomatoes. Serve hot with a sturdy bag of tortilla chips or Fritos Scoops.


Tips for Success

  • The Cream Cheese Secret: If you forgot to take the cream cheese out of the fridge, pop it in the microwave (wrapper removed!) for 15-20 seconds so it blends smoothly without lumps.

  • Control the Salt: If you find store-bought taco seasoning too salty, use a “Low Sodium” version or make your own blend with chili powder, cumin, garlic powder, and onion powder.

  • Hearty Variation: If you want to turn this into a meal, stir in 1 lb of browned, drained ground beef or chorizo before spreading the mixture into the baking dish.

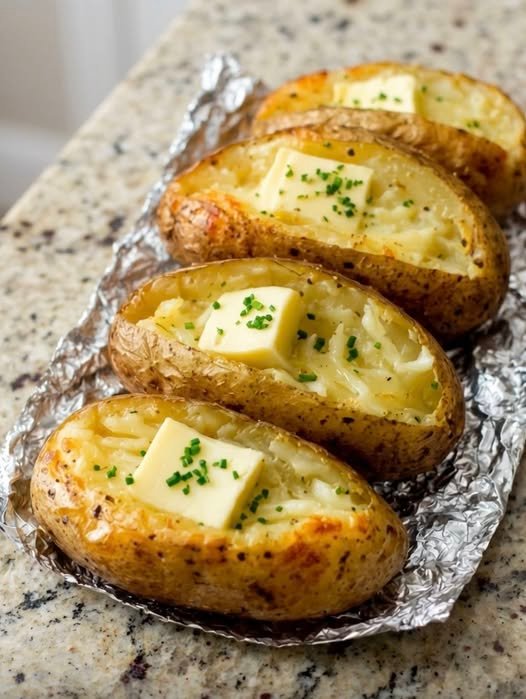
Baked Potato Recipe

The Perfect Crispy-Skin Baked Potato

This recipe focuses on the high-heat method to ensure the skin is salty and crunch while the inside remains light and fluffy.

  • Prep time: 10 minutes

  • Cook time: 55 minutes

  • Servings: 4 potatoes

Ingredients

  • 4 large Russet potatoes (scrubbed and dried thoroughly)

  • 2 tbsp Olive oil (or melted butter)

  • 1 tsp Kosher salt (coarse salt is best for texture)

  • ½ tsp Black pepper (freshly ground, optional)

Classic Toppings:

  • Salted butter

  • Sour cream

  • Shredded sharp cheddar cheese

  • Fresh chives or green onions

  • Crispy bacon bits


Instructions

  1. Heat the Oven: Preheat your oven to 425°F (220°C). Using a high temperature is the “secret” to getting that potato-skin-chip texture on the outside.

  2. Prep the Spuds: After washing and drying the potatoes completely (moisture on the skin will lead to steaming rather than crisping), pierce each potato 3–4 times with a fork.

  3. Season: Rub each potato generously with the olive oil until fully coated. Sprinkle the kosher salt and pepper over the entire surface.

  4. The Bake: Place the potatoes directly on the center oven rack for maximum air circulation. (You can place a baking sheet on the rack below to catch any stray oil drips).

  5. Timing: Bake for 50–60 minutes. Flip them once at the 30-minute mark to ensure even browning. They are done when the skin is crackly and a knife slides into the center with zero resistance.

  6. The Reveal: Remove from the oven and let them rest for 2–3 minutes. Use a knife to slice a long slit down the center. Use a towel to grab the ends and “pop” the potato open by pushing inward—this releases the steam immediately so the interior doesn’t get gummy.

  7. Fluff and Serve: Use a fork to mash and fluff the insides before adding a heavy pat of butter and your desired toppings.


Three Ways to Level Up Your Toppings

  • The Broccoli-Cheddar: Top with steamed broccoli florets and a quick homemade cheese sauce (or just plenty of melted sharp cheddar).

  • The Chili-Loaded: Pour a ladle of warm chili over the fluffed potato and top with red onions and pickled jalapeños.

  • The Mediterranean: Skip the butter and top with a dollop of Greek yogurt, a squeeze of lemon, and a sprinkle of dried oregano.

Egg Muffins – Quick & Nutritious Breakfast

Egg Muffins – Quick & Nutritious Breakfast

High in protein, low in carbs, and fully customizable

Prep Time: 10 minutes
Cook Time: 18–22 minutes
Total Time: 30 minutes
Yield: 6 muffins

Egg muffins are a versatile breakfast or snack option. You can add your favorite vegetables, meats, or cheeses, making them ideal for low-carb, keto, or meal-prep-friendly diets.


Ingredients

  • 6 large eggs

  • ¼ cup (60 ml) milk (or unsweetened almond/oat milk for dairy-free)

  • ½ cup shredded cheese (cheddar, feta, or your choice; optional for dairy-free)

  • ½ cup chopped vegetables (bell peppers, spinach, green onions, mushrooms, zucchini, etc.)

  • ¼ cup cooked bacon or ham (optional)

  • Salt and pepper to taste

  • ½ teaspoon garlic powder (optional)

  • ½ teaspoon paprika (optional)


Step-by-Step Instructions

1. Preheat the Oven

Preheat your oven to 375°F (190°C).
Lightly grease a 6-cup muffin tin with cooking spray, oil, or butter. Silicone muffin cups can also be used.


2. Prepare Ingredients

  • Chop your vegetables into small pieces.

  • Dice cooked bacon or ham if using.

  • Pre-sauté watery vegetables (like mushrooms or spinach) for 2–3 minutes to prevent soggy muffins.


3. Whisk the Eggs

In a large bowl, whisk together the eggs, milk, salt, pepper, garlic powder, and paprika until smooth and slightly frothy.
This ensures fluffy muffins with evenly distributed seasoning.


4. Assemble the Muffins

  • Divide the chopped vegetables and cooked meat evenly among the muffin cups.

  • Pour the egg mixture over the fillings, filling each cup about ¾ full.

  • Top each with shredded cheese, if using.


5. Bake

Place the muffin tin in the preheated oven.
Bake for 18–22 minutes, or until the egg muffins are set and lightly golden on top.
A toothpick inserted in the center should come out clean.


6. Cool and Serve

  • Allow the muffins to cool for a few minutes before removing them from the tin.

  • Serve warm, or store for meal prep.


Tips for Perfect Egg Muffins

  • Grease Well: Prevents sticking; silicone cups work best.

  • Whisk Thoroughly: Ensures light, fluffy muffins.

  • Do Not Overfill: Fill ¾ full to prevent overflow.

  • Cool Slightly Before Removing: Prevents breaking.

  • Storage & Reheating: Refrigerate in an airtight container for up to 5 days; microwave for 30–45 seconds to reheat.

  • Freezing: Let muffins cool completely, then freeze in airtight containers or freezer bags for up to 3 months. Reheat 1–2 minutes in the microwave.

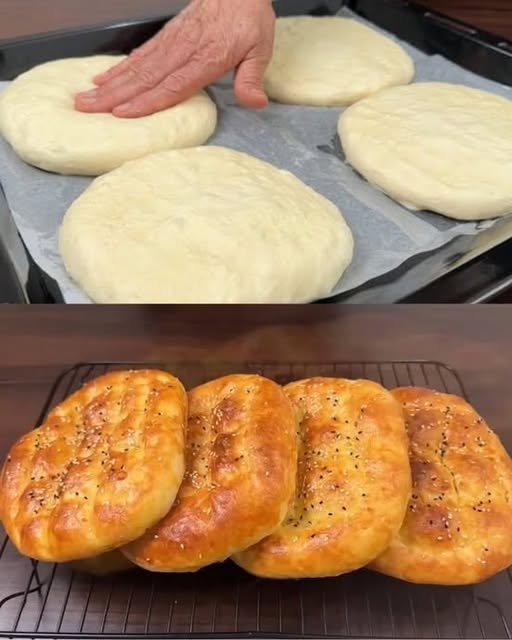
Cheese-Stuffed Flatbread (Quick Yeast Dough)

Cheese-Stuffed Flatbread (Quick Yeast Dough)

Soft baked flatbreads filled with melted cheese, prepared with a simple yeast dough and baked until lightly golden.


Preparation Overview

  • Preparation time: 15 minutes

  • Resting time: 40 minutes

  • Baking time: 15–20 minutes

  • Total time: About 1 hour 15 minutes

Yield

  • Makes 4 large flatbreads


Ingredients

For the Dough

  • 480 g wheat flour (about 4 cups)

  • 400 ml milk, warm (comfortably warm, not hot)

  • 10 g dry yeast

  • 15 g sugar

  • 20 g olive oil

  • 8 g salt

For the Filling & Topping

  • 200 g mozzarella or cheddar cheese, shredded

  • 1 egg yolk (for brushing)

  • Optional: sesame seeds or nigella seeds

For Handling

  • A small amount of vegetable oil (for greasing the bowl and hands)


Step-by-Step Instructions

1. Prepare the Yeast Mixture

Pour the warm milk into a large mixing bowl. Add the sugar and dry yeast, then stir gently to combine.

Set the bowl aside for 5–10 minutes, until the surface shows light bubbles. This indicates the yeast has activated properly.


2. Form the Dough

Add the olive oil and salt to the milk mixture. Stir briefly.

Gradually add the flour, mixing with a spoon or spatula until a rough dough forms.

Transfer the dough to a clean work surface and knead gently for about 5 minutes, until smooth and flexible.

If the dough feels sticky, lightly oil your hands instead of adding extra flour to maintain a soft texture.


3. Rest the Dough

Lightly grease a bowl with vegetable oil. Place the dough inside and turn it once so the surface is lightly coated.

Cover with a clean cloth and place in a warm, draft-free area. Let it rest for about 30 minutes, or until it has increased in volume.


4. Divide and Fill

Turn the rested dough onto a lightly floured surface and divide it into 4 equal portions. Shape each portion into a smooth ball.

Flatten each ball into a small round disc using your hands or a rolling pin.

Place a portion of shredded cheese in the center of each disc.

Bring the edges of the dough up and over the filling, pinching them together to seal completely.

Gently flatten each filled ball into a thick disc, taking care not to tear the dough.


5. Final Rest and Topping

Line a baking tray with parchment paper and place the shaped flatbreads on it.

Using your fingertips, gently press small indentations across the surface of each disc. This helps maintain an even shape during baking.

Cover and let rest for 10 minutes.

Brush the tops lightly with egg yolk and sprinkle with seeds if desired.


6. Bake

Preheat the oven to 200°C (400°F).

Bake the flatbreads for 15–20 minutes, until evenly baked and lightly golden on top.

Remove from the oven and allow them to cool slightly before serving.


Serving Suggestions

  • Serve warm as a snack or alongside soups and salads

  • Optional: lightly brush with melted butter and sprinkle with chopped parsley before serving


Storage

  • Best enjoyed fresh

  • Leftovers can be stored covered at room temperature for up to 1 day or refrigerated for 2 days

  • Reheat gently in the oven or on a pan before serving


Optional Notes

  • Cheese can be mixed (mozzarella and cheddar together) for balanced flavor

  • Dough can be divided into smaller portions for mini flatbreads