Soft & Thick Chocolate Chip Cookies

Soft & Thick Chocolate Chip Cookies

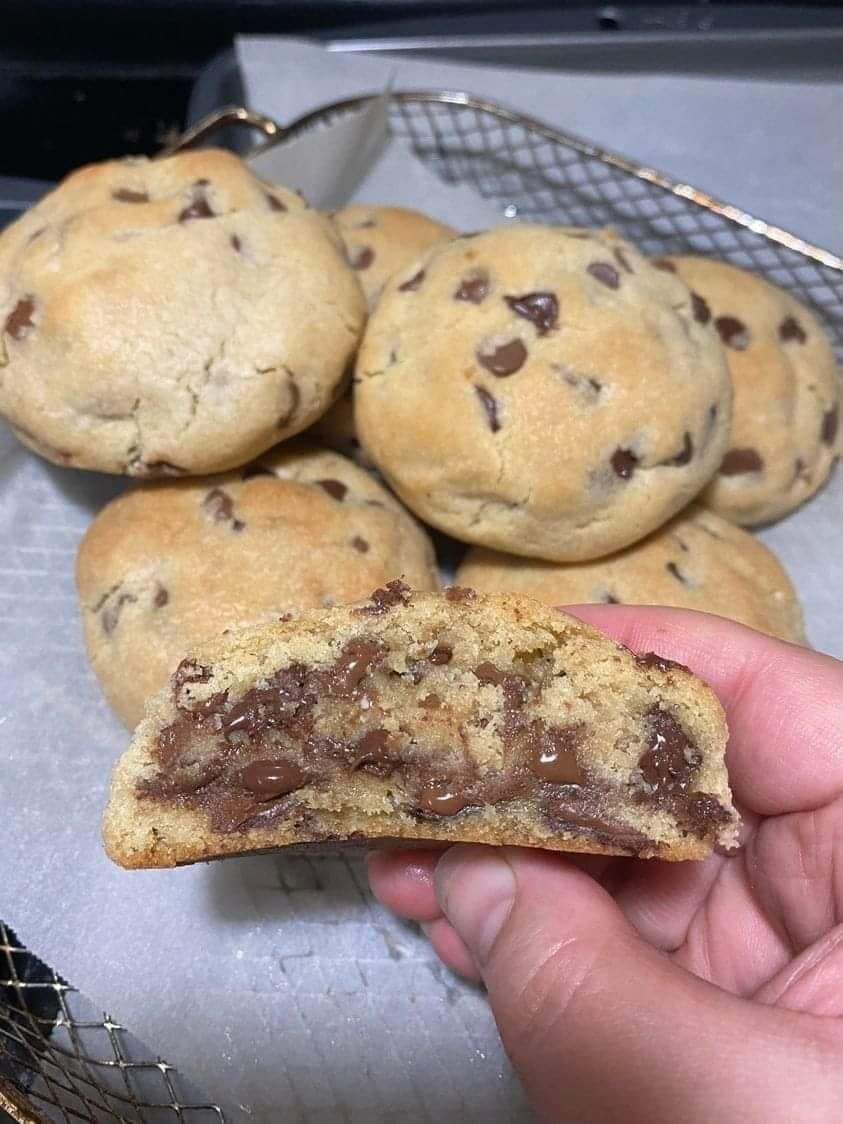
These cookies are designed to bake up thick with soft centers and lightly crisp edges. The method of dissolving baking soda in warm water helps control spread and improves texture, while the full amount of brown sugar supports moisture and structure.

Prep Time: 15 minutes
Bake Time: 10–12 minutes
Yield: About 24 cookies
Oven Temperature: 350°F (175°C)


Ingredients

  • 1 cup (226 g) unsalted butter, softened

  • 1 cup granulated sugar

  • 1 cup packed brown sugar

  • 2 large eggs, room temperature

  • 2 teaspoons vanilla extract

  • 1 teaspoon baking soda

  • 2 teaspoons hot water

  • ½ teaspoon salt

  • 3 cups all-purpose flour, spooned and leveled

  • 2 cups semi-sweet chocolate chips

  • 1 cup chopped walnuts (optional)


Step-by-Step Instructions

1. Prepare the Oven and Pans

  • Preheat the oven to 350°F (175°C).

  • Line baking sheets with parchment paper or silicone baking mats.

  • Set aside.


2. Cream Butter and Sugars

  • In a large mixing bowl, add the softened butter, granulated sugar, and brown sugar.

  • Beat with a hand mixer or stand mixer on medium speed until the mixture is light, smooth, and evenly blended (about 2–3 minutes).


3. Add Eggs and Vanilla

  • Add the eggs one at a time, mixing well after each addition.

  • Stir in the vanilla extract until fully combined.


4. Prepare the Baking Soda Mixture

  • In a small bowl, dissolve the baking soda completely in the hot water.

  • Add this mixture to the dough along with the salt.

  • Mix gently until incorporated.


5. Add the Flour

  • Gradually add the flour to the bowl.

  • Mix on low speed or by hand just until no dry flour remains.

  • Avoid overmixing to maintain a soft texture.


6. Fold in Add-Ins

  • Gently fold in the chocolate chips and walnuts (if using) using a spatula.


7. Portion the Dough

  • Scoop dough in portions of about 2 tablespoons.

  • Place cookies about 2½ inches apart on the prepared baking sheets.


8. Bake

  • Bake for 10–12 minutes, or until:

    • Edges are lightly golden

    • Centers appear soft but set


9. Cool

  • Allow cookies to rest on the baking sheet for 5 minutes.

  • Transfer to a wire rack to cool completely.


Storage Tips

  • Store in an airtight container at room temperature for up to 4 days.

  • Dough may be refrigerated for up to 48 hours before baking.

Soft Custard & Chocolate Chip Spirals

Soft Custard & Chocolate Chip Spirals

Pillowy Dough • Creamy Vanilla Custard • Melting Chocolate Chips

Prep Time: 30 minutes
Rising Time: About 1½ hours
Bake Time: 20–25 minutes
Yield: 12–15 soft spirals


Ingredients

For the Soft Dough

  • 500 g all-purpose flour or bread flour

  • 250 ml warm milk (comfortably warm, not hot)

  • 70 g sugar

  • 7 g dry yeast (1 standard packet)

  • 1 egg, at room temperature

  • 60 g unsalted butter, softened

  • ½ teaspoon salt

For the Vanilla Custard (Pastry Cream)

  • 250 ml milk

  • 2 egg yolks

  • 50 g sugar

  • 20 g cornstarch

  • 1 teaspoon vanilla extract

Filling & Finish

  • ½ cup mini chocolate chips

  • 1 egg, lightly beaten (for brushing the tops)


Step-by-Step Instructions

1. Prepare the Dough

Activate the Yeast

In a large mixing bowl, combine the warm milk, sugar, and yeast. Stir gently.

Let the mixture rest for 5–10 minutes, until the surface looks foamy and slightly bubbly. This indicates the yeast is active.

Mix the Dough

Add the egg and salt to the yeast mixture. Stir well.

Gradually add the flour, mixing until a soft dough begins to form.

Knead

Add the softened butter to the dough.

Knead by hand for about 10 minutes, or in a stand mixer for 5–7 minutes, until the dough becomes smooth, stretchy, and easy to handle.

The dough should feel soft and slightly elastic, not dry.

First Rise

Place the dough in a lightly greased bowl. Cover with a clean cloth.

Let it rest in a warm place for about 1 hour, or until it has noticeably increased in size.


2. Make the Custard Filling

Mix

In a small saucepan (off the heat), whisk together the egg yolks, sugar, and cornstarch until smooth.

Slowly pour in the milk while whisking, ensuring there are no lumps.

Cook

Place the saucepan over medium heat. Stir continuously with a whisk or spatula.

As the mixture warms, it will gradually thicken into a smooth, creamy texture similar to thick pudding.

Cool

Remove from heat and stir in the vanilla extract.

Transfer the custard to a bowl. Cover the surface directly with plastic wrap to keep it smooth.

Allow it to cool completely before using.


3. Shape the Spirals

Lightly press the risen dough to release excess air.

On a floured surface, roll the dough into a large rectangle, about ¼ inch (½ cm) thick.

Spread the cooled custard evenly over the dough, leaving a small border along one long edge.

Sprinkle the mini chocolate chips evenly over the custard.

Starting from the opposite edge, roll the dough gently but firmly into a long log.

Using a sharp knife or plain dental floss, slice into 12–15 equal spirals.


4. Second Rise & Baking

Place the spirals on a baking tray lined with parchment paper, leaving space between each piece.

Cover lightly and let them rest for 30 minutes, allowing them to puff up slightly.

Brush the tops gently with the beaten egg for a golden finish.

Bake in a preheated oven at 180°C (350°F) for 20–25 minutes, until the spirals are evenly golden and baked through.


Helpful Tips for Best Results

  • Custard Temperature: Ensure the custard is fully cooled before spreading to keep the dough easy to roll.

  • Neat Spirals: If the dough feels very soft, chill the rolled log for 10 minutes before slicing.

  • Even Baking: Rotate the tray halfway through baking if your oven heats unevenly.

  • Storage: Store in a sealed container at room temperature for up to 2 days. Warm briefly before serving to refresh the softness.

Pan-Cooked Cheese and Potato Bread

Pan-Cooked Cheese and Potato Bread

Soft flatbread filled with creamy potato and melted cheese, cooked gently in a frying pan

This cheese and potato bread is made with a simple milk-based dough and cooked slowly in a frying pan until soft inside and lightly golden outside. The filling is smooth, comforting, and stretchy, making this bread perfect for breakfast, snacks, or a light meal.


Ingredients

For the Soft Bread Dough

  • Strong (bread) flour – 90 g
    Gives the bread structure while keeping it tender.

  • Milk – 55 g (about 4 tablespoons)
    Adds moisture and softness.

  • Unsalted butter – 10 g, melted
    Adds richness and flavor.

  • Salt – a small pinch
    Balances the taste.


For the Filling

  • Boiled potato – 1 medium, mashed until smooth
    Creates a soft, creamy center.

  • Shredded cheese – 80–100 g
    Mozzarella, mild cheddar, or a melting cheese works best.

  • Salt – a small pinch (optional)

  • Black pepper – optional, to taste


Equipment Needed

  • Mixing bowl

  • Spoon or spatula

  • Rolling pin or bottle

  • Non-stick frying pan with lid


Step-by-Step Instructions


1. Prepare the Dough

  1. In a bowl, add the flour and salt.

  2. Pour in the milk and melted butter.

  3. Mix with a spoon until a soft dough forms.

  4. Transfer to a clean surface and knead gently for 2–3 minutes until smooth.

The dough should feel soft, pliable, and not sticky.


2. Rest the Dough

  • Cover the dough and let it rest for 10 minutes.

  • This relaxes the dough and makes it easier to roll.


3. Prepare the Filling

  1. Mash the boiled potato until completely smooth.

  2. Add the shredded cheese and mix gently.

  3. Season lightly with salt and pepper if desired.

The filling should be thick and creamy, not runny.


4. Shape the Bread

  1. Roll the dough into a thin circle (about 18–20 cm wide).

  2. Spread the potato and cheese mixture evenly over the surface.

  3. Fold the dough inward from the edges to enclose the filling, forming a flat round shape.

  4. Gently flatten with your hands.


5. Cook in the Frying Pan

  1. Heat a non-stick frying pan over low to medium heat.

  2. Place the filled bread into the pan.

  3. Cover with a lid and cook for 4–5 minutes until the bottom is lightly golden.

  4. Flip carefully, cover again, and cook the other side for another 4–5 minutes.

Cooking slowly allows the cheese to melt fully and the bread to cook evenly.


6. Serve

  • Remove from the pan and let rest for 1–2 minutes.

  • Cut into wedges and serve warm.


Serving Ideas

  • Enjoy plain as a comforting snack

  • Serve with yogurt, sour cream, or a fresh salad

  • Pair with soup or tea for a simple meal


Storage Tips

  • Best enjoyed fresh and warm

  • Can be refrigerated for 1 day

  • Reheat gently in a frying pan for best texture

Crispy Potato and Tuna Tortilla Pockets

Crispy Potato and Tuna Tortilla Pockets

Warm, comforting tortilla pockets with a creamy filling and golden exterior

These tortilla pockets are filled with a smooth potato and tuna mixture, folded with melted cheese, and cooked until lightly golden on the outside. They are easy to prepare, satisfying, and perfect for lunch, snacks, or a simple dinner. The filling is soft and flavorful, while the tortillas provide a pleasant contrast in texture.


Ingredients

For the Filling

  • 1 large potato, boiled and mashed until smooth
    Forms the soft, comforting base of the filling.

  • Cream cheese – 1 tablespoon
    Adds creaminess and helps the filling blend smoothly.

  • Canned tuna – 1 can, well drained
    Provides protein and mild flavor.

  • Hard-boiled egg – 1, finely chopped
    Adds richness and texture.

  • Canned corn – 2 to 3 tablespoons, drained
    Brings gentle sweetness and color.

  • Fresh parsley – 2 tablespoons, chopped
    Adds freshness and aroma.

  • Chopped olives and gherkins (pickles) – a small handful
    Give balance and mild tang.

  • Salt and black pepper – optional, to taste


For Assembly and Cooking

  • Small tortillas – 4 to 6 (flour or corn)
    Soft tortillas work best for folding.

  • Shredded cheese – 1 cup (mozzarella or cheddar)
    Melts smoothly and adds richness.

  • Melted butter or olive oil – 2 tablespoons
    Helps the tortillas turn golden when cooked.

  • Optional seasoning:
    A small pinch of paprika or garlic powder for added flavor.


Equipment Needed

  • Mixing bowl

  • Spoon or spatula

  • Skillet, oven, or air fryer

  • Pastry brush (or spoon)


Step-by-Step Instructions


1. Prepare the Filling

  • While the potato is still warm, place it in a medium bowl.

  • Add the cream cheese and mix until completely smooth and well combined.

  • Add the tuna, chopped egg, corn, parsley, olives, and gherkins.

  • Stir gently until everything is evenly mixed.

  • Season lightly with salt and black pepper if desired.

The filling should be creamy, soft, and easy to spread.


2. Assemble the Tortilla Pockets

  • Place a tortilla flat on a clean surface.

  • Spoon 2–3 tablespoons of the filling onto one half of the tortilla.

  • Sprinkle a generous layer of shredded cheese over the filling.


3. Fold the Tortillas

  • Fold the tortilla over to form a half-moon shape.

  • Press gently along the edges to help it stay closed during cooking.

  • Repeat with the remaining tortillas.


4. Prepare the Exterior

  • In a small bowl, mix the melted butter or olive oil with the optional paprika or garlic powder.

  • Lightly brush both sides of each folded tortilla.

  • This helps the outside cook evenly and develop a light golden color.


5. Cook the Tortilla Pockets

Stovetop Method

  • Heat a dry skillet over medium heat.

  • Place the tortillas in the pan and cook for 2–3 minutes per side, until the cheese has melted and the outside is lightly golden.

Oven or Air Fryer Method

  • Preheat oven or air fryer to 400°F (200°C).

  • Arrange tortillas in a single layer.

  • Air fry for 5–7 minutes or bake for 10 minutes, turning once halfway through.


6. Serve

  • Remove from heat and let rest for a minute before serving.

  • Serve warm with sour cream, yogurt, salsa, or a fresh green salad on the side.


Storage and Reheating Tips

  • Best enjoyed fresh and warm

  • Refrigerate leftovers in a covered container for up to 2 days

  • Reheat in a skillet or air fryer to restore texture

MELT IN YOUR MOUTH CHICKEN

Melt in your mouth Chicken

This is one of those recipes I make over and over again. On those days when I get home late to start dinner, this is my go-to recipe. Melt in your mouth chicken is just that. It melts in your mouth.

Melt in Your Mouth Chicken is a classic recipe that’s been around for ages. Its origins are unclear, but I’m glad whoever came up with it did.

The idea of topping chicken breast with mayo and Parmesan is pure genius! The mixture turns beautifully golden post-baking, and it smells phenomenal, too.

The flavor is so rich, so creamy, and so addictive!

More importantly… OMG… the chicken is insanely tender and moist! That’s something that’s hard to come by with baked chicken breast.

Best of all, this recipe is impossible to mess up. Even if you’re a newbie in the kitchen, you can easily pull it off.

If you’re looking for a dish to shock and impress your family and friends, this is the one.

Prep time: 15-20 minutes
Cook time: 20-25 minutes
 Total time: 35-45 minutes

Ingredients:

Table of Contents

4 boneless, skinless chicken breasts

1 Cup mayonnaise

1/2 Cup Shredded Parmesan cheese

1 tsp salt

1/2 tsp black pepper

1 tsp minced garlic

1 tsp garlic powder

How To Make Melt in your mouth Chicken:

Preheat the oven to 375 degrees.

In a small bowl, add the mayonnaise, Parmesan cheese, and seasonings.

Mix to combine.

Place the chicken in a baking dish, sprayed with a non-sticking baking spray.

Spread the mixture on top of the chicken breasts.

See also  The Frittata: Your Weeknight Dinnertime Hero (Made 3 Times a Week for a Reason!)

Bake the chicken for 45 minutes, or until cooked through.

Serve warm!

Tips for Achieving Melt-in-Your-Mouth Chicken:

1. Marinate: Marinate the chicken in a mixture of acid (such as lemon juice or vinegar) and oil to help break down the proteins and tenderize the meat.
2. Pound: Pound the chicken to an even thickness to ensure it cooks evenly and prevents it from becoming tough.
3. Don’t Overcook: Cook the chicken until it reaches the recommended internal temperature, but avoid overcooking it, as this can make it dry and tough.
4. Rest: Let the chicken rest for a few minutes before serving to allow the juices to redistribute and the meat to relax.
5. Use a Meat Thermometer: Use a meat thermometer to ensure the chicken has reached a safe internal temperature.

Nutrition Information

Calories: 140-160

Protein: 25-30 grams

Fat: 3-4 grams

Saturated Fat: 1-2 grams

Cholesterol: 60-80 milligrams

Sodium: 200-250 milligrams

Carbohydrates: 0-5 grams

Fiber: 0-1 gram

Sugar: 0-1 gram

Enjoy !

Cheesy Baked Potato Casserole

Cheesy Baked Potato Casserole

Creamy • Comforting • Oven-Baked

Servings: 6–8
Prep Time: 15 minutes
Bake Time: 25–30 minutes

Ingredients

Potatoes

  • 2 lbs (about 1 kg) Yukon Gold or Russet potatoes

  • Peeled and sliced into rounds or cut into cubes

Cream Sauce

  • 1½ cups heavy cream

  • 2 garlic cloves, finely minced

  • 1 teaspoon salt

  • ½ teaspoon black pepper

Cheese

  • 2 cups shredded cheddar or mozzarella cheese

Topping

  • ½ cup cooked and crumbled bacon

  • ¼ cup freshly chopped dill or chives


Instructions

1. Boil the Potatoes

  1. Place the sliced or cubed potatoes into a large pot.

  2. Cover with salted water.

  3. Bring to a boil and cook for 8–10 minutes, just until slightly tender.

  4. Drain well and set aside.


2. Prepare the Baking Dish

  1. Preheat oven to 375°F (190°C).

  2. Lightly grease a baking dish.


3. Layer the Casserole

  1. Arrange half of the potatoes evenly in the baking dish.

  2. Sprinkle with half of the cheese and half of the bacon.

  3. Add the remaining potatoes on top.


4. Add the Cream Sauce

  1. In a bowl, whisk together the cream, garlic, salt, and black pepper.

  2. Pour evenly over the layered potatoes.


5. Bake

  1. Sprinkle the remaining cheese over the top.

  2. Bake uncovered for 25–30 minutes, until the sauce is bubbling and the top is golden.


6. Garnish and Serve

  • Sprinkle with fresh dill or chives before serving.

  • Serve warm as a side dish or main course.