
Crispy Potato Nuggets

Crispy Potato Nuggets

Ingredients

  • 3 medium potatoes (Russet or Yukon Gold work best)

  • 1 large egg

  • 1/4 cup cornstarch (or all-purpose flour)

  • 1/4 cup breadcrumbs (plus extra for coating)

  • 2 tablespoons fresh parsley, finely chopped

  • 1/2 teaspoon garlic powder

  • Salt and black pepper to taste

  • Oil for frying (vegetable or canola)

Instructions

  1. Prepare the Potatoes: Peel the potatoes and cut them into chunks. Boil them in salted water until fork-tender (about 15–20 minutes). Drain well and mash them in a large bowl until completely smooth.

  2. Mix the Base: Add the egg, cornstarch, breadcrumbs, parsley, garlic powder, salt, and pepper to the mashed potatoes. Mix thoroughly until a soft dough forms. If the mixture feels too sticky, add an extra tablespoon of cornstarch.

  3. Shape the Nuggets: Take a small spoonful of the mixture and roll it into a ball, then flatten it slightly into a nugget or “tater tot” shape.

  4. Coat (Optional but Recommended): For extra crunch, roll each nugget in a shallow bowl of extra breadcrumbs until evenly coated.

  5. Fry: Heat about an inch of oil in a skillet over medium heat. Once the oil is shimmering, carefully add the nuggets in batches. Fry for 3–4 minutes per side until they reach a deep golden brown.

  6. Drain and Serve: Transfer the nuggets to a plate lined with paper towels to remove excess oil.

    Q: Can I make these ahead of time? A: Yes! You can shape the nuggets and even coat them in breadcrumbs, then store them in the refrigerator for up to 24 hours before frying. You can also freeze them in a single layer on a baking sheet; once frozen, transfer them to a bag for up to 3 months. Fry them directly from frozen, adding an extra minute or two to the cooking time.

    Q: Why did my nuggets fall apart in the oil? A: This usually happens if the mashed potatoes are too watery or if there isn’t enough binder (egg and cornstarch). Make sure to drain your potatoes very well after boiling. If the dough feels too loose, chilled mashed potatoes often hold their shape better than warm ones.

    Q: Can I bake these instead of frying? A: Absolutely. Arrange them on a parchment-lined baking sheet and lightly spray them with oil. Bake at 200°C (400°F) for about 20–25 minutes, flipping halfway through, until they are golden and crisp.

    Q: How do I make them extra flavorful? A: Feel free to mix in 1/4 cup of grated Parmesan or sharp cheddar cheese into the dough. You can also swap the parsley for cilantro or add a pinch of smoked paprika for a deeper, earthier flavor.
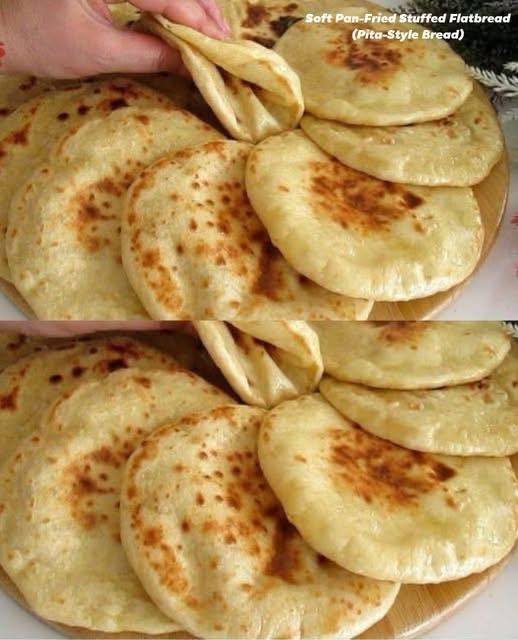

Soft Flourless Pan-Fried Flatbread

Soft Flourless Pan-Fried Flatbread

Ingredients

  • 3 large Eggs, separated

  • 3 oz Cream cheese, softened to room temperature

  • 1/4 tsp Cream of tartar (helps stabilize the egg whites)

  • A pinch of salt

  • Optional: Garlic powder or dried herbs for extra flavor


Step-by-Step Instructions

  1. Prepare the Oven and Pans: Preheat your oven to 300°F (150°C). While these are finished in a pan to get that golden look, they start in the oven to set the structure. Line a baking sheet with parchment paper.

  2. Separate the Eggs: Carefully separate the egg whites from the yolks into two clean bowls. It is important that no yolk gets into the whites, or they won’t whip properly.

  3. Mix the Yolks: In the bowl with the yolks, add the softened cream cheese and a pinch of salt. Use a whisk or hand mixer to blend until the mixture is completely smooth with no lumps.

  4. Whip the Whites: In the other bowl, add the cream of tartar to the egg whites. Using a clean whisk or hand mixer, beat the whites on high speed until stiff peaks form. The whites should be thick and stand up straight when you lift the beaters.

  5. Fold Gently: Very slowly and gently fold the yolk mixture into the whipped whites using a spatula. Do not over-mix; you want to keep as much air in the batter as possible to keep the bread light.

  6. Bake to Set: Spoon the mixture onto the parchment-lined baking sheet in 6 to 8 even circles. Bake for 15 to 20 minutes until they are just set.

  7. Pan-Fry for Color: Heat a non-stick skillet over medium heat with a light spray of oil. Place the baked flatbreads in the pan for 30 to 60 seconds per side until they develop those beautiful golden-brown “pita” spots seen in the image.

  8. Cool and Serve: Let them cool for a few minutes. They will soften as they sit, becoming perfectly pliable for folding.

Crispy Garlic & Herb Baked Cauliflower

Crispy Garlic & Herb Baked Cauliflower

This roasted cauliflower is a fantastic alternative to traditional side dishes. By using high heat and a blend of aromatic spices, the florets become tender on the inside with perfectly crisp, golden edges.

Ingredients

  • 1 large head of cauliflower, cut into bite-sized florets

  • 3 tbsp olive oil

  • 1 tsp garlic powder

  • 1 tsp smoked paprika

  • 1/2 tsp dried oregano

  • 1/4 tsp black pepper

  • Optional: A pinch of salt and 2 tbsp grated parmesan cheese (for extra crunch)


Step-by-Step Instructions

  1. Preparation: Preheat your oven to 200°C. Line a large baking sheet with parchment paper to prevent sticking and ensure easy cleanup.

  2. Clean and Dry: After cutting the cauliflower into florets, make sure they are thoroughly dry. Any excess water will cause the cauliflower to steam rather than crisp up.

  3. Seasoning: In a large mixing bowl, toss the cauliflower florets with the 3 tbsp olive oil. Add the garlic powder, smoked paprika, dried oregano, and black pepper. Toss well until every piece is evenly coated in the oil and spices.

  4. Arrange: Spread the florets in a single layer on the prepared baking sheet. Ensure they are not crowded; space between the pieces allows the hot air to circulate, making them crispy.

  5. Bake: Place the tray in the oven and bake for 20–25 minutes. Halfway through the cooking time, use a spatula to toss the florets so they brown evenly on all sides.

  6. Final Touch: If you are using parmesan cheese, sprinkle it over the cauliflower during the last 5 minutes of baking.

  7. Serve: Remove from the oven when the edges are charred and golden. Serve hot as a snack, a side dish, or even as a filling for tacos.


Recipe Variation

For an even crispier texture, you can also prepare these in an Air Fryer at 190°C for 12–15 minutes, shaking the basket every few minutes.

HAM AND EGG CUPS

🍳 Savory Ham and Egg Breakfast Cups

A high-protein, 1-point WW-friendly meal prep staple.

🛒 Ingredients & Exact Measurements

  • 6 slices Lean deli ham (approx. 170g / 6 oz) – Look for “Extra Lean” to keep points low.

  • 6 large Eggs

  • 2 tbsp Skim milk (or unsweetened almond milk)

  • 1/4 tsp Sea salt

  • 1/4 tsp Cracked black pepper

  • 1 tbsp Fresh chives or parsley (chopped)

  • Non-stick cooking spray


🥣 Step-by-Step Preparation

  1. Prep the “Crust”: Preheat your oven to 375°F (190°C). Spray a standard muffin tin generously. Take one slice of ham and press it into a muffin cup. You’ll need to pleat the edges slightly so it forms a “bowl” shape.

  2. Whisk the Base: In a small mixing bowl, whisk the eggs, milk, salt, and pepper.

    Pro-Tip: Whisk just until the yolks and whites are combined. Over-whisking incorporates too much air, which causes the eggs to puff up and then “deflate” into a rubbery texture once cooled.

  3. Fill and Bake: Pour the egg mixture into each ham cup, filling them about 3/4 of the way. Sprinkle your fresh herbs on top.

  4. The Bake: Bake for 18–22 minutes.

    • At 18 mins: The yolk will be slightly jammy.

    • At 22 mins: The egg will be fully set and firm (best for meal prep).

  5. Rest: Let them sit in the tin for 5 minutes. This allows the steam to release, making them easier to pop out with a butter knife.


📊 Nutritional Breakdown (Per Cup)

Metric Value
Calories 90 kcal
Protein 9 g
Fat 4 g
Net Carbs 1 g
WW SmartPoints 1 Point

❄️ Storage & Reheating

  • Fridge: Store in an airtight container for up to 4 days.

  • Freezer: Wrap individually in plastic wrap, then place in a freezer bag for up to 2 months.

  • Reheat: From the fridge, microwave for 30 seconds. If frozen, thaw overnight in the fridge or microwave for 60–90 seconds at 50% power.


💡 Pro-Tips for Success

  • Moisture Control: If using watery veggies (like spinach or mushrooms) as an add-in, sauté them first to cook off the liquid, otherwise the “ham bowl” will get soggy.

  • Ham Choice: Ensure the ham slices are thin enough to fold but thick enough not to tear. “Standard Deli Cut” is usually better than “Ultra-Thin.”

Diabetic Golden French Toast Recipe

 Diabetic Golden French Toast Recipe

 Ingredients

  • 4 slices low-carb bread or whole-grain bread

  • 2 large eggs

  • ¼ cup unsweetened almond milk (or low-fat milk)

  • 1 tsp vanilla extract

  • ½ tsp cinnamon

  • 1 tbsp erythritol or stevia (optional sweetener)

  • 1 tsp butter or coconut oil for frying

  • Pinch of salt

Optional toppings

  • Fresh berries (strawberries, blueberries)

  • Greek yogurt

  • Sugar-free maple syrup

  • Chopped nuts

 Instructions

  1. Prepare the batter
    In a bowl, whisk together eggs, almond milk, vanilla, cinnamon, sweetener, and salt.

  2. Dip the bread
    Dip each slice of bread into the mixture for about 10–15 seconds per side.

  3. Heat the pan
    Heat a non-stick skillet over medium heat and add butter or coconut oil.

  4. Cook the toast
    Place soaked bread into the skillet and cook for 2–3 minutes per side until golden brown.

  5. Serve
    Top with berries, nuts, yogurt, or sugar-free syrup.

 Cooking Time

  • Prep time: 5 minutes

  • Cook time: 6 minutes

  • Total time: 11 minutes

 Servings

2 servings (2 slices each)

Nutritional Information (Approx per serving)

  • Calories: 210 kcal

  • Carbohydrates: 15 g

  • Protein: 13 g

  • Fat: 11 g

  • Fiber: 5 g

  • Sugar: 2 g

(Values vary depending on bread brand.)

 Health Benefits

1️⃣ Blood sugar friendly
Low-carb bread and sugar substitutes help prevent blood sugar spikes.

2️⃣ High protein
Eggs provide protein that helps with fullness and glucose control.

3️⃣ Lower carbs
Much fewer refined carbohydrates than regular French toast.

4️⃣ Heart-healthy fats
Using coconut oil or small amounts of butter adds healthy fats.

5️⃣ Fiber support
Whole-grain or keto bread adds fiber for digestion.

 Helpful Tips

✔ Use keto bread or almond-flour bread for the lowest carbs.
✔ Cook on medium heat to avoid burning the outside.
✔ Add chia seeds or flax seeds for extra fiber.
✔ Avoid regular syrup; use sugar-free syrup or berries instead.
✔ Slightly stale bread works best because it absorbs the mixture better.

Notes

  • Always check carbohydrate count of your bread.

  • Portion control is important for people managing diabetes.

  • Pair with protein (Greek yogurt or nuts) for better blood sugar balance.

Frequently Asked Questions

1. Can diabetics eat French toast?

Yes, when made with low-carb bread and no added sugar, French toast can be diabetic-friendly.

2. What bread is best for diabetics?

  • Low-carb bread

  • Whole-grain bread

  • Almond-flour bread

  • Keto bread

3. Can I make it dairy-free?

Yes. Use almond milk, coconut milk, or oat milk.

4. Can I bake it instead of frying?

Yes. Bake at 375°F (190°C) for about 10–12 minutes, flipping halfway.

5. Is maple syrup allowed for diabetics?

Regular syrup is high in sugar. Use sugar-free syrup or fresh fruit instead.

Golden Crispy Potato Pancakes

Golden Crispy Potato Pancakes

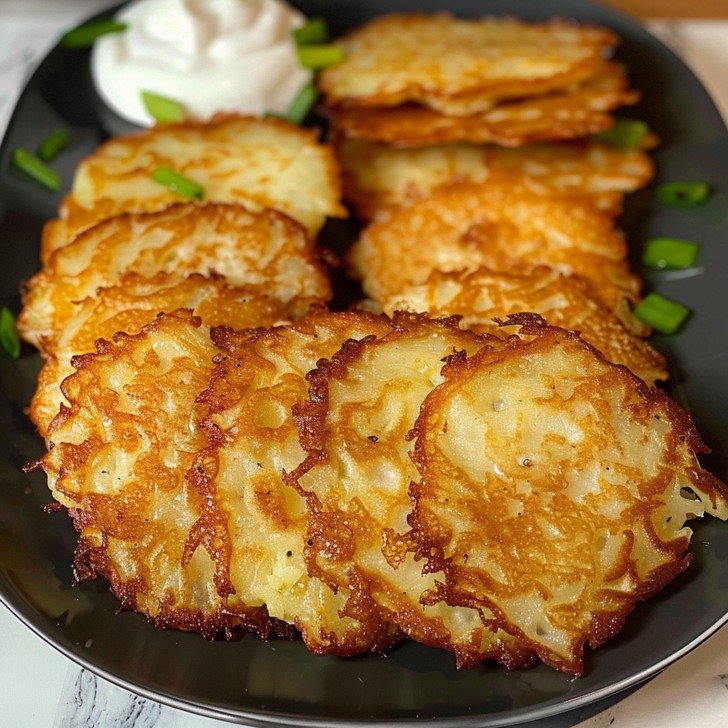
These classic Polish-style pancakes are thin, crunchy on the edges, and tender in the middle. The secret to the perfect texture is removing as much moisture as possible from the potatoes before frying.

Ingredients

  • 2 lbs starchy potatoes (like Russets), peeled

  • 1 medium onion

  • 2 large eggs, lightly beaten

  • 3 tbsp all-purpose flour

  • 1 tsp salt

  • 1/2 tsp black pepper

  • Vegetable oil for frying (such as canola or sunflower oil)


Preparation Steps

  1. Grate the Vegetables: Using the fine side of a box grater, grate the potatoes and the onion into a large bowl.

  2. Drain the Moisture: This is the most important step. Place the grated mixture into a clean kitchen towel or fine-mesh sieve. Squeeze out as much liquid as you possibly can into a separate bowl. Let that liquid sit for a minute, then pour it off, keeping the white potato starch that has settled at the bottom.

  3. Combine the Batter: Add the squeezed-dry potato and onion mixture back into the bowl with the saved starch. Stir in the beaten eggs, flour, salt, and pepper until everything is well combined.

  4. Heat the Oil: Pour enough oil into a large heavy skillet to generously coat the bottom (about 1/4 inch deep). Heat over medium-high until the oil is shimmering.

  5. Fry the Pancakes: Drop a large spoonful of the mixture into the hot oil and flatten it with the back of the spoon to create a thin circle. Do not overcrowd the pan.

  6. Achieve the Crunch: Fry for about 3–5 minutes per side until the edges are deep golden brown and crispy.

  7. Drain and Serve: Place the finished pancakes on a plate lined with paper towels to remove any excess oil. Serve immediately while hot and crunchy.