Crispy Garlic Parmesan Cauliflower

Crispy Garlic Parmesan Cauliflower

🛒 Ingredients

The Roast:

  • 1 Large head of cauliflower (cut into bite-sized florets)

  • 3 tbsp Extra virgin olive oil

  • 1/2 cup Freshly grated Parmesan cheese

  • 1/2 cup Panko breadcrumbs (for extra crunch)

  • 1 tsp Garlic powder

  • 1 tsp Paprika (for that golden color) 🌶️

  • Salt and black pepper to taste

The Garlic Butter Drizzle:

  • 2 tbsp Unsalted butter (melted)

  • 2 Cloves garlic (minced)

  • 2 tbsp Fresh parsley (finely chopped) 🌿

For Serving:

  • Ranch dressing or a Garlic Aioli dip 🥣


👩‍🍳 Step-by-Step Instructions

1. Prep & Dry 🚿

  • Preheat your oven to 200°C. Line a large baking sheet with parchment paper.

  • Wash the cauliflower florets and pat them very dry with a kitchen towel. ➡️ Excess water will cause the cauliflower to steam rather than crisp up!

2. The Coating 🥣

  • In a large mixing bowl, toss the florets with the olive oil until every piece is shiny.

  • In a small separate bowl, mix the Parmesan, Panko, garlic powder, paprika, salt, and pepper.

  • ➡️ Sprinkle the dry mix over the cauliflower and toss again until the crumbs stick to the oil-coated florets.

3. Arrange for Airflow 💨

  • Spread the cauliflower onto the baking sheet in a single layer.

  • ➡️ Make sure they aren’t touching each other! Space is the secret to getting those crispy, browned edges.

4. The Golden Bake 🔥

  • Bake for 20–25 minutes.

  • Halfway through, use a spatula to flip the florets. ➡️ Bake until they are tender when pierced with a fork but dark golden-brown on the outside.

5. The Flavor Finish ✨

  • While the cauliflower is hot, mix the melted butter, minced garlic, and parsley in a small bowl.

  • ➡️ Drizzle this mixture over the roasted bites and give them a quick toss right on the tray.

6. Serve Hot 🍽️

  • Transfer to a platter and serve immediately while they are at peak crunchiness. ➡️ Pair with a cool dipping sauce to balance the warm garlic flavor!


❓ Common Questions (Q&A)

Q: Can I make these in an Air Fryer? A: Yes! Air fry at 190°C for 12–15 minutes, shaking the basket halfway through. They come out even crunchier this way! 🌬️🔥

Q: Why isn’t the coating sticking to my cauliflower? A: Usually, this happens if the florets are too dry or if there isn’t enough oil. Make sure the cauliflower is well-coated in oil before you add the dry Parmesan mixture. 🧀✔️

Q: Is there a vegan alternative? A: Absolutely! Replace the Parmesan with nutritional yeast or a vegan parm alternative, and use olive oil or vegan butter for the final drizzle. 🌱✨


✨ Pro-Tips for Success:

  • Fresh is Best: Use a fresh block of Parmesan and grate it yourself. The pre-shredded kind in bags often has starch that prevents it from melting and crisping properly. 🧀🔪

  • The Squeeze: A tiny squeeze of fresh lemon juice right before serving can brighten up the heavy garlic and cheese flavors! 🍋

  • High Heat: Don’t be afraid of the high temperature; that’s what creates the “caramelization” (the brown bits) which carries all the flavor! 🌡️


Golden Crispy Cabbage Fritters

Golden Crispy Cabbage Fritters

  • Prep time: 15 minutes

  • Cook time: 15 minutes

  • Servings: 4 (makes approx. 10–12 fritters)

Ingredients

The Fritter Base

  • 500g Cabbage, finely shredded

  • 2 Onions, finely chopped

  • 3 cloves Garlic, minced

  • 3 large Eggs

  • 4 tbsp All-purpose flour (or almond flour for a lower-carb option)

  • 1 tsp Baking powder

  • To taste: Salt and black pepper

  • Optional: 1/2 cup shredded mozzarella or cheddar cheese, or fresh chopped dill

For Frying

  • 3–4 tbsp Olive oil or avocado oil

The Garlic-Yogurt Dip

  • 1 cup Greek yogurt (plain)

  • 1 clove Garlic, minced

  • 1 tbsp Fresh herbs (parsley or dill), finely chopped

  • 1 squeeze Fresh lemon juice

Instructions

  1. Soften the Cabbage: Place the shredded cabbage in a large bowl and sprinkle with a pinch of salt. Massage the cabbage with your hands for 1–2 minutes. This breaks down the fibers and draws out excess moisture. Let it sit for 5 minutes, then squeeze the cabbage firmly to remove as much water as possible. Discard the liquid.

  2. Sauté Aromatics: In a small skillet with a teaspoon of oil, sauté the chopped onions and garlic over medium heat until soft and translucent (about 3–5 minutes). Set aside to cool slightly.

  3. Prepare the Batter: In a large mixing bowl, whisk the 3 eggs. Add the sautéed onion and garlic mixture, the squeezed cabbage, and any optional cheese or herbs.

  4. Bind the Mixture: Fold in the flour and baking powder. Season generously with salt and pepper. Stir until the cabbage is thoroughly coated and the mixture holds together like a thick batter.

  5. Fry until Golden: Heat the oil in a large non-stick skillet over medium heat. Using a large spoon, drop scoops of the mixture into the pan. Use the back of the spoon to flatten them into discs about 1/2 inch thick.

  6. Cook and Flip: Fry for 3–4 minutes on the first side until deep golden brown. Carefully flip and cook for another 3–4 minutes. Ensure the heat isn’t too high so the middle cooks through without burning the outside.

  7. Drain and Serve: Move the fritters to a plate lined with paper towels to drain. Whisk the dip ingredients together in a small bowl and serve immediately while the fritters are hot and crisp.


Common Questions & Answers

Q: My fritters are falling apart in the pan. What should I do? A: This usually happens if the cabbage was too wet. Make sure to squeeze out as much liquid as possible in Step 1. If the batter still feels loose, add an extra tablespoon of flour to help bind the ingredients together.

Q: Can I bake these instead of frying them? A: Yes. Preheat your oven to 400°F (200°C). Place scoops of the mixture on a parchment-lined baking sheet and flatten them. Lightly spray with oil and bake for 15–20 minutes, flipping halfway through, until golden and firm.

Q: How do I keep the fritters crispy if I’m making a large batch? A: Keep the finished fritters on a wire rack set over a baking sheet in a warm oven (200°F or 90°C) while you fry the remaining batches. The wire rack allows air to circulate so the bottoms don’t get soggy.

Q: Can I add other vegetables to this recipe? A: Definitely. Grated carrots, zucchini (squeezed dry), or even finely chopped broccoli work beautifully. Just keep the total weight of the vegetables around 500g–600g so the egg and flour can still bind them.

Q: How long do these stay fresh? A: They are best served fresh, but you can store leftovers in the refrigerator for up to 3 days. Reheat them in an air fryer or dry skillet to regain the crispiness.

Air Fryer Grilled Cheese

Air Fryer Grilled Cheese

  • Prep time: 2 minutes

  • Cook time: 8–9 minutes

  • Servings: 1 sandwich

Ingredients

  • 2 slices of bread (Sourdough, whole wheat, or your choice)

  • 2 slices of cheese (Cheddar, Mozzarella, or Swiss work best)

  • 1–2 tbsp Butter, softened

  • Optional: A pinch of garlic powder or dried parsley for the crust

Instructions

  1. Preheat the Air Fryer: Set your air fryer to 370°F (190°C) and let it preheat for 3 minutes. This helps the bread crisp up immediately.

  2. Prepare the Bread: Spread the softened butter generously on one side of each slice of bread. For extra flavor, you can mix a little garlic powder into the butter before spreading.

  3. Assemble the Sandwich: Place the cheese slices between the non-buttered sides of the bread. Ensure the buttered sides are facing outward to contact the heat.

  4. Air Fry: Place the sandwich in the air fryer basket. To prevent the top slice of bread from blowing off due to the internal fan, you can secure the corners with toothpicks.

  5. Cook and Flip: Air fry at 370°F (190°C) for 4–5 minutes. Open the basket, flip the sandwich carefully with a spatula, and cook for an additional 3–4 minutes until both sides are deeply golden and the cheese is fully melted.

  6. Serve: Remove from the basket and let it sit for one minute to allow the cheese to set slightly. Slice diagonally and serve warm.


Common Questions & Answers

Q: Can I use mayonnaise instead of butter? A: Yes! Many people prefer using a thin layer of mayonnaise on the outside of the bread. It has a higher smoke point than butter and often results in an even more uniform, golden-brown crust.

Q: Why did my cheese not melt completely? A: This can happen if the cheese slices are very thick or if the cheese was used straight from a cold refrigerator. For the best melt, use room-temperature cheese or thin slices, and ensure the air fryer is properly preheated.

Q: How do I prevent the bread from getting too hard? A: If the bread feels too “toasty” or hard, reduce the temperature to 350°F and cook for a slightly longer duration. This allows the cheese to melt without over-browning the bread.

Q: Can I make more than one at a time? A: Yes, as long as the sandwiches are in a single layer and not overlapping. Air circulation is key to the “fried” texture, so do not stack them while cooking.

Q: What is the best bread for the air fryer? A: Sourdough and sturdy white breads hold up best. Very thin or light sandwich breads may toast too quickly before the cheese has a chance to melt through.

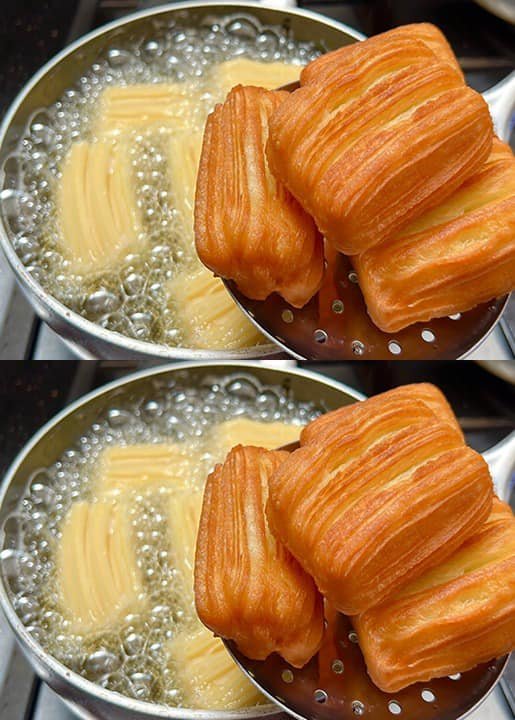
Crispy Golden Honey Fritters

Crispy Golden Honey Fritters

Ingredients

  • The Dough: 2 cups all-purpose flour, 2 large eggs, 1 cup water, 2 tablespoons butter, 1 tablespoon cornstarch, and 1 pinch of salt.

  • The Syrup: 2 cups sugar, 1 cup water, and 1 teaspoon lemon juice.

  • Oil for deep frying.

Step-by-Step Instructions

  1. Make the Syrup First: Combine sugar, water, and lemon juice in a pot. Boil for 10 minutes until it thickens slightly. Let it cool completely—this is key for keeping the fritters crispy.

  2. Prepare the Dough Base: In a saucepan, bring 1 cup of water, butter, and salt to a boil. Once the butter melts, dump in the flour all at once. Stir vigorously with a wooden spoon over low heat for 2–3 minutes until a smooth dough ball forms and pulls away from the sides.

  3. Cool and Add Eggs: Remove the dough from the heat and let it cool for 10 minutes. Add the eggs one at a time, mixing thoroughly after each addition until the dough is smooth and sticky. Mix in the cornstarch last for extra crunch.

  4. Shape: Transfer the dough into a piping bag fitted with a large star tip.

  5. The Frying Secret: Pipe 2-inch lengths of dough directly into cold or lukewarm oil, cutting the dough with oiled scissors.

  6. Fry: Turn the heat to medium. As the oil warms up, the fritters will rise and puff. Fry them, turning frequently, until they are a deep golden brown and feel very firm.

  7. Soak: Remove the hot fritters and drop them immediately into the cold syrup. Let them soak for 2–3 minutes, then drain and serve.


Recipe Q&A: Honey Fritters

Q: Why do I have to start with cold oil? A: Starting with cold or barely warm oil allows the fritters to expand and cook through evenly without burning the outside. It’s the secret to getting that characteristic “ridged” look and a very crispy shell.

Q: Can I make these without a piping bag? A: If you don’t have a star tip, the fritters won’t have the ridges, but they will still taste great. You can use a plastic freezer bag with the corner snipped off, or simply use two spoons to drop small mounds of dough into the oil.

Q: My fritters became soft after a few hours. How can I fix this? A: Softness usually happens if the syrup was too thin or if the fritters weren’t fried long enough. Make sure to fry them until they feel quite hard to the touch in the oil. Also, ensure the syrup is completely cold before adding the hot fritters.

Q: Can I flavor the syrup? A: Yes! You can add a splash of rose water, orange blossom water, or a pinch of cardamom to the syrup while it’s boiling for a more traditional Middle Eastern flavor profile.

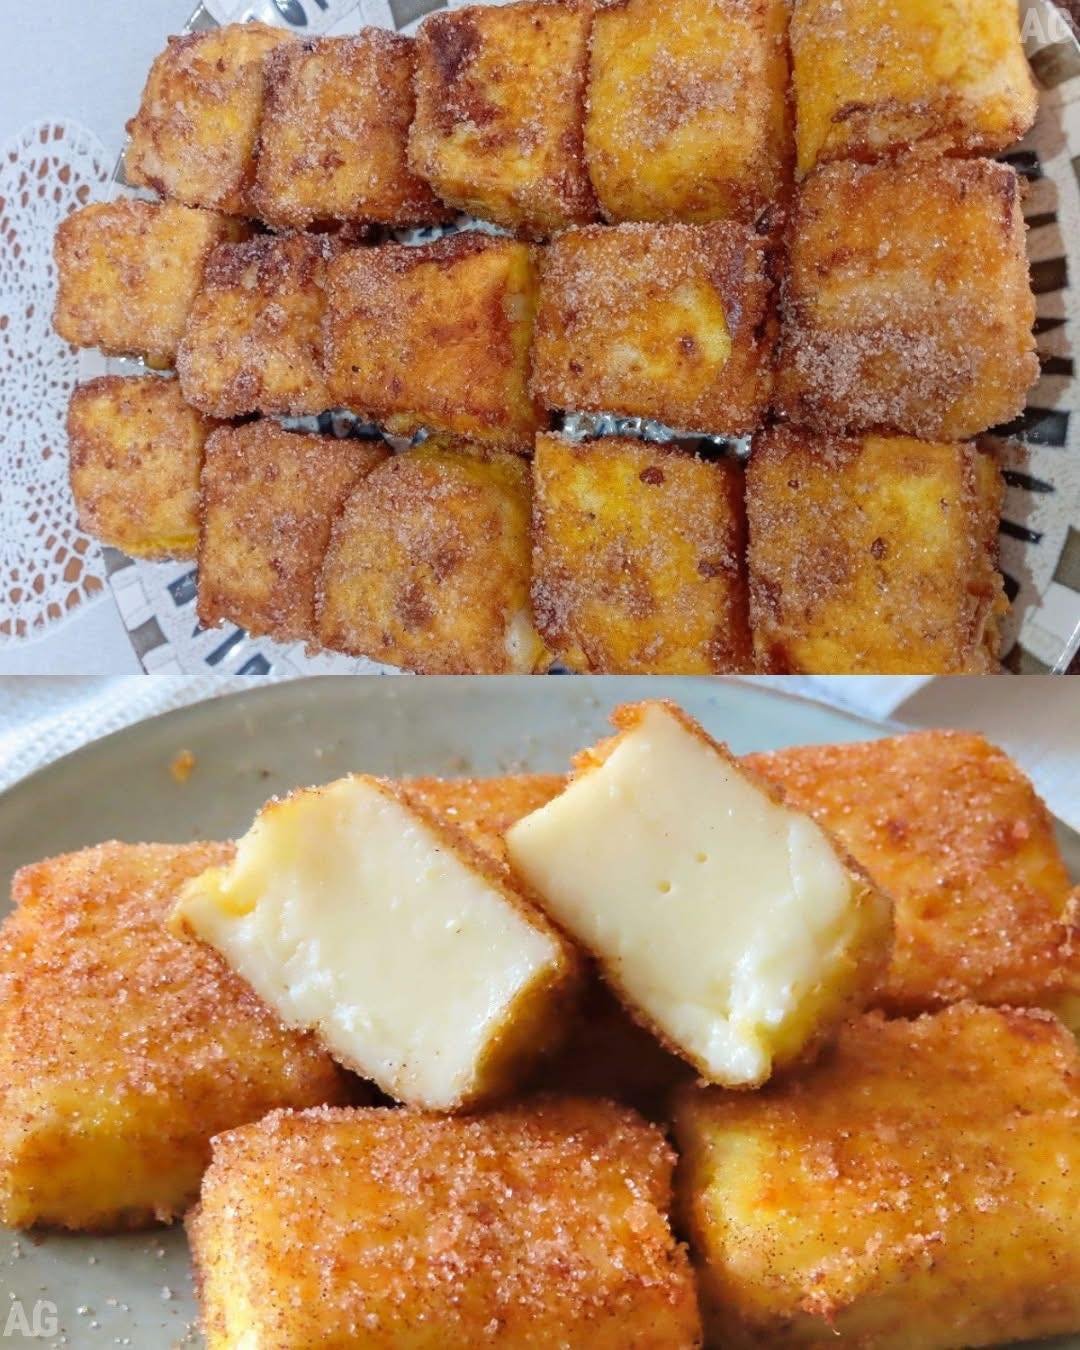
Creamy Fried Milk Cubes

Creamy Fried Milk Cubes

Ingredients

  • The Custard: 2 cups whole milk, 1/2 cup cornstarch, 1/2 cup sugar, 1 cinnamon stick, and a small piece of lemon peel.

  • The Coating: 2 large eggs (beaten), 1/2 cup all-purpose flour, 1/2 cup sugar mixed with 1 tablespoon ground cinnamon.

  • Oil for frying (neutral oil like sunflower or vegetable oil).

Step-by-Step Instructions

  1. Infuse the Milk: In a saucepan, combine 1.5 cups of the milk with the sugar, cinnamon stick, and lemon peel. Heat over medium until it starts to simmer, then remove from heat and let it sit for 10 minutes to infuse.

  2. Dissolve Cornstarch: In a small bowl, whisk the remaining 1/2 cup of cold milk with the cornstarch until completely smooth with no lumps.

  3. Thicken the Custard: Remove the cinnamon stick and lemon peel from the warm milk. Return the pan to low heat and slowly pour in the cornstarch mixture. Stir constantly with a whisk until the mixture becomes very thick and glossy (about 5 minutes).

  4. Set the Dough: Grease a square glass dish and pour the hot custard into it, smoothing the top. Cover with plastic wrap (touching the surface to prevent a skin from forming) and refrigerate for at least 3–4 hours (or overnight) until firm.

  5. Cut and Coat: Once set, turn the custard out onto a board and cut into equal squares or rectangles. Dredge each piece first in flour, then dip in the beaten eggs.

  6. Fry: Heat oil in a pan over medium-high heat. Fry the squares for about 2 minutes per side until they are golden brown and crispy.

  7. Sweet Finish: Immediately toss the hot fried milk in the cinnamon-sugar mixture until evenly coated. Serve warm or at room temperature.


Recipe Q&A: Fried Milk

Q: Why is my custard too soft to cut? A: This usually happens if the custard wasn’t cooked long enough on the stove or if it didn’t chill long enough in the fridge. It needs to reach a very thick, paste-like consistency before you take it off the heat.

Q: Can I make this without eggs? A: For an egg-free version, you can dip the custard squares in a thin slurry of flour and water before coating them in breadcrumbs or just flour, though the traditional texture comes from the egg wash.

Q: How do I get a smoother custard? A: Always dissolve the cornstarch in cold milk first. If you add it directly to hot milk, it will clump instantly. If you still see lumps, you can pass the mixture through a fine-mesh sieve before chilling.

Q: Can I air fry these? A: While frying gives the best traditional results, you can air fry them at 200°C for about 8–10 minutes. Spray them generously with oil first so the flour and cinnamon sugar can crisp up properly.

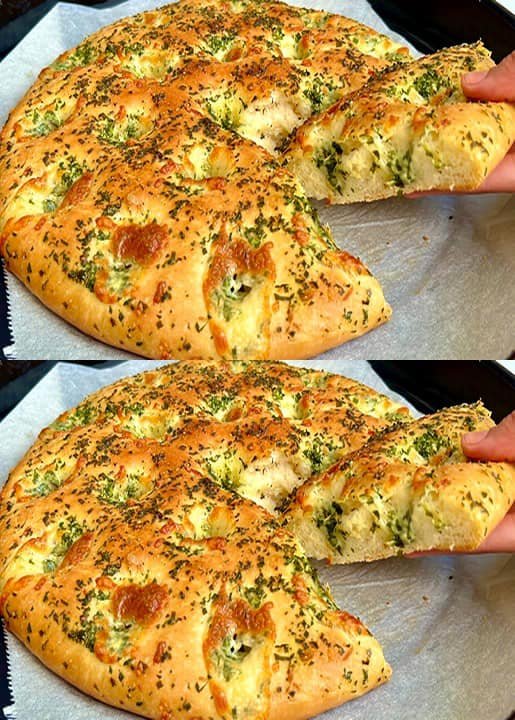
Fluffy Garlic & Herb Cheese Bread

Fluffy Garlic & Herb Cheese Bread

Ingredients

  • The Dough: 3 cups all-purpose flour, 1 cup warm water, 1 teaspoon sugar, 1 packet (7g) active dry yeast, 2 tablespoons olive oil, and 1 teaspoon salt.

  • The Topping: 3 tablespoons melted butter, 3 cloves minced garlic, 1 tablespoon chopped fresh parsley, 1 teaspoon dried oregano.

  • The Cheese: 1 cup shredded mozzarella or white cheddar.

Step-by-Step Instructions

  1. Activate Yeast: In a small bowl, combine warm water, sugar, and yeast. Let it sit for 5–10 minutes until it becomes foamy.

  2. Mix the Dough: In a large bowl, mix the flour and salt. Add the yeast mixture and olive oil. Stir until a shaggy dough forms.

  3. Knead and Rise: Knead the dough on a floured surface for about 5 minutes until smooth. Place it in a greased bowl, cover with a damp cloth, and let it rise in a warm spot for 1 hour (or until doubled in size).

  4. Shape: Punch down the dough and spread it out onto a parchment-lined baking sheet or into a round baking dish. Use your fingertips to poke deep dimples all over the surface.

  5. Add Flavor: Mix the melted butter, minced garlic, parsley, and oregano. Brush this mixture generously over the dough, ensuring it sinks into the dimples.

  6. Cheese & Bake: Sprinkle the shredded cheese evenly over the top. Bake in a preheated oven at 200°C (400°F) for 18–22 minutes until the crust is golden and the cheese is bubbly and browned in spots.

  7. Serve: Let it cool for 5 minutes before slicing into wedges or strips.


Recipe Q&A: Cheesy Garlic Bread

Q: Can I use instant yeast instead of active dry? A: Yes! If using instant yeast, you can skip the “activation” step and mix it directly into the dry ingredients. Just make sure your water is warm to help it rise.

Q: My bread didn’t rise; what happened? A: The most common reasons are using water that was too hot (which kills the yeast) or water that was too cold (which won’t activate it). The water should feel like a warm bath. Also, check the expiration date on your yeast packet.

Q: How do I get that extra-crispy bottom crust? A: For a crispier base, generously grease your baking pan with olive oil before pressing the dough into it. This essentially “fries” the bottom of the bread while it bakes.

Q: Can I make this dough in advance? A: Definitely. You can make the dough and let it rise slowly in the refrigerator overnight. This actually develops a deeper flavor in the bread. Just bring it to room temperature before shaping and baking.