Golden Herbal Tea –

🌼 The “Stay Glowing” Golden Herbal Tea

A warm, anti-inflammatory tonic for daily wellness. Yields: 1 Cup | Prep time: 2 mins | Simmer time: 5 mins

Ingredients

  • 1 cup Water: Fresh, filtered water is best.

  • ½ tsp Turmeric Powder: The “golden” star of the show.

  • 1 small piece Fresh Ginger: About ½ inch, peeled and sliced or smashed.

  • 1 tiny pinch of black pepper: essential for activating the turmeric.

  • 1 tsp honey: Or to your preferred sweetness level.

  • 1 squeeze Fresh Lemon Juice: For brightness and Vitamin C.


Instructions

  1. Boil: Pour one cup of water into a small saucepan and bring it to a rolling boil over medium-high heat.

  2. Infuse: Add the turmeric powder, the fresh ginger pieces, and that tiny pinch of black pepper.

  3. Simmer: Turn the heat down to low and let the tea simmer gently for about 5 minutes. This slow “steep” allows the heat to extract the oils and nutrients from the ginger and turmeric.

  4. Strain: Place a fine-mesh strainer over your favorite mug and pour the tea through, discarding the ginger pieces.

  5. Brighten & Sweeten: Stir in your teaspoon of honey and a fresh squeeze of lemon juice.

  6. Enjoy: Sip while warm to feel that comforting, healthy glow!


Why You’ll Love It

  • Anti-Inflammatory: Both ginger and turmeric are famous for helping with joints and digestion.

  • Immune Support: The lemon and honey provide a soothing boost for the throat and immune system.

  • Caffeine-Free: Since there’s no actual tea leaf, this is a perfect “wind-down” drink for the evening that won’t keep you awake.

A “Bestie” Pro-Tip

If you want an even creamier version (like a Golden Milk Latte), you can swap the water for almond or coconut milk! Just be sure to whisk it constantly while simmering so the milk doesn’t scorch.
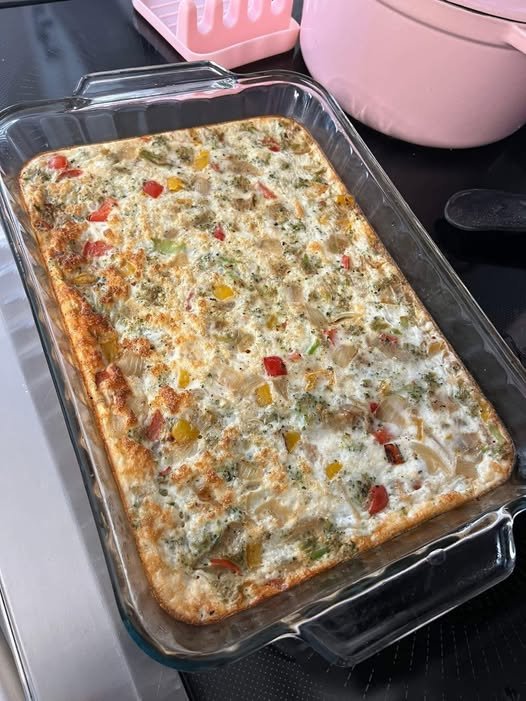
Very Veggie Egg White Casserole

Very Veggie Egg White Casserole

A high-protein, zero-point (Weight Watchers friendly) breakfast or meal prep staple. Yields: 6 servings | Calories: 77 per serving | Protein: 13g per serving

Ingredients

  • 500g Liquid Egg Whites: (Use “real” egg whites from a carton or about 15–16 large eggs).

  • 200 g (approx. ¾ cup) plain nonfat Greek yogurt (Chobani or similar).

  • 1 cup Broccoli: Chopped into small, bite-sized florets.

  • 2 Bell Peppers: Any color, chopped.

  • ½ Yellow Onion: Chopped.

  • Avocado Oil Spray: Just a light mist for the pan.

  • Seasoning: To taste (salt, black pepper, garlic powder, or red pepper flakes).


Instructions

  1. Prep the Oven and Pan: Preheat your oven to 325°F (160°C). Lightly mist a 13×9-inch baking dish with avocado oil spray.

  2. Sauté the Aromatics: Lightly spray a skillet with avocado oil over medium heat. Add the chopped onion, bell peppers, and broccoli. Sauté for 5–7 minutes until the vegetables are slightly softened.

  3. Season the Veggies: While they are in the skillet, add your seasonings. This ensures the flavor is locked into the vegetables rather than just floating in the egg.

  4. Create the Custard Base: In a large mixing bowl, whisk together the 500 g of egg whites and the 200 g of Greek yogurt. Whisk vigorously until the yogurt is fully incorporated and no large lumps remain.

  5. Assemble: Spread the sautéed vegetables evenly across the bottom of the prepared 13×9 pan. Pour the egg white and yogurt mixture over the top.

  6. Bake: Place in the center rack of the oven and bake for 25 minutes. The casserole should be set in the middle and slightly pulling away from the edges.

  7. Rest and Serve: Let it sit for 5 minutes before slicing. This allows the protein structure to firm up so you get clean squares.


Tips & Variations

  • The “Squeeze” Rule: If you use the suggested zucchini variation mentioned in the notes, be sure to squeeze the moisture out of the shredded zucchini before sautéing, or the casserole will become watery.

  • Seasonal Swaps: For a fall version, use roasted butternut squash and sage. For a spicy version, add chopped jalapeños and top with salsa.

  • Meal Prep: Slice these into six squares and store them in airtight containers. They reheat beautifully in the microwave (30–45 seconds) or an air fryer for a crispy edge.

Easy Homemade Recipes

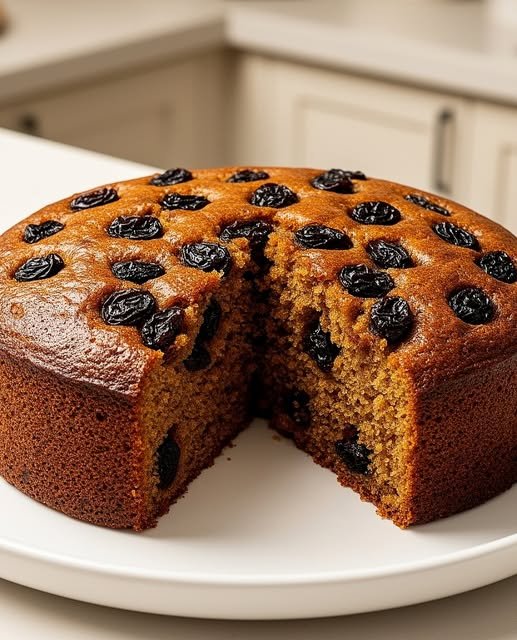
Moist Persian Date Cake with Honey Glaze

A rich, aromatic dessert featuring Middle Eastern spices and a glossy finish.

Ingredients

The Database

  • 200 g Dates: Pitted and chopped (Medjool dates work best for moisture).

  • 120 ml Milk: Full cream is preferred for richness.

The Batter

  • 120 g Unsalted Butter: Softened to room temperature.

  • 150g Granulated Sugar: White or light brown sugar.

  • 3 Large Eggs: Room temperature.

  • 1 tsp Vanilla Extract: High quality for the best aroma.

The Dry Mix

  • 150 g All-Purpose Flour: Sifted.

  • 1 tsp Baking Soda: To ensure a good rise.

  • 1 tsp Ground Cinnamon: For warmth.

  • ½ tsp Ground Cardamom: The “secret” Persian aromatic.

  • ¼ tsp salt: to balance the sweetness.

  • Optional: ½ cup raisins or chopped walnuts for texture.

The Finish

  • 1-2 Tbsp Honey: Warmed slightly for the glaze.


Instructions

  1. Soak the Dates: Combine the chopped dates and warm milk in a small bowl. Let them sit for 10 minutes until soft. For a smooth cake, blend this mixture into a purée; for a rustic feel, leave it chunky.

  2. Cream the Base: In a large bowl, cream the softened butter and sugar until the mixture is light, pale, and fluffy.

  3. Emulsify: Add the eggs one at a time, beating thoroughly after each addition to prevent curdling. Stir in the vanilla and your date/milk mixture.

  4. Fold the Dry Ingredients: In a separate bowl, whisk the flour, baking soda, spices, and salt. Gradually fold this into the wet batter using a spatula. Do not overmix! Stir in the nuts or raisins now if using.

  5. Bake: Pour the batter into a greased and floured 8-inch round pan. Bake at 350°F (175°C) for 35–40 minutes. The cake is done when a toothpick inserted into the center comes out clean.

  6. The Honey Glaze: While the cake is still warm from the oven, brush the top generously with warmed honey. This creates that signature professional sheen and locks in moisture.

  7. Cool & Serve: Let it cool in the pan for 10 minutes, then move to a wire rack.


Pro Tips for Success

  • The Saffron Twist: Though not in the base list, a pinch of crushed saffron threads added to the milk while soaking the dates will elevate this to a truly traditional Persian flavor profile.

  • The Temperature Secret: Always ensure your eggs and butter are at room temperature. This creates an emulsion that traps air, resulting in a lighter, more “velvety” crumb.

  • Serving: This cake is divine served warm with a dollop of unsweetened whipped cream or a side of vanilla bean ice cream to cut through the richness of the dates.

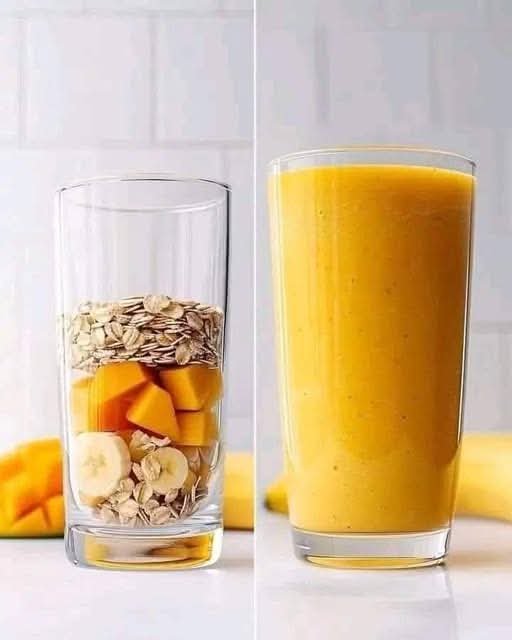
Mango Banana Oat Breakfast Smoothie

🥭 Mango Banana Oat Breakfast Smoothie

Ingredients

Category Ingredient Quantity

Fiber Rolled Oats (Old Fashioned) ¼ cup

Fruit Fresh or Frozen Mango (cubed) 1 cup

Fruit Ripe Banana ½ large

Liquid Orange Juice or Coconut Water ½ cup

Creaminess Milk or Yogurt (Dairy or Plant-based) ½ cup

Optional Honey or Agave Syrup 1 tsp

Optional Fresh Turmeric or Ginger A tiny pinch (for extra glow)

Instructions

  1. Soften the Oats (Optional): If you prefer a completely smooth texture without any “chew,” place the oats in the blender first and pulse them into a fine powder before adding other ingredients.

  2. Layer Your Ingredients: Add your liquid base (orange juice/milk) first. Follow with the oats, then the banana and mango chunks. Placing the frozen items on top helps push everything down into the blades.

  3. The Blend: Start on a medium speed to break down the oats and fruit, then finish on high for 45 seconds. You want to ensure the oats are fully pulverized for that “silk” finish seen in the second image.

  4. Adjust Consistency: * Too thick? Add a splash more orange juice.

    • Too thin? Add a few ice cubes or more frozen mango.


Why this combination works

  • The Oats: They act as a natural thickener and provide slow-release energy, preventing a “sugar crash” later in the morning.

  • The Mango: High in Vitamin C and fiber, it provides that intense tropical color and natural sweetness.

  • The Banana: This is the “glue” of the smoothie; it provides the creamy, emulsified texture that binds the oats and juice together.

Pro Tip for Texture

If you have the time, let the blended smoothie sit for 2–3 minutes before drinking. This allows the oats to hydrate slightly, making the drink even creamier!

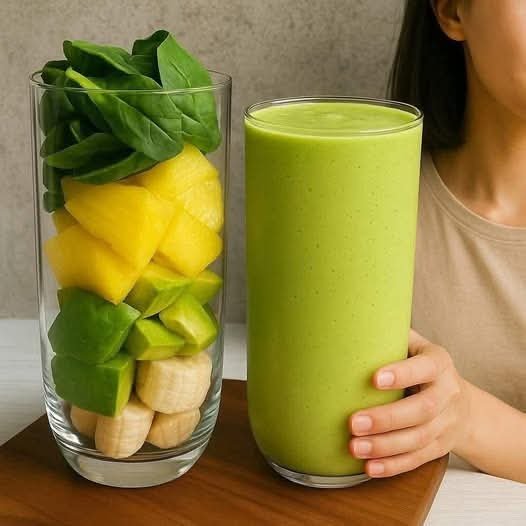
Creamy Green Power Smoothie Recipe

Creamy Green Power Smoothie Recipe

This creamy green power smoothie is a refreshing, nutrient-packed drink made with simple, wholesome ingredients. It combines leafy greens, tropical fruit, and healthy fats to create a smooth, naturally sweet beverage that’s perfect for breakfast, post-workout recovery, or a mid-day energy boost. The vibrant green color comes from fresh spinach, while banana, mango, and avocado add richness and natural sweetness without the need for added sugar.

Ingredients:

  • 1 cup fresh spinach leaves (washed and loosely packed)

  • 1 ripe banana (peeled and sliced)

  • ½ ripe avocado (peeled and cubed)

  • 1 cup fresh or frozen mango chunks

  • 1 to 1½ cups cold water, coconut water, or almond milk

  • Optional: 1 teaspoon honey or dates (for extra sweetness)

  • Optional: Ice cubes for a thicker, colder smoothie

Instructions:

  1. Begin by washing the spinach thoroughly under running water to remove any dirt. Pat dry if needed.

  2. Peel the banana and avocado, then cut them into medium-sized pieces for easier blending.

  3. Add the liquid of your choice (water, coconut water, or almond milk) to the blender first. This helps the blades move smoothly.

  4. Add spinach on top of the liquid, followed by banana, avocado, and mango chunks.

  5. Blend on medium speed for about 30 seconds, then increase to high speed and blend for another 30–60 seconds until completely smooth and creamy.

  6. Taste the smoothie. If you prefer it sweeter, add honey or dates and blend again briefly.

  7. If the texture is too thick, add a little more liquid. For a colder drink, add ice and blend once more.

  8. Pour into a tall glass and serve immediately.

Benefits:

This smoothie is rich in fiber, vitamins A and C, potassium, and healthy fats. Spinach supports digestion and immunity, banana provides natural energy, mango adds antioxidants, and avocado contributes heart-healthy fats that keep you full longer. Together, they create a balanced, satisfying drink that’s both delicious and nourishing.

Serving Tip:

Enjoy this smoothie fresh for the best taste and nutrition. Pair it with nuts or whole-grain toast for a complete, energizing meal.

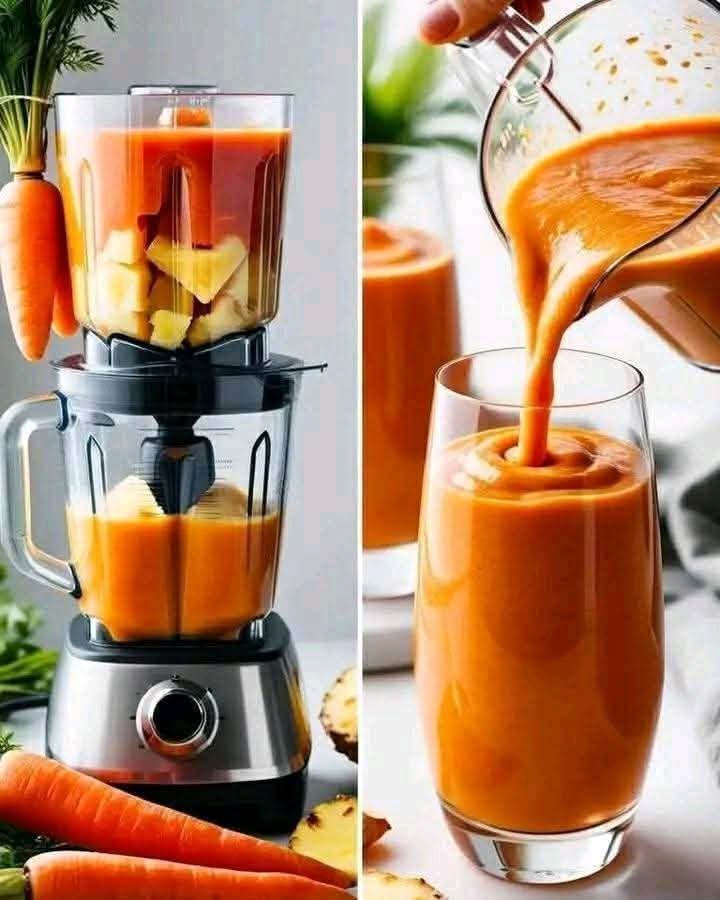
Tropical Carrot & Pineapple Glow Smoothie

Tropical Carrot & Pineapple Glow Smoothie

This blend is packed with Vitamin A from the carrots and Vitamin C from the pineapple, making it great for energy and skin health.

Ingredients

Carrots: 2 medium carrots (peeled and roughly chopped)


Pineapple: 1.5 cups fresh or frozen pineapple chunks


Liquid Base: 1 cup coconut water (or orange juice for extra sweetness)


Creaminess: 1/2 cup Greek yogurt or a splash of coconut milk


Optional Kick: 1/2 inch piece of fresh ginger (peeled)


Sweetener: 1 tsp honey or maple syrup (optional, depending on fruit ripeness)


Ice: 1/2 cup (if using fresh instead of frozen fruit)


Instructions

Prep the Carrots: Since carrots are quite firm, if you don’t have a high-speed blender, you may want to finely grate them or lightly steam them for 2 minutes and let them cool before blending.


Layer the Blender: Add the liquid (coconut water) first, followed by the carrots and ginger, then the pineapple and yogurt on top.


Blend: Start on a low speed and gradually increase to high. Blend for 60–90 seconds until the carrot particles are completely pulverized and the texture is silky smooth.


Adjust: If the smoothie is too thick, add a little more coconut water. If you want it colder, toss in a few ice cubes and pulse again.


Serve: Pour into a tall glass as shown in the image and enjoy immediately!

Pro Tips for the Best Texture

  • High-Speed Blending: To get that perfectly smooth pour seen in the second panel of your image, a high-speed blender is key for handling raw carrots.

  • Juice vs. Smoothie: If you prefer a thinner consistency like a juice, you can strain the mixture through a fine-mesh sieve or nut milk bag to remove the fiber.