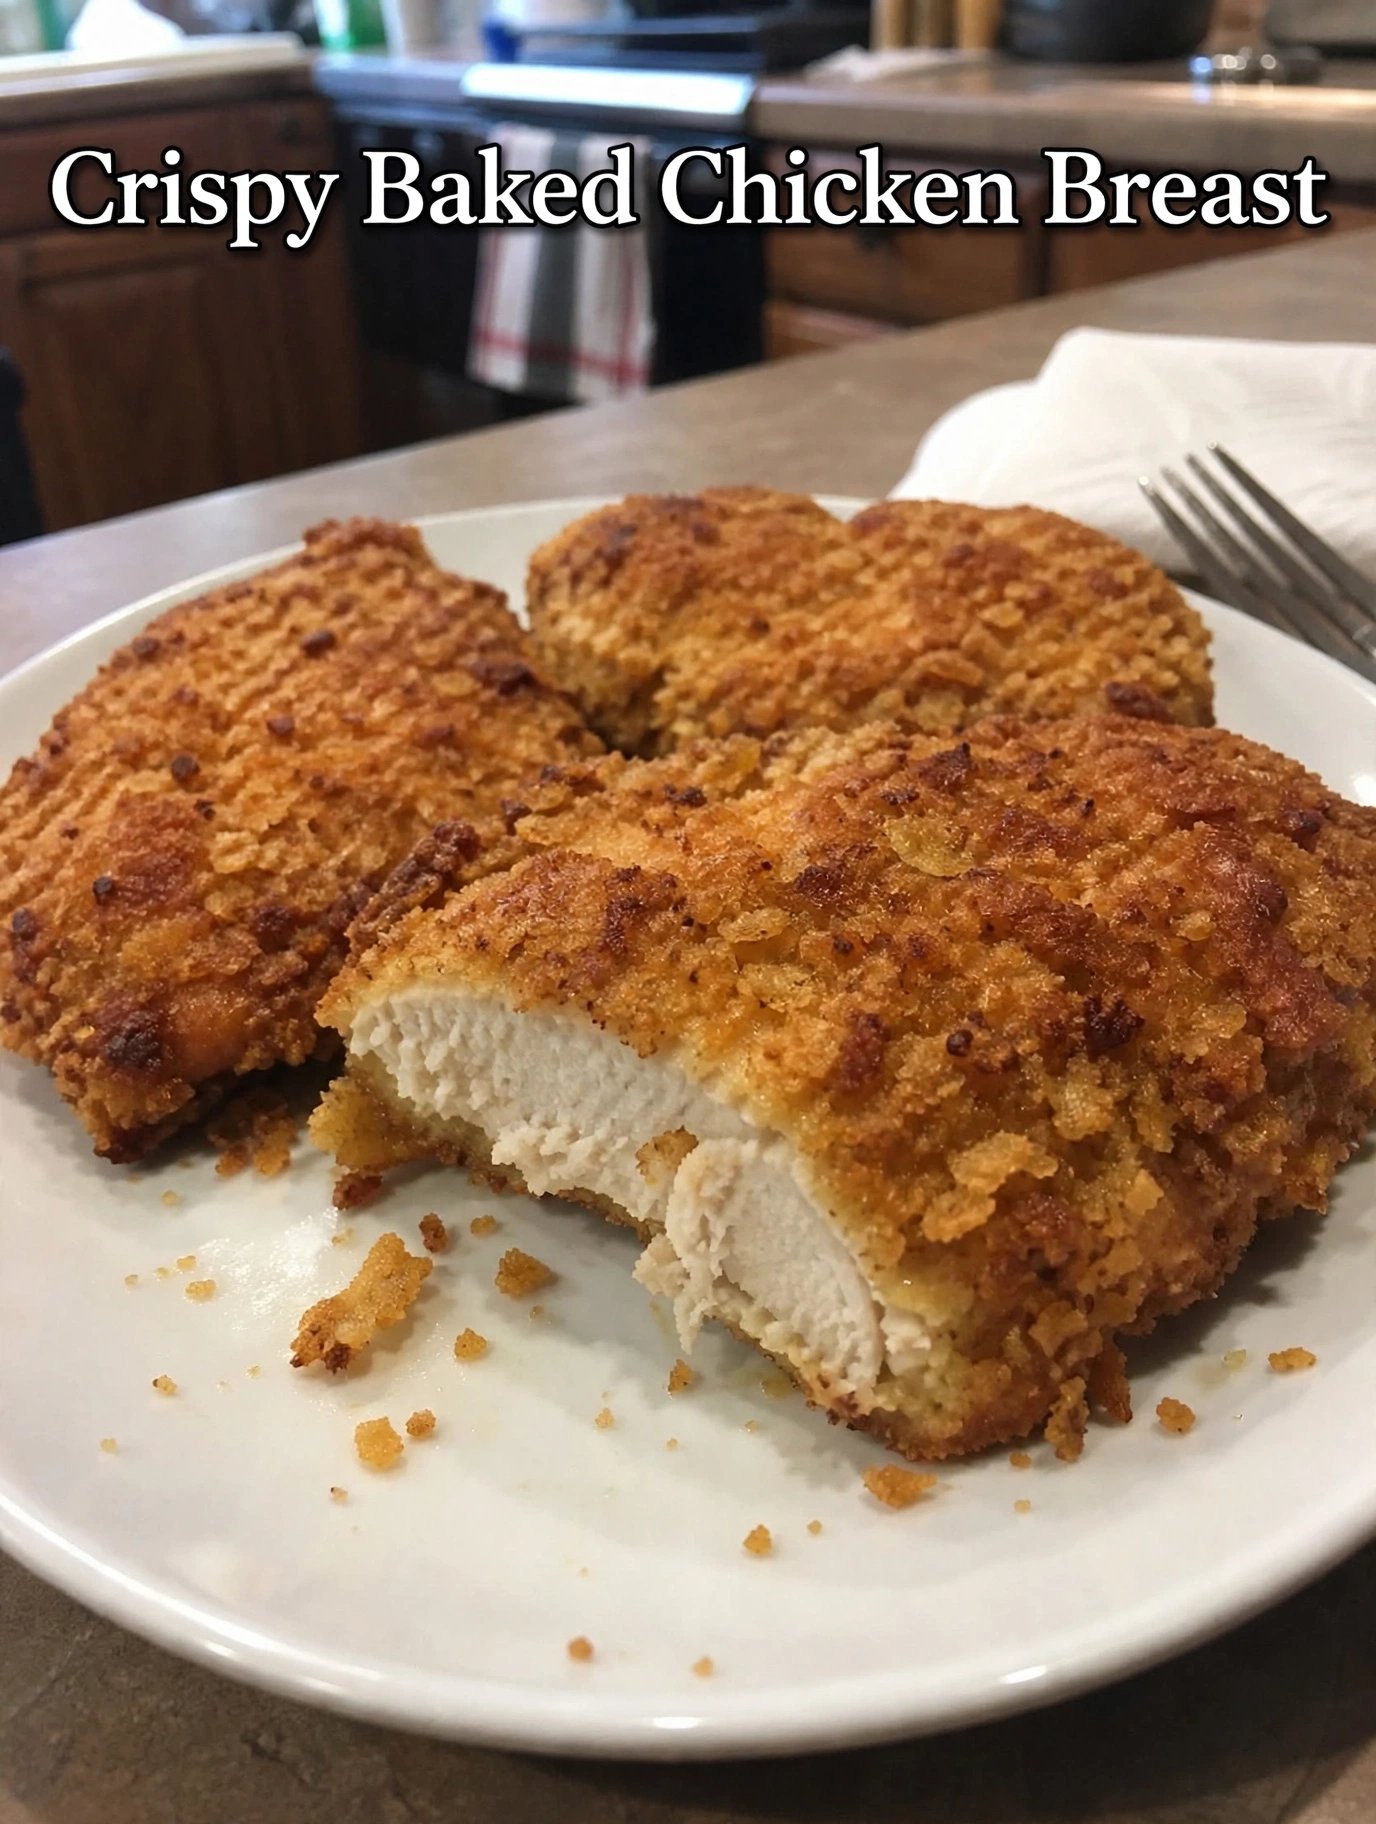
Crispy Baked Chicken Breast Recipe: Crunchy Outside, Juicy Inside
If you have ever bitten into a chicken breast that was dry, tough, and bland, you are not alone. For years, chicken breast had a bad reputation for being boring health food. But this recipe changes everything.
This *Crispy Baked Chicken Breast* is golden, crunchy, and unbelievably juicy inside —. The crust is made with a perfect blend of panko breadcrumbs, parmesan, and spices that crackles with every bite, while the inside stays tender and moist. And the best part? It is baked, not deep-fried, so you get all the crunch without all the oil.
Whether you are cooking for a busy weeknight dinner, meal prepping for the week, or trying to impress your family, this is the one recipe you will come back to again and again. It takes just 35 minutes from start to finish, uses simple pantry ingredients, and works for everyone — kids love it, adults love it, and it is even great for weight loss and high-protein diets.
In this post, I will show you exactly how to make the crispiest chicken breast in the oven, why it stays juicy, what mistakes to avoid, how to store it, and all the variations you can try. Let’s get cooking!
*Prep Time:* 15 minutes
*Cook Time:* 22 minutes
*Total Time:* 37 minutes
*Servings:* 4 servings
*Calories:* 342 kcal per serving
*Cuisine:* American
*Course:* Main Course / Dinner
*Diet:* High-Protein, Low-Carb Option Available
Why You Will Love This Crispy Baked Chicken Breast
There are hundreds of chicken breast recipes online, so why is this one different? Because it solves the three biggest problems everyone has with chicken breast.
*1. It Is Actually Crispy*
Most baked chicken turns out soft and soggy. Not this one. We use panko breadcrumbs instead of regular breadcrumbs, plus a light spray of oil and high oven heat. Panko is lighter and flakier, so it crisps up beautifully in the oven like it was fried. The parmesan in the coating melts slightly and helps the crust turn deep golden brown, exactly like you see in the picture.
*2. It Stays Juicy*
The secret is pounding the chicken to an even thickness and not overcooking it. Thick chicken breasts cook unevenly — the thin end dries out while the thick center is still raw. When you pound them to 1/2-inch thickness, they cook fast and evenly. We also use a quick brine-style seasoning and bake at 425°F for a short time, so the juices stay locked inside.
*3. It Is So Easy And Healthy*
You only need 9 ingredients, most of which you already have. No deep fryer, no messy oil, no complicated steps. Just dip, coat, bake, and done. Compared to fried chicken, this version has 60% less fat but 100% of the crunch. It is also naturally high in protein, low in carbs, and perfect for meal prep.
My family asks for this at least once a week. My kids call it “the crunchy chicken” and they eat it with ketchup, ranch, or honey mustard. I love it because I can make a big batch on Sunday and use it in salads, wraps, sandwiches, and bowls all week long.
Ingredients You Will Need
You don’t need anything fancy for this recipe. Here is what you need and why each ingredient matters.
For The Chicken:
– *4 boneless, skinless chicken breasts (about 6 oz each)* — Try to choose breasts that are similar in size so they cook evenly. If they are very thick, you will pound them.
– *1 teaspoon salt* — For seasoning the chicken itself, not just the coating.
– *1/2 teaspoon black pepper* — Freshly ground is best.
For The Breading Station:
– *1 cup panko breadcrumbs* — This is the key to crunch. Do NOT substitute with regular breadcrumbs if you want that extra-crispy texture. Panko is Japanese-style breadcrumbs that are larger and airier.
– *1/2 cup grated Parmesan cheese* — Adds salty, nutty flavor and helps the crust brown.
– *1 teaspoon garlic powder* — For deep savory flavor.
– *1 teaspoon onion powder* — Adds sweetness and depth.
– *1 teaspoon paprika* — Use smoked paprika for extra flavor and beautiful golden color.
– *1/2 teaspoon Italian seasoning* — A blend of oregano, basil, and thyme.
– *1/4 teaspoon cayenne pepper (optional)* — If you like a little kick. Skip it for kids.
For Dredging:
– *1/2 cup all-purpose flour*
– *2 large eggs, beaten*
– *1 tablespoon milk or water* — Helps thin the egg wash so it coats evenly.
– *Cooking spray or 2 tablespoons olive oil* — Spraying the top is what makes it crispy in the oven.
Optional For Serving:
Lemon wedges, fresh parsley, ranch dressing, honey mustard, ketchup, or hot sauce.
How To Make Crispy Baked Chicken Breast – Step By Step
Follow these steps exactly, and you will get perfect crispy chicken every single time.
Step 1: Preheat Your Oven And Prepare Your Pan
Preheat your oven to 425°F (220°C). This high heat is very important for crispiness. If the oven is too low, the coating will get soggy before it crisps.
Line a large baking sheet with parchment paper or a wire rack. A wire rack is actually better because it lets hot air circulate underneath the chicken, so the bottom gets crispy too. If you don’t have a rack, parchment paper works fine. Spray the rack or paper lightly with cooking spray.
Step 2: Pound The Chicken To Even Thickness
This is the most important step that most people skip. Place each chicken breast between two sheets of plastic wrap or in a zip-lock bag. Use a meat mallet or rolling pin to pound it to about 1/2-inch thickness all over.
Why does this matter? When chicken is uneven, the thin parts overcook and dry out while you wait for the thick part to cook. Pounding ensures it cooks in 20 minutes and stays juicy throughout. Don’t pound too hard or you will tear the meat. Use gentle, even strokes from the center outward.
Pat the chicken dry with paper towels, then season both sides with salt and pepper.
Step 3: Set Up Your Breading Station
You need three shallow bowls or plates:
*Bowl 1 – Flour:* Add flour, 1/2 teaspoon salt, and 1/4 teaspoon pepper. Mix.
*Bowl 2 – Egg Wash:* Whisk eggs with 1 tablespoon milk until smooth.
*Bowl 3 – Crispy Coating:* Mix panko, parmesan, garlic powder, onion powder, paprika, Italian seasoning, and cayenne.
Arrange them in order: flour, egg, panko. Put a clean plate at the end for the coated chicken.
Step 4: Bread The Chicken
Take one chicken breast at a time and follow this order:
First, dredge it in flour. Shake off any excess — you want a thin, even layer. The flour helps the egg stick.
Second, dip it in the egg wash. Let any extra drip off.
Third, press it firmly into the panko mixture. Use your fingers to press the crumbs onto both sides. Make sure every part is covered. This pressing is what makes the crust stay on and get extra crunchy. Place it on your prepared baking sheet.
Repeat for all chicken breasts. For extra-thick crunch, you can double-dip: after the first panko coat, dip again in egg and panko. This is my secret for the ultra-crispy version in the photo.
Step 5: Spray And Bake
Generously spray the top of each chicken breast with cooking spray or drizzle with olive oil. This is what fries the coating in the oven and turns it golden brown.
Bake for 18-22 minutes, flipping halfway through if you are not using a wire rack. The chicken is done when the internal temperature reaches 165°F (74°C) in the thickest part and the crust is deep golden and crunchy. Do not overbake — even 2 extra minutes can dry it out.
If you want extra browning, turn on the broiler for the last 1-2 minutes, but watch it closely so it doesn’t burn.
Step 6: Rest And Serve
Remove the chicken from the oven and let it rest for 5 minutes on the pan. This lets the juices redistribute inside, so when you cut into it, it stays juicy instead of running out onto the plate.
Slice one piece to check — : a thick, golden, crunchy crust and white, tender, juicy meat inside. Serve hot with lemon wedges and your favorite dipping sauce.
Pro Tips For The Crispiest Chicken Ever
After making this recipe more than 50 times, here are my best tips:
*1. Use Panko, Not Regular Breadcrumbs:* Panko is the game-changer. Regular breadcrumbs absorb moisture and go soft. Panko stays airy and crisp.
*2. Don’t Skip The Flour:* Flour creates a dry surface for the egg to grip. Without it, your coating will slide off.
*3. Press The Crumbs On:* Don’t just sprinkle. Really press them in with your hands.
*4. Use A Wire Rack:* If you have one, use it. Airflow underneath = crispy bottom.
*5. Don’t Crowd The Pan:* Leave at least 1 inch between chicken pieces. If they are too close, they steam instead of crisp.
*6. Use A Meat Thermometer:* This is the only way to know for sure it is done without cutting it open and losing juices. Chicken breast is perfect at 165°F.
*7. Let It Rest:* Cutting too soon makes it dry. 5 minutes makes a huge difference.
Delicious Variations To Try
Once you master the basic recipe, try these fun twists:
*1. Spicy Buffalo Version:* Add 1 teaspoon cayenne and 1/2 teaspoon chili powder to the panko. Serve with buffalo sauce and blue cheese dressing.
*2. Parmesan Herb Version:* Add 2 tablespoons fresh chopped parsley, basil, and 1 teaspoon dried oregano to the coating. Serve with marinara sauce like chicken parmesan.
*3. Gluten-Free Version:* Use gluten-free panko and gluten-free flour. It works exactly the same and is just as crispy.
*4. Keto / Low-Carb Version:* Skip the flour and panko. Use 1 cup almond flour + 1/2 cup crushed pork rinds + parmesan. Net carbs are only 2g per serving.
*5. Air Fryer Version:* This is my favorite quick method. Air fry at 400°F for 12-14 minutes, flipping halfway. Spray well with oil. It gets even crispier than the oven!
*6. Anti-Inflammatory Version:* For my @anti_inflammatory_recipess followers, add 1/2 teaspoon turmeric, 1/4 teaspoon black pepper, and use olive oil spray. Turmeric + black pepper together are powerful anti-inflammatory superstars. Serve with steamed broccoli.
What To Serve With Crispy Baked Chicken Breast
This chicken goes with almost everything. Here are my favorite pairings:
– *Classic Comfort:* Mashed potatoes, green beans, and gravy.
– *Healthy Bowl:* Brown rice, roasted broccoli, and avocado.
– *Salad:* Chopped romaine, tomatoes, cucumber, and ranch — slice the chicken on top.
– *Sandwich:* In a brioche bun with lettuce, tomato, pickles, and mayo.
– *Kids Dinner:* With fries, corn, and ketchup.
For a complete anti-inflammatory dinner, I serve it with roasted sweet potatoes, steamed broccoli, and a side of turmeric rice. It is colorful, filling, and so good for your body.
How To Store And Reheat
*In The Fridge:* Store leftover chicken in an airtight container for up to 4 days. To keep it crispy, place a paper towel in the container to absorb moisture.
*In The Freezer:* Wrap each breast individually in plastic wrap, then place in a freezer bag. Freeze for up to 3 months. Thaw overnight in the fridge.
*How To Reheat And Keep It Crispy:* Do NOT microwave it — it will go soggy. The best way is in the oven or air fryer at 375°F for 8-10 minutes until hot and crispy again. If using the oven, place it on a wire rack.
*Meal Prep Tip:* Make a double batch on Sunday. Use it for lunches all week. It is amazing cold in wraps too!
Frequently Asked Questions
*Why is my chicken not crispy?*
Three reasons: oven too low, not enough oil spray, or you crowded the pan. Make sure oven is at 425°F, spray generously, and leave space between pieces. Using a wire rack also helps a lot.
*Can I use chicken thighs instead?*
Yes! Boneless, skinless chicken thighs work great. They are naturally juicier. Pound them to even thickness and bake for 20-24 minutes.
*Can I make this ahead?*
Yes. You can bread the chicken up to 24 hours ahead. Keep it uncovered in the fridge on a baking sheet. The cold air actually helps the coating dry out and get even crispier. Bake when ready.
*Is this healthy?*
Yes! One serving has 42g protein, only 342 calories, and is baked not fried. It is perfect for weight loss, muscle building, and healthy eating. For an even healthier version, use whole wheat panko and olive oil spray.
*Can I make it without eggs?*
Yes. Use 1/2 cup buttermilk or plain Greek yogurt instead of eggs. It works just as well and adds a nice tang.
*How do I know when chicken is done without a thermometer?*
Cut into the thickest part — the juices should run clear and the meat should be white with no pink. But I highly recommend a thermometer for perfect results every time.
Nutrition Information (Per Serving)
Calories: 342 | Protein: 42g | Carbohydrates: 14g | Fat: 12g | Saturated Fat: 3g | Fiber: 1g | Sugar: 1g | Sodium: 520mg | Cholesterol: 145mg
_Nutrition is estimated and may vary based on ingredients used._
Final Thoughts
This Crispy Baked Chicken Breast is proof that healthy food does not have to be boring. It is crunchy, juicy, flavorful, and so easy that even beginners can make it perfectly on the first try.
If you try this recipe, please leave a comment below and tell me how it turned out. Did you try the spicy version or the air fryer version? I love hearing from you!
Don’t forget to save this recipe on Pinterest and share it with a friend who loves crispy chicken. And follow @anti_inflammatory_recipess for more healthy, delicious, anti-inflammatory recipes every day!
*Happy Cooking!*