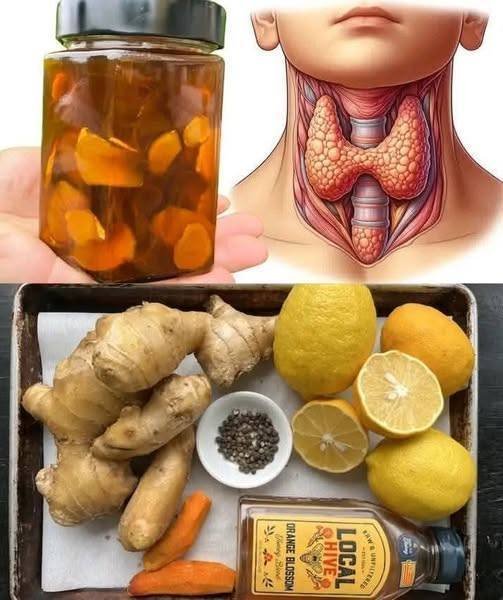
Barbara O’Neill’s Turmeric Soak Formula

Barbara O’Neill’s Turmeric Soak Formula

Yields: 1 Serving | Prep time: 5 mins | Cook time: 7 mins

Ingredients

  • 1 tbsp: Turmeric powder (or fresh grated root)

  • 2-inch piece: Fresh ginger, peeled and grated

  • 1 tsp: Black pepper (essential for turmeric absorption)

  • 1 tbsp: Fresh lemon juice (or 1 lemon, sliced)

  • 1 tbsp: Honey (optional, for sweetness)

  • 2 cups: Water


Instructions

  1. Boil the Water: Bring 2 cups of water to a boil in a small saucepan.

  2. Infuse the Aromatics: Add the turmeric, grated ginger, and black pepper to the boiling water. If using lemon slices instead of juice, add them now.

  3. Simmer: Reduce the heat and let the mixture simmer for 5–7 minutes to allow the compounds to infuse.

  4. Final Additions: Remove the pan from the heat. Stir in the fresh lemon juice and honey (if using).

  5. Strain: Pour the mixture through a fine-mesh strainer into a jar or cup, discarding the solids.

  6. Apply or Drink: * As a Drink: Consume once daily for three consecutive days.

    • As a Soak: Soak a clean cloth in the warm liquid (ensure it is a safe temperature for the skin) and apply it as a compress to the thyroid area.


Key Notes & Tips

  • Fresh is Best: Using fresh turmeric and ginger roots provides a stronger potency compared to powdered forms.

  • Medical Consultation: If you are currently on thyroid medication, consult your healthcare provider before starting this remedy, as turmeric can sometimes interfere with certain drugs.

  • Storage: You can double or triple this recipe and store the extra in the refrigerator for up to 3 days.
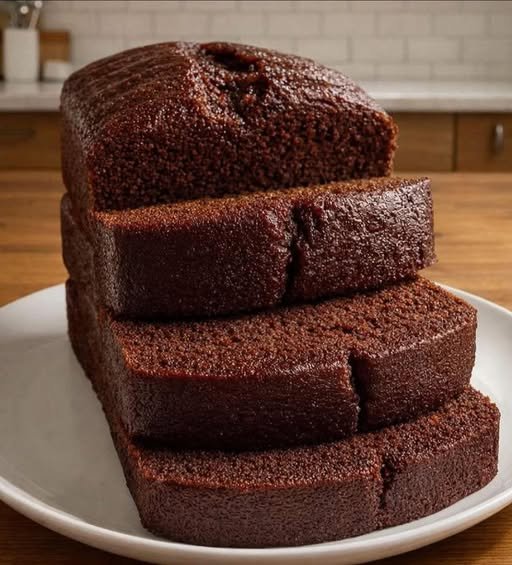

Quick & Easy Chocolate Loaf Cake

Quick & Easy Chocolate Loaf Cake

Prep time: 10 mins | Cook time: 45–55 mins | Total time: ~1 hour

Ingredients

  • 1 cup Granulated sugar

  • 1 cup Milk

  • ½ cup Vegetable oil

  • 2 Large eggs

  • 1 tsp Vanilla extract (optional)

  • 1 ½ cups All-purpose flour

  • ½ cup Unsweetened cocoa powder

  • 1 tsp Baking powder

  • ½ tsp Baking soda

  • ¼ tsp Salt

For the Optional Ganache:

  • ½ cup Heavy cream

  • 1 cup Semi-sweet chocolate chips


Instructions

  1. Preheat and Prep: Preheat your oven to 350°F (175°C). Grease a 9×5-inch loaf pan with butter or cooking spray, or line it with parchment paper for easy removal.

  2. Mix Wet Ingredients: In a large mixing bowl, whisk together the sugar, milk, vegetable oil, eggs, and vanilla extract until well combined and smooth.

  3. Incorporate Dry Ingredients: Sift in the flour, cocoa powder, baking powder, baking soda, and salt. Gently whisk by hand until just combined. Tip: Do not overmix, or the cake will become tough rather than tender.

  4. Bake: Pour the batter into the prepared loaf pan. Bake for 45 to 55 minutes. To check for doneness, insert a toothpick into the center; it should come out clean or with just a few moist crumbs.

  5. Cool: Let the cake cool in the pan for about 10 minutes before transferring it to a wire rack to cool completely.

  6. Make the Ganache (Optional): While the cake cools, heat the heavy cream in a small saucepan or microwave until it just begins to simmer. Pour the hot cream over the chocolate chips in a bowl. Let it sit for 5 minutes, then whisk until glossy and smooth.

  7. Finish: Pour the warm ganache over the cooled loaf cake and let it set before slicing.


Tips for a Busy Kitchen

  • No Sifter? No problem. Just use a whisk to fluff up the dry ingredients in a separate bowl before adding them to the wet mixture to get rid of any cocoa clumps.

  • Storage: This cake stays incredibly moist for up to 3 days if kept in an airtight container at room temperature.

Homemade Strawberry Ice Cream — Sweet, Smooth, and Bursting with Berry Flavor”

  • Servings: 4
  • Total Time: 10 minutes prep (+ freezing 2–4 hours)
  • Difficulty: Very Easy
  • Calories per Serving: ~120 kcal
  • Macros (Per Serving): 6g Protein / 8g Net Carbs / 7g Fat / 2g Fiber

Introduction

Indulge in the sweet, fruity goodness of strawberry ice cream without any guilt. This healthy strawberry ice cream is creamy, refreshing, and naturally sweetened—perfect for keto, slimming, Weight Watchers, High-Protein, and Mediterranean diets.

Made with just a few wholesome ingredients, this recipe is ideal for quick dessert cravings, summer treats, or a post-workout snack. No added sugar, no heavy cream, and fully customizable for your diet preferences.

Every spoonful is packed with fresh strawberries and a smooth, creamy texture that feels indulgent but keeps your macros in check.


Look at the recipe.

  • Texture & Visual: Creamy, smooth, with bright pink strawberry swirls.
  • Flavor Highlight: Sweet-tart strawberries balanced with a hint of vanilla and natural creaminess.
  • Diet Benefit: Low in sugar, high in protein (optional), and keto/WW/SW friendly.

Ingredients Needed

  • 2 cups frozen strawberries
  • ½ cup Greek yogurt (or coconut yogurt for dairy-free Mediterranean version)
  • 2–3 tbsp sweetener of choice (erythritol, monk fruit, or honey for Mediterranean version)
  • 1 tsp vanilla extract
  • Optional: ½ scoop protein powder for extra protein

How to Make Our Healthy Strawberry Ice Cream

  1. Blend the ingredients:
    Place frozen strawberries, Greek yogurt, sweetener, vanilla, and protein powder (if using) into a blender or food processor. Blend until smooth and creamy.
  2. Adjust sweetness:
    Taste and add more sweetener if needed.
  3. Freeze for firmness:
    Transfer the mixture into a freezer-safe container. Freeze for 2–4 hours for a scoopable consistency.
  4. Serve:
    Scoop into bowls or cones. Top with fresh strawberries, nuts, or a drizzle of sugar-free chocolate if desired.

Storage & Serving Suggestions

  • Store: Keep in a covered container in the freezer for up to 1 week.
  • Serving Ideas:
    • Serve with fresh berries or sliced banana for extra fiber.
    • Pair with low-carb chocolate shavings for a keto/high-protein dessert.
    • Enjoy as a refreshing snack during warm weather or after a workout.

Tips & FAQs

1. Can I make this slimming-friendly?
Yes—use fat-free Greek yogurt and a syn-free sweetener. Each serving is roughly 0–1 syn, depending on sweetener choice.

2. How many Weight Watchers points per serving?
Approximately 2–3 points, depending on the yogurt and sweetener used.

3. Can I make it keto-friendly?
Yes—stick to Greek yogurt, frozen strawberries, and low-carb sweeteners like erythritol.

4. Can I make it dairy-free or Mediterranean-style?
Yes—use coconut or almond yogurt and natural sweeteners like honey.

5. How can I make it higher in protein?
Add a scoop of whey protein or collagen peptides into the blender.

Blueberry Pie Bombs

Blueberry Pie Bombs

Prep time: 15 mins | Cook time: 15 mins | Total time: 30 mins Servings: 8 Bombs

Ingredients

  • 1 can (16.3 oz): Refrigerated flaky layers biscuit dough (8-count)

  • 1 cup: Blueberry pie filling

  • 4 oz: Cream cheese, softened

  • 2 tbsp: Powdered sugar

  • ½ tsp: Vanilla extract

  • 2 tbsp: Unsalted butter, melted

  • 1 tbsp: Granulated sugar (for topping)

  • Optional: Lemon zest (to mix into the cream cheese for brightness)


Instructions

  1. Prep the Oven and Pan: Preheat your oven to 375°F (190°C). Line a large baking sheet with parchment paper or lightly grease it.

  2. Prepare the Creamy Filling: In a small bowl, combine the softened cream cheese, powdered sugar, and vanilla extract. Whisk or stir until smooth and creamy.

  3. Flatten the Dough: Open the can of biscuits and separate them. Use your hands or a rolling pin to flatten each biscuit into a 4-inch or 5-inch circle.

  4. Assemble the Bombs: * Place about 1 tablespoon of the cream cheese mixture in the center of each dough circle.

    • Top the cream cheese with about 1 generous tablespoon of blueberry pie filling.

  5. Seal Them Up: Carefully gather the edges of the dough up over the filling, pinching them tightly together to create a sealed “bomb” or pouch. Ensure there are no gaps, or the filling will leak out!

  6. Coat and Bake: Place the bombs seam-side down on the prepared baking sheet. Brush the tops with melted butter and sprinkle with a little granulated sugar.

  7. Cook to Perfection: Bake for 12–15 minutes, or until the pastries are puffed and a deep golden brown.

  8. Serve: Let them cool for at least 5 minutes before serving—the blueberry filling gets very hot!


Tips for Success

  • Don’t Overfill: It’s tempting to pile on the blueberries, but overfilling makes them much harder to seal.

  • Egg Wash Alternative: For that extra shiny, professional look seen in your image, you can brush the tops with a beaten egg instead of melted butter before baking.

Amish Sweet Pepper Relish (Old-Fashioned Jar Recipe)

Introduction

“My Amish neighbor brought jars of this stuff over, and I knew I had to copy the recipe!”

That was my first reaction after tasting this sweet, tangy, crunchy relish. This traditional Amish recipe is made with simple vegetables, vinegar, and sugar, preserved in jars just like old-time families have done for generations. It’s perfect on sandwiches, burgers, hot dogs, or even served as a side with meats. Once you try it, you’ll understand why people beg for the recipe.

History

Amish communities are known for their simple living, home gardening, and food preservation traditions. Long before refrigeration was common, vegetables were preserved using vinegar, sugar, and salt. Sweet pepper relish became popular because it allowed families to enjoy garden produce all year long. Recipes were shared between neighbors, often gifted in jars as a sign of kindness and hospitality.

Ingredients

  • 6 cups bell peppers (red, green, or mixed), finely chopped
  • 2 cups onions, finely chopped
  • 1 cup sugar
  • 1½ cups white vinegar
  • 1 teaspoon salt
  • 1 teaspoon mustard seeds
  • ½ teaspoon celery seeds
  • ½ teaspoon turmeric
  • ½ teaspoon black pepper
  • 1 tablespoon cornstarch (optional, for thicker relish)

Formation (Preparation)

  1. Wash all vegetables thoroughly.
  2. Finely chop peppers and onions (uniform size helps even cooking).
  3. Place vegetables in a large bowl and sprinkle with salt.
  4. Let sit for 1 hour, then drain excess liquid.
  5. Prepare clean glass jars if you plan to store the relish.

Cooking Methods

Method 1: Traditional Stove-Top Amish Method

  1. In a large pot, combine vinegar, sugar, mustard seeds, celery seeds, turmeric, and pepper.
  2. Bring to a gentle boil.
  3. Add drained peppers and onions.
  4. Reduce heat and simmer for 25–30 minutes, stirring occasionally.
  5. If using cornstarch, dissolve it in a little water and stir in during the last 5 minutes.

Method 2: Jar Preservation Method

  1. Spoon hot relish into sterilized jars.
  2. Seal tightly.
  3. Let cool completely before storing in the refrigerator or pantry (if properly canned).

Instructions (Step-by-Step Summary)

  • Chop vegetables
  • Salt and drain
  • Cook with vinegar and spices
  • Simmer until flavorful
  • Jar and store

Benefits

  • Made from natural vegetables
  • No artificial preservatives
  • Long shelf life
  • Adds flavor without heavy calories
  • Encourages home cooking and food sharing

For Lovers Of

This recipe is perfect for lovers of:

  • Amish & farmhouse recipes
  • Homemade jar foods
  • Sweet-and-tangy flavors
  • Old-fashioned traditions
  • Simple, honest ingredients

Serving Ideas

  • On burgers and hot dogs
  • With grilled meats
  • Inside sandwiches
  • Alongside cheese and bread

Conclusion

This Amish Sweet Pepper Relish is more than just a condiment—it’s a piece of tradition in a jar. Easy to make, full of flavor, and perfect for sharing, it’s no surprise that once someone tastes it, they want the recipe. Just like my Amish neighbor, you’ll find yourself giving jars away and spreading the love.

If you want, I can also:

  • Rewrite it in simpler school language
  • Turn it into a viral Facebook/Instagram post
  • Adapt it for long-term canning

Enjoy.

One-Skillet Shrimp Alfredo Ribbons

One-Skillet Shrimp Alfredo Ribbons

Prep time: 10 mins | Cook time: 25 mins | Total time: 35 mins Servings: 4-6

Ingredients

  • 1 lb. Large shrimp (pink crustaceans), peeled and deveined

  • 10 oz. Fettuccine or Pappardelle (wide, flat wheat ribbons)

  • 2 cups Chicken broth (savory clear liquid stock)

  • 1 ½ cups Whole milk (full-fat dairy)

  • ½ cup Heavy cream (high-fat pouring liquid)

  • 3 cloves Garlic, minced (pressed pungent cloves)

  • ¾ cup Parmesan cheese, freshly grated (aged hard Italian curd)

  • 2 tbsp Unsalted butter (clarified dairy fat)

  • 1 tbsp Olive oil (cold-pressed fruit oil)

  • 1/8 tsp Ground nutmeg (ground tropical seed)

  • Salt and black pepper to taste


Instructions

  1. Sear the Shrimp: Heat the olive oil and 1 tablespoon of butter in a large, deep skillet over medium-high heat. Season shrimp with salt and pepper. Add them to the pan and sear for about 1–2 minutes per side until they turn pink and form a “C” shape. Remove immediately and set aside on a plate.

  2. Sauté Aromatics: Reduce heat to medium. Add the remaining tablespoon of butter and the minced garlic. Sauté for 1 minute until fragrant (don’t let the garlic brown!).

  3. Build the Base: Pour in the chicken broth and the milk. Increase the heat slightly to bring the liquid to a gentle simmer.

  4. Cook the Pasta: Add the dry pasta ribbons directly into the skillet. Use tongs to submerge them as they soften. Cover and simmer, stirring occasionally to prevent sticking, for about 8–10 minutes (or until the pasta is al dente and most of the liquid is absorbed).

  5. Finish the Sauce: Stir in the heavy cream, the grated Parmesan cheese, and the pinch of nutmeg. Stir constantly over low heat until the cheese is melted and the sauce is velvety and thick.

  6. Combine & Serve: Fold the cooked shrimp (and any juices from the plate) back into the skillet. Toss gently for 1 minute just to warm them through. Season with extra salt or pepper if needed and serve immediately.


A Quick Tip for Success

Since you mentioned using “aged hard Italian curd” (Parmesan), definitely stick to your own FAQ advice and grate it fresh. The pre-shredded stuff in the green can or the bags won’t give you that silky restaurant finish you’re after!