Creamy Tuna & Veggie Salad Dip 

Creamy Tuna & Veggie Salad Dip 

Creamy Tuna & Veggie Salad Dip 

Description

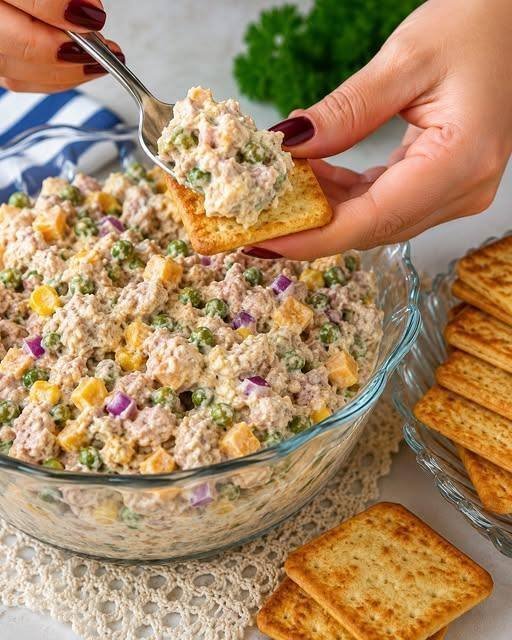
This Creamy Tuna & Veggie Salad Dip is a chilled, protein-packed spread combining flaky tuna with sweet corn, peas, red onion, and creamy mayonnaise dressing. It has a soft yet chunky texture that pairs perfectly with crackers, toast, or sandwiches. It’s ideal for parties, quick lunches, or make-ahead snacks.

Ingredients

  • 2 cans tuna in water or oil, drained
  • ½ cup mayonnaise
  • 2 tablespoons Greek yogurt (optional for lighter texture)
  • ½ cup sweet corn (boiled or canned)
  • ½ cup green peas (boiled or thawed frozen)
  • ¼ cup red onion, finely chopped
  • ¼ cup cheddar cheese cubes (optional)
  • 1–2 tablespoons pickle relish or chopped pickles (optional)
  • 1 teaspoon mustard
  • Salt and black pepper to taste
  • 1 teaspoon lemon juice
  • Optional garnish: parsley or paprika

Instructions

Step 1: Prepare Ingredients

Drain tuna well and fluff it with a fork.

Boil or thaw peas if needed.

Step 2: Mix Dressing

In a bowl, combine mayonnaise, Greek yogurt, mustard, lemon juice, salt, and pepper.

Mix until smooth and creamy.

Step 3: Combine Salad

Add tuna, corn, peas, onion, and optional cheddar cheese and pickles.

Fold everything gently until well coated.

Step 4: Chill

Refrigerate for at least 30 minutes for best flavor.

Step 5: Serve

Serve chilled with crackers, toast, or bread.

Notes

  • Draining tuna well prevents watery texture.
  • Fresh vegetables add crunch and color.
  • Greek yogurt makes it lighter and tangier.
  • Chilling improves flavor and texture.

Tips

  • Add boiled egg for extra protein.
  • Use sweet corn for better flavor balance.
  • Don’t overmix to keep texture chunky.
  • Add paprika or chili flakes for spice.
  • Serve in a glass bowl for a party presentation.

Servings

  • Serves: 4–6 people

Nutritional Information (Approximate Per Serving)

  • Calories: 280
  • Protein: 22g
  • Carbohydrates: 10g
  • Fat: 18g
  • Fiber: 2g
  • Sugar: 3g
  • Sodium: 520mg

Benefits

High in Protein

Tuna supports muscle health and keeps you full longer.

Quick No-Cook Recipe

Perfect for fast meals and snacks.

Budget Friendly

Uses simple pantry ingredients.

Great for Meal Prep

Stores well for several days.

Versatile Dish

Works as dip, sandwich filling, or salad.

Storage

Refrigerator

Store in airtight container for up to 3 days.

Freezer

Not recommended due to mayonnaise texture changes.

Q&A

Can I use chicken instead of tuna?

Yes, shredded chicken works perfectly.

Can I make it healthier?

Use light mayo or replace half with Greek yogurt.

What can I serve it with?

Crackers, toast, lettuce wraps, or sandwiches.

Can I make it spicy?

Yes, add chili flakes, hot sauce, or jalapeños.

Why is my salad watery?

Vegetables or tuna may not be drained properly.

Can I prepare it ahead?

Yes, it tastes even better after chilling.

Is this kid-friendly?

Yes, just reduce onion or spice if needed.

Baked Cracker Sandwiches

Baked Cracker Sandwiches

Baked Cracker Sandwiches

Baked Cracker Sandwiches are a ridiculously easy, crispy, cheesy snack made by sandwiching a savoury filling between buttery crackers and baking them until warm, golden, and delicious. They’re perfect for parties, game nights, lunchboxes, afternoon snacks, or whenever you need a quick bite with minimal effort. The crackers become lightly toasted while the warm filling turns creamy and flavourful.

Recipe Details

Prep Time: 10 minutes
Cook Time: 10–12 minutes
Total Time: 20–25 minutes
Servings: 12–16 sandwiches
Difficulty: Very Easy

Ingredients

For the Cracker Sandwiches

  • 24–32 buttery round crackers
  • 4 oz (115 g) cream cheese, softened
  • ½ cup shredded cheddar cheese
  • ¼ cup finely chopped cooked bacon or turkey bacon, optional
  • 2 tablespoons finely chopped green onions
  • ½ teaspoon garlic powder
  • ¼ teaspoon black pepper
  • ¼ teaspoon smoked paprika
  • 1 tablespoon mayonnaise or sour cream
  • 1 tablespoon melted butter

Optional Toppings

  • 2 tablespoons grated Parmesan
  • Chopped fresh parsley
  • Chives
  • Sesame seeds
  • Everything bagel seasoning
  • A pinch of red pepper flakes

Instructions

1. Prepare the Oven

Preheat your oven to 350°F (175°C).

Line a baking sheet with parchment paper.

This makes cleanup easier and helps prevent the crackers from sticking.

2. Make the Filling

Place the softened cream cheese in a medium bowl.

Add the shredded cheddar cheese, chopped green onions, garlic powder, black pepper, smoked paprika, and mayonnaise or sour cream.

If you’re using cooked bacon or turkey bacon, add it now.

Mix everything thoroughly until you have a thick, creamy filling.

The mixture should be easy to spread but firm enough that it doesn’t run off the crackers.

3. Prepare the Crackers

Lay half of the crackers flat on the prepared baking sheet.

These will form the bottom of your sandwiches.

Try to choose crackers that are similar in size and shape so the finished sandwiches hold together neatly.

4. Add the Filling

Scoop approximately 1 teaspoon of filling onto each cracker.

Spread it gently toward the centre, leaving a small border around the edges.

Don’t overfill the crackers because too much filling can squeeze out during baking.

5. Complete the Sandwiches

Place a second cracker on top of each filled cracker.

Press down gently but don’t crush the crackers.

You should have a neat little cracker sandwich with the creamy filling in the middle.

6. Brush With Butter

Brush the tops lightly with melted butter.

For extra flavour, you can mix a pinch of garlic powder or smoked paprika into the melted butter before brushing.

7. Add Optional Toppings

If desired, sprinkle the tops with a little Parmesan, chopped parsley, sesame seeds, or everything bagel seasoning.

Keep the toppings light so the crackers remain crisp.

8. Bake

Place the baking sheet in the preheated oven.

Bake for approximately 10–12 minutes, or until the crackers are lightly golden and the cheese filling is warm and melted.

Keep a close eye on them during the final few minutes because crackers can brown quickly.

9. Cool Briefly

Remove the sandwiches from the oven and allow them to cool for 3–5 minutes.

The filling will be very hot immediately after baking.

As they cool slightly, the cheese mixture will firm up and become easier to bite into.

10. Serve

Transfer the baked cracker sandwiches to a serving platter.

Garnish with a little fresh parsley or chives if desired.

Serve warm or at room temperature.

Recipe Notes

Choose Sturdy Crackers

Buttery round crackers work especially well because they’re crisp but sturdy enough to hold the filling.

You can also use:

  • Whole-grain crackers
  • Ritz-style crackers
  • Saltine crackers
  • Multigrain crackers
  • Cheese crackers

The flavour will change depending on the cracker you choose.

Soften the Cream Cheese

Allow the cream cheese to soften at room temperature before mixing.

Soft cream cheese blends much more easily and creates a smoother filling.

Don’t Overfill

A small amount of filling is enough.

If you add too much, it can ooze out while baking and make the sandwiches difficult to handle.

Watch the baking time.

The goal is to warm the filling and lightly toast the crackers.

You don’t want the crackers to become dark brown or burnt.

Helpful Tips

Make Them Extra Cheesy

Add an extra tablespoon or two of shredded cheddar to the filling.

You can also use Monterey Jack, Colby, mozzarella, or pepper Jack.

Add Some Heat

For spicy cracker sandwiches, add:

  • Chopped jalapeños
  • Cayenne pepper
  • Red pepper flakes
  • Hot sauce
  • Pepper Jack cheese

Try Different Fillings

The basic cream cheese mixture is very versatile.

Try adding finely chopped ingredients:

  • Cooked chicken
  • Ham
  • Turkey
  • Tuna
  • Olives
  • Pickles
  • Roasted red peppers
  • Spinach
  • Artichokes

Make Them Vegetarian

Simply leave out the bacon and add finely chopped vegetables, spinach, olives, or roasted peppers.

Make Them More Flavorful

A small amount of Dijon mustard, Worcestershire sauce, ranch seasoning, or Italian seasoning can add another layer of flavour.

Start with a small amount because these ingredients can be quite salty.

Serving Suggestions

Baked cracker sandwiches are perfect for casual entertaining.

Serve them as an appetiser alongside the following:

  • Fresh vegetable sticks
  • Pickles
  • Olives
  • Fruit
  • A simple green salad
  • Soup
  • Dips

They’re also great for parties because they’re small, easy to grab, and don’t require utensils.

For game-day gatherings, make a spicy version with pepper Jack cheese and jalapeños.

For a kid-friendly snack, keep the filling simple with cream cheese and mild cheddar.

Storage

These cracker sandwiches are best enjoyed fresh because the crackers gradually lose their crispness as they absorb moisture from the filling.

Refrigerator

If you have leftovers, place them in an airtight container and refrigerate for up to 2 days.

Allow them to cool completely before storing.

Reheating

Reheat in a 350°F (175°C) oven for approximately 5–7 minutes.

An air fryer can also work well. Heat at approximately 325°F (165°C) for 3–5 minutes.

Avoid microwaving if possible because it can make the crackers soft.

Approximate Nutritional Information

Nutrition varies depending on the crackers, cheese, cream cheese, and optional bacon used.

Estimated per sandwich, assuming 16 sandwiches and including the basic filling:

  • Calories: ~115
  • Protein: ~2.5 g
  • Carbohydrates: ~8 g
  • Fat: ~8 g
  • Fiber: ~0.5 g
  • Sugar: ~1 g
  • Sodium: ~180–250 mg

For a lighter version, use reduced-fat cream cheese, less butter, reduced-fat cheddar, and whole-grain crackers.

Benefits of Baked Cracker Sandwiches

 Convenient Snack

These sandwiches require very little preparation and use simple ingredients that are easy to keep on hand.

 Satisfying

The combination of crackers, cheese, and cream cheese provides carbohydrates and fat, making these little sandwiches more substantial than plain crackers.

 Customizable

You can easily change the filling based on what you have available.

 Portion-Friendly

Because each sandwich is individually portioned, it’s easy to serve them as appetisers or snacks.

 Easy to Add Vegetables

Finely chopped peppers, spinach, olives, green onions, or roasted vegetables can be incorporated into the filling.

Frequently Asked Questions

What are baked cracker sandwiches?

They’re small sandwiches made by placing a savoury filling between two crackers and baking them until warm, crispy, and lightly golden.

Can I make these ahead of time?

You can prepare the filling ahead of time and refrigerate it for up to 2 days. For the crispiest result, assemble and bake the sandwiches shortly before serving.

Can I use different crackers?

Absolutely. Saltines, whole-grain crackers, buttery crackers, and multigrain crackers can all work.

Can I use shredded mozzarella?

Yes. Mozzarella creates a mild, stretchy filling. For stronger flavour, combine it with cheddar or Parmesan.

Can I leave out the bacon?

Yes. Bacon is completely optional.

For a vegetarian version, replace it with chopped green onions, roasted peppers, mushrooms, spinach, or olives.

Can I use Greek yoghurt instead of mayonnaise?

Yes. Plain Greek yoghurt can replace the mayonnaise and provides a slightly tangier flavour.

How do I stop the filling from coming out?

Use only about 1 teaspoon of filling per cracker sandwich and leave a small border around the edges. Press the top cracker down gently rather than firmly.

Why did my crackers become soft?

This usually happens when the filling contains too much moisture or when the sandwiches are stored for too long.

For the best texture, bake and serve them relatively soon after assembly.

Can I freeze them?

Freezing isn’t recommended because the crackers can become soft and lose their crisp texture after thawing.

Can I make them spicy?

Yes! Add jalapeños, hot sauce, cayenne, red pepper flakes, or pepper Jack cheese.

Can I make a sweet version?

You can create a completely different dessert-style version using crackers with cream cheese, peanut butter, cinnamon, or a little honey. However, keep sweet and savoury fillings separate for the best flavour.

Final Thoughts

Baked cracker sandwiches are one of those wonderfully simple recipes that prove you don’t need complicated ingredients to make something delicious. Crisp crackers, creamy cheese filling, savoury seasonings, and a quick trip to the oven create a warm, crunchy snack that’s perfect for almost any occasion.

They’re especially useful when you’re hosting guests and need an appetiser that can be prepared quickly. You can also customise the filling with different cheeses, meats, vegetables, herbs, and spices to create your own favourite combination.

Golden Baked Brie with Caramelized Apples and Thyme

Golden Baked Brie with Caramelized Apples and Thyme

Golden Baked Brie with Caramelised Apples and Thyme

Golden Baked Brie with Caramelised Apples and Thyme is an elegant yet easy appetiser made with creamy Brie cheese, flaky puff pastry, buttery caramelised apples, maple syrup, and fresh thyme. The Brie becomes warm and wonderfully soft inside the crisp golden pastry, while the apples add a naturally sweet, buttery contrast.

This impressive baked Brie is ideal for holiday entertaining, dinner parties, brunch, wine nights, or cozy gatherings at home. Serve it with toasted baguette slices, crackers, fresh fruit, or toasted nuts for an appetiser everyone can enjoy.

Why You’ll Love This Baked Brie

This baked Brie recipe brings together several delicious textures and flavors in one simple appetizer. The puff pastry becomes crisp and golden in the oven, while the Brie melts into a rich and creamy center. Caramelized Honeycrisp apples add sweetness and a slightly buttery texture, while fresh thyme provides an earthy note that balances the richness.

Another advantage is that the recipe looks much more complicated than it actually is. The apples can be prepared in one skillet, and the Brie is simply wrapped in thawed puff pastry before baking.

The original recipe is designed for approximately 8 to 10 servings and takes about 50 to 55 minutes from start to finish.

Ingredients

Caramelised Apples

  • 2 Honeycrisp apples, thinly sliced
  • 3 tablespoons salted butter
  • 3 tablespoons pure maple syrup or brown sugar

The Brie

  • 1 wheel Brie cheese, 8 to 12 ounces
  • 1 sheet frozen puff pastry, thawed
  • 2 tablespoons apple butter or fig preserves

For the Pastry Finish

  • 1 large egg, beaten
  • Coarse sugar, for sprinkling
  • Fresh thyme sprigs, for garnish

These ingredients create the recipe’s signature combination of creamy Brie, flaky pastry, sweet caramelised apples, and fresh herbs.

How to Make Baked Brie with Caramelised Apples

Step 1: Prepare the Oven

Preheat your oven to 400°F (200°C). Line a baking sheet with parchment paper. The parchment makes cleanup easier and helps prevent melted cheese or caramelised filling from sticking.

Step 2: Caramelize the Apples

Wash and dry the Honeycrisp apples. Remove the cores and slice the apples evenly. You can leave the peels on, or remove them if you prefer a softer and more uniform filling.

Place a large skillet over medium heat and melt the salted butter. Add the sliced apples and gently toss them in the butter. Cook for about 3 to 4 minutes, stirring occasionally, until the apples begin to soften.

Pour in the maple syrup, or sprinkle in brown sugar if using it instead. Continue cooking for another 5 to 8 minutes. The apples should become tender, glossy, and lightly caramelised while still holding their shape.

Avoid cooking them until they become mushy because they will continue cooking slightly while the Brie bakes. Remove the skillet from the heat and let the apples cool for several minutes.

Step 3: Prepare the Puff Pastry

Gently unfold the thawed puff pastry onto a lightly floured surface. If necessary, roll it gently to smooth out any creases.

Place the Brie wheel in the centre of the pastry. Spread the apple butter or fig preserves evenly across the top of the cheese.

Arrange some of the caramelised apples over the preserves. Reserve a few attractive apple slices for the final presentation if desired.

Step 4: Wrap the Brie

Carefully bring the puff pastry up and over the Brie. Fold the pastry toward the center, overlapping the edges so the cheese is completely enclosed.

Press the seams gently to seal them. If there is too much excess pastry, carefully trim it so the wrapped Brie does not become unnecessarily thick.

Place the wrapped Brie seam-side down on the parchment-lined baking sheet.

Step 5: Add the Egg Wash

Beat the egg in a small bowl and brush it evenly over the entire puff pastry. The egg wash helps create the beautiful glossy golden crust that makes baked Brie so visually appealing.

Sprinkle a light layer of coarse sugar over the top. For an elegant presentation, lightly score a decorative pattern into the pastry without cutting completely through it.

Add a few small thyme leaves, keeping some fresh thyme sprigs for garnish.

Step 6: Bake

Bake the wrapped Brie for approximately 25 to 30 minutes, or until the puff pastry is deeply golden, crisp, and fully puffed.

Keep an eye on the pastry during baking because ovens can vary. If the top starts browning too quickly, loosely cover it with aluminum foil for the remaining baking time.

Once baked, remove the Brie from the oven and let it rest for 10 to 15 minutes. This allows the melted cheese to settle slightly while remaining warm and creamy.

Step 7: Garnish and Serve

Transfer the baked Brie to a serving platter. Spoon any remaining caramelized apples around the pastry and garnish with fresh thyme sprigs.

Serve warm with toasted baguette slices, crackers, apple wedges, pear slices, grapes, or toasted nuts.

Expert Tips for the Best Baked Brie

Keep the Apples Slightly Firm

Do not overcook the apples. They should be tender and glossy but still maintain their shape. Apples that are too soft can release excess moisture into the pastry.

Keep Puff Pastry Cool

Puff pastry is easiest to work with when it remains cool. If the pastry becomes very soft or sticky while assembling the Brie, place it in the refrigerator for several minutes before continuing.

Seal the Pastry Properly

Make sure the puff pastry completely encloses the Brie and that the seams are firmly sealed. This helps prevent the melted cheese from escaping during baking.

Don’t Overfill

Although the caramelized apples and preserves are delicious, using too much filling can make the pastry difficult to seal and may cause leaks.

Rest Before Cutting

Allow the baked Brie to rest for 10 to 15 minutes before serving. Cutting into it immediately can cause the melted cheese to escape too quickly.

Serve It Warm

For the best texture, serve this appetiser while the Brie is still warm and creamy and the pastry remains crisp.

Delicious Variations

There are several easy ways to customise this baked Brie recipe:

  • Fig and Apple Brie: Use fig preserves instead of apple butter.
  • Cinnamon Apple Brie: Add ¼ teaspoon ground cinnamon to the apples.
  • Pecan Apple Brie: Stir ¼ cup chopped toasted pecans into the apple mixture.
  • Honey Apple Brie: Replace maple syrup with honey.
  • Cranberry Apple Brie: Add a few tablespoons of dried cranberries.
  • Rosemary Brie: Use fresh rosemary instead of thyme.
  • Pear and Brie: Substitute firm ripe pears for the apples.
  • Bacon Apple Brie: Add a small amount of cooked crumbled bacon.
  • Spiced Apple Brie: Add a pinch of cinnamon and nutmeg.
  • Savory Brie: Replace the apples with caramelized onions and skip the coarse sugar.

Frequently Asked Questions

Can I prepare baked Brie ahead of time?

Yes. Assemble the Brie several hours before baking and keep it refrigerated and covered. Apply the egg wash immediately before baking.

What apples are best for baked Brie?

Honeycrisp is an excellent choice because it provides a good balance of sweetness and acidity. Gala, Pink Lady, Fuji, and Granny Smith apples can also be used.

Should I remove the Brie rind?

No. The rind is edible and can remain intact. It also helps the Brie hold its shape as it melts.

Can I use homemade puff pastry?

Yes. Homemade puff pastry works well, although refrigerated or frozen store-bought puff pastry makes this appetizer faster and easier to prepare.

Why did my baked Brie leak?

Leaking usually happens when the pastry is not sealed properly or there is too much filling. Completely enclose the Brie and avoid overfilling the pastry.

Can I use fig jam instead of apple butter?

Yes. Fig preserves are a delicious alternative and give the appetizer a richer fruit flavor.

What can I serve with baked Brie?

Try toasted baguette slices, crackers, apple wedges, pear slices, grapes, toasted nuts, or a simple charcuterie board.

How should I store leftovers?

Cool the leftovers and place them in an airtight container. Refrigerate for up to 3 days. Reheat gently in the oven to help restore some of the pastry’s crispness.

Can I freeze baked Brie?

For the best results, freeze the assembled Brie before baking rather than freezing it after baking. Wrap it tightly and bake from chilled, allowing additional baking time if necessary.

Can I leave out the coarse sugar?

Yes. Coarse sugar is optional and mainly adds a subtle crunchy sweetness and attractive finish.

Nutrition Facts

Approximate nutrition per serving:

  • Calories: 390
  • Protein: 10g
  • Carbohydrates: 27g
  • Fat: 27g
  • Saturated Fat: 12g
  • Fiber: 2g
  • Sugar: 14g
  • Sodium: 430mg
  • Calcium: 8% DV
  • Iron: 10% DV

These values are estimates and can vary depending on the Brie size, puff pastry brand, apple quantity, and exact ingredients used.

Conclusion

Golden Baked Brie with Caramelized Apples and Thyme is an easy appetizer that delivers an impressive combination of creamy, flaky, sweet, and savory flavors. The warm Brie melts inside crisp puff pastry, while buttery caramelized apples and maple syrup add a naturally sweet contrast. Fresh thyme brings an earthy finish that keeps every bite balanced.

Whether you’re preparing a holiday appetizer, hosting a dinner party, planning a brunch, or simply want something special for a cozy weekend, this baked Brie is an excellent choice. Serve it warm with crusty baguette slices, crackers, fresh fruit, or toasted nuts for an inviting appetizer everyone will want to share.

With simple preparation, flexible variations, and an elegant presentation, this baked Brie with caramelized apples can easily become a favorite recipe for entertaining.