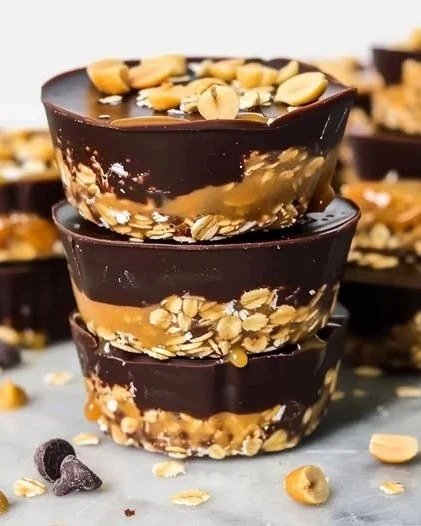
Peanut Butter Oat Cups
These Peanut Butter Oat Cups are an easy no-bake treat made with wholesome oats, creamy peanut butter, maple syrup, and rich chocolate. Each little cup has a chewy oat base, a gooey peanut butter center, and a smooth chocolate topping finished with crunchy roasted peanuts and a touch of flaky sea salt.
They are simple enough to prepare without turning on the oven and make a delicious snack, lunchbox treat, or quick dessert. The combination of chewy oats, creamy peanut butter, chocolate, and a hint of salt creates a satisfying sweet-and-salty flavor in every bite. They can also be made ahead and kept chilled for an easy grab-and-go treat.
Prep Time: 20 minutes
Chilling Time: 1 hour
Total Time: 1 hour 20 minutes
Servings: 12 oat cups
Ingredients
The Chewy Oat Base
Rolled oats or quick-cooking oats: 1½ cups
Creamy peanut butter: ¾ cup
Maple syrup or honey: ⅓ cup
Vanilla extract: 1 teaspoon
Salt: ¼ teaspoon
The Gooey Middle Filling
Creamy peanut butter: ½ cup
Maple syrup: 1 tablespoon
The Chocolate Topping & Garnish
Dark or semi-sweet chocolate chips: 1 cup
Coconut oil: 1 teaspoon, optional
Whole or chopped roasted peanuts: ¼ cup
Flaky sea salt: For sprinkling, optional
Instructions
Prepare the oat mixture: Add the rolled oats, creamy peanut butter, maple syrup or honey, vanilla extract, and salt to a medium mixing bowl. Stir thoroughly until the mixture becomes evenly combined and the oats are coated with the peanut butter mixture.
The consistency should be thick and sticky enough to hold together when pressed. If the mixture seems too dry, add another tablespoon of peanut butter. If it feels excessively soft, add a small amount of oats.
Prepare the muffin pan: Line a standard 12-cup muffin pan with paper or silicone liners. Silicone liners are especially convenient because the chilled oat cups release easily.
Form the oat bases: Divide the oat mixture evenly among the 12 liners. Use the back of a spoon, small measuring cup, or your fingers to firmly press the mixture into the bottom of each liner.
Press firmly enough to create a compact base. A loosely packed base may crumble when you remove the cups.
Make the peanut butter filling: In a small bowl, stir together the ½ cup creamy peanut butter and 1 tablespoon maple syrup until smooth and glossy. If your peanut butter is very thick, gently warm it for a few seconds to make spreading easier.
Add the filling: Spoon a small amount of the peanut butter mixture into the center of each oat base. Spread it gently while keeping it slightly away from the edges if possible. This creates a distinct gooey center once the cups are chilled.
Melt the chocolate: Place the chocolate chips in a microwave-safe bowl and heat in short 15–20 second intervals, stirring well between each interval. Continue until the chocolate is smooth and completely melted.
Alternatively, melt the chocolate gently over a double boiler. Stir in 1 teaspoon of coconut oil if desired for a smoother, more easily spreadable topping.
Add the chocolate layer: Spoon melted chocolate over each peanut butter-filled oat cup. Use the back of a small spoon to gently spread the chocolate across the top and cover the filling completely.
Add the garnish: While the chocolate is still melted, sprinkle the tops with chopped or whole roasted peanuts. Finish with a tiny pinch of flaky sea salt if you enjoy a sweet-and-salty flavor combination.
Chill: Place the muffin pan in the refrigerator and chill the cups for at least 1 hour, or until the chocolate and oat base are firm.
For a faster option, you can place them in the freezer for approximately 20–30 minutes, but avoid leaving them there too long if you want the best texture.
Remove and serve: Once firm, carefully remove the oat cups from their liners. Let them sit at room temperature for a few minutes before serving if you prefer a softer, chewier texture.
Store any leftovers in an airtight container in the refrigerator.
Tips
Use natural or regular peanut butter: Both can work well, but very runny natural peanut butter may require slightly more oats to create a firm base. Stir natural peanut butter thoroughly before measuring.
Choose the right oats: Rolled oats give the cups a pleasantly chewy texture, while quick-cooking oats create a softer and more compact texture.
Press the base firmly: This is important for keeping the cups together. Use a small measuring cup or the back of a spoon to compact the mixture evenly.
Do not overfill the centers: A modest layer of peanut butter filling gives the cups a balanced texture. Too much filling can make them difficult to handle.
Warm thick peanut butter: If the filling is difficult to spread, gently warm it for a few seconds. It should become fluid enough to spoon without becoming hot.
Melt chocolate slowly: Chocolate can seize or burn if overheated. Short heating intervals with frequent stirring produce a smoother result.
Use coconut oil carefully: A teaspoon of coconut oil can make melted chocolate smoother and easier to spread. It also helps create a slightly softer chocolate shell when chilled.
Let the chocolate set completely: Make sure the cups are properly chilled before removing them from the liners. This helps every layer stay intact.
Add toppings immediately: Roasted peanuts and flaky salt should be added while the chocolate is still melted so they adhere properly.
Make them ahead: These cups are excellent for preparing in advance. Keep them refrigerated and grab one whenever you want a quick sweet snack.
For a firmer texture: Store the finished cups in the refrigerator. For a softer texture, allow them to sit at room temperature for several minutes before eating.
Use good-quality chocolate: Since chocolate is one of the main flavors, a good-quality dark or semi-sweet chocolate can noticeably improve the finished dessert.
Variations
Chocolate Peanut Butter Oat Cups: Add 2 tablespoons of unsweetened cocoa powder to the oat mixture for a chocolate-infused base.
Extra Chocolate Version: Stir a small handful of mini chocolate chips into the oat base before pressing it into the muffin liners.
Almond Butter Cups: Replace the peanut butter with creamy almond butter for a slightly milder nutty flavor.
Cashew Butter Cups: Cashew butter creates a naturally creamy and delicate variation.
Honey Oat Cups: Use honey instead of maple syrup in the oat base for a slightly sweeter, floral flavor.
Date Caramel Filling: Replace the peanut butter center with a homemade date caramel for a naturally sweet variation.
Coconut Peanut Butter Cups: Add ¼ cup unsweetened shredded coconut to the oat mixture for extra texture and flavor.
Crunchy Peanut Version: Use crunchy peanut butter in the filling or sprinkle extra chopped roasted peanuts over the chocolate.
Banana Peanut Butter Cups: Add a very thin layer of mashed banana between the oat base and peanut butter filling. Because banana adds moisture, these are best eaten relatively quickly.
Dark Chocolate Sea Salt Cups: Use dark chocolate and finish with a generous but delicate sprinkle of flaky sea salt for a more sophisticated flavor.
Protein Oat Cups: Stir a small amount of your preferred protein powder into the oat base and add an extra splash of maple syrup or peanut butter if the mixture becomes too dry.
Q&A
Do Peanut Butter Oat Cups need to be baked?
No. These are designed as a no-bake treat. The oat mixture is pressed firmly into the liners, then chilled until the cups become firm.
Can I use quick oats instead of rolled oats?
Yes. Quick-cooking oats work well and produce a softer, more compact texture. Rolled oats provide more chew.
Can I use honey instead of maple syrup?
Yes. Honey works very well as a substitute and helps create a sticky oat mixture.
Can I use crunchy peanut butter?
Absolutely. Crunchy peanut butter adds extra texture, especially in the filling.
How do I stop the oat cups from falling apart?
Make sure the oat mixture is moist enough and press it firmly into the muffin liners. Chilling the cups completely before removing them is also important.
Can I freeze Peanut Butter Oat Cups?
Yes. Place them in an airtight freezer-safe container with parchment between layers. Thaw them in the refrigerator or let them soften briefly at room temperature before serving.
How long do they last in the refrigerator?
They can generally be stored in an airtight container in the refrigerator for about 1 week for the best texture and flavor.
Can I make these without coconut oil?
Yes. Coconut oil is optional. It simply helps make the melted chocolate smoother and easier to spread.
Can I use white chocolate?
Yes. White chocolate can be used for a sweeter variation, although dark or semi-sweet chocolate provides a stronger contrast with the peanut butter.
Are these suitable for meal prep?
Yes. They are excellent for make-ahead snacks. Prepare a batch, chill them thoroughly, and keep them refrigerated for an easy treat throughout the week.
Nutrition
Approximate nutrition per oat cup:
Calories: 245 kcal
Protein: 6 g
Carbohydrates: 25 g
Fat: 15 g
Saturated Fat: 5 g
Fiber: 3 g
Sugar: 14 g
Sodium: 120 mg
Nutrition information is an estimate and may vary depending on the peanut butter, chocolate, sweetener, and serving size used.
Conclusion
These Peanut Butter Oat Cups prove that a delicious dessert does not need to be complicated. With a chewy oat base, creamy peanut butter center, smooth chocolate topping, crunchy peanuts, and a touch of sea salt, they deliver plenty of flavor and texture in every bite.
They are perfect when you want something sweet without spending a lot of time in the kitchen. Keep a batch chilled for quick snacks, afternoon cravings, lunchbox treats, or an easy dessert that everyone will love.
#PeanutButterOatCups #NoBakeDessert #PeanutButterRecipes #OatRecipes #HealthyTreats #EasyDesserts #NoBakeTreats #ChocolatePeanutButter #HomemadeSnacks #EasySnackRecipe #SweetTreats #OatCups #DessertRecipes #SnackIdeas #HomemadeDessert