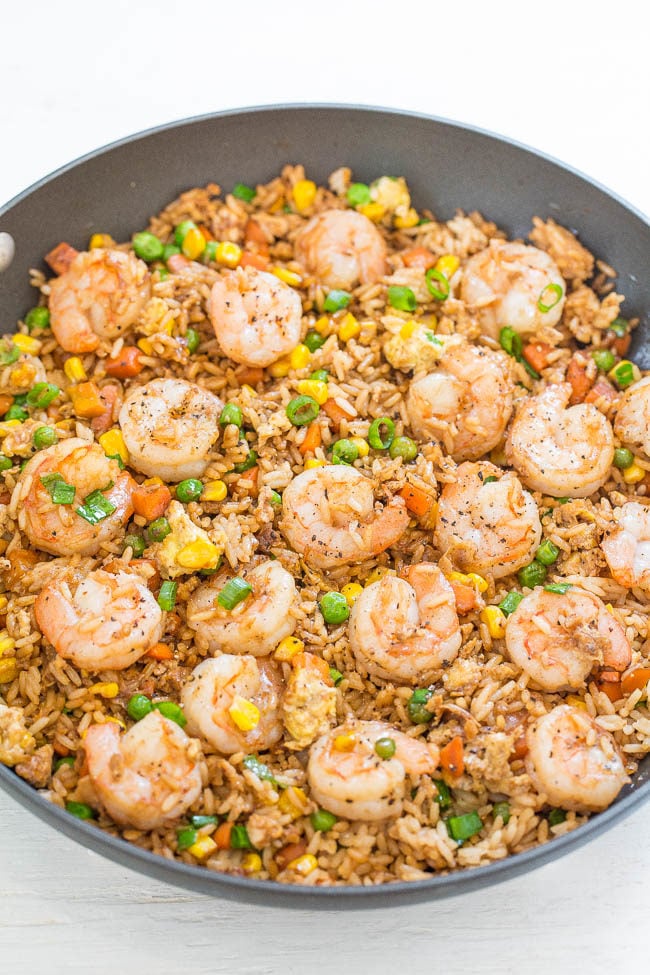
Shrimp Fried Rice Recipe

One-skillet, ready in 20 minutes, and you’ll never get takeout again!! Homemade tastes WAY BETTER!! Tons more flavor, not greasy, and loaded with tender shrimp!!

It’s healthier, not greasy, and you’re going to love it.

There’s garlic, ginger, green onions, sesame oil, and soy sauce for layers of flavor while peas, carrots, corn, and bits of egg add texture. It’s a perfect weeknight meal when you’re in a rush want a break from the usual chicken dinner.

Tips for the Best Shrimp Fried Rice
To save time if you don’t have leftover rice on hand or don’t want to cook a batch, use two pouches of ready-to-serve rice. Works like a charm! I don’t even bother thawing the frozen peas, carrots, and corn that’s mixed into the rice.
Feel free to add edamame, bean sprouts, mushrooms or whatever floats your fried rice boat.
I use fresh shrimp from the butcher because I think it has the best flavor, but if you’re in an ultimate hurry you can use frozen shrimp that’s already been cooked and all you have to do is thaw it.

Prep Time: 5 mins

Cook Time: 10mins

Total Time: 15mins

Calories: 450kcal

Ingredients:

  • 2 tablespoons sesame oil
  • 2 tablespoons canola or vegetable oil
  • 1 pound medium-large fresh shrimp cleaned (approximately 15-20 count shrimp)
  • 1 cup frozen peas and diced carrots blend I don’t thaw and use straight from the freezer
  • 1/2 cup corn I use frozen straight from the freezer
  • 2 to 3 garlic cloves finely minced or pressed
  • 1/2 teaspoon ground ginger
  • 3 large eggs lightly beaten
  • 4 cups cooked rice I use white, long-grain or brown may be substituted. To save time use two 8.8-ounce pouches cooked and ready-to-serve rice
  • 2 to 3 green onions trimmed and sliced into thin rounds
  • 3 to 4 tablespoons low-sodium soy sauce
  • 1/2 teaspoon salt or to taste
  • 1/2 teaspoon freshly ground black pepper or to taste

Instructions:

  1. To a large non-stick skillet or wok, add the oils, shrimp, and cook over medium-high heat for about 3 minutes, flipping halfway through.
  2. Cooking time will vary based on size of shrimp, don’t overcook.
  3. Remove shrimp with a slotted spoon (allow oils and cooking juices to remain in skillet) and place shrimp on a plate; set aside.
  4. Add the peas, carrots, corn, and cook for about 2 minutes, or until vegetables begin to soften, stir intermittently.
  5. Add the garlic, ginger, and cook for 1 minute, stir intermittently.
  6. Push vegetables to one side of the skillet, add the eggs to the other side, and cook to scramble, stirring as necessary.
  7. Add the shrimp, rice, green onions, evenly drizzle with soy sauce, evenly season with salt and pepper, and stir to combine.
  8. Cook for about 2 minutes, or until shrimp is reheated through.
  9. Recipe is best warm and fresh but will keep airtight in the fridge for up to 5 days or in the freezer for up to 4 months. Reheat gently as desired.

Nutritional Info:

Serving: 1g | Calories: 450kcal | Carbohydrates: 58g | Protein: 14g | Fat: 18g | Saturated Fat: 3g | Cholesterol: 142mg | Sodium: 882mg | Fiber: 4g | Sugar: 4g

The Perfect Ice-cream Dessert

The Perfect Ice-cream dessert is the perfect frozen dessert with fudge, caramel and salty pretzels!

Prep Time:30 min

Total Time:07 hrs 15 min

Servings:16

Ingredients:

CRUST

  • 2 cups (about 16) finely crushed shortbread cookies
  • 1/4 cup cashews, finely chopped
  • 1/3 cup Butter, melted

ICE CREAM

  • 1 half-gallon vanilla ice cream, softened

FUDGE LAYER

  • 1 cup semi-sweet chocolate chips
  • 1 1/2 cups powdered sugar
  • 1/2 cup Land o lakes
  • 2 (5-ounce) cans evaporated milk
  • 1 teaspoon vanilla extract
  • TOPPING
  • 1 cup pretzel sticks, coarsely crushed
  • 1/2 cup cashews, coarsely chopped
  • 1 (12-ounce) jar caramel ice cream topping, warmed

Instructions:

  1. Combine all crust ingredients in bowl; mix well. Press onto bottom of ungreased 13×9-inch baking pan. Freeze 10 minutes.
  2. Spread ice cream over crust. Cover; freeze 1-2 hours or until set.
  3. Meanwhile, combine all fudge layer ingredients except vanilla in 2-quart saucepan.
  4. Cook over medium heat, stirring constantly, 7-9 minutes or until mixture comes to a boil. Reduce heat to medium-low.
  5. Cook, stirring occasionally, 5 minutes or until slightly thickened. Remove from heat; stir in vanilla. Cool completely.
  6. Pour cooled fudge layer mixture over frozen ice cream. Freeze 4 hours or overnight until set.
  7. Combine pretzel sticks and cashews in bowl; set aside.
  8. Let dessert stand at room temperature 10-15 minutes before serving.
  9. Cut into servings; top each serving with about 1 tablespoon pretzel mixture. Drizzle each with about 1 tablespoon caramel topping.

Tips:

  • To soften ice cream, scoop large pieces of ice cream onto 15x10x1-inch baking pan. Place in refrigerator 10-15 minutes or until softened.
  • To crush pretzels, put into resealable plastic food bag; crush with rolling pin.

Nutritional Info:

(1 serving) 490Calories 27Fat (g)70Cholesterol (mg)350Sodium (mg)59Carbohydrates (g)2Dietary Fiber|6Protein (g)

Fried Potatoes and Onions/Peppers with Smoked Sausage

Fried Potatoes and Onions/Peppers with Smoked Sausage Yummiest Recipe you ever tried 😋

Ingredients:

  • 2 lbs baby red potatoes (you can also use regular red potatoes or gold potatoes), cut into 1 – 1 1/2 inch pieces
  • 1 onion, sliced into thick half circles
  • 1 red bell pepper, cut into 1-inch pieces
  • 8 oz smoked sausage or kielbasa (I use smoked Polish kielbasa), cut into 1-inch pieces
  • 8 oz fresh mushrooms (baby Bella, white button, etc.), cut in half or quarters
  • 1/4 cup olive oil
  • 4 garlic cloves, minced
  • 1 teaspoon fresh thyme
  • 1 Tablespoon spice/ dry herbs blend
  • salt, ground black pepper
  • fresh herbs, minced (parsley, thyme, chives, dill, etc)

Instructions:

  1. Preheat the oven to 475 degrees Fahrenheit (I used the convection setting on my oven, although if you don’t have that option, it will still work.).
  2. Place a large rimmed baking sheet into the oven at the same time, so that it heats up while you are prepping all the ingredients.
  3. Scrub the potatoes really well and cut them into 1 – 1½ inch pieces. Place them into a medium pot, and fill it with water, so that the water is just barely covering the potatoes.
  4. Bring it to a boil, reduce to a simmer and cook for about 5 minutes, covered, just until the potatoes are halfway cooked through. Drain the potatoes.
  5. Meanwhile, cut the mushrooms in half or in quarters if they are very large.
  6. Slice the onions into thick half circles. Cut the bell pepper into 1-inch pieces, and slice the sausage into 1-inch pieces.
  7. In a large bowl, combine the onion, bell pepper, mushrooms, olive oil, minced garlic cloves, fresh thyme salt, freshly ground black pepper and a mixture of dry herbs.
  8. When the potatoes are halfway cooked, gently toss them with the mushroom and pepper mixture, along with the sausage.
  9. Take out the searingly hot baking sheet from the oven and quickly spread everything out in one layer.
  10. Roast in the preheated oven, uncovered, for 20-30 minutes, until the vegetables are all cooked through and golden brown, turning everything over halfway through cooking.
  11. You can broil the dish during the last few minutes of cooking to give it extra brownness and a slight char.
  12. Garnish with fresh herbs, such as parsley, thyme, chives, dill, etc.

Make Ahead: Prep all the ingredients, without placing them onto the baking sheet. Store in the refrigerator up to 2 days. When you are ready to serve, preheat the oven with the rimmed baking sheet in it and then proceed with the rest of the steps.

Notes:

You can use any cooked sausage that you like. I buy my sausage from a local Polish store, where they make their own sausage. It is SO delicious. The sausage that I used this time had a really smoky flavor, so it gave that same smoky flavor to the rest of the vegetables. However, you can use any kind of sausage that you prefer.

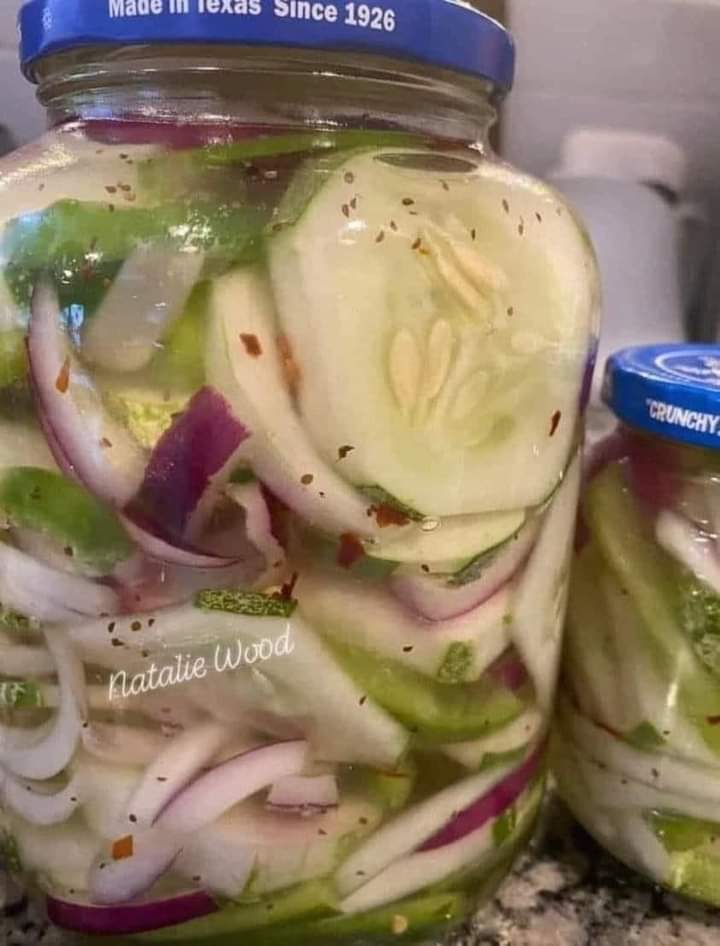
Cucumber Onion Salad

This Easy Cucumber Onion Salad is a light, refreshing, summertime side dish, made with just six ingredients and done in 10 minutes!

If you’re looking for a light, fresh side dish to serve at your next barbecue, picnic, or potluck, look no further than our Cucumber Onion Salad. This vinegar-marinated cucumber salad is a perfect complement to the flavors of summer, whether you’re cooking out on the grill or enjoying a picnic in the park. It’s the perfect side for grilled chicken, hot dogs, steaks, burgers, you name it!

You can serve them as an appetizer, snack, or side dish. They’re perfect for picnics because they keep well in the fridge and can be made ahead of time.This Easy Cucumber Onion Salad is a light, refreshing, summertime side dish. Add regular or cherry tomatoes to make it an even more colorful cucumber salad.

Types of Cucumber to use in this Salad

You can use any variety of slicing cucumber for this salad and it will taste great. Cucumbers fresh from the garden are always a first choice, no matter what the variety. However, English cucumbers, Persian cucumbers, or the regular grocery store variety cucumbers are also delicious. If purchasing cucumbers, choose cucumbers that are firm without any blemishes or soft spots.

The Best Dressing for Cucumber Salad

It is hard to beat cucumbers in vinegar with a little sugar, which is the basis of the dressing in this recipe. The vinegar enhances the natural flavor in the cucumbers, and every crunchy bite is refreshing. The flavor of vinegar used in the dressing is a matter of preference. Apple cider vinegar, rice vinegar, red wine vinegar, and white vinegar all give their own unique flavor to the dressing.

Salad Dressing Substitutions

There are also creamy cucumber salads that use a sour cream and mayonnaise based dressing. Again, it’s a matter of preference. This adds calories to the salad, and makes a heavier dressing that can dominate the fresh cucumber taste. With the vinegar based dressing, this cucumber salad is only 66 calories per serving.

Is Cucumber Salad Keto Friendly?

Leave the sugar out or replace the sugar with a monk fruit sweetener (or your favorite keto sweetener) to make this cucumber salad keto-friendly! Even if you decide to add mayonnaise, it will still be ok to eat on the keto diet. It is also gluten-free!

Suggestions for Cucumber Onion Salad

Turn the vinegar marinated cucumbers into a colorful summertime salad by adding cherry tomatoes or sliced tomatoes, some red onions, and a splash of olive oil.

You could also add green bell pepper, red or yellow peppers, slices of squash, or fresh herbs to the mix. Fresh basil or fresh dill add a burst of flavor. There is no wrong way to dress up this salad.

Any kind of onion will work for this cucumber salad recipe. I like red or purple onion for the color, but any onion you have on hand is great.

You can make this recipe right before serving or ahead of time to let the cucumbers have longer to marinate. To do this, divide the cucumbers into a couple of quart jars and pour the vinegar mixture over the top instead of putting in Ziploc bags (as directed in the recipe card below). This makes it easier for snacking right out of the jar. 

You can store these vinegar marinated cucumbers in your fridge in a jar or air-tight container for up to three days. Any longer than that and the cucumbers will lose their “crisp-ness” and become limp. There is also a slight risk for microbes forming after three days, but I know some people keep them in their fridge and continue to eat them for up to a week without any issues.

Cucumber Onion Salad Recipe:

This Easy Cucumber Onion Salad is a light, refreshing, summertime side dish. Add regular or cherry tomatoes for a more colorful cucumber salad.

Prep Time 10mins

Cook Time 0mins

Total Time 10mins

Course: Salad, Side Dish

Cuisine: American

 Servings: 10 people

Calories: 66kcal

Ingredients:

  • 5 cucumbers
  • 1 red onion
  • 1 cup apple cider vinegar (or white vinegar, red wine vinegar, rice vinegar)
  • 1/2 cup sugar (or more to taste)
  • 1/2 cup water
  • 1 teaspoon salt
  • 1 tsp celery flakes

Instructions:

  1. Peel and slice cucumbers into thin slices.
  2. Cut onion in half and cut into very thin slices.
  3. Combine onions and cucumbers in a large bowl.
  4. In a separate, medium-sized bowl, combine remaining ingredients. Stir until sugar dissolves.
  5. Pour vinegar mixture over cucumbers and onions. Stir until the cucumbers are evenly coated in the dressing.*
  6. Refrigerate at least 20 minutes. Before serving, drain liquid and place in a serving bowl to serve.

Notes:

  • You can also combine the cucumbers, onions, and dressing in a resealable plastic bag to marinade. Drain liquid from the bag and pour the salad into a bowl to serve.
  • You can store these vinegar marinated cucumbers in your fridge in a jar or air-tight container for up to three days.
  • Any longer than that and the cucumbers will lose their “crisp-ness” and become limp.
  • There is also a slight risk for microbes forming after three days, but I know some people keep them in their fridge and continue to eat them for up to a week without any issues.

Nutritional Info:

Calories: 66kcal | Carbohydrates: 14g | Protein: 1g | Fat: 1g | Saturated Fat: 1g | Sodium: 237mg | Potassium: 220mg | Fiber: 1g | Sugar: 13g | Vitamin A: 108IU | Vitamin C: 6mg | Calcium: 25mg | Iron: 1mg

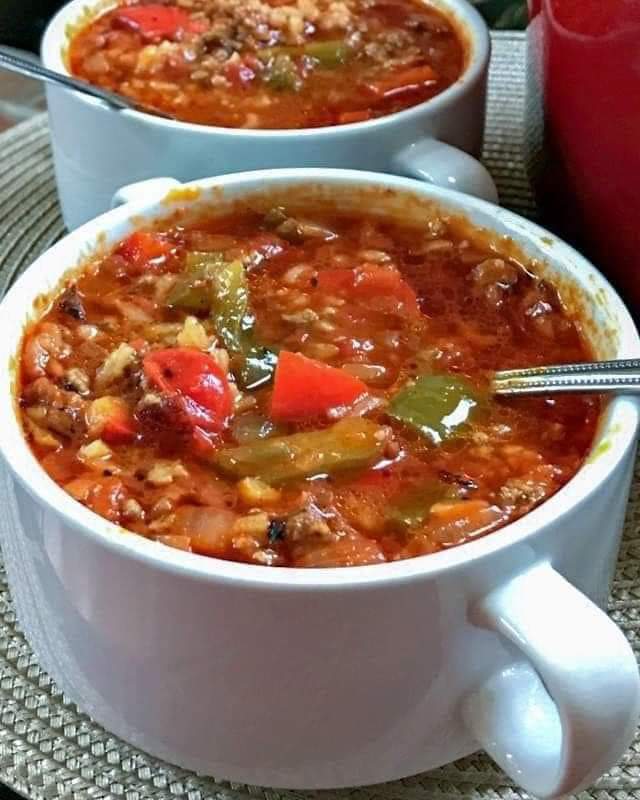
Stuffed Pepper Soup Recipe

A super easy, fast, budget-friendly one pot dinner! So hearty and so cozy with ground beef, rice and bell peppers.

If you love stuffed peppers, you will love this as a soup. It takes minimal effort and can be made in 45 min start to finish (with most of the time simmering so all the wonderful flavors can meld together).

Is this soup freezer-friendly? I will say that after some recipe testing, this soup will not freeze well with the rice as the rice can become mushy once thawed and reheated. If you plan to freeze, I recommend freezing without the rice, adding it in prior to serving. It will make all the difference.

Yield: 6 SERVINGS

 Prep Time: 15MIN 

Cook Time: 30MINS 

Total Time: 45MIN

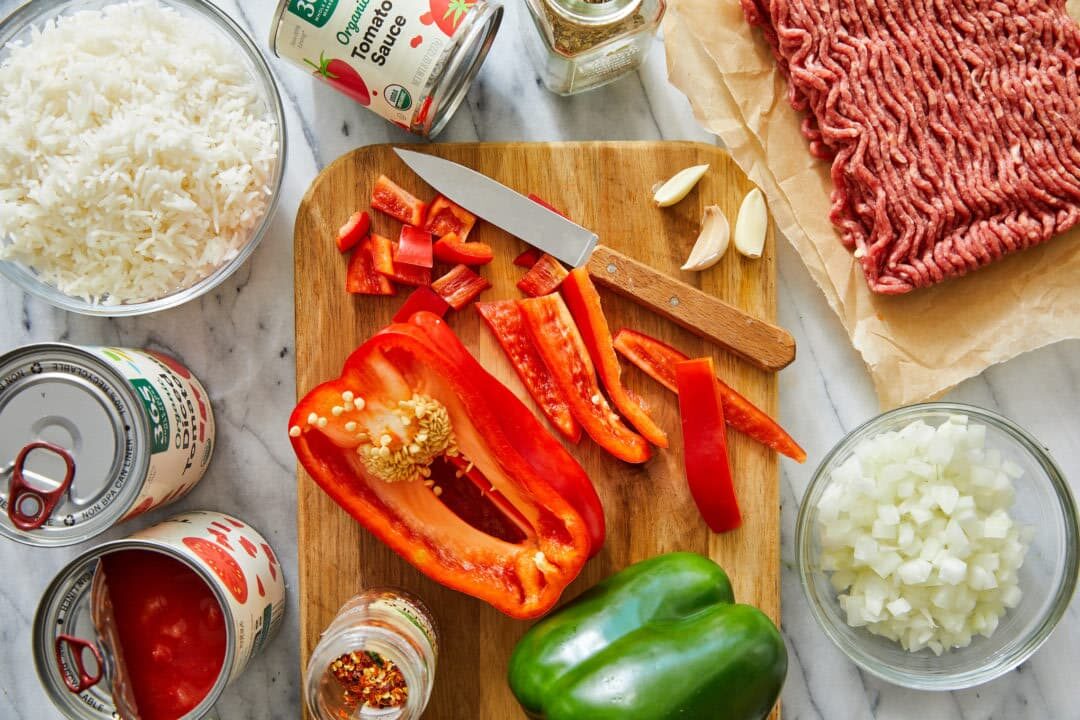
INGREDIENTS:

Stuffed Pepper Soup Recipe
Photographed by: Ren Fuller
  • 1 tablespoon canola oil
  • 1 pound lean ground beef
  • 1 medium sweet onion, diced
  • 1 red bell pepper, diced
  • 1 green bell pepper, diced
  • 4 cloves garlic, minced
  • 1 1/2 teaspoons Italian seasoning
  • 1/4 teaspoon crushed red pepper flakes
  • 2 (14.5-ounce) cans diced tomatoes
  • 1 (8-ounce) can tomato sauce
  • 3 cups beef broth
  • Kosher salt and freshly ground black pepper, to taste
  • 2 cups cooked white rice
  • 2 tablespoons chopped fresh parsley leaves

INSTRUCTIONS:

  1. Heat canola oil in a large stockpot or Dutch oven over medium heat.
  2. Add ground beef and cook until browned, about 3-5 minutes, making sure to crumble the beef as it cooks; drain excess fat and set aside.
  3. Add onion and bell peppers. Cook, stirring occasionally, until tender, about 3-4 minutes.
  4. Stir in garlic, Italian seasoning and red pepper flakes until fragrant, about 1 minute.
  5. Stir in diced tomatoes, tomato sauce, beef broth and ground beef; season with salt and pepper, to taste.
  6. Bring to a boil; reduce heat and simmer until flavors have blended, about 15-20 minutes.
  7. Stir in rice and parsley until heated through, about 1-2 minutes.
  8. Serve immediately.

Notes:

  • For more flavor double up on the herbs. This is also good with 2 tsp Italian seasoning in place of basil and oregano.
  • For a thinner soup don’t add all of the rice and for a thicker heartier soup add it all.
  • Also, if you plan on having it for leftovers the next day then don’t add the rice to the pot of soup, just add it to each individual bowl, then reserve the rice in a separate container in refrigerator to add to the soup the next day (otherwise it would turn into mush).

Nutritional Info:

Calories 374Calories from Fat 117

% Daily Value*

Fat 13g20%Saturated Fat 4g25%Cholesterol 49mg16%Sodium 733mg32%Potassium 1183mg34%Carbohydrates 43g14%Fiber 5g21%Sugar 12g13%Protein 22g44%Vitamin A 1604IU32%Vitamin C 73mg88%Calcium 88mg9%Iron 5mg28%

Maxican Beef and Rice Casserole

This Mexican Beef and Rice Casserole is a delicious, cheesy casserole that’s full of flavor and makes the perfect easy weeknight dinner.

If you’re tired of having the same plain dinner every night of the week, then consider this cheesy casserole recipe as the perfect solution! You could turn this into a cheesy chicken casserole by substituting chicken for the ground beef, or even adding sausage to give it a bit of a different flavor! In addition to the meat, customize this dish and make it perfect for your family by adding different vegetables or your favorite fresh salsa!

Weeknight dinners can sometimes be hard to cook, but this cheesy casserole only takes 15 minutes of prep and the oven does the rest! With ingredients like ground beef, canned corn and beans, and minute rice, you should have most if not all these ingredients in your kitchen already! This is one of those perfect weeknight dinners when you don’t want to go out to eat and need to use up what you have in the pantry.

Prep Time: 15mins

Cook Time: 30mins

Total Time: 45mins

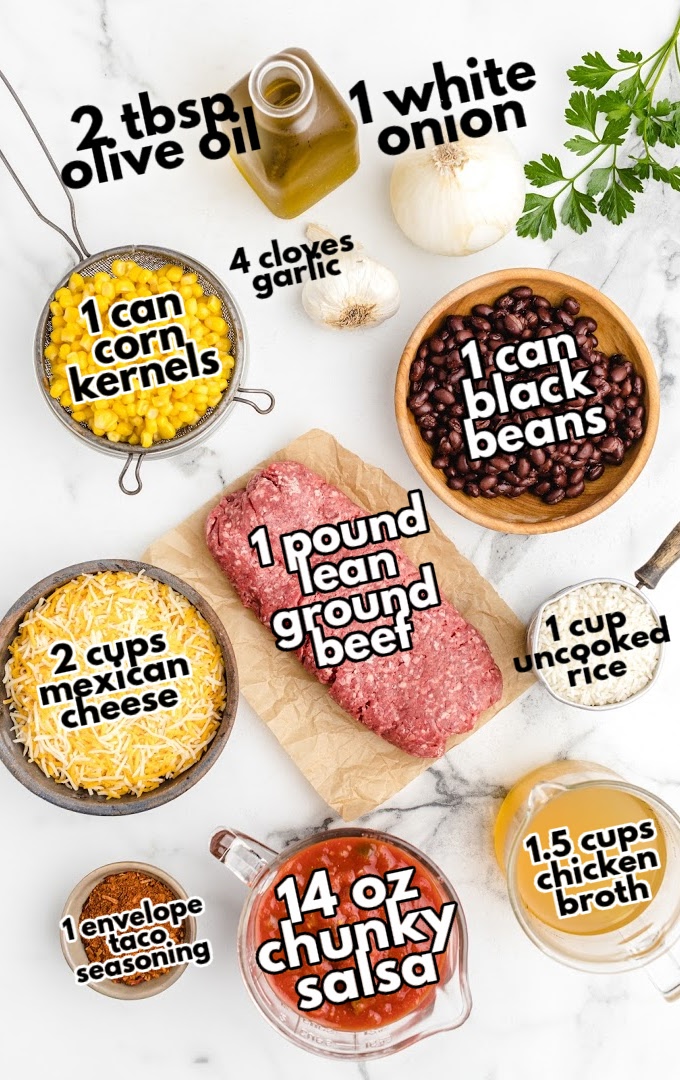
Ingredients:

Maxican beef and rice casserole

  • 2 tbsp olive oil
  • 1 white onion diced
  • 4 cloves garlic minced
  • 1 lb lean or extra lean ground beef
  • 15 oz canned corn kernels rinsed and drained
  • 15 oz canned black beans rinsed and drained
  • 1 envelope taco seasoning 2 tablespoons
  • 14 oz jar chunky salsa mild or medium
  • 1 cup minute rice uncooked
  • 1 ½ cup chicken broth low sodium
  • 2 cup shredded mexican cheese divided

Instructions:

  1. Preheat oven to 375F degrees.
  2. Spray a 9 x 13 baking dish and set aside.
  3. In a large frying pan, cook white onion and garlic with olive oil over high heat until onions have softened and garlic is just starting to brown.
  4. Pour onion mixture into the prepared baking dish.
  5. Using the same frying pan, cook ground beef over high heat.
  6. Break up beef into crumbles while baking. Be careful not to overcook, it shouldn’t be crispy.
  7. Once the meat has thoroughly cooked, drain off a bit of the grease and then pour it into the baking dish.
  8. Add corn, black beans, taco seasoning, salsa, uncooked Minute Rice, and 1 cup of shredded cheese to the baking dish and stir well to mix.
  9. Leave the remaining cheese for the top.
  10. Pour chicken broth over ingredients and mix well.
  11. Cover baking dish with foil and bake for 35 minutes.
  12. Remove from the oven and check that rice has softened.
  13. If not, place back into the oven for an additional 5 minutes and check again.
  14. If the rice has softened, remove all foil and sprinkle remaining 1 cup of cheese over top of casserole and bake (uncovered) for an additional 5 minutes to melt the cheese.
  15. Serve hot.

Notes:

  • Add Jalapenos to this recipe to give it a bit of extra spice, or use your favorite type of salsa with your preferred heat level.
  • Make this recipe vegetarian/vegan by substituting the ground beef with tofu or a vegetable like zucchini. Also, use vegetable broth instead of chicken broth.
  • Make sure to use uncooked rice in this dish. While it seems like cooking the rice before heating up the casserole would be faster, you would end up with mush instead of rice and it wouldn’t hold up very well.
  • This recipe could easily be used as a dip recipe too if you are cooking this for a potluck. Grab some scooping chips and dig in!

Nutritional Info:

Calories: 443kcal | Carbohydrates: 42g | Protein: 31g | Fat: 18g | Saturated Fat: 8g | Trans Fat: 1g | Cholesterol: 71mg | Sodium: 1026mg | Potassium: 786mg | Fiber: 8g | Sugar: 5g | Vitamin A: 587IU | Vitamin C: 8mg | Calcium: 265mg | Iron: 5mg