Green Grapes Smoothie Recipe

This simple grape smoothie is so good, and very easy to make, that it is difficult to beat. Now you can enjoy the deliciousness of a smoothie without the lines or cost.

Making a fresh grape smoothie is very simple and it tastes fabulous. Not only is this smoothie recipe the perfect treat, but it is also a healthy snack you can enjoy without guilt.

Be sure to give this easy smoothie recipe a try, or save it for later. You won’t want to miss out on this easy smoothie recipe!

 Today we are excited to show you how you can easily make a Green Grape Smoothie from scratch with only a few additional ingredients included. You can also use other types of grapes, with this same recipe to make a Concord Grape Smoothie or a Red Grape Smoothie. 

The types of grapes you use will slightly change the flavor of your smoothie. But all types taste delicious when you make this simple grape smoothie recipe.

PREP TIME: 10mins

TOTAL TIME: 10mins

COURSE: Appetizer, Breakfast, Dessert, Drinks

SERVINGS: 2 glasses

INGREDIENTS:

  • 3 cups green grapes
  • 1 cup yogurt
  • 3/4 cup apple juice
  • 1/4 tsp lemon juice

INSTRUCTIONS:

  1. Before you begin making your smoothie, it is best to buy fresh grapes, remove them from their stem, and thoroughly rinse them in cold water.
  2. After they dry, transfer the grapes to a plastic freezer bag and freeze.
  3. When your grapes are frozen solid, add to your blender along with yogurt and juice. Blend until smooth.
  4. Pour your smoothie from the blender into your serving glass.
  5. If desired top with whipped cream, then serve right away. Enjoy!


NOTES:

Any variety of grapes may be used for this recipe as long as they are seedless and have been completely frozen.

You may also choose to add a top of flavoring to this recipe if you wish. ½ tsp of vanilla or ¼ tsp of lemon juice often add a nice little bit of additional flavor.

Nutritional Info:

2 Servings Each serving is estimated to contain 222 calories. It is also estimated to contain 2.1g total fat, 7mg cholesterol, 92mg sodium, 42.8g total carbohydrates, and 7.9g protein. 

General Tso’s Chicken Recipe

General Tso’s Chicken is that perfect combination of sweet, savoury, spicy and tangy with crispy Chinese chicken bites. It’s a Chinese takeout favourite that just pushes all the right buttons

General Tso’s Chicken

This is a popular Chinese-American dish that appears in suburban Chinese restaurants here in Australia under various other guises. Peking-Style Chicken or sometimes something mysteriously titled House Special Crispy Chicken. I can never resist a House Special!

Prep Time: 15mins

Cook Time: 10mins

Course: Mains, Stir Fries

Cuisine: American Chinese, Chinese

Keyword: General Tsao’s Chicken, General Tso’s Chicken

Servings: 4 – 5 people

INGREDIENTS:

Sauce/Chicken Marinade:
  • 3 tbsp soy sauce – light or all-purpose (NOT dark soy, Note 1)
  • 1 tbsp hoisin sauce
  • 1 tbsp rice vinegar (sub white wine vinegar)
  • 2 tsp chilli paste , any (Sambal Oelak is great)
  • 1 tsp sesame oil toasted preferably (Note 6)
  • 3 tbsp brown sugar
  • 1 tbsp cornflour/cornstarch
  • 3/4 cup chicken stock/broth , low sodium
Chicken:
  • 600g/ 1.4 lb chicken thighs , boneless skinless, cut into 2.5cm / 1″ pieces (breast / tenderloin – Note 2)
  • 1 tsp ginger , finely grated
  • 1 tsp garlic ,finely grated
  • 1 cup cornflour/cornstarch (Note 5)
  • 1 – 4 cups oil, for frying (peanut, vegetable or canola; Note 4)
Stir Fry Sauce:
  • 2 tbsp oil (peanut, vegetable or canola)
  • 2 tsp ginger , finely chopped (Note 3)
  • 2 cloves garlic , finely chopped (Note 3)
  • 1/2 teaspoon red chilli flakes (red pepper flakes)
  • Garnishes (at least 1 recommended):
  • Finely sliced green onion
  • Sesame seeds

INSTRUCTIONS:

Sauce-Marinade: Mix the soy, hoisin, vinegar, chilli and sesame oil.

Marinate Chicken: Take out 2 tablespoons of Sauce-Marinade and mix with chicken. Add ginger and garlic to chicken, mix, then marinate 30 minutes.

Dust chicken: Add cornflour into chicken and toss to coat, ensuring pieces are separated so they get fully coated.

Shake off excess: Tip into a colander and shake to remove excess cornflour (or grab handfuls, shake so cornflour falls through your fingers).

Finish Sauce: To the remaining Sauce-Marinade (that you made in Step 1), add sugar and cornflour. Mix, then add chicken stock and mix.

Heat oil: Heat 2 cm / 4/5″ oil in a deep skillet (or large pot – whatever you’re comfortable with) to 200°C/390°F. To use less, see Note 4.

Fry: Cook chicken 3 minutes, turning halfway, until golden and crispy. Drain on paper towel lined plate.

New / clean skillet: Discard oil, wipe skillet and return to heat. Or use another large skillet.

Stir Fry Sauce: Heat oil in a large skillet over medium heat. Add garlic, ginger, chilli flakes, saute 30 seconds until garlic is light golden. Add Sauce, bring to simmer and stir occasionally until it thickens enough that you can draw a path across pan base.

Toss! Add chicken, toss to coat quickly – the quicker you are, the crispier the chicken stays! Transfer to serving plate, garnish and serve immediately with your rice of choice.

Notes:

1. Soy sauce – all purpose or light soy is required here. Either is fine, just don’t use dark soy sauce (labelled as such) – it will overwhelm flavour and make sauce too dark. More on different soy sauces here.

2. Chicken – thigh is best because you can be assured that it will stay juicy inside. Breast is very prone to overcooking and drying out, and especially fraught when deep frying because most people aren’t that experienced with deep or semi-deep frying.

BREAST & Tenderloin – If you really want to use breast, then tenderise the meat a bit to give yourself a bit of legroom to overcook without it drying out. Add 1/4 tsp baking soda (bi-carb) with the marinade Sauce and marinate for 1 hour or even overnight. This is a dialled back method of Tenderising Chicken the Chinese Restaurant Way (using less bicarb and marinating for longer so you don’t need to rinse it off).

3. Garlic and ginger – use a microplane or other fine grater for the chicken marinade. For stir frying, you must finely chop with a knife. If you use a garlic press or microplane grater, the garlic and ginger gets too wet and paste-like, so it burns in a flash when stir fried.

4. Amount of oil to use – it’s best to use enough oil so it comes at least halfway up the side of the chicken (from the base of pan) so you only need to turn it once to get nice crispy chicken (ie. shallow frying). You could also use more oil – enough so the chicken is bobbing in the oil – which will give a more even crispy coating all around (ie. deep frying).

Using minimal oil – If you don’t want to fry and want to use as little oil as possible, then just cover the base of the pan with a slick of oil over medium-high heat. Cook the chicken for 3 – 4 minutes in total, turning to crisp up as many sides of the chicken as you can (this is tedious, which is why I shallow fry!)

5. Cornflour for coating – I know 1 cup sounds like a lot for 600g/1.2 lb of chicken. I err on the side of generous here to ensure there is enough to properly coat the chicken all over using the mixing then shaking off method. You lose a fair amount due to the cornflour clumping from the chicken juices / marinade. You could probably get away with 3/4 cup if you toss really well and quickly. Or, if you dipped each piece of chicken into cornflour one by one then shook off the excess, you could get away with 1/2 cup.

6. Sesame oil – toasted sesame oil is brown and has more flavour than untoasted (which is yellow). Default sesame oil sold in Australia is toasted, untoasted is harder to find.

7. Storage and reheating – Will keep in fridge for up to 5 days. Can be reheated (add a little water if sauce too thick), however the chicken will not be crispy. That said, everybody who’s reheated their leftovers still loved it!

9. Nutrition per serving, excluding rice, and assuming all sauce is consumed.

Nutritional Info:

Calories: 465cal | Carbohydrates: 22g | Protein: 32g | Fat: 28g | Saturated Fat: 14g | Cholesterol: 143mg | Sodium: 974mg | Potassium: 446mg | Fiber: 1g | Sugar: 10g | Vitamin A: 110IU | Vitamin C: 1mg | Calcium: 26mg | Iron: 2mg

Maxican Tortilla Casserole Recipe

This Maxican Tortilla Casserole is perfect for making on busy weeknights when you need something quick and delicious that everyone will eat!

This is an easy dinner recipe, and we all need some of those, right? We love tacos in our house, and we make them often. But enchiladas are awesome too. I love this recipe to make for two people, because that means there are plenty of leftovers to eat for a day or two. It’s delicious comfort food!

PREP TIME: 25mins

COOK TIME: 35mins

TOTAL TIME: 1hr

COURSE: Main Course

CUISINE: Mexican

SERVINGS: 4 servings

INGREDIENTS:

  • 1 lb. ground beef
  • 1/2 cup diced onion
  • 1 pack taco seasoning mix
  • 2 cups shredded cheddar cheese
  • 1 can refried beans (thet spread easier if you warm them in microwave)
  • 1 cup prepared rice (I used Minute Rice)
  • 1 can Mexican blend corn (DRAINED)will only use about 1/2 can
  • 4-5 large flour tortillas
  • 8 oz of thick chunky salsa (your choice mild or hot)

PREPARATIONS:

  1. Spray a spring form, round cake pan or casserole with cooking spray
  2. Brown ground beef ,and onion and drain
  3. Add taco seasonings and cook according to package direction
  4. Lay 1 tortilla in bottom of baking dish and spread 1/3 of bean on it ,top with 1/3 of the meat and sprinkle on some cheese .
  5. 2nd layer tortilla, 1/2 the rice, 1/2 salsa, 1/2 the corn and cheese
  6. 3rd layer tortilla, 1/3 beans ,1/3meat, cheese
  7. 4 layer tortilla . beans ,meat, corn, rice, salsa and cheese
  8. Bake covered with foil at 350 for about 40 minutes uncover and bake 10-15 minutes longer.
  9. Let sit 5 minutes before cutting .
  10. After baking top with sour cream,diced onion and shredded lettuce if desired

NUTRITIONAL INFO:

Serving: 1servingCalories: 535kcalCarbohydrates: 13gProtein: 44gFat: 34gSaturated Fat: 17gPolyunsaturated Fat: 1gMonounsaturated Fat: 11gTrans Fat: 1gCholesterol: 149mgSodium: 1783mgPotassium: 602mgFiber: 2gSugar: 6gVitamin A: 1094IUVitamin C: 13mgCalcium: 450mgIron: 5mg

Salisbury Steak with Onion Gravy Recipe

Salisbury Steak with Onion Gravy is an easy old-fashioned comfort food. Homemade from scratch with tender beef patties and rich brown onion gravy in only 40 minutes.

Prep Time: 10minutes

Cook Time: 30minutes

Total Time: 40minutes

INGREDIENTS:

▢1 pound ground beef

▢⅓ cup Panko bread crumbs

▢2 teaspoons ketchup

▢1 teaspoon mustard – regular yellow or dijon

▢1 teaspoon Worcestershire sauce

▢½ teaspoon garlic powder

▢½ teaspoon onion powder – optional, use if not doing onion in gravy

Gravy

▢1 onion – optional if not using mushrooms

▢½ cup sliced mushrooms – optional if not using onion

▢1 teaspoon oil

▢2 cups beef broth

▢4 tablespoons flour

▢1 teaspoon ketchup

▢½ teaspoons Worcestershire sauce

▢salt and pepper to taste

INSTRUCTIONS:

  1. If you want caramelized onions or mushrooms in your gravy, start by thin-slicing a small onion or about 5 oz of mushrooms. Cook with 1 teaspoon oil over medium-high heat until nicely brown onions or cooked mushrooms. About 7-8 minutes for the onion, or saute the mushrooms until cooked. Set aside in a bowl.
  2. In a large mixing bowl, combine 1 pound of ground beef with ⅓ cup Panko breadcrumbs, 2 teaspoons ketchup, 1 teaspoon mustard and Worcestershire sauce, and ½ teaspoon garlic powder. If not doing the onions, then add ½ teaspoon onion powder.
  3. Divide the hamburger mixture into 3-4 equal portions. A quarter-size indent in the middle of one side prevents puffing up of the patties and makes cooking evener.
  4. Place steak patties in a large frying pan with a teaspoon of oil over medium-high heat. Flip about every 5-6 minutes until an internal temperature of 165°. It takes about 15-20 minutes, depending on the thickness, the pan, and the burners.
  5. Place steak patties in a large frying pan with a teaspoon of oil over medium-high heat. Flip about every 5-6 minutes until an internal temperature of 165°. It takes about 15-20 minutes, depending on the thickness, the pan, and the burners.
  6. Slowly add the flour-broth mixture while continuing to whisk. Add 1 teaspoon ketchup and ½ teaspoon Worcestershire sauce. Add salt and pepper to taste.
  7. Whisk until nicely thickened, a few minutes. If using the caramelized onions or mushrooms, add them to the gravy and mix well.
  8. Whisk until nicely thickened, a few minutes. If using the caramelized onions or mushrooms, add them to the gravy and mix well.

Recipe Notes

Pro Tips

Use the ground meat you like. Make the patties ¼ to ⅓ pound. ½ pound will not cook well on the stovetop.

Don’t chop the onion. Cut into rings and maybe cut the larger ones in half.

You can easily use mushrooms in place of or in addition to the onions in the gravy. They will cook faster than the onion. Do not add either to the gravy raw.

Use the depression in the center of the patties. It will help prevent them from puffing up during cooking, and they will cook more evenly.

Be sure to cook the patties to 165° minimum.

NUTRITIONAL INFO:

Calories : 362.2 kcal (18%)

Carbohydrates : 16.7 g (6%)

Protein : 32.4 g (65%)

Fat : 17.5 g (27%)

Saturated Fat : 6.3 g (32%)

Polyunsaturated Fat : 1 g

Monounsaturated Fat : 7.6 g

Trans Fat : 1.1 g

Cholesterol : 97.5 mg (33%)

Sodium : 447.4 mg (19%)

Potassium : 740 mg (21%)

Fiber : 1.2 g (5%)

Sugar : 2.8 g (3%)

Vitamin A : 22.5 IU

Vitamin C : 2.6 mg (3%)

Calcium : 51.6 mg (5%)

Iron : 4.1 mg (23%)


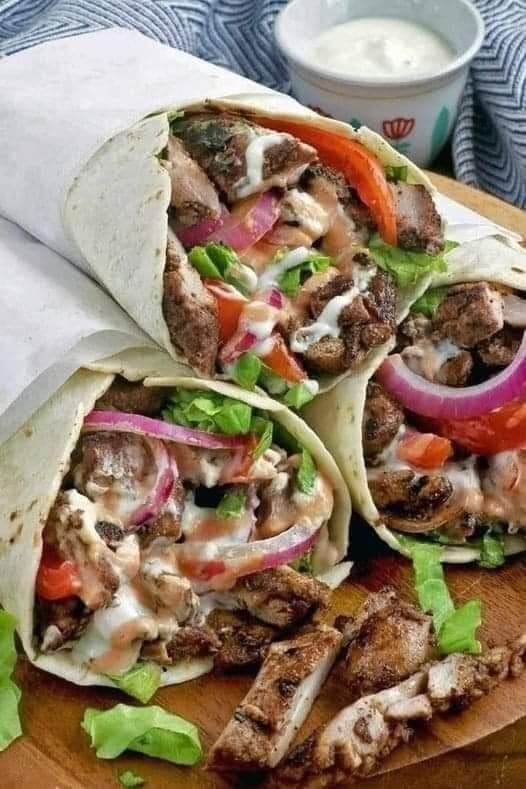
Homemade Chicken Shawarma Recipe

 Here is how to make delicious chicken shawarma with a flavorful marinade and yogurt sauce, served with pita bread, vegetables, and optional hot sauce.

Course: dinner

Cuisine: middle eastern

Keyword: chicken, shawarma

Prep Time: 10minutes

Cook Time: 15minutes

Marinating time: 2hours 

Servings: 6 people

INGREDIENTS:

Chicken

  • 2lbs boneless boneless skinless chicken thighs

Marinade

  • 1/4 cup plain Greek yogurt
  • 1/4 cup olive oil
  • 1/4 cup lemon juice about 2 lemons
  • 6 cloves garlic minced
  • 1 tsp ground cumin
  • 2 tsp paprika
  • 1 tsp ground turmeric
  • 1 tsp ground coriander
  • 1/2 tsp ground cinnamon
  • 1/4 tsp cayenne pepper
  • salt and pepper to taste

Assembling:

Topping Ideas: sliced tomatoes cucumber, lettuce, pickles, tahini sauce, or garlic sauce

INSTRUCTIONS:

Marinate:

In a large bowl, combine the Greek yogurt, olive oil, lemon juice, minced garlic, cumin, paprika, turmeric, coriander, cinnamon, cayenne pepper, salt, and black pepper. Mix well to create the marinade.

Add the chicken thighs to the marinade, ensuring each piece is well coated. Cover the bowl with plastic wrap and refrigerate for at least 2 hours, preferably overnight for maximum flavor.

Cook:

Remove the chicken from the marinade, allowing any excess to drip off.

Stovetop: Heat a large non-stick skillet or cast-iron pan over medium-high heat. Add 2 tablespoons of olive oil to the pan, and let it heat up. Add the marinated chicken. Sauté the chicken for 6-8 minutes on each side, or until fully cooked and golden brown. If needed, cook the chicken in batches to avoid overcrowding the pan.

Oven method: Preheat your oven to 425°F (220°C). Line a large baking sheet with parchment paper. Arrange the chicken thighs on the prepared baking sheet. Bake for 25-30 minutes, or until the chicken is cooked through and the edges are slightly charred.

While the chicken is cooking, prepare your desired toppings and warm up your pita or flatbread.

Once the chicken is cooked, remove it from the oven and let it rest for 5 minutes. Chop into bite-size or slice the chicken into thin strips.

Assemble:

To assemble the shawarma, spread a layer of tahini or garlic sauce onto the warm pita or flatbread. Add the sliced chicken and your choice of toppings.

Wrap the filling with the flatbread, and enjoy your delicious homemade chicken shawarma.

Don’t forget napkins—this tasty dish can get a little messy!

Nutritional Info:

Calories: 358.9kcal | Carbohydrates: 3.1g | Protein: 30.1g | Fat: 24.8g | Saturated Fat: 7.8g | Polyunsaturated Fat: 1.6g | Monounsaturated Fat: 13.3g | Cholesterol: 89.6mg | Sodium: 103.4mg | Potassium: 610.3mg | Fiber: 0.7g | Sugar: 0.7g | Vitamin A: 369IU | Vitamin C: 5.1mg | Calcium: 36.9mg | Iron: 4mg

Caramelized Maple Walnuts Recipe

Caramelized Maple Walnuts are my latest addiction around here. Just pure maple syrup, walnuts and a few minutes of time in the skillet, and you’ve got delicious candied walnuts for a myriad of uses.

Caramelized Maple Walnuts: my newest addiction. Pure maple syrup makes a lovely candied walnut. Perfection in trail mix, salads, ice cream, oatmeal & more!

I’m already planning ahead for the holidays, and these Caramelized Maple Walnuts are the perfect fall treat. They make great nibbles at Thanksgiving and are perfect for mailing in holiday packages and tucking into Christmas stockings.

Pure maple syrup makes a lovely candied walnut. Perfection in trail mix, salads, ice cream, oatmeal & more! Perfect snack for your sweet tooth!

 Course: Nuts

 Prep Time: 5minutes

 Total Time: 5minutes

 Servings: 1 generous cup

INGREDIENTS:

  • 1 cup walnuts
  • 1/4 cup maple syrup

INSTRUCTIONS:

  1. Place walnuts in medium skillet.
  2. Pour maple syrup on top and gently stir to coat.
  3. Cook over medium heat until bubbling, stirring every few minutes.
  4. Syrup will begin to caramelize after about five minutes or so. Watch closely.
  5. When syrup is sticking to walnuts and there’s not so much liquid left in the skillet, remove from heat.
  6. Quickly (and carefully!) place separately on parchment paper to harden.
  7. Once dry and hardened, store in airtight container until needed.