🌮 Cheesy Baked Chicken Roll-Ups

This recipe is known for its creamy filling and crispy baked shell.

📝 Ingredients

Component Item Quantity Notes
For the Filling Cooked Chicken, shredded 2 cups Rotisserie chicken works great!
Cream Cheese, softened 8 oz
Shredded Cheese 1 cup Colby Jack, Monterey Jack, or a Mexican blend.
Salsa (red or green) 1/4 cup Mild or hot, to your taste.
Sour Cream or Plain Greek Yogurt 1/4 cup
Ground Cumin 1/2 tsp
Chili Powder 1/2 tsp Can substitute with garlic powder/onion powder.
Salt and Pepper To taste
For the Roll-Ups Flour Tortillas (6-8 inches) 8-10 Taco or fajita size.
Cooking Spray or Olive Oil For brushing
Extra Shredded Cheese A little Optional, for topping.


👩‍🍳 Instructions

1. Prepare for Baking

  • Preheat Oven: Preheat your oven to $425^\circ\text{F}$ ($220^\circ\text{C}$).

  • Prep Pan: Line a baking sheet with parchment paper or spray it with cooking spray.

2. Make the Filling

  • In a large bowl, combine the softened cream cheese, shredded cheese, salsa, sour cream/yogurt, cumin, chili powder, and salt/pepper.

  • Mix well until everything is creamy and well-combined.

3. Mix in Chicken

  • Stir the shredded cooked chicken into the cream cheese mixture until it is evenly distributed.

4. Prep and Fill Tortillas

  • Warm Tortillas: To make them easier to roll without cracking, lightly warm the tortillas in the microwave for about 10-20 seconds (stacked between damp paper towels).

  • Fill: Spoon about 2-3 tablespoons of the chicken mixture onto the lower third of a warmed tortilla. Spread it in a line, leaving a little space on the sides.

  • Roll: Roll the tortilla up tightly and place it seam-side-down on the prepared baking sheet. Repeat with the remaining tortillas.

5. Bake

  • Lightly spray or brush the tops of the rolled tortillas with olive oil or cooking spray.

  • (Optional): Sprinkle the tops with a little extra shredded cheese for a more browned, cheesy finish.

  • Cook: Bake for 15-20 minutes, or until the roll-ups are golden brown and crispy, and the cheese is melted and bubbly.

6. Serve

  • Let them cool slightly before serving with your favorite toppings like extra salsa, sour cream, guacamole, or a sprinkle of fresh cilantro/parsley.


Creamy Cucumber Chickpea Salad

Creamy Cucumber Chickpea Salad — Complete Recipe
Ingredients:
For the Salad:
1 can (15 oz / 400g) chickpeas, rinsed and drained
1 large cucumber, sliced or chopped
ÂĽ cup red onion, finely diced
2 tbsp fresh dill, chopped (or to taste)
Optional: ÂĽ cup chopped fresh parsley
Salt & black pepper, to taste
For the Creamy Dressing:
½ cup plain Greek yogurt (or use dairy-free yogurt)
1 tbsp olive oil
1–2 tsp lemon juice (or vinegar)
1 clove garlic, finely minced or grated
Salt & pepper, to taste
Instructions:
Prep the veggies: Slice cucumber, dice red onion, and chop dill and parsley.
Make the dressing: In a bowl, whisk together yogurt, olive oil, lemon juice, garlic, salt, and pepper.
Mix it all together:
In a large bowl, combine chickpeas, cucumber, red onion, and herbs.
Pour the dressing over and toss well to coat everything evenly.
Chill (optional): Refrigerate for 15–30 minutes for best flavor.
Serve: Top with extra dill or black pepper before serving.

Cheesy Baked Meat & Potato “Pillows”

Cheesy Baked Meat & Potato “Pillows”

Yields: 6–8 individual portions | Prep time: 20 mins | Bake time: 40 mins

Ingredients

The Meat Base:

  • 2.2 lb (1 kg) Ground beef (lean is best to avoid excess grease)

  • 2 oz (60 g) Breadcrumbs

  • 1 Large egg

  • 1 Carrot, finely grated

  • 1 Green onion, chopped

  • 1 Red onion, finely diced

  • 1 Garlic clove, minced

  • 2 tbsp Fresh dill, chopped

  • Seasoning: Salt, ground black pepper, and dried garlic (to taste)

The Topping & Layers:

  • 3.5 oz (100 g) Sour cream

  • 2.8 oz (80 g) Mayonnaise

  • 10.6 oz (300 g) Mushrooms, finely sliced or chopped

  • 2 Tomatoes, thinly sliced

  • 7 oz (200 g) Mozzarella cheese, shredded

  • Garnish: Paprika and fresh parsley


Step-by-Step Instructions

1. Prepare the Meat Mixture

Preheat your oven to 375°F (190°C). In a large mixing bowl, combine the ground beef, breadcrumbs, egg, grated carrot, onions, garlic, and dill. Season generously with salt, pepper, and dried garlic. Mix by hand until well combined but do not overwork the meat (this keeps them tender).

2. Shape the Portions

Instead of a flat layer, shape the meat into large, thick patties (about 1.5 inches thick) and place them on a greased baking sheet or in a large baking dish with space between them. Use your thumb to make a slight indentation in the center of each patty—this creates a “well” for the toppings.

3. Layer the Flavor

  • Cream Base: Mix the sour cream and mayonnaise in a small bowl. Spread a dollop onto each meat patty.

  • Vegetables: Press a few mushroom slices and a slice of tomato into the cream on top of each patty.

  • The Cheese: Pile a generous mound of mozzarella over the top of each portion.

  • Final Touch: Spread a tiny bit more of the cream mixture over the cheese (this helps it brown without burning) and sprinkle with paprika.

4. The Bake

Cover the tray loosely with foil (try not to let it touch the cheese). Bake for 30 minutes. Remove the foil and bake for another 10–15 minutes until the cheese is bubbly and has those characteristic golden-brown spots seen in your photo.

5. Rest and Serve

Let the dish rest for 5–10 minutes before serving. This allows the juices to redistribute so the meat stays moist. Garnish with fresh parsley.


Chef’s Pro-Tips

  • Moisture Control: If your mushrooms are very fresh/watery, sautĂ© them for 3 minutes in a pan before putting them on the meat to prevent the “pillows” from sitting in too much liquid.

  • The “Picky Eater” Hack: If someone dislikes mushrooms, swap them for a thin layer of pre-boiled potato slices or even a spoonful of caramelized onions.

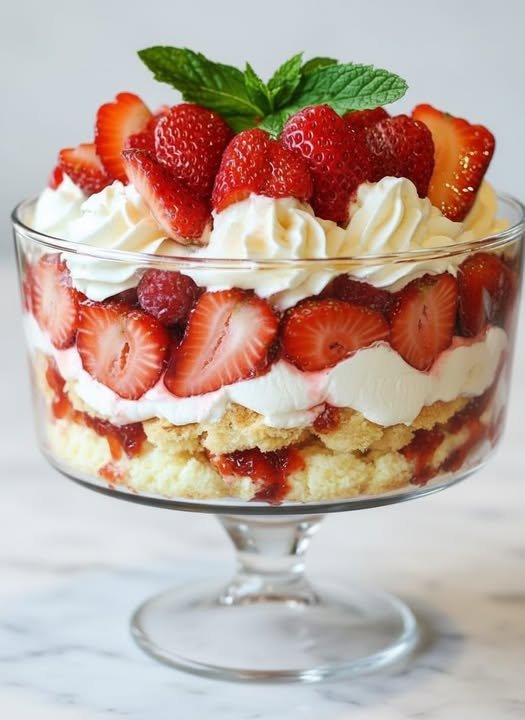
Easy Homemade Strawberry Trifle Recipe – Layered Summer Dessert

Welcome to Chef Emma’s kitchen, where elegance meets simplicity! This delight is a true showstopper, perfect for any gathering or a sweet weekend treat. Layers of fluffy sponge cake, sweet strawberry jam, fresh vibrant strawberries, and luscious whipped cream come together in a symphony of flavors and textures that will tantalize your taste buds. It’s a dessert that not only looks incredible but is also incredibly easy to assemble, making you look like a culinary genius with minimal effort!


📜 Ingredients

2 pounds fresh ripe strawberries, hulled and sliced (reserve some whole for garnish)

1/4 cup granulated sugar

1 tablespoon fresh lemon juice (optional, enhances strawberry flavor)

1 pound vanilla sponge cake or pound cake, store-bought or homemade, cut into 1-inch cubes

1 cup good-quality strawberry jam or preserves

2 cups heavy cream, very cold

1/2 cup powdered sugar (confectioners’ sugar)

1 teaspoon pure vanilla extract

Fresh mint leaves for garnish

📝 Instructions

  1. In a medium bowl, combine the sliced strawberries with the granulated sugar and lemon juice (if using). Gently stir and let them sit for at least 15-20 minutes to macerate, releasing their delicious juices.
  2. While the strawberries are macerating, prepare your whipped cream. In a large, chilled bowl using an electric mixer with a whisk attachment (or a hand whisk), beat the very cold heavy cream, powdered sugar, and vanilla extract on medium-high speed until stiff peaks form. Be careful not to overbeat, or it will turn grainy.
  3. To assemble the trifle, choose a large, clear glass trifle bowl (about 3-4 quart capacity) for best presentation.
  4. Start by arranging a layer of half the sponge cake cubes at the bottom of the bowl. Gently press them down to create an even base.
  5. Spoon half of the strawberry jam over the cake layer, spreading it evenly.
  6. Next, spoon half of the macerated strawberries (including their juices) over the jam.
  7. Top with a generous layer of half of the freshly whipped cream, spreading it to cover the strawberries.
  8. Repeat the layers: add the remaining cake cubes, followed by the rest of the strawberry jam, then the remaining macerated strawberries.
  9. Finish with the remaining whipped cream, creating beautiful swirls or peaks on top.
  10. Garnish the trifle spectacularly with the reserved whole strawberries (and any extra sliced ones) and fresh mint leaves for a pop of color.
  11. Refrigerate the trifle for at least 2-4 hours, or preferably overnight, to allow the flavors to meld and the cake to soak up all the delicious juices. Serve chilled.

đź’ˇ Chef’s Tips

  • Make Ahead Magic: This trifle is even better when made a day in advance! The flavors deepen, and the cake becomes wonderfully moist. Just add the final mint garnish just before serving.
  • Berry Bliss: Feel free to mix and match your berries! Raspberries or blueberries would be a fantastic addition alongside or instead of strawberries for a mixed berry trifle.

10-Minute No-Bake Chocolate Cheesecake

10-Minute No-Bake Chocolate Cheesecake

Ingredients

The Base:

  • 200 g Biscuits (Digestives, Graham crackers, or Oreo-style cookies), finely crushed

  • 1 tbsp Bitter cocoa powder

  • 100 g Unsalted butter, melted

The Chocolate Cream:

  • 600 g Spreadable cream cheese or Mascarpone (at room temperature)

  • 100 g Dark chocolate, melted and slightly cooled

  • 80 g Powdered sugar (adjust to taste)

  • 1 tsp Vanilla extract

  • Optional: 200 ml heavy whipping cream (if you want a lighter, fluffier texture)

Topping:

  • Grated dark chocolate or chocolate shavings


Instructions

  1. Prepare the Base: In a medium bowl, mix the crushed biscuits with the cocoa powder. Pour in the melted butter and stir until it looks like wet sand.

  2. Press the Crust: Press the mixture firmly into the bottom of a 20 cm (8-inch) springform pan lined with parchment paper. Use the back of a spoon to level it. Pop it in the freezer for 5 minutes while you make the filling.

  3. Mix the Cream: In a large bowl, beat the cream cheese (or mascarpone) with the powdered sugar and vanilla until smooth.

  4. Add Chocolate: Slowly pour the melted chocolate into the cream cheese mixture while whisking constantly to prevent lumps. Note: If using heavy cream, whip it separately to soft peaks and fold it in now.

  5. Assemble: Pour the chocolate cream over the chilled biscuit base and smooth the top with a spatula.

  6. Chill: Though the prep takes 10 minutes, let it set in the fridge for at least 4 hours (or 1 hour in the freezer if you are in a rush) to ensure clean slices.

  7. Serve: Finish with a generous layer of grated chocolate shavings before serving.

Creamy Pineapple Pastry Cake

Creamy Pineapple Pastry Cake

Ingredients

The Pastry:

  • 500 g Puff pastry dough (store-bought or homemade)

  • 3 tbsp Sugar (for sprinkling)

  • Powdered sugar (for dusting)

The Filling:

  • 300 g Canned pineapple, drained and chopped into small cubes

  • 500 ml Whole milk

  • 4 Egg yolks

  • 100 g Sugar

  • 40 g Cornstarch

  • 1 tsp Vanilla extract or cinnamon (to match your “Cinnamon Twists” theme)

  • Optional: 100 g whipped cream (to fold into the custard for a lighter “Diplomat Cream”)


Instructions

1. Bake the Pastry Layers

  • Preheat your oven to 200°C (400°F).

  • Roll out the puff pastry and cut two circles (or squares) to fit your pan.

  • Place them on a baking sheet lined with parchment paper. Prick one layer thoroughly with a fork (this will be the bottom).

  • For the top layer, score it lightly into portions (like the diamonds seen in the photo) to make it easier to cut later. Sprinkle with 3 tbsp of sugar.

  • Bake for 15–20 minutes until golden brown and puffed. Let cool completely.

2. Prepare the Custard (Pastry Cream)

  • In a saucepan, heat the milk and vanilla (or a cinnamon stick) until it just begins to simmer.

  • In a separate bowl, whisk the egg yolks, sugar, and cornstarch until pale.

  • Slowly pour half of the hot milk into the egg mixture while whisking constantly to temper the eggs.

  • Pour the mixture back into the saucepan with the remaining milk. Cook over medium heat, stirring constantly, until it thickens into a thick custard.

  • Remove from heat, stir in the chopped pineapples, and let it cool completely. (Fold in whipped cream now if using).

3. Assembly

  • Place the flat pastry layer at the bottom of a springform pan.

  • Pour the pineapple custard mixture over the base and smooth it out.

  • Place the pre-scored pastry layer on top.

  • Refrigerate for at least 4 hours to allow the cream to set firmly.

4. Finishing Touches

  • Dust the top generously with powdered sugar before serving.

  • Serve alongside Rose-Infused Tea: Simply steep your favorite black or green tea with dried culinary rosebuds for 3–5 minutes.