Stuffed Potato Patties with Mushroom Filling

Stuffed Potato Patties with Mushroom Filling

Crispy on the outside, creamy inside, with a savory mushroom and cheese center and a bright dill yogurt sauce

Prep Time: 40–50 minutes
Cook Time: 20–25 minutes
Total Time: 1 hour 10–15 minutes
Servings: 6

These patties combine smooth mashed potatoes, flavorful mushroom filling, and melty mozzarella, coated and fried to golden perfection. Served with dill yogurt sauce, they make an elegant appetizer or a hearty main course.


Ingredients

For the Potato Mixture

  • 1 kg (2.2 lbs) starchy potatoes (Russet or Yukon Gold)

  • 2 large eggs, beaten

  • 15 g (2 tablespoons) all-purpose flour

  • 1 teaspoon fine sea salt

  • ½ teaspoon freshly ground black pepper

For the Mushroom Filling

  • 400 g (14 oz) fresh mushrooms, finely chopped

  • 1 medium onion, finely diced

  • 1 large carrot, grated

  • 45 g (3 tablespoons) unsalted butter

  • 100 g (3.5 oz) mozzarella, cut into small cubes

  • Salt and pepper to taste

For Coating and Frying

  • 120 g (1 cup) all-purpose flour

  • 1 large egg, beaten

  • Additional butter for frying

For the Dill Yogurt Sauce

  • 2 tablespoons (30 g) plain yogurt

  • 2 tablespoons fresh dill, finely chopped

  • Pinch of salt


Step-by-Step Instructions

1. Prepare the Mashed Potatoes

  1. Peel and cut potatoes into uniform chunks.

  2. Place in cold, salted water and bring to a boil.

  3. Cook until tender when pierced with a fork (about 15–20 minutes).

  4. Drain thoroughly and return potatoes to the pot over low heat for 1–2 minutes to remove excess moisture.

  5. Mash while hot until completely smooth.

  6. Add 2 beaten eggs, 2 tablespoons flour, salt, and pepper. Mix until combined but do not overmix.

  7. Let the mixture cool until comfortable to handle.


2. Make the Mushroom Filling

  1. Finely chop mushrooms with a knife or food processor.

  2. Melt butter in a large skillet over medium heat.

  3. Add diced onion and cook until soft and translucent (5–6 minutes).

  4. Add grated carrot and cook 2–3 minutes until softened.

  5. Add chopped mushrooms and increase heat to medium-high. Cook, stirring frequently, until all moisture evaporates (8–10 minutes).

  6. Season generously with salt and pepper.

  7. Transfer to a bowl and let cool completely.


3. Assemble the Patties

  1. Place 1 cup of flour on a shallow plate for coating.

  2. Take about 3 tablespoons of the potato mixture and flatten in your palm.

  3. Make a small well in the center.

  4. Place 1 tablespoon mushroom filling and a cube of mozzarella in the well.

  5. Fold edges over to enclose filling completely. Shape into an oval patty about 3 inches long.

  6. Coat thoroughly in flour, shaking off excess.

  7. Repeat with remaining mixture.


4. Cook the Patties

  1. Heat 2 tablespoons butter in a large skillet over medium heat.

  2. Dip flour-coated patties in beaten egg.

  3. Place patties in the hot pan without overcrowding.

  4. Fry 3–4 minutes per side until golden brown and crispy.

  5. Transfer to paper towels to drain excess butter.

  6. Keep warm in a 200°F oven while cooking remaining batches.


5. Prepare the Dill Yogurt Sauce

  • In a small bowl, combine yogurt, chopped dill, and a pinch of salt.

  • Refrigerate until ready to serve.


Tips for Success

  • Use starchy potatoes for a fluffy, smooth texture.

  • Ensure mashed potatoes and filling are cooled before assembly to prevent breakage.

  • If the potato mixture is too soft, chill in the refrigerator for 30 minutes.

  • Test oil temperature with a small piece of mixture; it should sizzle gently.

  • Don’t flip patties too early—wait until a golden crust forms.


Storage and Reheating

  • Uncooked Patties: Store between layers of parchment paper in the fridge for up to 24 hours.

  • Cooked Patties: Keep in an airtight container in the fridge for 2–3 days. Reheat in a 350°F oven for 10–12 minutes.

  • Dill Sauce: Refrigerate for up to 3 days.


Nutrition (Per Serving, Serves 6)

  • Calories: 380 kcal

  • Total Fat: 15 g

  • Saturated Fat: 8 g

  • Cholesterol: 120 mg

  • Sodium: 450 mg

  • Total Carbohydrates: 52 g

  • Dietary Fiber: 4 g

  • Protein: 12 g

  • Iron: 10% DV

  • Calcium: 15% DV

Egg Muffins – Quick & Nutritious Breakfast

Egg Muffins – Quick & Nutritious Breakfast

High in protein, low in carbs, and fully customizable

Prep Time: 10 minutes
Cook Time: 18–22 minutes
Total Time: 30 minutes
Yield: 6 muffins

Egg muffins are a versatile breakfast or snack option. You can add your favorite vegetables, meats, or cheeses, making them ideal for low-carb, keto, or meal-prep-friendly diets.


Ingredients

  • 6 large eggs

  • ¼ cup (60 ml) milk (or unsweetened almond/oat milk for dairy-free)

  • ½ cup shredded cheese (cheddar, feta, or your choice; optional for dairy-free)

  • ½ cup chopped vegetables (bell peppers, spinach, green onions, mushrooms, zucchini, etc.)

  • ¼ cup cooked bacon or ham (optional)

  • Salt and pepper to taste

  • ½ teaspoon garlic powder (optional)

  • ½ teaspoon paprika (optional)


Step-by-Step Instructions

1. Preheat the Oven

Preheat your oven to 375°F (190°C).
Lightly grease a 6-cup muffin tin with cooking spray, oil, or butter. Silicone muffin cups can also be used.


2. Prepare Ingredients

  • Chop your vegetables into small pieces.

  • Dice cooked bacon or ham if using.

  • Pre-sauté watery vegetables (like mushrooms or spinach) for 2–3 minutes to prevent soggy muffins.


3. Whisk the Eggs

In a large bowl, whisk together the eggs, milk, salt, pepper, garlic powder, and paprika until smooth and slightly frothy.
This ensures fluffy muffins with evenly distributed seasoning.


4. Assemble the Muffins

  • Divide the chopped vegetables and cooked meat evenly among the muffin cups.

  • Pour the egg mixture over the fillings, filling each cup about ¾ full.

  • Top each with shredded cheese, if using.


5. Bake

Place the muffin tin in the preheated oven.
Bake for 18–22 minutes, or until the egg muffins are set and lightly golden on top.
A toothpick inserted in the center should come out clean.


6. Cool and Serve

  • Allow the muffins to cool for a few minutes before removing them from the tin.

  • Serve warm, or store for meal prep.


Tips for Perfect Egg Muffins

  • Grease Well: Prevents sticking; silicone cups work best.

  • Whisk Thoroughly: Ensures light, fluffy muffins.

  • Do Not Overfill: Fill ¾ full to prevent overflow.

  • Cool Slightly Before Removing: Prevents breaking.

  • Storage & Reheating: Refrigerate in an airtight container for up to 5 days; microwave for 30–45 seconds to reheat.

  • Freezing: Let muffins cool completely, then freeze in airtight containers or freezer bags for up to 3 months. Reheat 1–2 minutes in the microwave.

Garlic, Lemon, and Honey Drink for Respiratory Comfort

Garlic, Lemon, and Honey Drink for Respiratory Comfort

A natural remedy to soothe the throat, reduce coughing, and support lung health

Prep Time: 5 minutes
Cook/Steep Time: 5 minutes
Yield: 1–2 servings

This simple drink combines garlic, lemon, and honey to create a soothing beverage that may help reduce coughing, clear mucus, and support respiratory wellness. It is a gentle, natural option that can be prepared easily at home.


Ingredients

  • 2 cloves garlic, peeled and crushed
    Garlic has natural antibacterial and antiviral properties that may support respiratory health.

  • 1 lemon, juiced
    Rich in vitamin C and antioxidants to support the immune system.

  • 1 tablespoon honey (preferably raw or organic)
    Soothes the throat and adds mild antimicrobial properties.

  • 2 cups water


Step-by-Step Instructions

1. Prepare the Ingredients

  • Peel and crush the garlic cloves to release their natural oils.

  • Juice the lemon carefully, removing any seeds.


2. Boil the Water

  • In a small pot, bring 2 cups of water to a gentle boil.


3. Steep Garlic and Lemon

  • Add the crushed garlic and lemon juice to the boiling water.

  • Reduce the heat to low and let it simmer for 5 minutes to extract the beneficial compounds from the garlic and lemon.


4. Strain and Sweeten

  • Pour the liquid through a strainer into a cup to remove the garlic pieces (optional: you may leave them in for a stronger flavor).

  • Stir in 1 tablespoon of honey while the liquid is still warm until fully dissolved.


5. Serve

  • Drink the beverage warm.

  • Recommended intake: 1–2 cups per day, for up to three days.


Notes and Tips

  • Gentle on the Stomach: If you have a sensitive stomach, reduce the garlic to 1 clove or drink the mixture with food.

  • Stronger Flavor: Leaving the garlic in the drink will intensify the flavor and medicinal potency.

  • Adjust Sweetness: You can add extra honey if desired, but keep in mind it increases sugar content.

  • Storage: Best consumed fresh. Any leftovers can be stored in the refrigerator for up to 24 hours and warmed before drinking.


Benefits

  • Respiratory Support: Helps soothe the throat, reduce coughing, and may loosen mucus.

  • Immune Boosting: Garlic and lemon provide antioxidants and compounds that support the immune system.

  • Natural Relief: Offers a simple, chemical-free way to ease mild bronchial discomfort.


Safety and Considerations

  • Not a Cure: This drink helps relieve symptoms but does not cure bronchitis. Consult a healthcare professional if symptoms are severe or persistent.

  • Allergies: Ensure you are not allergic to garlic, honey, or citrus before consuming.

  • Children: Honey should not be given to children under 1 year old.

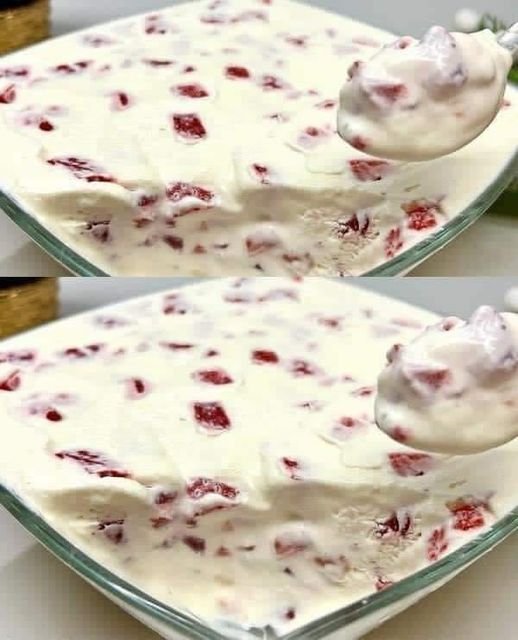
Homemade 3-Ingredient Strawberry Ice Cream

Homemade 3-Ingredient Strawberry Ice Cream

No gelatin, no ice cream machine—just creamy, fruity goodness

Prep Time: 10 minutes
Freeze Time: 4–6 hours
Yield: About 4–6 servings

This recipe is simple, naturally creamy, and customizable. You can swap strawberries for other fruits, chocolate chips, or even cookie pieces.


Ingredients

  • 500 ml (2 cups) whipping cream
    Use full-fat cream for best results; it creates a rich, creamy texture.

  • 150 g (2/3 cup) sweetened condensed milk
    Provides sweetness and helps the ice cream hold its shape without gelatin.

  • 100 g (3/4 cup) fresh strawberries, diced
    Adds natural fruit flavor. You can substitute raspberries, blueberries, or mango if desired.


Step-by-Step Instructions

1. Whip the Cream

Pour the cold whipping cream into a large mixing bowl.
Using an electric mixer, whip on medium-high speed until stiff peaks form.

  • Stiff peaks mean the cream holds its shape when the beaters are lifted.

  • Do not overwhip, or the cream may turn into butter.


2. Fold in the Condensed Milk

Gently add the sweetened condensed milk to the whipped cream.
Use a spatula to fold it in carefully, preserving the air in the whipped cream.
The mixture should become smooth and slightly glossy.


3. Add the Fruit

Fold in the diced strawberries (or your chosen fruit) until evenly distributed.
Be gentle to keep the whipped cream light and airy.


4. Transfer and Freeze

Pour the mixture into a freezer-safe container.
Smooth the top with a spatula and cover the container with a lid or plastic wrap.

Freeze for at least 4 hours, or until firm.
For best flavor, you can refrigerate the mixture for 1–2 hours before freezing to let the flavors meld, but this step is optional.


5. Serve

Scoop the ice cream into bowls and enjoy immediately.
Optional toppings: fresh berries, chocolate shavings, or a drizzle of fruit syrup.


Tips & Variations

  • Fruit Variations: Mango, banana, or mixed berries all work well.

  • Chocolate Strawberry: Fold in 50 g of finely chopped chocolate with the fruit.

  • Nutty Option: Add 2–3 tablespoons chopped nuts for texture.

  • Storage: Keep covered in the freezer for up to 7 days. For softer scooping, let ice cream sit at room temperature for 5 minutes before serving.

Lemon Crinkle Cookies

Lemon Crinkle Cookies

Soft, bright cookies with a delicate citrus flavor and a classic cracked sugar finish

Prep Time: 15 minutes
Chill Time: 30–60 minutes
Bake Time: 10–12 minutes
Yield: About 20–24 cookies

These Lemon Crinkle Cookies are tender on the inside with lightly crisp edges. Fresh lemon zest and juice give them a refreshing citrus taste, while the powdered sugar coating creates the signature crinkled appearance as they bake.


Ingredients

Cookie Dough

  • 1½ cups (180 g) all-purpose flour
    Provides structure for the cookies.

  • 1 teaspoon baking soda
    Helps the cookies spread slightly and crack on top.

  • ½ teaspoon baking powder
    Adds lightness to the texture.

  • ¼ teaspoon salt
    Balances the sweetness and enhances flavor.

  • 1 cup (227 g) unsalted butter, softened
    Creates a rich, tender cookie.

  • 1 cup (200 g) granulated sugar
    Sweetens and helps create a soft crumb.

  • 1 large egg
    Binds the dough and adds moisture.

  • 1 tablespoon fresh lemon zest
    Provides bright lemon aroma.

  • 2 tablespoons fresh lemon juice
    Adds natural citrus flavor.


For Coating

  • ½ cup powdered sugar
    Creates the classic crinkle finish.

  • Optional: 2–3 tablespoons granulated sugar
    Helps form a slight crust before rolling in powdered sugar.


Step-by-Step Instructions

1. Prepare the Dough

In a large bowl, beat the softened butter and granulated sugar together until pale, light, and fluffy. This usually takes 2–3 minutes with an electric mixer.

Add the egg and mix until fully incorporated.
Stir in the lemon zest and lemon juice until evenly combined.


2. Mix the Dry Ingredients

In a separate bowl, whisk together the flour, baking soda, baking powder, and salt.

Gradually add the dry ingredients to the wet mixture. Mix just until a soft, smooth dough forms. Avoid overmixing.


3. Chill the Dough

Cover the bowl and refrigerate the dough for 30–60 minutes.
This step firms the dough, improves texture, and helps prevent excessive spreading.


4. Shape and Coat

Preheat the oven to 175°C (350°F).
Line baking sheets with parchment paper.

Scoop the dough into tablespoon-sized portions and roll into balls.

For best results:

  1. Roll each dough ball lightly in granulated sugar (optional).

  2. Roll generously in powdered sugar, completely coating the surface.

Place the coated dough balls on the baking sheet, spacing them about 2 inches apart.


5. Bake

Bake for 10–12 minutes, until:

  • The edges are set

  • The tops are cracked and puffed

  • The centers remain soft

Do not overbake; the cookies will continue to set as they cool.


6. Cool

Let the cookies rest on the baking sheet for 5 minutes, then transfer them to a wire rack to cool completely.


Tips for Perfect Crinkle Cookies

  • Extra Cracks: Roll the dough in powdered sugar twice for a thicker white coating.

  • Strong Lemon Flavor: Add a drop of lemon extract if desired.

  • Soft Centers: Remove cookies when the centers still look slightly underbaked.

  • Storage: Store in an airtight container at room temperature for up to 4 days.

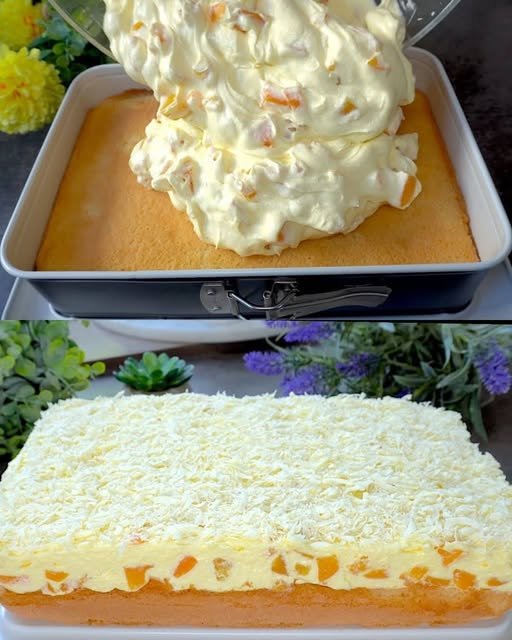
Vanilla Peach Cake with Cream and White Chocolate

Vanilla Peach Cake with Cream and White Chocolate

A light vanilla sponge layered with fruit, fluffy cream, and delicate white chocolate

Prep Time: 30 minutes
Total Time: About 1 hour + chilling time
Servings: 12–15 slices

This Vanilla Peach Cake is a refreshing, elegant dessert made with a soft sponge base, juicy peaches, smooth vanilla cream, and a snowy topping of white chocolate. It’s light, creamy, and perfect for celebrations, summer gatherings, or make-ahead desserts.


Ingredients

For the Sponge Cake

  • 3 large eggs
    Create structure and lightness.

  • 100 g granulated sugar
    Sweetens the cake and helps trap air for a fluffy texture.

  • 100 g all-purpose flour
    Forms the base of the sponge.

  • 1 teaspoon baking powder
    Provides gentle lift.

  • 1 teaspoon vanilla extract
    Adds classic vanilla flavor.


For the Cream Layer & Topping

  • 480 g canned peaches or apricots, drained
    Adds fruit sweetness and moisture.

  • Reserved fruit juice (from the can)
    Used to lightly moisten the sponge.

  • 300 ml (1¼ cups) cold milk

  • 250 ml (1 cup) cold whipping cream (36% fat)
    Creates a rich yet airy cream layer.

  • 2 packets instant vanilla cream or pudding mix
    Provides structure and vanilla flavor.

  • 100 g white chocolate, well chilled
    Used for garnish.


Step-by-Step Instructions

1. Prepare the Sponge Base

Preheat the oven to 180°C (350°F).
Line a 9×13-inch (23×33 cm) rectangular springform pan with parchment paper.

In a large bowl, beat the eggs and sugar using an electric mixer for 5–8 minutes, until the mixture becomes pale, thick, and nearly triples in volume.

Sift the flour and baking powder together.
Gently fold them into the egg mixture using a spatula, working slowly to keep the batter airy. Add the vanilla extract.

Pour the batter evenly into the prepared pan and smooth the surface.

Bake for 20–25 minutes, or until lightly golden and springy to the touch.
Allow the sponge to cool completely in the pan.


2. Prepare the Fruit

Drain the peaches well and reserve the juice.

Once the sponge has cooled, lightly prick the surface with a fork.
Drizzle 3–4 tablespoons of the reserved fruit juice evenly over the sponge to keep it moist.

Cut the peaches into small, bite-sized pieces and set aside.


3. Make the Vanilla Cream

In a large chilled bowl, combine:

  • Cold milk

  • Cold whipping cream

  • Instant vanilla cream mix

Beat on low speed for 30 seconds, then increase to high speed and beat for about 3 minutes, until thick, smooth, and holding stiff peaks.

Gently fold in the diced peaches until evenly distributed.


4. Assemble the Cake

Spread the peach and vanilla cream mixture evenly over the cooled sponge base.
Smooth the top using an offset spatula or the back of a spoon.

Using a fine grater, grate the chilled white chocolate generously over the entire surface of the cake.


5. Chill and Serve

Refrigerate the cake for at least 2–4 hours, or preferably overnight.
This allows the cream to set fully and makes slicing neat and clean.

Slice and serve chilled.


Helpful Tips & Variations

  • Cold Ingredients Matter: Keep milk, cream, and mixing bowl cold for best cream consistency.

  • Fruit Options: Apricots, mango, or mixed fruit can be used instead of peaches.

  • Extra Flavor: Add lemon zest to the cream for a brighter taste.

  • Storage: Store covered in the refrigerator for up to 3 days.