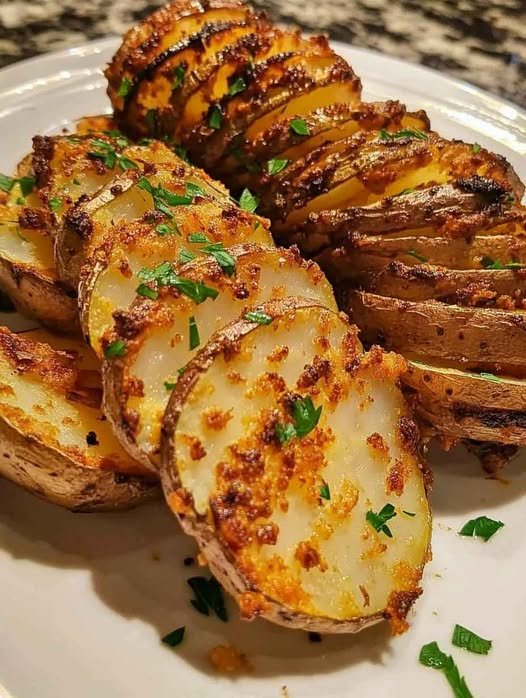
Crispy Oven-Baked Potato Slices

Crispy Oven-Baked Potato Slices

These slices are designed to be a healthier, versatile side dish that works for everything from a casual snack to a dinner party.

  • Prep time: 10 mins

  • Cook time: 30 mins

  • Total time: 40 mins

  • Servings: 4

Equipment

  • Large mixing bowl

  • Large baking tray (oven tray)

  • Parchment paper or aluminum foil

  • Mandolin or sharp chef’s knife

Ingredients

  • 500 g (approx. 1 lb) Potatoes: Starchy varieties like Russet, Maris Piper, or King Edward are best.

  • 1 tbsp Oil: Vegetable, sunflower, or olive oil.

  • ¼ tsp Garlic Powder

  • ¼ tsp Onion Granules

  • ¼ tsp Dried Parsley

  • ⅛ tsp Dried Rosemary

  • ⅛ tsp Black Pepper

  • Salt: To taste.

Instructions

  1. Prepare the Potatoes: Scrub the potatoes thoroughly. You can peel them if you prefer, but leaving the skin on adds extra texture and nutrients. Pat them completely dry with a paper towel—moisture is the enemy of crispiness!

  2. Slice Uniformly: Slice the potatoes into even rounds, approximately 1/8 to 1/4 inch thick. Using a mandolin will help ensure they all cook at the exact same rate.

  3. Season: In a large mixing bowl, toss the potato slices with the oil and all the herbs and spices. Mix well until every slice has a thin, even coating of oil and seasoning.

  4. Arrange: Line your baking tray with parchment paper. Lay the slices out in a single layer. Do not let them overlap, as this creates steam and will make the potatoes soggy.

  5. Bake: Place in a preheated oven at 400°F (200°C). Bake for 25–30 minutes. For maximum crunch, flip the slices halfway through the cooking time.

  6. Finish: They are ready when the edges are golden brown and the centers are tender. Serve immediately while hot.


Quick Tips for Success

  • The “Crowding” Rule: If you are cooking for a large group, use two trays rather than piling potatoes onto one. Space is what allows the hot air to circulate and crisp the edges.

  • Flavor Boost: For a “Cheesy Twist,” sprinkle grated Parmesan over the slices during the last 5–10 minutes of baking.

  • Dip Ideas: These pair excellently with a garlic aioli, spicy sriracha mayo, or a fresh Greek yogurt and chive dip.

Blueberry Cottage Cheese Breakfast Bake

🫐 Blueberry Cottage Cheese Breakfast Bake

Description

This Blueberry Cottage Cheese Breakfast Bake is a soft, lightly sweetened, protein-rich breakfast that feels like a cross between a cheesecake and a baked oatmeal. It’s naturally comforting, packed with juicy blueberries, and made with wholesome ingredients that keep you full and energized. Perfect for busy mornings, meal prep, or a cozy weekend brunch.

🍽️ Servings

6 servings

⏱️ Prep & Cook Time

  • Prep Time: 10 minutes

  • Bake Time: 35–40 minutes

  • Total Time: ~50 minutes

🧾 Ingredients

  • 1 ½ cups cottage cheese (full-fat or low-fat)

  • 2 large eggs

  • ½ cup rolled oats

  • ¼ cup honey or maple syrup

  • 1 teaspoon vanilla extract

  • 1 teaspoon baking powder

  • ½ teaspoon cinnamon

  • ¼ teaspoon salt

  • 1 cup fresh or frozen blueberries

  • Optional: 1 tablespoon lemon zest

👩‍🍳 Instructions

  1. Preheat oven to 350°F (175°C) and lightly grease an 8×8-inch baking dish.

  2. In a blender or food processor, blend cottage cheese until smooth.

  3. Add eggs, oats, honey (or maple syrup), vanilla, baking powder, cinnamon, and salt. Blend until fully combined.

  4. Gently fold in blueberries (and lemon zest if using).

  5. Pour mixture into the prepared baking dish.

  6. Bake for 35–40 minutes, or until the center is set and the top is lightly golden.

  7. Let cool for 10 minutes before slicing and serving.

📝 Notes

  • The texture will firm up more as it cools.

  • Frozen blueberries can be used without thawing.

  • Blending the cottage cheese ensures a smooth, custard-like bake.

💡 Tips & Variations

  • Extra Protein: Add a scoop of vanilla protein powder.

  • Low-Carb Option: Replace oats with almond flour (⅓ cup).

  • Dairy-Free: Use plant-based cottage cheese alternatives.

  • Flavor Boost: Add nutmeg, cardamom, or a swirl of almond butter.

  • Toppings: Serve with Greek yogurt, nut butter, or fresh berries.

🥗 Nutritional Information (Per Serving – Approximate)

  • Calories: 180

  • Protein: 14g

  • Carbohydrates: 18g

  • Fat: 6g

  • Fiber: 3g

  • Sugar: 9g

🌟 Health Benefits

  • High Protein: Supports muscle repair and keeps you full longer.

  • Gut-Friendly: Cottage cheese and oats aid digestion.

  • Antioxidant-Rich: Blueberries support heart and brain health.

  • Balanced Energy: Ideal for stable blood sugar levels.

  • Great for Meal Prep: Stores well for up to 4 days in the fridge.

❓ Q & A

Q: Can I make this ahead of time?
A: Yes! Store in an airtight container in the refrigerator for up to 4 days.

Q: Can I freeze it?
A: Absolutely. Slice, wrap individually, and freeze for up to 2 months.

Q: Can I make it sweeter?
A: Increase honey/maple syrup to ⅓ cup or add a drizzle on top before serving.

Q: Is this good for weight loss?
A: Yes. It’s high in protein, low in refined sugar, and very filling.

Q: Can I use other fruits?
A: Yes—raspberries, chopped strawberries, peaches, or apples work well.

Orange & Carrot Ginger Glow Juice

Orange & Carrot Ginger Glow Juice

Ingredients

  • 3 Large Oranges: Peeled and halved (Navel or Valencia oranges work best for juice).

  • 2 Large Carrots: Scrubbed, peeled, and chopped into chunks.

  • 1-inch knob of Fresh Ginger: Peeled (adjust based on how much “zing” you like).

  • Optional: A splash of lemon juice for extra brightness or a pinch of turmeric for anti-inflammatory benefits.

  • For Smoothie Version: Add 1/2 cup of water or coconut water and some ice cubes.


Instructions

Option 1: Using a Juicer (Best for a clear juice)

  1. Prep: Wash all produce thoroughly. Peel the oranges and ginger.

  2. Juice: Feed the carrots, ginger, and oranges through your juicer one by one.

  3. Serve: Stir the juice to combine the flavors and pour into a glass over ice. Drink immediately for the most nutrients.

Option 2: Using a Blender (Best for a fiber-rich smoothie)

  1. Prep: Peel the oranges and remove as much of the white pith as possible. Peel and roughly chop the carrots and ginger.

  2. Blend: Place all ingredients into a high-speed blender. Add 1/2 cup of water or ice to help it blend smoothly.

  3. Liquify: Blend on high until completely smooth.

  4. Strain (Optional): If you prefer a thinner juice without the pulp, pour the mixture through a fine-mesh nut milk bag or sieve, pressing down with a spoon to extract all the liquid.


Tips for the Best Flavor

  • Sweetness: If your carrots aren’t very sweet, you can add a small slice of red apple to the mix.

  • Coldness: Chill your fruits and vegetables in the fridge beforehand so the juice is cold and refreshing the moment it’s made.

  • Storage: Fresh juice is best consumed within 24 hours. Store it in a glass jar with a tight lid in the refrigerator.

Home-Made Cucumber Sandwiches

🥒 Home-Made Cucumber Sandwiches

📖 Description

Home-made cucumber sandwiches are light, refreshing, and classic finger sandwiches traditionally served at afternoon tea. Made with crisp cucumbers, soft bread, and a creamy spread, they are perfect for summer lunches, tea parties, picnics, or quick healthy snacks. Their mild flavor, cooling nature, and elegant presentation make them timeless and versatile.

⏱️ Preparation Time

  • Prep Time: 10 minutes

  • Assembly Time: 5 minutes

  • Total Time: 15 minutes

🍽️ Servings

  • Serves: 4 people

  • Yield: 8 small sandwiches (16 triangles or fingers)

🧾 Ingredients

Main Ingredients

  • 8 slices white or whole-wheat sandwich bread

  • 1 medium cucumber

  • 4 tablespoons cream cheese (softened)

  • 1 tablespoon butter (optional, softened)

Seasoning & Flavor (optional but recommended)

  • Salt, to taste

  • Freshly ground black pepper

  • 1 teaspoon lemon juice

  • 1 teaspoon fresh dill or mint (finely chopped)

👩‍🍳 Instructions

  1. Prepare the cucumber

    • Wash and thinly slice the cucumber.

    • Lightly sprinkle with salt and let sit for 5 minutes.

    • Pat dry with a paper towel to remove excess moisture.

  2. Prepare the spread

    • In a bowl, mix cream cheese, butter (if using), lemon juice, pepper, and herbs until smooth.

  3. Prepare the bread

    • Trim crusts from the bread slices (optional for classic style).

    • Spread an even layer of the cream cheese mixture on each slice.

  4. Assemble the sandwiches

    • Arrange cucumber slices evenly on half the bread slices.

    • Cover with the remaining bread slices, spread side down.

  5. Cut & serve

    • Cut into halves, triangles, or finger shapes.

    • Serve immediately or chill briefly before serving.

📝 Notes

  • English cucumbers or seedless cucumbers work best.

  • Always dry cucumbers well to prevent soggy sandwiches.

  • Best eaten fresh, within a few hours of preparation.

💡 Tips for Best Results

  • Use room-temperature cream cheese for easy spreading

  • Slice cucumbers paper-thin for better texture

  • Add butter under the cream cheese to create a moisture barrier

  • Chill sandwiches for 10 minutes before serving for clean cuts

  • For extra crunch, add thin lettuce leaves (optional)

🌱 Variations

  • Vegan: Use dairy-free cream cheese

  • Healthy: Use whole-grain or multigrain bread

  • Spicy: Add a pinch of chili flakes or paprika

  • Fancy Tea Style: Add a light layer of mayonnaise with cream cheese

🥗 Nutritional Information (Approx. per sandwich)

Nutrient Amount
Calories 90–110 kcal
Carbohydrates 12 g
Protein 3 g
Fat 5 g
Fiber 1.5 g
Sodium 120 mg

(Values may vary depending on ingredients used)

🌿 Health Benefits

  • Hydrating: Cucumbers are over 95% water

  • Low-Calorie Snack: Ideal for weight-conscious diets

  • Digestive Friendly: Light and easy to digest

  • Cooling Effect: Helps regulate body temperature

  • Heart-Healthy: Low in saturated fat when made lightly

❓ Q & A – Frequently Asked Questions

Q1: Can I make cucumber sandwiches ahead of time?
Yes, but they are best made within 4–6 hours. Store wrapped tightly in the refrigerator.

Q2: How do I prevent soggy sandwiches?
Salt and dry cucumbers well and apply butter or thick cream cheese as a moisture barrier.

Q3: Can I use mayonnaise instead of cream cheese?
Yes, but cream cheese offers better structure and less sogginess.

Q4: Are cucumber sandwiches good for kids?
Absolutely! They are mild, nutritious, and easy to eat.

Q5: Can I toast the bread?
Traditionally no, but lightly toasted bread can be used for a modern twist.

3-Ingredient Banana Oat Pancakes

3-Ingredient Banana Oat Pancakes

Ingredients

  • 1 cup Rolled oats (old-fashioned or quick oats)

  • 1 large Ripe banana (the spottier, the sweeter!)

  • 2 large Eggs

  • Optional: A pinch of cinnamon, a splash of vanilla extract, or 1/2 teaspoon of baking powder (for fluffiness).


Instructions

  1. Blend the Batter: Place the oats, banana, and eggs into a blender. Blend on high until the mixture is completely smooth and creamy.

    • Tip: If you don’t have a blender, mash the banana into a smooth paste, whisk in the eggs, and stir in the oats (though the texture will be heartier/chunkier).

  2. Rest the Batter: Let the batter sit for 5 minutes. This allows the oats to hydrate, which thickens the batter and makes the pancakes easier to flip.

  3. Heat the Pan: Lightly grease a non-stick skillet or griddle with a little butter or oil over medium-low heat. These pancakes cook better at a lower temperature than traditional pancakes because the fruit sugars can burn quickly.

  4. Cook: Pour about 1/4 cup of batter per pancake onto the skillet. Cook for 2–3 minutes until the edges look set and small bubbles appear on the surface.

  5. Flip: Carefully flip and cook for another 1–2 minutes until golden brown on both sides.


Serving Suggestions

  • Fresh Fruit: Top with sliced strawberries, blueberries, or extra banana.

  • Nut Butter: A drizzle of peanut or almond butter adds great protein.

  • Sweetener: Use a touch of maple syrup or honey if you like them extra sweet.

Grandma’s Holiday Cheesy Asparagus Casserole

Grandma’s Holiday Cheesy Asparagus Casserole

This dish features tender asparagus nestled in a rich, velvety cream sauce, topped with a golden blanket of melty cheeses and optional crispy breadcrumbs for that perfect holiday crunch.

  • Prep time: 10–15 minutes

  • Cook time: 20–25 minutes

  • Servings: 6–8

Ingredients

The Base

  • 2 lbs fresh asparagus, woody ends trimmed

  • 2-3 cloves garlic, minced (or 1 tsp garlic powder)

  • 1/2 tsp salt and 1/4 tsp black pepper (to taste)

The Creamy Sauce

  • 3 tbsp unsalted butter

  • 2 tbsp all-purpose flour

  • 2 cups heavy cream (can substitute with whole milk for a lighter version)

  • 1/2 cup freshly grated Parmesan cheese

The Cheesy Topping

  • 1 cup shredded mozzarella cheese

  • 1/2 cup grated Parmesan cheese

  • Optional: 1/2 cup Panko breadcrumbs or crushed Ritz crackers mixed with 2 tbsp melted butter for extra crunch


Instructions

  1. Prep the Oven and Asparagus: Preheat your oven to 400°F (200°C). Lightly grease a 9×13-inch baking dish. Place the trimmed asparagus in the dish in a mostly even layer.

  2. Make the Roux: In a small saucepan, melt the 3 tbsp of butter over medium heat. Whisk in the flour and cook for about 1–2 minutes until lightly golden and bubbling.

  3. Simmer the Sauce: Gradually whisk in the heavy cream and minced garlic. Simmer for 3–5 minutes, whisking constantly, until the sauce thickens enough to coat the back of a spoon.

  4. Add Cheese to Sauce: Remove from heat and stir in 1/2 cup of the Parmesan cheese, salt, and pepper until the cheese is melted and smooth.

  5. Assemble: Pour the hot cheese sauce evenly over the center of the asparagus, leaving the tips exposed if you prefer a little roast on them. Sprinkle the mozzarella and the remaining Parmesan cheese over the top. If using breadcrumbs or crackers, scatter them over the cheese.

  6. Bake: Pop it in the oven for 15–20 minutes until the asparagus is tender and the cheese is bubbly and golden. For an extra crispy top, you can broil it for the last 2 minutes