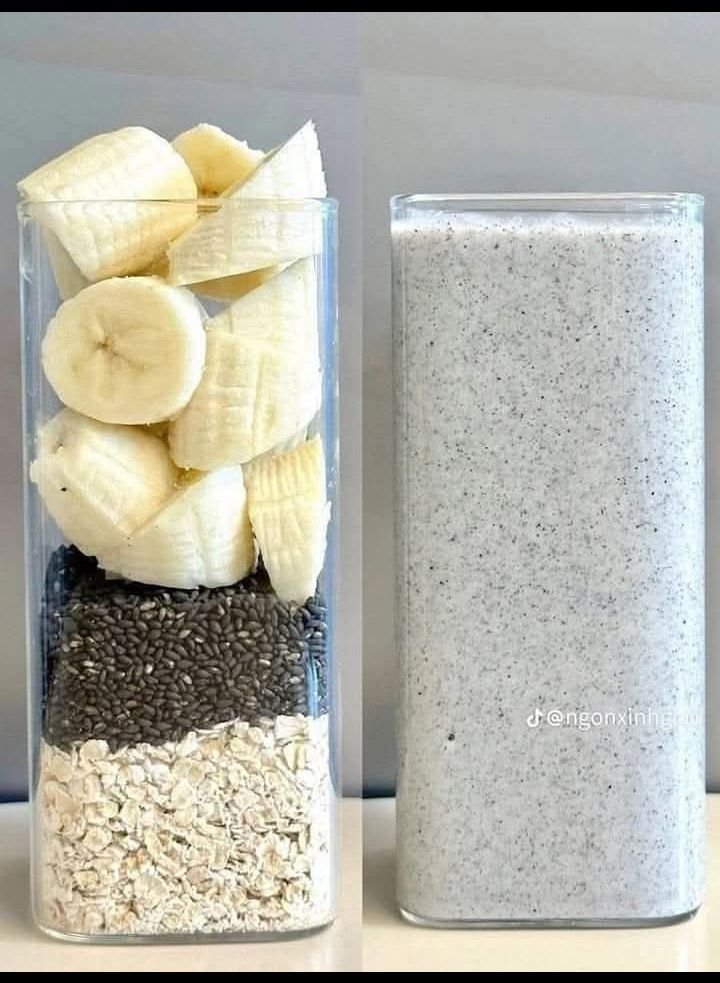
Banana Oat Chia Smoothie Recipe

Banana Oat Chia Smoothie Recipe

This banana oat chia smoothie is a simple, nourishing, and naturally creamy drink that works well for breakfast, a midday refreshment, or a light evening option. The ingredients shown in the image come together beautifully to create a smooth texture and mild sweetness without needing refined additions. It is easy to prepare, uses everyday kitchen items, and can be adjusted to suit personal taste.

Ingredients

  • 2 ripe bananas, peeled and sliced

  • 2 tablespoons chia seeds

  • ½ cup rolled oats

  • 1½ to 2 cups milk of choice (dairy or plant-based)

  • ½ teaspoon ground cinnamon (optional)

  • 1 teaspoon honey or dates paste (optional)

  • A few ice cubes (optional, for a chilled texture)

Preparation Method

Start by preparing the oats. If you prefer an extra smooth drink, soak the rolled oats in warm water or milk for about 10 minutes. This step softens the oats and helps them blend more easily. While the oats soak, slice the bananas into small pieces so they blend evenly and smoothly.

Next, add the soaked oats to the blender jar. Sprinkle the chia seeds over the oats, allowing them to sit briefly so they begin to absorb moisture. This helps create a naturally thick and creamy consistency. Add the banana slices on top, followed by your chosen milk. If you enjoy gentle spice notes, add a small amount of cinnamon at this stage.

Blend everything on medium speed for about 30 seconds, then increase to high speed for another 30–45 seconds. Pause once to scrape down the sides if needed. The mixture should become pale, creamy, and evenly blended, with no visible oat pieces. If the smoothie feels too thick, add a little more milk and blend again briefly.

Taste the smoothie and adjust sweetness if desired by adding honey or dates paste. Blend once more for a few seconds. If you like it chilled, add ice cubes and blend until smooth.

Serving Suggestions

Pour the smoothie into a tall glass and enjoy immediately. It can also be topped with a few chia seeds or oat flakes for visual appeal. This smoothie pairs well with fresh fruit or a light snack and can be stored in the refrigerator for a few hours if needed, though it tastes best fresh.

This banana oat chia smoothie is a comforting, balanced option that feels satisfying while staying simple and wholesome.
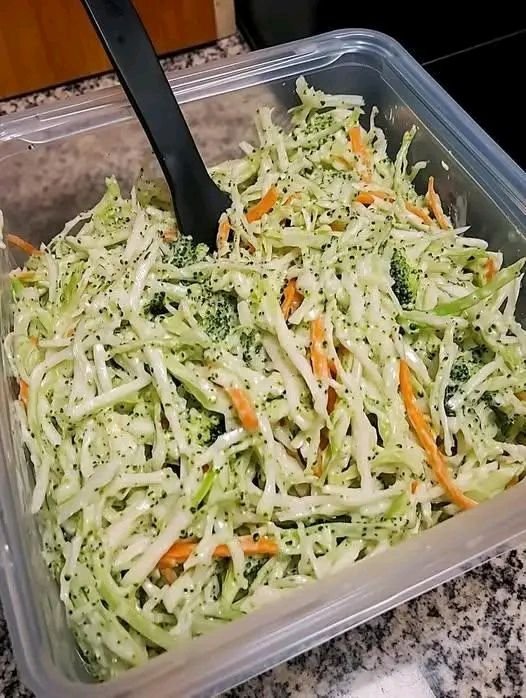
Mediterranean Garden Slaw with Creamy Lemon-Tahini Dressing

Mediterranean Garden Slaw with Creamy Lemon-Tahini Dressing

A vibrant, crunchy slaw packed with shredded cabbage, carrots, and broccoli, tossed in a silky lemon-tahini dressing. This salad is light yet satisfying, perfect as a side dish or a healthy main.

 Time

  • Prep: 15 minutes

  • Cook: None

  • Total: 15 minutes

 Ingredients

Slaw

  • 4 cups green cabbage, finely shredded

  • 1 cup carrots, julienned or grated

  • 1½ cups broccoli stems or florets, thinly sliced

  • 2 tablespoons fresh parsley or dill, finely chopped (optional)

  • 1 tablespoon sesame seeds or black seeds (optional, as seen in image)

Creamy Lemon-Tahini Dressing

  • ¼ cup tahini

  • 3 tablespoons fresh lemon juice

  • 1 tablespoon olive oil

  • 1 small garlic clove, finely grated

  • 2–4 tablespoons warm water (to thin)

  • Salt and black pepper, to taste

 Instructions

  1. Place cabbage, carrots, broccoli, and herbs in a large bowl.

  2. In a separate bowl, whisk tahini, lemon juice, olive oil, garlic, salt, and pepper.

  3. Slowly add warm water, whisking until smooth and creamy.

  4. Pour dressing over vegetables and toss until evenly coated.

  5. Sprinkle with sesame seeds if using.

  6. Chill 10 minutes before serving for best flavor.

 Description Notes

  • The slaw softens slightly as it rests while staying crisp.

  • Broccoli stems are ideal here—sweet, crunchy, and less bitter.

  • Dressing thickens naturally as it sits.

Tips & Variations

  • Extra protein: Add chickpeas, grilled chicken, or tofu

  • More Mediterranean: Add olives or sun-dried tomatoes

  • Low-fat option: Reduce tahini and add extra lemon juice

  • Spicy kick: Add chili flakes or a dash of cayenne

 Servings

  • Serves: 4 as a side

  • Serves: 2 as a main salad

Approximate Nutritional Info (per serving)

  • Calories: ~180

  • Protein: ~5 g

  • Fat: ~13 g

  • Carbohydrates: ~12 g

  • Fiber: ~5 g

(Values vary depending on tahini amount)

 Health Benefits

  • ✅ Rich in fiber for digestion

  • ✅ Healthy fats from tahini & olive oil

  • ✅ Anti-inflammatory ingredients

  • ✅ Naturally gluten-free

  • ✅ Supports heart & gut health

 Q & A

Q: Can I make this ahead of time?
A: Yes! Keeps well refrigerated for up to 2 days.

Q: Is tahini strong in flavor?
A: Lemon and garlic balance it beautifully—smooth, not bitter.

Q: Can I use red cabbage?
A: Absolutely! It adds color and extra antioxidants.

Q: Is this keto-friendly?
A: It’s low-carb but not strict keto due to carrots and tahini.

Savory Puff Pastry with Minced Meat and Cheese!

🥐 Savory Puff Pastry with Minced Meat & Cheese

Flaky golden puff pastry filled with seasoned minced meat, onions, herbs, and melted cheese. Perfect for snacks, appetizers, lunchboxes, or party trays!

✅ Ingredients (Makes 8–12 pastries)

For the Filling

  • 1 lb (450 g) minced beef or lamb

  • 1 small onion, finely chopped

  • 2–3 garlic cloves, minced

  • 1 tablespoon olive oil

  • ½ teaspoon paprika

  • ½ teaspoon cumin

  • ½ teaspoon black pepper

  • ½ teaspoon dried oregano or thyme

  • ¼–½ teaspoon chili flakes (optional)

  • 2 tablespoons tomato paste

  • 2 tablespoons chopped parsley (optional)

  • Salt to taste

For the Pastry

  • 1 sheet puff pastry (thawed)

  • 1 cup shredded cheese (mozzarella, cheddar, or a mix)

  • 1 egg (for egg wash)

  • Sesame seeds or nigella seeds (optional)


🍳 Instructions

1. Make the minced meat filling

  1. Heat olive oil in a pan.

  2. Sauté onions until soft.

  3. Add garlic and cook 30 seconds.

  4. Add minced meat and cook until browned.

  5. Add tomato paste, spices, herbs, and salt.

  6. Cook 3–4 minutes until mixture thickens (no excess liquid).

  7. Let cool completely before assembling.


2. Prepare the puff pastry

  1. Preheat oven to 400°F (200°C).

  2. Roll out the puff pastry sheet lightly.

  3. Cut into squares or rectangles (about 3–4 inches each).


3. Assemble

  1. Add 1–2 tablespoons of cooled meat filling onto the center.

  2. Top with a pinch of cheese.

  3. Fold pastry into desired shape:

    • triangles

    • rectangles

    • parcels

    • rolls

  4. Press edges with a fork to seal.


4. Bake

  1. Brush tops with egg wash.

  2. Sprinkle sesame or nigella seeds if desired.

  3. Bake 15–20 minutes, until puffed and golden brown.


5. Serve

Enjoy warm with:

  • ketchup

  • garlic sauce

  • yogurt dip

  • chili sauce

  • tzatziki


⭐ Tips for Best Results

  • Cool the filling completely so pastry stays crisp.

  • Don’t overfill; puff pastry expands.

  • Keep pastry cold — return it to the fridge if it becomes too soft.

  • For extra flavor, add shredded cheese inside and on top.

  • Use pre-rolled pastry for quick assembly.


❓ Q&A About Savory Puff Pastry with Minced Meat & Cheese

Q1: Can I use chicken or turkey mince instead of beef?

Yes! Any ground meat works — just adjust seasoning to taste.


Q2: Can I make these ahead of time?

Yes. Assemble them and refrigerate up to 24 hours before baking.


Q3: Can I freeze them?

Absolutely!

  • Freeze unbaked pastries on a tray, then store in bags.

  • Bake from frozen at 400°F (200°C) for 20–25 minutes.


Q4: What cheese works best?

Mozzarella (melty), cheddar (flavorful), gouda, provolone, or a cheese blend.


Q5: Why is my puff pastry not rising?

Possible reasons:

  • Oven wasn’t hot enough

  • Pastry became warm before baking

  • Overfilled, weighing it down


Q6: How do I prevent soggy bottoms?

  • Let filling cool fully

  • Bake on a preheated tray

  • Avoid watery sauces in the filling


Q7: Can I make them vegetarian?

Yes! Replace meat with:

  • sautéed mushrooms

  • spinach + feta

  • mashed potatoes + cheese

  • lentils + spices.

Magic Quick-Mix Grain Bread

Magic Quick-Mix Grain Bread

  • ​Prep time: 3 minutes
  • ​Bake time: 50–60 minutes
  • ​Rising time: None

​Ingredients

  • ​550g All-purpose or Bread flour
  • ​150g Mixed grains (like sunflower seeds, flaxseeds, oats, or sesame)
  • ​500ml Lukewarm water
  • ​1 packet (7g) Active dry yeast (or 1 block of fresh yeast)
  • ​2 tsp Salt
  • ​1 tsp Sugar (to help the yeast activate quickly)
  • ​1 tbsp Vinegar (apple cider or white—this helps with the structure since there is no long rise)

​Instructions


    1. ​Prep the Oven & Tin: Preheat your oven to 200°C (400°F). Thoroughly grease a loaf pan with butter or oil and lightly dust it with flour or seeds.
    2. ​Mix the Base: In a large bowl, whisk together the lukewarm water, yeast, and sugar. Let it sit for 1 minute until it starts to look slightly creamy.
    3. ​Combine: Add the flour, grains, salt, and vinegar to the bowl. Stir with a sturdy wooden spoon or a dough hook for about 2 to 3 minutes until a sticky, uniform dough forms. It will be much wetter than traditional bread dough—don’t worry, that’s normal for this recipe!
    4. ​Transfer: Pour the dough directly into your prepared loaf pan. Smooth the top with the back of a wet spoon.
    5. ​Bake: Place the pan into the cold oven (or preheated, both work for this method) on the middle rack. Bake for 50 to 60 minutes.
    6. ​The “Thump” Test: The bread is done when the top is golden brown and the bottom sounds hollow when you tap it.

​Pro Tip: For a crispier crust, spray the top of the loaf with a little water right before it goes into the oven, or place a small heat-proof dish of water on the bottom rack of the oven to create steam.

Diabetic-Friendly Stuffed Phyllo Cups with Spinach, Feta & Sundried Tomatoes!

🧁 Diabetic-Friendly Stuffed Phyllo Cups with Spinach, Feta & Sundried Tomatoes

⭐ Servings: 12 mini cups

⭐ Prep Time: 10 min

⭐ Cook Time: 12 min

⭐ Total Time: 22 min


📝 Ingredients

For the Cups

  • 12 mini phyllo shells (store-bought, pre-baked)

  • 1 tsp olive oil or light cooking spray

For the Filling

  • 1 ½ cups fresh spinach, finely chopped
    (or ¾ cup frozen spinach—thawed & drained completely)

  • ⅓ cup low-fat feta cheese, crumbled

  • 1 egg (optional – helps binding)

  • 1 tbsp Greek yogurt (optional – adds creaminess)

  • 1 clove garlic, minced

  • 1 tbsp fresh parsley, chopped

  • A pinch of salt

  • Black pepper to taste

  • 1–2 tbsp oil-free, unsweetened sundried tomatoes, finely chopped


👩‍🍳 Instructions

1. Preheat Oven

  • Heat oven to 180°C / 350°F.


2. Prepare Spinach

If fresh:

  1. Cook in a dry pan 2–3 minutes until wilted.

  2. Squeeze out all excess water.

If frozen:

  • Thaw and squeeze very dry.


3. Make Filling

In a mixing bowl combine:

  • Spinach

  • Low-fat feta

  • Egg (optional)

  • Greek yogurt (optional)

  • Garlic

  • Parsley

  • Salt & pepper

Mix well to form a light, creamy filling.


4. Fill the Phyllo Cups

  • Lightly brush cups with olive oil or spray.

  • Spoon the filling inside each cup.

  • Add a tiny amount of chopped sundried tomatoes on top.


5. Bake

  • Arrange cups on a baking tray.

  • Bake for 10–12 minutes until the edges turn golden brown.


6. Serve

  • Serve hot or warm.

  • Garnish with parsley if desired.


📊 Nutrition (Approx. per 1 Cup)

  • Calories: 45–60

  • Carbs: 4–6g

  • Protein: 2–3g

  • Fat: 2–3g

(Values can vary depending on brands and portion sizes.)


❓ Q&A Section

Q1: Are phyllo cups safe for diabetics?

A: Yes—in small portions. Phyllo dough has carbs, so limit to 1–2 cups per serving.


Q2: Can I make these without feta cheese?

A: Yes! Replace with:

  • Low-fat ricotta

  • Cottage cheese

  • Or skip cheese and add extra spinach + herbs


Q3: Do sundried tomatoes increase sugar levels?

A: They contain natural sugars, so use oil-free, unsweetened, and add only a small amount (1–2 tsp divided among all cups).


Q4: Can I make this recipe egg-free?

A: Absolutely. The egg just helps binding. Without egg:

  • Increase Greek yogurt
    OR

  • Add 1 tbsp almond flour for structure


Q5: Can I prepare these cups ahead of time?

A: Yes.

  • Option 1: Make filling ahead and assemble before baking.

  • Option 2: Bake completely and reheat in the oven for 5 minutes before serving.
    Avoid microwaving (makes phyllo soggy).


Q6: Can I add more vegetables?

A: Yes! These work well:

  • Mushrooms

  • Bell peppers

  • Green onions

  • Zucchini (grated & squeezed)

More vegetables = more fiber = better for diabetics.


Q7: Can I use whole-wheat phyllo instead?

A: Yes, if available—it’s even better because it has more fiber and is lower GI.


Q8: What can I serve these with?

They pair well with:

  • Green salad

  • Grilled chicken

  • Lentil soup

  • Roasted vegetables

All diabetic-friendly options.

Ginger Water (Ginger–Lemon Detox Drink)

Ginger Water (Ginger–Lemon Detox Drink)

Prep & Cook Time

  • Prep: 5 minutes

  • Cook: 10–15 minutes

  • Total: ~20 minutes

Servings

  • Makes 4–6 servings (or 1 large bottle for the day)

Ingredients

  • 2–3 inches fresh ginger root

  • 1–2 lemons (optional but recommended)

  • 1 liter (4 cups) water

  • Optional:

    • 1 tsp raw honey (after cooling)

    • A pinch of turmeric

    • A few mint leaves

Instructions

  1. Wash and peel the ginger (peeling optional).

  2. Slice or grate the ginger thinly.

  3. Bring water to a boil.

  4. Add ginger, reduce heat, and simmer for 10–15 minutes.

  5. Turn off heat and let cool slightly.

  6. Strain into a bottle or jar.

  7. Add fresh lemon juice (and honey if using).

  8. Store in the refrigerator for up to 2 days.

Description

Ginger water is a warming herbal infusion known for its thermogenic, digestive, and anti-inflammatory properties. Lemon adds vitamin C and supports liver detox pathways.

Health Benefits (Evidence-Based)

✔ Supports Weight Loss

  • Boosts metabolism

  • Reduces appetite & cravings

  • Improves fat oxidation

✔ Reduces Bloating & Water Retention

  • Aids digestion

  • Relieves gas and constipation

✔ Improves Blood Circulation

  • Helps mobilize stored fat

  • Supports cardiovascular health

✔ Anti-Inflammatory

  • Reduces chronic inflammation linked to obesity

✔ Blood Sugar Control

  • Helps stabilize insulin response

What It Does NOT Do

  • ❌ Spot-reduce fat

  • ❌ Replace exercise or calorie control

  • ❌ Melt fat overnight

How & When to Drink

  • Morning (best): 1 cup on an empty stomach

  • Before meals: Reduces overeating

  • Daily limit: 2–3 cups

Tips for Best Results

  • Drink warm, not ice cold

  • Combine with:

    • Walking or light exercise

    • High-protein meals

    • Reduced sugar & refined carbs

  • Be consistent for 2–4 weeks

Nutritional Information (per cup)

  • Calories: ~5–10

  • Carbs: ~2g

  • Sugar: 0g

  • Fat: 0g

  • Vitamin C: ~10–15%

Q & A

Q: Can I drink it every day?
✔ Yes, in moderation.

Q: Can pregnant women drink ginger water?
⚠️ Small amounts are usually safe, but consult a doctor.

Q: Will it burn belly fat fast?
👉 It supports fat loss over time, not instant results.

Q: Can I drink it cold?
✔ Yes, but warm is more effective for digestion.