Biscoff Creamy Pudding Parfaits

Biscoff Creamy Pudding Parfaits

Smooth • No-Bake • Ready in Minutes

These Biscoff Creamy Pudding Parfaits are an easy, no-bake dessert that comes together quickly while still looking elegant and indulgent. Layers of finely crushed Biscoff cookies, smooth vanilla pudding blended with Biscoff spread, and fluffy whipped cream create a perfectly balanced dessert that’s sweet, creamy, and comforting.

Ideal for family gatherings, celebrations, or anytime you want a quick dessert that feels special.


🧾 Yield & Time

  • Servings: 4–6 parfaits

  • Preparation Time: About 10 minutes

  • Chilling Time (Optional): 30 minutes


🧺 Ingredients

Cookie Layers

  • Biscoff Cookies (Speculoos) – 1 pack (about 200 g)

  • Butter – 2 tablespoons, melted (optional, for a richer cookie base)

Creamy Pudding Layer

  • Instant Vanilla Pudding Mix – 1 standard box

  • Cold Milk – As directed on pudding package (usually 2 cups)

  • Biscoff Spread – 2 tablespoons, gently warmed until smooth

Topping

  • Whipped Cream – 1 cup (store-bought or homemade)

  • Extra Biscoff Cookies or Crumbs – for garnish


🥣 Step-by-Step Instructions

1️⃣ Prepare the Cookie Crumbs

Place about 15 Biscoff cookies into a zip-top bag or food processor. Crush until you have fine, even crumbs.

If you prefer a more structured base:

  • Transfer crumbs to a bowl

  • Stir in the melted butter until evenly combined

Set aside.


2️⃣ Make the Creamy Pudding Filling

In a medium mixing bowl, add the instant vanilla pudding mix and cold milk. Whisk for about 2 minutes, until the mixture thickens and becomes smooth.

Add the gently warmed Biscoff spread and whisk again until fully blended. The pudding should be creamy, evenly colored, and glossy.

Tip: Warming the spread slightly helps it blend smoothly without lumps.


3️⃣ Assemble the Parfaits

Use clear glasses or dessert cups so the layers are visible.

Layering order:

  • Bottom Layer:
    Add about 2 tablespoons of cookie crumbs to each glass. Gently press down with a spoon.

  • Middle Layer:
    Spoon or pipe the pudding mixture over the crumbs until the glass is about halfway full.

  • Second Cookie Layer:
    Sprinkle a thin layer of cookie crumbs on top of the pudding.

  • Top Layer:
    Finish with a generous spoonful or piped swirl of whipped cream.


4️⃣ Garnish and Finish

Sprinkle extra cookie crumbs over the whipped cream.
For a polished look, place one whole cookie gently into the cream at a slight angle.


5️⃣ Serve or Chill

  • These parfaits can be enjoyed immediately

  • For a softer, more blended texture, refrigerate for 30 minutes before serving

Chilling allows the cookie layers to gently soften, creating a dessert that feels smooth and cake-like.


⭐ Helpful Tips for Best Results

  • Use cold milk for the pudding so it thickens properly

  • Fine cookie crumbs give a smoother texture

  • Mini dessert cups are perfect for portion control

  • Keep covered if chilling longer than 30 minutes


🔄 Easy Variations

🍰 Cheesecake-Style

Fold 4 oz (115 g) softened cream cheese into the pudding for a richer, slightly tangy flavor.

🍌 Fruit Addition

Add a thin layer of sliced bananas between the pudding and whipped cream for a naturally sweet contrast.

🍫 Chocolate Touch

Drizzle melted chocolate over the whipped cream or mix chocolate chips into the pudding.
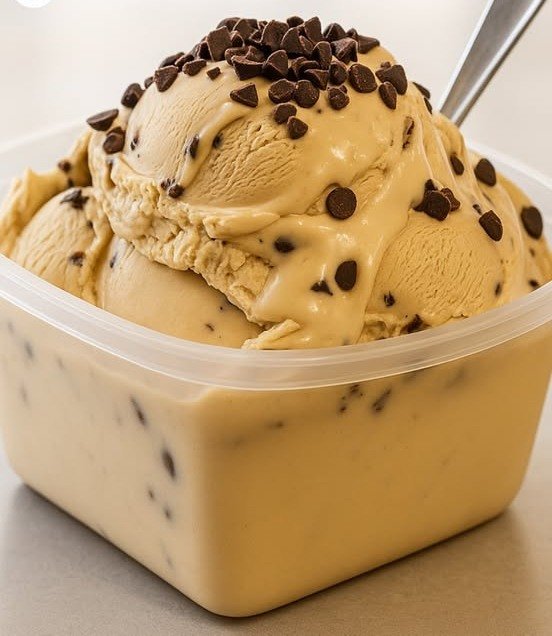
No-Churn Coffee Chocolate Chip Ice Cream

No-Churn Coffee Chocolate Chip Ice Cream

Creamy • Smooth • No Machine Needed

This No-Churn Coffee Chocolate Chip Ice Cream is rich, silky, and incredibly easy to make at home—no special equipment required. The combination of lightly sweetened cream, smooth coffee flavor, and chocolate chips creates a dessert that feels indulgent yet simple. Because it uses condensed milk instead of eggs, the texture stays soft and scoopable straight from the freezer.

Perfect for summer days, family treats, or anytime you crave a café-style frozen dessert at home.


🧾 Ingredients

Base Ingredients

  • Whipping Cream – 450 ml (about 2 cups), very cold

  • Sweetened Condensed Milk – 200 g (about ¾ cup), chilled

  • Instant Coffee – 2 tablespoons + 2 teaspoons
    (Adjust to taste for lighter or stronger coffee flavor)

  • Warm Water or Warm Milk – 1 to 2 tablespoons (for dissolving coffee)

Mix-Ins

  • Chocolate Chips – ½ cup

  • Extra Chocolate Chips – for topping (optional)

Optional Enhancers

  • A small pinch of salt (balances sweetness)

  • Cocoa Powder – 1 tablespoon (for mocha flavor)


🥣 Step-by-Step Instructions

1️⃣ Prepare the Coffee Mixture

In a small bowl, add the instant coffee and warm water or milk. Stir well until the coffee is fully dissolved and the mixture looks smooth, with no granules remaining.

Set aside and allow it to cool completely to room temperature.
(Adding warm coffee directly to cream can affect texture, so cooling is important.)


2️⃣ Whip the Cream

Pour the cold whipping cream into a large mixing bowl.
Using a hand mixer or stand mixer, whip on medium-high speed until the cream becomes thick and holds its shape.

How to tell it’s ready:
When you lift the beaters, the cream should stand upright and keep its form without falling over.

Tip: Stop mixing as soon as this stage is reached to maintain a light, smooth texture.


3️⃣ Combine the Base

Gently add the chilled condensed milk to the whipped cream.
Next, pour in the cooled coffee mixture.

Using a spatula, fold gently by scooping from the bottom and turning the mixture over itself. Continue until the color is even and the mixture looks smooth and airy.


4️⃣ Add Chocolate Chips

Sprinkle in the chocolate chips and gently fold again just until evenly distributed.

At this stage, you may also add:

  • A pinch of salt

  • Cocoa powder (sifted) for a mocha-style flavor


5️⃣ Transfer and Freeze

Spoon the mixture into a freezer-safe container.
Smooth the top with the back of a spoon and sprinkle extra chocolate chips if desired.

Cover tightly with a lid or wrap to keep the surface fresh and smooth.


6️⃣ Freeze Until Set

Place the container in the freezer for at least 6 hours, or preferably overnight.

Thanks to the condensed milk, the ice cream will remain soft and easy to scoop once frozen.


🍦 Serving Tips

  • Let the ice cream sit at room temperature for 2–3 minutes before scooping for best texture

  • Serve in bowls, cones, or alongside brownies or cookies

  • Sprinkle with cocoa powder or drizzle with chocolate syrup if desired


⭐ Pro Tips for Best Results

  • Cold Tools Matter: Chill your bowl and beaters for 10–15 minutes before whipping for maximum volume

  • Flavor Control: Adjust coffee quantity to suit your taste

  • Texture Boost: Mini chocolate chips distribute more evenly

  • Storage: Keep covered tightly to maintain smoothness

Comforting Chicken Soup with Potatoes!

🍲 Comforting Chicken Soup with Potatoes

Servings

6

Total Time

45–55 minutes


🛒 Ingredients

  • 1½ lbs chicken (bone-in thighs or drumsticks; or boneless thighs)

  • 1 tbsp olive oil or butter

  • 1 medium onion, diced

  • 3 carrots, sliced

  • 2 celery stalks, sliced

  • 3 cloves garlic, minced

  • 3 medium potatoes (Yukon Gold or russet), diced

  • 6–7 cups chicken broth (low sodium)

  • 1 bay leaf

  • 1 tsp dried thyme

  • ½ tsp dried rosemary (optional)

  • Salt & black pepper, to taste

  • 2 tbsp fresh parsley, chopped

  • Optional: squeeze of lemon juice


👩‍🍳 Instructions

  1. Sauté the aromatics
    Heat oil/butter in a large pot over medium heat.
    Add onion, carrots, and celery. Cook 5–6 minutes until softened.

  2. Add garlic & herbs
    Stir in garlic, thyme, rosemary, and bay leaf. Cook 30 seconds until fragrant.

  3. Add chicken & broth
    Place chicken in the pot. Pour in broth until just covered.

  4. Simmer
    Bring to a gentle boil, then reduce heat.
    Simmer 20–25 minutes (until chicken is cooked through).

  5. Shred chicken
    Remove chicken, shred, discard bones/skin if needed.
    Return meat to the pot.

  6. Add potatoes
    Stir in diced potatoes. Simmer 12–15 minutes until tender.

  7. Finish
    Season with salt and pepper. Remove bay leaf.
    Add parsley and optional lemon juice.

Serve hot with crusty bread.


❓ Q & A

Q: What potatoes work best?

A: Yukon Gold for creamy texture, russet for heartier soup, red potatoes if you want them to hold shape.


Q: Can I use rotisserie chicken?

A: Yes!

  • Add shredded chicken during the last 10 minutes

  • Simmer potatoes separately or add them earlier


Q: Can I make this in a slow cooker?

A: Absolutely.

  • Add everything except parsley & lemon

  • Cook 6–7 hours on LOW or 3–4 hours on HIGH

  • Shred chicken, then add potatoes for last hour


Q: How do I make it extra comforting?

A:

  • Add a splash of cream or milk

  • Stir in a knob of butter at the end

  • Add egg noodles or rice


Q: Can I freeze this soup?

A: Yes, but potatoes soften after freezing.

  • Freeze up to 3 months

  • For best texture, freeze before adding potatoes


Q: How do I thicken it slightly?

A:

  • Mash a few potatoes in the pot

  • Or add 1 tsp cornstarch mixed with water


Q: What can I serve with it?

A:

  • Crusty bread or biscuits

  • Grilled cheese

  • Simple green salad.

Spinach & Feta Egg Muffins!

🧁 Spinach & Feta Egg Muffins

A healthy, high-protein breakfast you can make ahead and grab on the go.


🥣 Ingredients (Makes 10–12 muffins)

  • 8 large eggs

  • 1 cup fresh spinach, chopped
    (or ½ cup frozen spinach, thawed + squeezed dry)

  • ½ cup feta cheese, crumbled

  • ¼ cup milk (any type: dairy, almond, oat, etc.)

  • 1 small onion, finely diced (optional)

  • 1 clove garlic, minced (optional)

  • ½ tsp salt

  • ¼ tsp black pepper

  • ¼ tsp dried oregano (optional)

  • Olive oil or cooking spray


👩‍🍳 Instructions

  1. Preheat the oven to 350°F (175°C). Grease a muffin tin or use silicone liners.

  2. Optional step: In a small pan, sauté onion and garlic in a teaspoon of oil over medium heat until softened. Set aside to cool.

  3. In a large bowl, whisk together eggs, milk, salt, pepper, and oregano until well combined.

  4. Stir in spinach, feta, and the cooled onion/garlic.

  5. Fill each muffin cup about ¾ full with the egg mixture.

  6. Bake for 18–22 minutes, or until the tops are set and slightly golden.

  7. Let cool a few minutes before removing from the pan.


🌟 Tips

  • Use silicone muffin cups—they make removing the muffins effortless.

  • Don’t overfill the cups; the muffins will puff up as they bake.

  • Crumble the feta finely to help distribute flavor evenly.


❓ Q&A Section

Q1: Can I use frozen spinach instead of fresh?

A: Yes! Use ½ cup frozen spinach, thaw it, and squeeze out all excess water so the muffins don’t become watery.


Q2: Can I make these dairy-free?

A: Absolutely.

  • Replace milk with a non-dairy alternative (almond, soy, oat, etc.).

  • Either omit the feta or substitute a dairy-free feta-style cheese.


Q3: How do I store and reheat them?

A:

  • Fridge: Store in an airtight container for 4–5 days.

  • Freezer: Freeze individually, then store in a freezer bag for up to 2 months.

  • Reheat: 20–30 seconds in the microwave from chilled; 45–60 seconds from frozen.


Q4: Can I add more vegetables?

A: Yes! Try bell peppers, mushrooms, tomatoes, or zucchini. Just sauté watery veggies first to avoid sogginess.


Q5: Can I use egg whites instead of whole eggs?

A: Yes. Use 12 egg whites (≈ 1½ cups). Muffins will be lighter and lower in fat.


Q6: What other cheeses go well with this recipe?

A: Goat cheese, mozzarella, cheddar, Monterey Jack, or pepper jack work great.


Q7: Why did my egg muffins deflate?

A: This is normal—they puff up while baking and settle as they cool.
To reduce sinking, avoid overmixing and don’t overbake.


Q8: How can I make these more filling?

A: Add:

  • Diced cooked potatoes

  • Cooked turkey sausage or ham

  • Extra veggies

  • Serve with whole-grain toast or fruit


Q9: Are these good for meal prep?

A: They’re perfect for meal prep! They store well, freeze well, reheat quickly, and can be customized for variety.


Q10: Are these keto or low-carb?

A: Yes—this recipe is naturally low in carbohydrates and fits keto, low-carb, and high-protein diets.

Eggless Buttermilk Fruit Cake

Eggless Buttermilk Fruit Cake

Prep time: 15 mins | Bake time: 50-60 mins | Servings: 1 loaf

Ingredients

Dry Base:

  • 1 1/2 cups (200g) all-purpose flour

  • 1 tsp (4 g) baking soda

  • 1/2 tsp (2 g) salt

Spices:

  • 1/2 tsp freshly grated nutmeg

  • 3/4 tsp ground cinnamon

  • 1/4 tsp ground ginger

  • 1/4 tsp ground cloves

Wet Ingredients:

  • 1 cup (240 ml) buttermilk (room temperature)

  • 1/2 cup (113g) unsalted butter (melted and cooled)

  • 3/4 cup (150g) light brown sugar (firmly packed)

  • 1/2 tsp (2 g) pure vanilla extract

The Fruit Mix:

  • 2 cups (300g) mixed dried and candied fruits (raisins, currants, dates, figs, cranberries, cherries, apricots, mixed peel, etc

Instructions

  1. Preparation: Preheat your oven to 350°F (180°C). Grease and flour a 9x5x3 inch loaf pan.

  2. Combine Dry Ingredients: In a large bowl, whisk the flour, salt, baking soda, and all spices. Add the fruit mix to the bowl and toss well until all the fruit pieces are coated in flour to prevent them from sinking.

  3. Mix Wet Ingredients: In a separate bowl, whisk together the buttermilk, melted butter, vanilla, and brown sugar.

  4. Create the Batter: Pour the buttermilk mixture into the dry ingredients and stir with a spatula until just combined and moistened.

  5. Bake: Pour the batter into the prepared pan and smooth the top. Bake for 50–60 minutes until the loaf is golden brown and a toothpick comes out clean.

  6. Cool: Let the cake cool in the pan for 10 minutes before transferring to a wire rack to cool completely.


Recipe Collection Roundup

  • Seafood: Crispy Joe’s Crab Shack Crab Cakes

  • Savory: Cheesy Air Fryer Hasselback Potatoes

  • Dessert: Rich Chocolate Cake with Glossy Glaze

Oatmeal and Apples (No Flour, No Sugar!)

Oatmeal and Apples (No Flour, No Sugar!)

Description

This simple and nutritious recipe combines oats, apples, and eggs to create a warm, lightly sweet, and satisfying bake — with no refined sugar or flour. The natural sweetness from apples, creaminess from warm milk, and a touch of vanilla make it taste like a dessert while keeping it healthy and filling.
It’s rich in fiber, protein, and antioxidants, helping to support digestion and maintain energy levels — perfect if you’re looking to lose weight or eat clean without giving up flavor.

⏱️ Preparation Time

  • Prep Time: 10 minutes
  • Cook Time: 25–30 minutes
  • Total Time: 35–40 minutes

🍴 Ingredients

  • 1 cup (90 g) oatmeal (old-fashioned or quick oats)
  • 150 ml (⅔ cup) warm milk (dairy or plant-based)
  • 2 apples, peeled and diced
  • 20 g (1 ½ Tbsp) butter, melted (or coconut oil for a lighter version)
  • ½ tsp vanillin or vanilla extract
  • 2 large eggs

Optional additions:

  • ½ tsp cinnamon (pairs perfectly with apples!)
  • A handful of raisins, nuts, or seeds for texture
  • A pinch of salt to enhance flavor

🔥 Instructions

  1. Preheat the Oven:
    Set oven to 350°F (175°C) and lightly grease a small baking dish or line it with parchment paper.
  2. Soak the Oats:
    In a bowl, pour warm milk over the oats. Let it sit for 5–10 minutes so the oats soften.
  3. Prepare Apples:
    Peel and dice the apples into small chunks. For extra sweetness, you can sauté them in a teaspoon of butter for 2–3 minutes until slightly soft.
  4. Mix the Batter:
    In a separate bowl, whisk eggs, melted butter, and vanilla (plus cinnamon if using). Add soaked oats and apples, and stir until well combined.
  5. Bake:
    Pour the mixture into your prepared dish and bake for 25–30 minutes, or until golden brown and set in the center.
  6. Serve:
    Serve warm or chilled. It’s delicious plain, or with a dollop of Greek yogurt, a drizzle of honey (optional), or a sprinkle of nuts.

🍽️ Servings

Makes: 2–3 servings
Serving Size: About 1 cup (200 g)

🧮 Nutritional Information (per serving, approx.)

Nutrient Amount
Calories 250 kcal
Protein 9 g
Carbohydrates 32 g
Sugars 10 g (from apples only)
Fiber 5 g
Fat 9 g
Saturated Fat 3 g
Sodium 60 mg
Calcium 10% DV
Iron 8% DV

(Values may vary slightly depending on milk type and apple variety.)

🌿 Health Benefits

  • 🧠 Oats: High in soluble fiber (beta-glucan) which helps lower cholesterol, supports digestion, and keeps you full longer.
  • 🍎 Apples: Rich in antioxidants, pectin fiber, and natural sweetness that stabilizes blood sugar levels.
  • 🥚 Eggs: Great source of protein and healthy fats, helping maintain lean muscle during weight loss.
  • 🧈 Butter (or coconut oil): Adds healthy fats for sustained energy and better nutrient absorption.
  • 🌸 Vanilla: Enhances sweetness naturally without added sugar.

Weight Loss Benefit:
High fiber + protein combination keeps you full longer, curbs sugar cravings, and stabilizes energy — ideal for eating three times a day as part of a balanced plan!

💡 Chef’s Notes & Tips

  1. Consistency Control:
    For a softer, pudding-like texture, add 2–3 extra tablespoons of milk. For firmer bars, reduce milk slightly.
  2. Batch Prep:
    Make a larger batch and store in the fridge — it reheats beautifully in the microwave or air fryer.
  3. Flavor Variations:
    Add spices like nutmeg or cardamom, or mix in grated carrots or pears for variation.
  4. Sweetness Upgrade (Still Natural!):
    Add 1 mashed banana or a few chopped dates if you want a bit more natural sweetness.
  5. Portable Snack:
    Bake in muffin tins for portioned “oat-apple cups” — great for on-the-go eating.

❓ Q & A

Q1: Can I make this without eggs?
👉 Yes! Replace each egg with 1 tablespoon ground flaxseed + 3 tablespoons warm water (let sit for 10 minutes).

Q2: Can I use water instead of milk?
👉 You can, but milk makes it creamier and adds protein. For a lighter version, use almond or oat milk.

Q3: Can I skip the butter?
👉 Yes. Use coconut oil or even unsweetened applesauce instead — still moist and flavorful.

Q4: Can I eat this cold?
👉 Definitely! It’s great cold as a breakfast bar or chilled dessert.

Q5: How long does it last?
👉 Store covered in the fridge for up to 4 days. You can also freeze portions for up to 1 month.

Q6: Is it really good for weight loss?
👉 Yes — it’s nutrient-dense, high in fiber and protein, and naturally low in calories and sugar, helping reduce hunger and stabilize metabolism.

🍯 Serving Suggestion

Serve warm with a sprinkle of cinnamon, a spoonful of Greek yogurt, and a few slices of fresh apple on top. It feels like dessert but nourishes like a balanced meal!