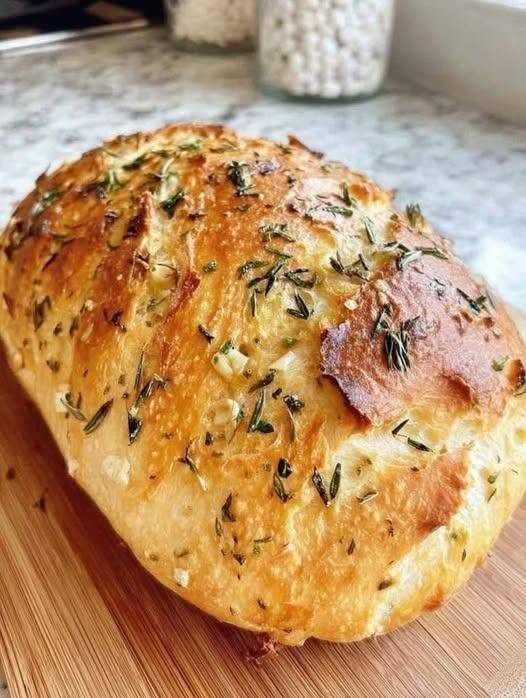
Garlic & Herb No-Knead Bread
Introduction
Garlic & Herb No-Knead Bread is a rustic homemade bread with a beautifully golden, crispy crust and a soft, airy interior infused with fragrant garlic and fresh herbs. It delivers the comforting aroma of freshly baked bread without the hard work of traditional kneading. With a few simple ingredients, a mixing bowl, and a little patience, you can prepare a delicious loaf that looks and tastes like it came from an artisan bakery.
The secret to this recipe is allowing time to do most of the work. Instead of kneading the dough by hand, you simply stir together flour, yeast, salt, water, garlic, and herbs. During the resting period, the dough gradually develops its structure and flavor. When baked in a preheated Dutch oven or another suitable covered baking pot, the dough traps steam, helping create a crisp, crackly crust while keeping the inside tender and moist.
Garlic adds a savory aroma, while rosemary and thyme contribute an earthy, Mediterranean-inspired flavor. A little olive oil enhances the richness, and a sprinkle of flaky salt on the crust makes each slice even more delicious.
This bread is wonderful alongside soups, pasta, salads, roasted vegetables, and hearty stews. You can also serve it warm with olive oil for dipping or toast leftover slices for breakfast.
Whether you are a beginner baker or someone who enjoys making homemade bread, this Garlic & Herb No-Knead Bread is a straightforward recipe worth adding to your kitchen routine.
Recipe Overview
-
Preparation Time: 15 minutes
-
Resting Time: 12–18 hours
-
Additional Rising Time: 30–45 minutes, if needed
-
Cooking Time: 40–50 minutes
-
Total Time: Approximately 13–20 hours, mostly inactive
-
Servings: 8–10 slices
-
Difficulty: Easy
-
Cuisine: Rustic, Mediterranean-inspired
-
Cooking Method: Oven-baked
-
Texture: Crispy crust with a soft, airy center
Ingredients
For the Bread Dough
-
3 cups (375 g) all-purpose flour or bread flour
-
1½ cups (360 ml) lukewarm water
-
1 teaspoon instant yeast
-
1½ teaspoons fine salt
-
1 tablespoon extra-virgin olive oil
-
4 cloves garlic, finely minced
-
1 tablespoon fresh rosemary, finely chopped
-
1 tablespoon fresh thyme leaves
-
2 tablespoons chopped fresh parsley
-
½ teaspoon freshly ground black pepper, optional
For the Topping
-
1 teaspoon olive oil, optional
-
1 small garlic clove, finely grated, optional
-
1 teaspoon chopped fresh rosemary
-
A pinch of flaky sea salt, optional
Ingredient notes: Bread flour generally produces a chewier loaf, while all-purpose flour creates a slightly softer texture. Fresh herbs provide a particularly fragrant flavor, but you can substitute dried herbs if necessary. Use approximately one-third of the quantity of dried herbs because they are more concentrated.
For a more pronounced garlic flavor, serve the baked bread with garlic-infused olive oil rather than adding too much raw garlic to the dough.
Equipment Needed
-
Large mixing bowl
-
Wooden spoon or sturdy spatula
-
Measuring cups or kitchen scale
-
Clean kitchen towel or plastic wrap
-
Parchment paper
-
Dutch oven or oven-safe covered baking pot
-
Oven mitts
-
Wire cooling rack
-
Sharp bread knife
A Dutch oven is ideal because it traps steam during baking. If you do not have one, you can use a suitable oven-safe covered pot or follow the alternative baking method described below.
Instructions
Step 1: Prepare the Garlic and Herbs
Peel and finely mince the garlic cloves. Chop the rosemary and parsley, then remove the small thyme leaves from their stems.
Try to chop the rosemary finely so that its firm leaves distribute evenly through the dough. Large pieces can create concentrated pockets of flavor.
Fresh garlic provides a strong, savory aroma, while rosemary and thyme bring an earthy fragrance. Parsley adds a fresh herbal note that balances the stronger ingredients.
If you are using dried herbs, measure them before beginning. You can also combine rosemary and thyme with a little dried oregano for a more Mediterranean-inspired loaf.
Set the prepared ingredients aside.
Step 2: Combine the Dry Ingredients
Place the flour in a large mixing bowl. Add the instant yeast, salt, black pepper if using, rosemary, thyme, and parsley.
Stir the mixture thoroughly with a wooden spoon so the yeast and seasonings are distributed throughout the flour.
Keeping the ingredients evenly mixed helps ensure that the bread rises consistently and that every slice contains a balanced amount of herbs.
If you are using active dry yeast instead of instant yeast, check the manufacturer’s instructions. Some active dry yeast products benefit from being dissolved in lukewarm water before mixing.
Step 3: Add the Garlic and Water
Add the minced garlic and olive oil to the dry ingredients.
Gradually pour in the lukewarm water, stirring as you go. Continue mixing until all the flour is moistened and a rough, sticky dough forms.
The dough will not look smooth like traditional kneaded bread dough. Instead, it should look shaggy, uneven, and slightly sticky.
This is completely normal.
Avoid adding large amounts of extra flour simply because the dough feels sticky. A wetter dough helps create the open, airy crumb associated with no-knead bread.
If there are small dry patches at the bottom of the bowl, add a teaspoon of water at a time until they are incorporated.
Step 4: Cover and Let the Dough Rise
Cover the mixing bowl with plastic wrap, a lid, or a clean kitchen towel.
Leave the dough at a cool room temperature for approximately 12–18 hours. During this time, the yeast gradually produces gas, causing the dough to expand and develop flavor.
The ideal resting time depends on room temperature and yeast activity. In a warm kitchen, the dough may rise more quickly; in a cooler environment, it may need longer.
When ready, the dough should look bubbly, expanded, and noticeably softer. Its surface may appear slightly uneven, and small bubbles should be visible around the edges.
Do not rely on the clock alone. The appearance and expansion of the dough are useful indicators of fermentation.
Because this dough contains fresh garlic and herbs, do not leave it at room temperature indefinitely. Follow the recommended rising period and move to the next step when the dough is ready.
Step 5: Prepare the Dough for Shaping
Lightly flour a clean work surface.
Use a spatula to gently release the dough from the bowl and turn it onto the floured surface. It will feel soft and sticky.
With lightly floured hands or a dough scraper, gently fold the edges of the dough toward the center several times. This helps create a rounder shape without conventional kneading.
Turn the dough seam-side down and gently shape it into a round loaf.
Do not press out all the air. The bubbles developed during fermentation help create a light, airy interior.
If the dough sticks excessively, use a little flour on your hands rather than working large quantities of flour into the dough.
Step 6: Allow a Short Second Rise
Place a sheet of parchment paper on the counter and set the shaped dough on top.
Cover it loosely with a clean towel and let it rest for approximately 30–45 minutes.
During this time, the dough may puff slightly. This brief rest helps relax the dough and prepares it for baking.
Meanwhile, preheat your oven to 450°F (232°C). Place your empty Dutch oven, including its lid, inside the oven while it heats.
Allow the pot to preheat for approximately 30 minutes if its manufacturer permits this. Always verify that the pot and lid are oven-safe at the intended temperature.
Important safety note: A very hot Dutch oven can cause serious burns. Use dry oven mitts, keep the pot on a stable surface, and avoid placing a hot pot on a cold or wet surface.
Step 7: Transfer the Dough to the Hot Pot
Carefully remove the preheated Dutch oven from the oven and place it on a heat-safe surface.
Using the parchment paper as a sling, lower the dough into the hot pot.
Keep your hands away from the pot’s interior because the metal will be extremely hot.
If desired, use a sharp knife or bread lame to make one shallow cut across the top of the dough. This gives the loaf room to expand as it bakes.
Sprinkle a little chopped rosemary and flaky salt over the top if you like.
Cover the pot with its lid and return it to the oven.
Step 8: Bake Covered
Bake the bread, covered, for approximately 30 minutes.
The covered pot traps moisture released by the dough, creating a steamy environment that allows the loaf to expand before its crust fully sets.
During this stage, the bread begins developing its structure and internal crumb.
Avoid lifting the lid repeatedly, because doing so releases steam and reduces the effectiveness of the covered baking method.
Step 9: Bake Uncovered Until Golden
After 30 minutes, carefully remove the lid.
Continue baking for another 10–20 minutes, until the crust is deep golden brown and crisp.
The exact time depends on your oven, the size of your loaf, and the type of pot used.
If the top browns too quickly, reduce the oven temperature slightly and continue baking until the loaf is cooked through.
The bread should feel firm when gently tapped, and the crust should look dry and well developed. For a more precise check, the center of a fully baked loaf generally reaches approximately 200–210°F (93–99°C).
Avoid judging doneness by color alone. A beautiful crust is important, but the center must also be fully baked.
Step 10: Add the Optional Garlic-Herb Finish
For an extra fragrant crust, mix one teaspoon of olive oil with a small amount of finely grated garlic and chopped rosemary.
Brush a very thin layer over the loaf immediately after baking, if desired.
Use the raw garlic topping sparingly. Raw garlic has a sharper flavor than baked garlic, and too much can overpower the delicate herbs.
Alternatively, skip the topping and let the natural garlic and rosemary aroma speak for itself.
Step 11: Cool Before Slicing
Carefully remove the bread from the pot using the parchment paper or suitable utensils.
Transfer it to a wire rack and allow it to cool for at least 45–60 minutes before slicing.
Cooling is an important part of baking. The interior continues to settle as the loaf cools, helping it maintain a tender crumb instead of becoming gummy.
Cutting into the bread too early can release steam and compress the interior.
Once cooled, slice with a serrated bread knife using gentle sawing motions.
Step 12: Serve and Enjoy
Arrange the slices on a serving board or plate.
Serve warm or at room temperature with olive oil, balsamic vinegar, soup, pasta, or a fresh Mediterranean salad.
For a delicious appetizer, toast slices lightly and top them with chopped tomatoes, basil, and a drizzle of olive oil.
The crust should be crisp, the center soft and airy, and the garlic-herb aroma noticeable without being overpowering.
Tips for the Best Garlic & Herb No-Knead Bread
1. Measure the Flour Accurately
Too much flour can make the bread dense and dry. Weighing the flour is the most reliable approach. If using cups, spoon the flour into the measuring cup and level it rather than packing it tightly.
2. Use Lukewarm Water
Water that is comfortably lukewarm helps the yeast become active. Very hot water can damage the yeast, while cold water may slow fermentation.
3. Give the Dough Enough Time
The long rise allows flavor and structure to develop. If the dough has not expanded or developed bubbles, it may need additional time, depending on room temperature.
4. Avoid Excessive Flour During Shaping
Sticky dough is normal for this recipe. Use lightly floured hands and a scraper to shape it gently.
5. Preheat the Dutch Oven Carefully
A hot, covered pot helps produce the loaf’s signature crust. Check that your pot, lid, and handles can safely withstand the oven temperature.
6. Let the Bread Cool Completely
Cooling preserves the texture and makes slicing easier. Patience at this stage makes a noticeable difference.
7. Balance the Herbs
Rosemary has a strong, pine-like flavor, while thyme is earthy and delicate. Parsley adds freshness. Keep the quantities balanced so the bread remains fragrant rather than bitter or overpowering.
Variations to Try
Roasted Garlic and Herb Bread: Replace the raw minced garlic with several soft cloves of roasted garlic. Roasted garlic has a sweeter, milder flavor.
Parmesan Garlic Bread: Add approximately ¼ cup finely grated Parmesan cheese to the dough. Cheese can increase browning, so watch the loaf during the uncovered baking stage.
Mediterranean Olive Bread: Add ⅓ cup of chopped, well-drained Kalamata olives. Pat them dry before mixing so they do not introduce excessive moisture.
Chili Garlic Bread: Add ¼–½ teaspoon red pepper flakes for gentle heat.
Whole-Wheat Garlic Bread: Replace up to one cup of the all-purpose flour with whole-wheat flour. You may need a little extra water, and the finished loaf will be denser.
Dried Herb Version: Substitute approximately one teaspoon dried rosemary, one teaspoon dried thyme, and one teaspoon dried parsley for the fresh herbs, adjusting to taste.
Alternative Baking Method Without a Dutch Oven
If you do not own a Dutch oven, you can still make this bread.
-
Preheat the oven to 450°F (232°C).
-
Place the shaped dough on parchment paper on a sturdy baking tray.
-
Put an empty, oven-safe metal tray on a lower rack while the oven preheats.
-
Place the loaf in the oven and carefully pour hot water into the lower tray to create steam, if the tray is designed for this use.
-
Close the oven door promptly and bake until the loaf is golden and cooked through, approximately 35–45 minutes depending on its shape and thickness.
Use appropriate oven protection when handling hot water and trays. Never pour water onto the oven floor, a glass dish, or an unsuitable hot surface. This method may produce a slightly different crust from the Dutch oven method.
Serving Suggestions
Garlic & Herb No-Knead Bread works beautifully with many dishes.
-
Tomato soup: Dip warm slices into creamy tomato or roasted red pepper soup.
-
Mediterranean pasta: Serve alongside tomato-based pasta, pesto pasta, or a simple garlic olive oil sauce.
-
Fresh salad: Pair with cucumber, tomatoes, red onion, olives, and feta.
-
Olive oil dip: Combine extra-virgin olive oil with black pepper, dried oregano, and a little balsamic vinegar.
-
Roasted vegetables: Serve with eggplant, zucchini, bell peppers, or roasted mushrooms.
-
Cheese board: Add slices to a platter with olives, cheese, fresh tomatoes, and herbs.
-
Garlic toast: Toast leftover slices and brush them lightly with olive oil.
Nutritional Information
The following is an approximate estimate per slice, assuming the loaf is divided into 10 slices and the optional topping is omitted.
| Nutrient | Approximate amount |
|---|---|
| Calories | 165–190 kcal |
| Protein | 4–6 g |
| Carbohydrates | 32–36 g |
| Fat | 2–4 g |
| Fiber | 1–2 g |
| Sodium | 300–400 mg |
Actual values depend on the flour brand, slice size, amount of olive oil, and quantity of salt used. Bread flour and all-purpose flour may also differ slightly in their nutritional composition.
Health and Nutrition Benefits
Provides carbohydrates for energy: Flour supplies carbohydrates that the body can use for energy throughout the day.
Contains small amounts of healthy fats: Olive oil contributes predominantly monounsaturated fat, although the amount per slice is relatively modest.
Adds flavor without requiring a heavy topping: Garlic, rosemary, thyme, and parsley make the bread flavorful without needing large amounts of butter or cheese.
Can complement a balanced meal: Pairing the bread with vegetables, legumes, soup, or a protein-rich dish helps create a more varied meal.
This bread is still primarily a flour-based food, so portion size and the overall balance of your diet matter.
Storage Instructions
At room temperature: Once completely cooled, store the loaf in a bread bag or suitable bread container for approximately two to three days. A breathable container helps preserve the crust, although the crust naturally softens over time.
In the refrigerator: Refrigeration is generally unnecessary and may cause bread to stale more quickly.
In the freezer: Slice the cooled loaf and place the slices in a freezer-safe bag or container. Freeze for up to approximately three months for good quality.
To reheat: Warm slices in a toaster or oven until crisp. To refresh a larger portion of the loaf, heat it in a moderate oven for several minutes, checking frequently to prevent excessive drying.
Because the dough contains fresh garlic and herbs, follow the recipe’s fermentation time rather than leaving it at room temperature for an extended period.
Frequently Asked Questions
Q1: Can I make this bread without kneading at all?
Yes. The recipe requires only mixing and gentle shaping. The long resting period allows the dough to develop structure without conventional kneading.
Q2: Can I use active dry yeast?
Yes. Use the same general quantity, but follow the yeast package instructions for activation. Dissolving active dry yeast in some of the lukewarm water before adding it can help ensure it is active.
Q3: Why is my dough so sticky?
No-knead dough contains relatively high moisture, which helps create an airy crumb. Use a scraper and lightly floured hands rather than adding excessive flour.
Q4: Why did my bread turn out dense?
Possible causes include inactive yeast, insufficient rising time, too much flour, or a dough that did not develop enough gas before baking.
Q5: Can I use dried herbs instead of fresh herbs?
Yes. Use smaller quantities of dried herbs because their flavor is concentrated. Dried rosemary and thyme work particularly well.
Q6: Can I prepare the dough in advance?
The dough can be prepared ahead, but fermentation needs to be controlled. For a longer delay, refrigerate the dough rather than allowing it to rise indefinitely at room temperature. The dough may need additional time to warm and rise before baking.
Q7: How do I know when the bread is fully baked?
Look for a deep golden crust and a firm loaf. An internal temperature around 200–210°F (93–99°C) is a useful guide.
Q8: Can I add cheese to the dough?
Yes. Finely grated Parmesan is a good choice. Keep additions moderate so they do not interfere with the dough’s structure.
Q9: Is this recipe suitable for beginners?
Absolutely. There is no complicated kneading technique. The most important steps are measuring the ingredients, allowing enough fermentation time, and baking the loaf thoroughly.
Q10: Why should I cool the bread before slicing?
Cooling allows the interior crumb to set. Slicing too early can make the bread appear gummy and cause the soft center to compress.