No-Bake Cherry Yum Yum Pie Recipe

No-Bake Cherry Yum Yum is a layered dessert of sweetened graham cracker crumbs, cream cheese, cherry pie filling and fresh whipped cream!

A YUMMY LAYERED DESSERT

Not long ago, I made a No Bake Apple Yum Yum dessert and we all loved it! But my favorite flavor is always cherry so I just had to make a cherry version. It couldn’t be simpler. Whether you don’t feel like baking or it’s too hot to turn on the oven – this is a perfect dessert!

Tip For Making Best Cherry Yum Yum Pie

You can use Cool Whip instead of making fresh whipped cream. To do that you would take out the heavy whipping cream, 3 tablespoons sugar and 1/2 teaspoon vanilla extract and replace with one (8 ounce) tub of COOL WHIP, thawed.

You can also switch out the pie filling flavors. Apple, strawberry, peach and blueberry pie filling all work in this dessert!
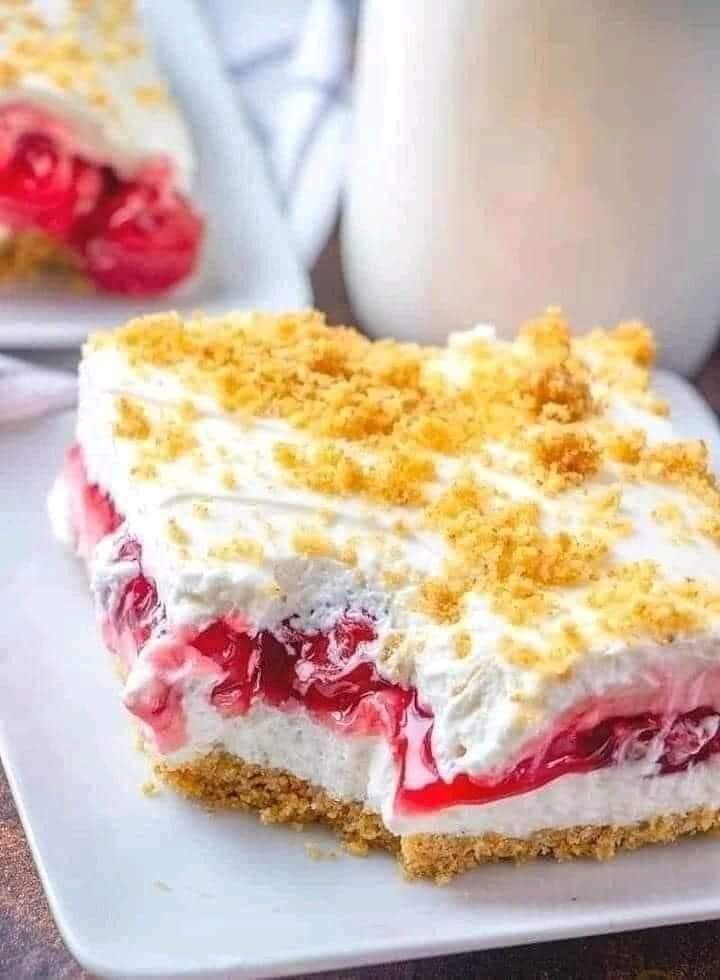
No-Bake Cherry Yum Yum is a layered dessert of sweetened graham cracker crumbs, cream cheese cherry pie filling and fresh whipped cream!

Prep Time:20min

Total Time:20min

Servings:12

Calories:339kcal

Ingredients:

  • 1 1/2 cups graham cracker crumbs
  • 6 Tablespoons salted butter, melted melted
  • 8 ounce block cream cheese, softened to room temperature
  • 1/2 cup sugar
  • 2 cups (1 pint) heavy whipping cream
  • 3 Tablespoons sugar
  • 1/2 teaspoon vanilla extract
  • 21 ounce can cherry pie filling

Instructions:

  1. Start by crushing the graham crackers into crumbs.
  2. I put about 10 graham cracker sheets into a ziploc bag then pounded them with a heavy object (like a rolling pin or flat meat tenderizer).
  3. You need enough to make 1 1/2 cups in crumbs.
  4. Set aside 2 tablespoons of the crumbs (we’ll use that for the topping.)
  5. In a medium bowl, combine melted butter with graham cracker crumbs.
  6. Spread the rest of the crumbs into a 9×9-inch baking dish.
  7. Push down with your hands to make a flat layer.
  8. Next, combine softened cream cheese with 1/2 cup sugar.
  9. This is easiest if you use a stand mixer or a handheld electric mixer. Set this bowl aside.
  10. In a separate bowl (to make the whipped cream), combine the heavy whipping cream, 3 tablespoons sugar and vanilla extract.
  11. Using a stand or electric mixer, whip it until stiff peaks form.
  12. You can skip this if you are using COOL WHIP. This will take a minute or two on a high speed setting.
  13. Combine the cream cheese mixture with the whipped cream, by hand, until combined well.
  14. Spread half of the cream cheese/whipped cream mixture evenly over crust.
  15. Evenly spread the cherry pie filling over the whipped cream layer.
  16. Finally, top with the remaining cream cheese/whipped cream mixture. Spread evenly.
  17. Top with reserved graham cracker crumbs.
  18. Refrigerate for a couple hours (or overnight) before slicing and serving.

Notes:

  • Please refer to my tips and ingredient list above for other substitutions or for the answers to the most common questions.
  • You can substitute the heavy whipping cream, 3 tablespoons sugar and 1/2 teaspoons vanilla extract with one (8 ounce) tub of COOL WHIP, thawed.
  • Leftovers should be kept covered in the refrigerator for up to 3 days. This can also be frozen if stored properly in a freezer safe container for up to 3 months.

Nutritional Info:

Calories: 339kcal | Carbohydrates: 35g | Protein: 1g | Fat: 21g | Saturated Fat: 12g | Cholesterol: 69mg | Sodium: 144mg | Potassium: 100mg | Sugar: 15g | Vitamin A: 860IU | Vitamin C: 2.1mg | Calcium: 41mg | Iron: 0.6mg

Apple Pie with Custard Recipe: You’ll never bake another one!

With this delicious Apple Pie with Custard, the apples are placed in a pudding, which is then baked in the oven. That gives you that sweet exterior, with a creamy filling with fresh apple. A party will be on your plate, so delicious.

Prep Time: 25mins

Cook Time: 1hr 10mins

Stiffen: 3 hrs

Total Time: 4hrs 35min

Servings: 8 persons

Calories: 585 kcal

Ingredients:
  • 155 grams of sugar
  • 2 packets of vanilla sugar
  • 250 g Butter
  • a bit of salt
  • 250 g flour
  • 2 packets of vanilla custard powder
  • 3 Owner
  • 155 ml milk
  • 3 large apples
  • 1 packet of baking powder
Preparation:
  1. (Preheat the oven to 180-190 °C and grease a springform pan with a little butter).
  2. Next, cream the butter with the vanilla sugar, sugar and a pinch of salt. Then gradually stir in the eggs. Add the flour, baking powder and vanilla pudding powder and mix well and gradually add the milk.
  3. Now wash the apples, peel, core and cut into pieces as desired. Using a spatula, fold the apple pieces into the batter.
  4. Finally, fill the batter with the apple pieces in the rectangular springform pan and bake on the middle shelf for 40 to 50 minutes and you’re done. Fast and tasty!
NOTES:

Optional:

  • Add a layer of crushed almonds over your pie crust before adding the apple filling to give a little extra crunch to your pie.
  • Another addition you can add is raisins.
  • If you experience issues with a soggy crust bottom, try squeezing as much liquid as possible out of the shredded apple before adding it to the pie crust.
  • Or blind bake your crust at 350 degrees for about 5-10 minutes.

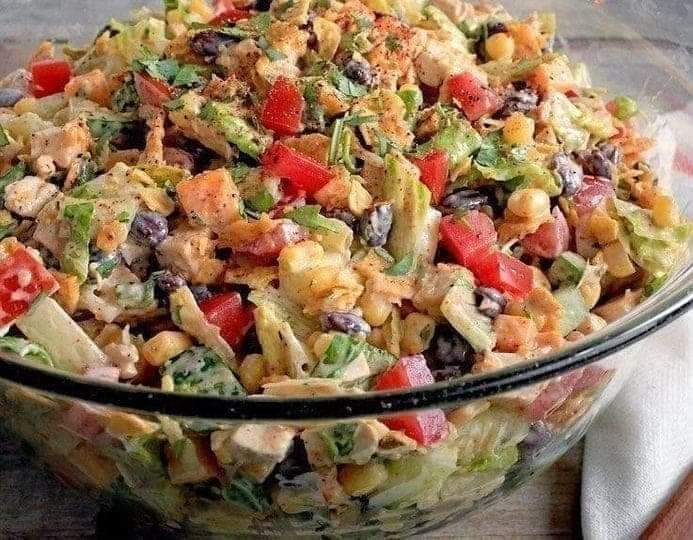
Tex-Mex Chicken Salad Recipe

This Tex-Mex inspired salad is a great way to use up any leftover chicken you might have on hand. A super easy, healthy and delicious entrée salad you’re sure to love.

Weight Watchers Tex-Mex Chicken Salad Recipe with corn, black beans, scallions, bell peppers, cilantro, and boneless, skinless chicken breast.

A super quick, and easy meal! Delicious Mexican flavors!

The perfect, make ahead recipe!

Weight Watchers Tex-Mex Chicken Salad Recipe 

Weight Watchers Tex-Mex Chicken Salad Recipe. This is a quick and healthy, low calorie lunch or dinner with 267 calories, 2 WW Freestyle Points, and 7 Smart Points.

PREP TIME: 15MINS

COOK TIME: 0MINS

TOTAL TIME: 15MINS

COURSE: Salad

CUISINE: Mexican

SERVINGS: 2

INGREDIENTS:
  • ½ medium red bell pepper chopped
  • ½ medium green bell pepper chopped
  • 2 medium scallions chopped
  • 1 can (15 oz) corn drained
  • 1 can (15 oz) black beans drained and rinsed
  • 1 tbsp corn oil
  • 2 tbsp lime juice
  • 8 ozs boneless skinless chicken breast cooked and chopped
  • 2 tbsp reduced-sodium taco seasoning mix
  • 4 tbsp fresh cilantro chopped
  • 4 tbsp sour cream – reduced-fat
INSTRUCTIONS:
  1. In a large mixing bowl, add red sweet pepper, green bell pepper, scallions, corn, and black beans. Mix well.
  2. Add lime juice and oil to bean mixture; toss to coat
  3. Mix in (toss) taco seasoning, cilantro, and chicken.
  4. Top each serving with sour cream, if desired.
NOTES:

My WW Points: 2 Blue Plan and 7 Green Plan

2 WW Freestyle Points and 7 Weight Watchers Smart Points

We are not associated with Weight Watchers/WW in any way. Double check points on their official calculator.

NUTRITIONAL INFO:

Calories: 267.1kcalCarbohydrates: 38.1gProtein: 22.7gFat: 3.9gSaturated Fat: 0.8gCholesterol: 39.6mgSodium: 87.4mgFiber: 9.2gSugar: 4.8g

Easy Chocolate Mousse Recipe

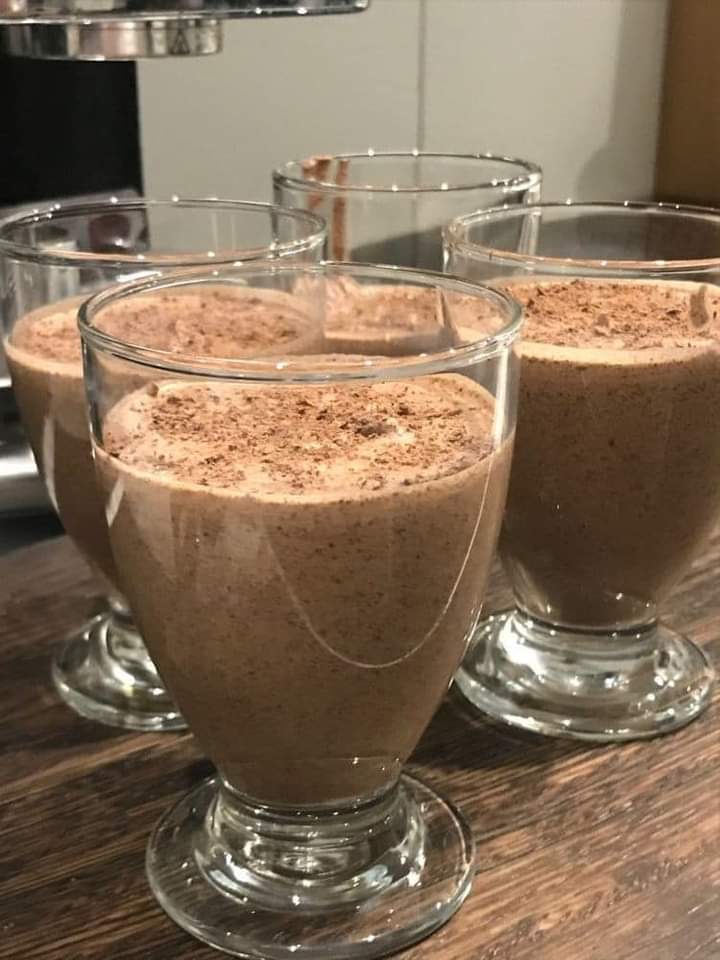
Chocolate Mousse may well be the ultimate chocolate fix! Rich and creamy, yet light and fluffy, one pot is satisfying but always leaves me wanting more…….

This is a classic chocolate mousse made the proper French way, as served in fine dining restaurants. Less cream, more chocolate, a more intense chocolate flavour and a beautiful creamy mouth feel.

Chocolate Mousse Recipe:

Light and airy yet rich, this is a Chocolate Mousse made the classic French way, as served in fine dining restaurants. Less cream, richer mouth feel, true chocolate flavour. It’s actually quite straight forward to make!

Raw eggs note: required to make real chocolate mousse. It is not possible to achieve the same result without using eggs, despite what other recipes promise – and I’ve tried many. It will either be denser, or be like eating whipped cream, or have a weird jelly like texture more like pana cotta. Read in post for more information. Note: raw eggs not advisable for pregnant women or babies to consume.

Prep Time: 20 mins

 Servings: 4 

INGREDIENTS:

  • 3 eggs (~55g/2 oz each)
  • 125g / 4.5 oz dark cooking chocolate , bittersweet / 70% cocoa (Note 1)
  • 10g / 0.3 oz unsalted butter
  • 1/2 cup cream , full fat (Note 2)
  • 3 tbsp caster sugar (superfine white sugar)
Decorations:
  • More whipped cream
  • Chocolate shavings (Note 3)
INSTRUCTIONS:

  1. For reliable results, work at a steady pace so your whipped egg whites and cream do not get too warm!
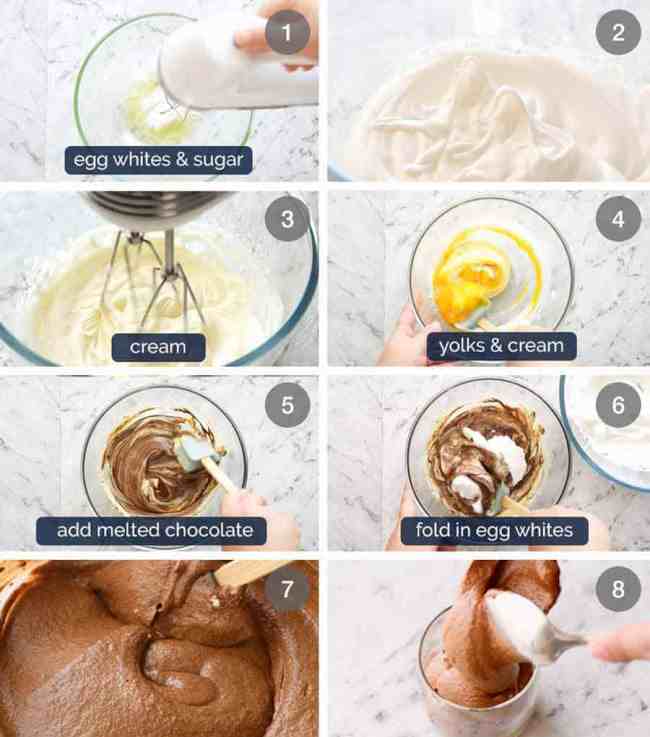
  2. Separate eggs and yolks while eggs are cold. Place whites in a large bowl and yolks in a small bowl. Leave whites while you prepare other ingredients. (Note 4)
  3. Yolks: Whisk yolks until uniform.
  4. Melt chocolate and butter: Break chocolate into pieces and place in a microwave-proof bowl with the butter. Melt in the microwave in 30 second bursts, stirring in between, until smooth. (Stir in optional flavourings at this point, but read Note 6 first). Set aside to cool slightly while you proceed with other steps.
  5. Whip cream: Beat cream until stiff peaks form, being careful not to over-whip.
  6. Whip whites: Add sugar. Beat whites until firm peaks form ( Note 5)
Fold together all ingredients:
  1. Fold egg yolks into cream using a rubber spatula – 8 folds max. Some streaks is fine.
  2. Check chocolate temperature: The chocolate should still be runny but warm (min 35C / 95F; ideal 40C / 104F). If too cool or thick, microwave in burst of 5 seconds at a time until runny.
  3. Pour chocolate into cream yolk mixture. Fold through – 8 folds max. Some streaks here are ok.
  4. Add 1/4 of beaten egg whites into chocolate mixture. Fold through until incorporated – “smear” the spatular across surface to blend white lumps in – aim for 10 folds.
  5. Pour chocolate mixture into egg whites. Fold through until incorporated and no more white lumps remain – aim for 12 folds max, but ensure there are no obvious egg white patches.
  6. Divide mixture between 4 small glasses or pots. Refrigerate for at least 6 hours, preferably overnight.
  7. To serve, garnish with cream and chocolate shavings. Raspberries and a tiny sprig of mint for colour would also be lovely!
Notes:

1. Chocolate: It’s critical you use COOKING chocolate, not eating chocolate. Cooking chocolate (found in the baking aisle) is made for, well, cooking with. It melts more smoothly and is thinner than eating chocolate when melted. If you use eating chocolate, the chocolate may seize when mixed in and you may get lumps in your mousse! Don’t risk it, use cooking chocolate.

Bittersweet dark chocolate and 70% cocoa dark chocolate is best to get a good chocolatey flavour.

2. Cream: You must use full-fat cream that can be whipped – pure cream (35% fat), thickened cream (35% fat) or heavy cream (35 – 40% fat). Do not use pouring cream that cannot be whipped – the label will state if the cream cannot be whipped.

3. Chocolate Shavings: Use a small knife and scrape at a low angle on the flat side of a block of chocolate.

4. Eggs tip: It’s easier to separate whites from yolks when eggs are cold, but whites at room temp fluff up better when closer to room temp. So separate the eggs when fridge cold then set aside while you prep the other ingredients to let the whites come to room temp a bit.

5. Beaten whites consistency: Egg whites can be beaten to: soft peaks, firm and stiff peaks. We want the middle one – firm peaks. This is when you have a “elf hat” floppage at the top of the peak. If it stands straight upright without the little hook then it’s stiff, not firm (still works fine but it won’t hold up as well after a few days in the fridge). If you do not get any type of peaks at all, then keep beating!

6. Flavourings: such as liquor, can be added into the melted chocolate, but make sure it is at room temperature other it can make the chocolate sieze. Stir it in then leave to cool per recipe. You can taste it later to see if the flavour is strong enough for you – but don’t go overboard otherwise you may have issues setting the mousse! Up to 1 tbsp should be fine (and that should be enough!!), don’t go overboard otherwise it might affect the melted chocolate or compromise how the mousse sets.

PRO TIP: Never add flavourings into just melted chocolate otherwise it might seize and become grainy, always ensure it’s combined with something (butter, in this case).

7. Storage: Best within 2 days but keeps for a week in the fridge with only a slight reduction in aeration.

9. Nutrition per serving. Makes 4 x 1/2 cup (125ml) servings. It is quite rich!

NUTRITIONAL INFO:

Calories: 375cal | Carbohydrates: 27g | Protein: 7g | Fat: 26g | Saturated Fat: 18g | Cholesterol: 171mg | Sodium: 92mg | Potassium: 266mg | Fiber: 1g | Sugar: 19g | Vitamin A: 700IU | Calcium: 134mg | Iron: 1mg


Home-made Bread Recipe

The way to make bread every time the rainy season comes back or the cold season comes, women pay a lot of attention. Many people are afraid that making bread is difficult and consider it a great challenge. However, that is not the case. There are many successful easy ways to make bread.

  INGREDIENTS:

  • 420g bread flour
  • 1/2 teaspoon salt
  • 1/2 tablespoon sugar
  • 250ml warm water
  • 1.5 teaspoons of bread yeast
  • 1 tablespoon cooking oil (optional)
  • 1 chicken egg (optional)

INSTRUCTIONS:

Soak yeast to make bread
  1. You put the yeast in a cup, add 1/2 cup of warm water, stir well and wait 15 minutes for the yeast to bloom. To get the right water temperature to help ferment, try water that is just warm on your hand or wrist. Because, if the water is not warm, the yeast will not bloom and the hot water will kill the yeast.
  2. The process of soaking yeast in making bread is very important. The successful soaking of yeast almost determines 70% of your batch of cakes, so you should pay attention to this step.
  3. After adding water to the yeast, you only need to wait a few minutes to see the effervescent yeast. If you wait for more than 5 minutes, the yeast just melts without bubbling, then discard this cup of yeast and make another one.
Effervescent yeast:

Effervescent yeast is your yeast that has successfully fermented. Internet photos

 Dough:

Once I had a good yeast, I started kneading the dough. You put 2/3 of the flour in a deep bowl, add salt and sugar, mix well, then pour in the yeast and continue to mix.

Next, you add warm water with the same warmth as when making yeast or close to it. Add water slowly and mix well. You can use a wooden spoon or chopsticks to mix because the dough is very sticky at this point.

Sticky dough
  1. At the beginning of mixing the dough, the dough is very sticky, please be patient. Internet photos
  2. After adding all the water and mixing well, add the remaining dry powder little by little, continue mixing.
  3. When you have mixed 1/2 of the remaining dry flour, you begin to knead the dough. 1/2 of the remaining dough, you use to prevent sticking during the kneading process until the shape of the cake.
  4. To knead the dough, you can either stuff it on a clean countertop or use a clean wooden cutting board. You sprinkle some dry powder on it and pour the mixed powder out.
  5. You use the palm near the wrist to knead. While kneading, add a little dry flour until the dough no longer sticks to your hands.
  6. Stuffing time is about 15 minutes. Or when you see that the dough is soft, smooth, not sticky to your hands, when you pull it out with a certain elasticity, stop.
Dough stuffing

You knead the dough for about 15 minutes or when you see a smooth dough that doesn’t stick to your hands anymore. Internet photos

 Let the dough rest
  1. After kneading the dough, use a large deep bowl/bowl, apply a little dry flour evenly to the bottom and sides of the bowl.
  2. At the same time, you also apply a little dry flour to the dough, place the dough in a bowl, cover with cling film or cover the bowl with a clean towel.
  3. You can also use cooking oil to grease the bottom and sides of the bowl so that when the baking powder doesn’t stick it’s easier to remove it from the bowl.
  4. Place the bowl of dough in a warm place, the dough will rise faster.
  5. After 90 minutes, your dough has doubled, you deflate the dough, take out the dough and shape the cake.
Let the dough rest:

After kneading the dough, let the dough rest for about 90 minutes for the dough to rise.

Shape the cake:
  1. If you want to make large bread, you can leave the dough whole, make the baguette or as long as you want.
  2. To make a circle, pull the edge of the dough to the center of the underside of the dough, then rotate the dough with your hands to gradually round it.
  3. To make a long loaf, roll the dough a little longer, flatten the dough slightly, then roll the edges of the dough in the middle, maybe letting one edge of the dough overlap the other.
  4. Next, you can tighten the two ends of the dough to slim it down.
  5. If you want the bread to be small, you can divide the dough into small portions.
  6. Depending on your preference, you can create a round or long bread shape.
  7. With bagels, you roll the dough but do not use force but just cup your hands enough to create a roundness for the dough.
  8. Or, you can put the ball on your hand, pull the edge of the dough into the center of the dough ball to smooth the other half of the dough.
  9. When placing in the baking tray, you put this smooth side on top, the beautiful smooth surface is not rough.
Shape a baguette:

When shaping the bread, do not use force.

  1. With long bread, you gently flatten the dough into a cylinder and roll the 2 sides of the dough inward, rolling it gently.
  2. Or, you can simply roll gently by hand until the ball is long and cylindrical, then gently roll the ends to slightly point it.
  3. After shaping all the dough, let the dough rest for another 30 minutes.
  4. You also use a towel or food wrap to cover the dough so that the dough rises a second time and does not dry out.
  5. Let the dough rest for the second time
  6. After shaping, cover the dough and let it rest for the second time for about 30 minutes. Internet photos
  7. When the dough is almost ready, turn on the oven to heat it up, then reduce it to 180-200 degrees Celsius depending on your oven to prepare for baking.
  8. If you are making a large loaf shape, then use a sharp knife or razor to cut the surface of the dough.
  9. As a circle, you make a cross from the center of the dough to pull out 1/2 of the cake or make a big grid.
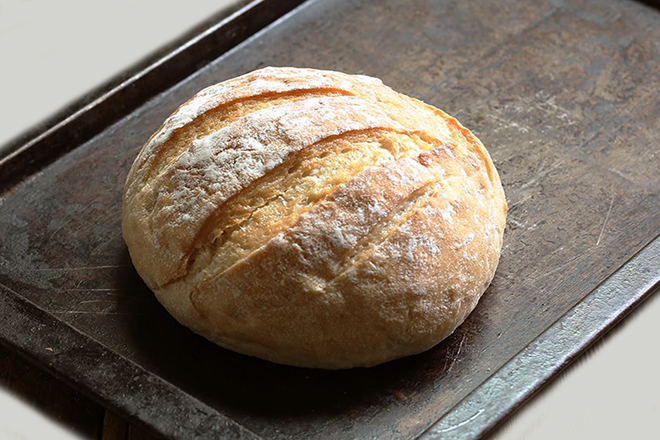
  10. As a long loaf, you slit about 3 diagonal lines on the dough, the length of each incision is about 2/3 along the width of the cake, or you can also slit a large grid on the surface of the cake.
  11. If you want a nice golden cake, beat the eggs and brush the dough before baking. However, you can also do not need to use eggs, but use fresh milk without sugar to brush, or do not brush at all, our cake has a more brown color.
Scramble eggs:

Brushing eggs on the top of the bread will give the cake an attractive color.

Bake:
  1. You put the cake on the tray and put it in the oven for about 30-35 minutes or when the cake turns golden brown.
  2. To prevent the delicious cake from drying out, you can put a cup of water in the oven.
  3. To store water, you can use a small ceramic cup/cup or a stainless steel mold to make cupcakes .
  4. In case you do not leave a cup of water in the oven, during the baking process, you can occasionally use a spray bottle to spray the surface of the cake.
  5. When the cake is golden brown, use a chopstick or fork to try to press the cake to feel crispy.
  6. You turn off the oven, open the oven door for about 5-7 minutes to cool down, then remove the cake.
  7. You can also take out the cake to enjoy immediately if you like. When the cake is removed from the oven, you should leave it on the tray to cool down and then store it.
  8. Enjoy the bread
 Preserving bread after baking
  1. After baking, you need to pay attention to the preservation stage, the cake will be delicious for a long time. To preserve the cake you need to do the following steps:
  2. Wait for the cake to cool down, when it is still warm, you should cover it with a clean towel to prevent the cake from drying out
  3. When the cake is completely cooled, put the cake in a zip or plastic food bag tied or glued. Stored in this way, the cake will be soft and take a long time to dry.
  4. You can also use a paper bag to preserve the cake. If you use a paper bag, you can put the cake in the bag while it is still warm, without waiting for it to cool completely.
  5. After putting the cake in the bag, you keep it in a cool place.
  6. The shelf life of the cake is 3 days, the best is to use it after baking and on the 2nd day.
Store in a paper bag
  1. After making bread, use it right away or it’s still delicious the next day, you can keep it for 3 days. Internet photos
  2. You see, the way to make bread seems to be very difficult, but it is not.
  3. Maybe the fermenting or kneading process will “annoy” you a bit, but if you get through it the first time, it’s sure to bring you a lot of fun and enjoyment after that. difficult to describe.
  4. Homemade bread has a very strong allure. Since baking, the scent has been so sweet that it can fly all over the house, even flying over to the neighbor’s house.
  5. With the way of making bread, although the process of making many steps is interesting, but when it is finished, you can enjoy the freshly baked hot cakes, guaranteed to taste as delicious as never before. before.
  6. This is the joy of making bread at home, which nothing can replace or give you the same pleasure.
  7. Give it a try, the Delicacies section believes that you will conquer this cake and can create your own excitement, to try other great bread recipes waiting for you to discover.

Old-Fashioned 7-Minute Frosting Recipe

Seven-minute frosting is the stuff of legend, at least for those of us of a certain generation—the pillowy white cloud of frosting our grandmothers spread over and between layers of cake. Every bite was a shock of marshmallow sweetness, little more than sugar and air, with nothing but a whisper of vanilla for flavor.

The simplicity of its ingredients, along with the speed of its preparation, made seven-minute frosting a common companion to cakes with a more complicated profile, such as gingerbread, coconut layer cake or devil’s food.

Like any of those old recipes that evolved in the American kitchen, definitions remain conceptual rather than rule-bound, based on intuition rather than training. But the truth of the matter is that seven-minute frosting is a Swiss meringue in disguise; that is, a combination of egg whites and sugar cooked over a water bath and whipped into a glossy meringue.

The ratio of ingredients in any Swiss meringue will vary from baker to baker, and purpose to purpose, as the amount of sugar affects not only sweetness but stability and volume. The amount of sugar and egg whites I’ll use for Swiss buttercream differs from the ratios I lean on for pie, and that same variation is found within the microcosm of seven-minute frosting as well.

Classic recipes call for sugar and egg whites in proportions ranging from 2:1 all the way to 5:1 by weight, and it’s these high-sugar recipes that are the norm. Yet the meringue itself becomes increasingly fluffy and light as the amount of sugar falls, but this lightness comes at the cost of stability, as it’s sugar that keeps the moisture of the egg whites in check, and the meringue aloft.

Old-Fashioned 7-Minute Frosting Recipe

Active: 12 mins

Total: 20 mins

Serves: 40 servings

Makes: 5 cups

Ingredients:

  • 6 ounces egg whites (2/3 cup; 170g), from 5 to 6 large eggs
  • 12 1/4 ounces plain or toasted sugar (about 1 3/4 cups; 340g) (see notes)
  • 3/4 teaspoon (3g) Diamond Crystal kosher salt, or more to taste; for table salt, use about half as much by volume or the same weight
  • 1/4 teaspoon cream of tartar
  • 1 teaspoon (5ml) vanilla extract, or more to taste

Instructions:

For a Stand Mixer With a Bowl-Lift Design: Tear off a long strip of foil and crumple it into a thick ring. Place it in the bottom of a 3-quart saucier, or similarly large, wide pot, and fill with roughly 1 1/2 inches water. Place over high heat until bubbling-hot, then adjust the temperature to maintain a gentle simmer.

In a stainless steel stand mixer bowl, combine egg whites, toasted sugar, salt, and cream of tartar. Set over the steaming water so that the bowl is resting on the foil ring and touching neither the water nor the pot itself. Cook, stirring and scraping constantly with a flexible spatula, until egg whites register 175°F (79°C) on a digital thermometer; this should take no longer than 10 to 12 minutes. Transfer bowl to a stand mixer fitted with a whisk attachment.

For a Stand Mixer With a Tilt-Head Design: Fill a large pot with a few inches of water. Place over high heat until bubbling-hot. In a large glass or ceramic bowl, combine egg whites, toasted sugar, salt, and cream of tartar. Set bowl over the steaming water, then cook, stirring and scraping constantly with a flexible spatula, until egg whites register 175°F (79°C) on a digital thermometer; this should take no longer than 12 minutes. Scrape mixture into the stand mixer bowl and fit stand mixer with a whisk attachment.

Add vanilla extract, and whip the meringue on high speed until glossy, stiff, and cool to the touch. Along the way, pause mixing to taste the meringue, adjusting salt and vanilla as needed; if using an extract of another flavor, fold it in with a flexible spatula at the very end, as the oil content of flavors like citrus, almond, or mint may otherwise deflate the meringue.

Use immediately as a frosting for cake, and serve as soon as possible; at cool room temperature, the frosting will hold for about 24 hours, as the cake will slowly absorb the meringue over time. If desired, after frosting a cake, the exterior layer of meringue can be toasted like a marshmallow using a culinary blowtorch.

Troubleshooting: While the approximate cooking times for the water bath are estimations at best, and will naturally vary from kitchen to kitchen, substantially missing the mark indicates heats that are vastly too high or low. When the meringue cooks much too fast, it is prone to scrambling, regardless of how thoroughly the bowl is scraped, resulting in a lumpy texture and eggy flavor. When the meringue is cooked too slowly, excess evaporation will dry the meringue, making it grainy and dense. In either event, adjusting the heat as needed will resolve the issue.

Notes:

Though technically optional, using quick-toasted sugar will dramatically tame the sweetness of this frosting, while also adding subtle depth of flavor. Or, for a bolder (and entirely different) flavor, try using a light brown sugar (which will produce sea foam frosting) or raw sugar instead; for more information, see our guide to raw sugars.