Southern Fried Chicken Recipe

Southern Fried Chicken – One bite of this chicken’s crunchy, spicy outer layer followed by the tender, juicy meat inside, and you’ll understand why this is a true-blue Southern classic. Infused with spices for intense flavor and soaked in buttermilk tender juiciness, this is the perfect addition to your collection of chicken recipes!

Honestly, this is one of those recipes that is just plain irresistible. I never have leftovers, and everyone always goes back for seconds. Give this fried chicken a try, and you’ll understand what all the fuss is about. 😋

Besides being utterly tantalizing, this Southern-fried chick recipe is super affordable. Marinate simple chicken cuts in buttermilk, then coat them with seasoned flour, and voila!

Prep Time: 4hours 10minutes

Cook Time: 20minutes

Cooling Time: 10minutes

Total Time: 4hours 40minutes

Servings: 10

INGREDIENTS:

  • 1 whole chicken, cut into 10 pieces
  • 1½-2 teaspoons salt, adjust to preference
  • ½ -1 tablespoon hot sauce
  • 3-4 cloves garlic, crushed
  • 2-3 teaspoons Creole seasoning
  • 4 cups buttermilk (for both marinating and coating)
Chicken Coating
  • 3 cups all-purpose flour
  • 1 cup cornstarch
  • 2 teaspoons baking powder
  • 1 tablespoon paprika
  • 2 tablespoon garlic powder
  • 2 tablespoon onion powder
  • 1-1½ tablespoon dried herbs (thyme, oregano, parsley, etc.)
  • 1 teaspoon cayenne pepper
  • 1 teaspoon white pepper
  • 1 teaspoon salt, adjust to taste

INSTRUCTIONS:

Prepping the Chicken and Coating
  1. Place the chicken pieces in a large bowl. Then season it with salt, crushed garlic, hot sauce, and Creole seasoning.
  2. Pour some of the buttermilk over the marinated chicken, transfer the chicken to a gallon-sized zipper-lock freezer bag, and refrigerate for at least 4 hours (or overnight).
  3. Whisk together the flour, cornstarch, baking powder, paprika, garlic powder, onion powder, herbs, cayenne pepper, white pepper, and salt in a large bowl.
  4. Remove the marinated chicken from the buttermilk. Then dredge it in the flour mixture, shaking off any excess flour. You could use a Ziploc bag for this process, too.
  5. Double dip the chicken in the remaining buttermilk (add fresh buttermilk as needed), followed by the flour mixture – shake off any excess flour. Let the chicken rest for 10-15 minutes while preparing the oil. That will help the coating to stay on better.
Frying the Chicken
  1. Heat oil in a deep fryer or cast iron skillet to 375℉/190℃. The temperature will drop once you add chicken.
  2. Slowly and carefully place the chicken in the hot oil using a tong. Work in batches, and don’t overcrowd the skillet.
  3. Fry the chicken until golden brown, turning once every 10-15 minutes – depending on the size of the pieces. Chicken is done when it is no longer pink inside and its juices run clear, or your instant-read thermometer reads 165℉/75℃. You may do a test by piercing the chicken with a fork.
  4. Drain the chicken on paper towels and then transfer them to a wire rack.
  5. Repeat with remaining chicken pieces. Let them cool for at least 10 minutes before serving.

NOTES:

  • After you coat the chicken with the flour mixture and dip your chicken in buttermilk, let it rest first before frying it. That will allow your chicken to form a crust and warm to room temperature, which will help it cook evenly.
  • When frying, ensure your oil is at the right preheated temperature. If it’s too hot, the outside of your chicken will get burned; if it’s cold, the chicken will get soggy and greasy.
  • Don’t ever use extra virgin olive oil on fried chicken because it’ll result in bitter-tasting meat. Go for a neutral-tasting oil like canola, vegetable, or, preferably, peanut oil.
  • Don’t overcrowd your pan with chicken because it will lower the oil’s temperature and slow the cooking time (soggy chicken isn’t good). Do it in small batches instead.
  • A cast-iron pan is a must for a perfectly cooked fried chicken because it holds the temperature better and heats evenly, resulting in perfectly cooked chicken.
  • Rather than deep frying or submerging your chicken entirely into the pan or deep fryer, only ¾ of the chicken should be covered in hot oil. The weight of the chicken will cause it to sit just almost above the oil’s surface, creating a crispy crust without burning.
  • Don’t let anything fried sit on a paper towel too long because it’ll start to steam. Then your chicken might get soggy and stick to the paper towel. Instead, drain your chicken using a wire rack over a baking sheet, and they’ll cool crispy and dry all at once easily.
  • Please remember that the nutritional information is a rough estimate and can vary significantly based on the products used in the recipe.

NUTRITIONAL INFO:

Serving: 1piece | Calories: 242kcal | Carbohydrates: 49g | Protein: 8g | Fat: 2g | Saturated Fat: 1g | Polyunsaturated Fat: 0.3g | Monounsaturated Fat: 0.3g | Cholesterol: 4mg | Sodium: 764mg | Potassium: 338mg | Fiber: 2g | Sugar: 5g | Vitamin A: 665IU | Vitamin C: 3mg | Calcium: 175mg | Iron: 3mg
Peach Cobbler Recipe

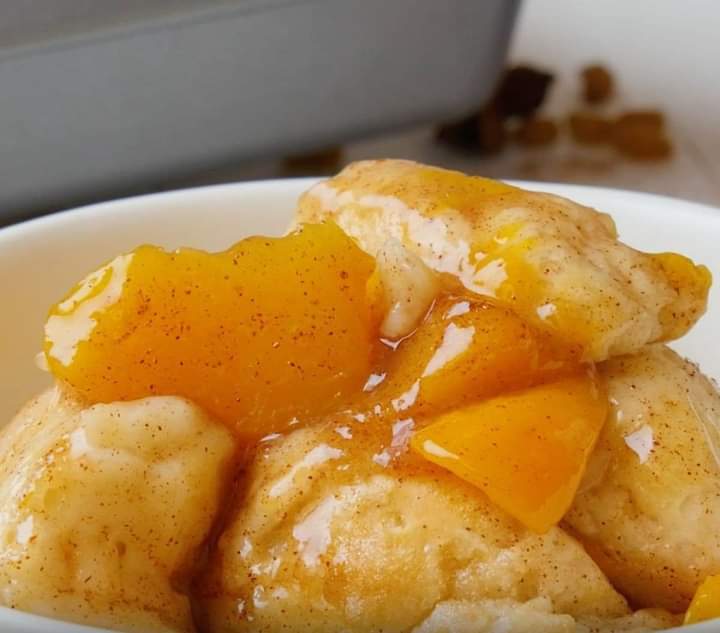
Mouth watering and easy, simple peach cobbler with self rising flour, sugar, butter and peaches.

Strike up the cobbler, because it’s fresh peach season. I have been waiting for July 1, so I can fresh peach bake, especially peach cobbler bake.

Best Peach Cobbler Recipe Baking Tips

Use ripe, fresh peaches for this easy cobbler recipe. Ripe peaches will deliver a sweet, juicy flavorful peach cobbler. See below for tips on how to ripen peaches more quickly.

I used around 5 cups of peaches for my four ingredient peach cobbler. That was 8 medium peaches.

Cut peaches in bite size pieces and all around the same size. Cutting your peaches all around the same size will allow even cooking and optimal texture in every bite.

Start checking your peach cobbler after it’s been in the over around 40 minutes. I have had it take up to an hour to cook. Make sure it is golden brown when you remove it from the oven.

You can substitute frozen peaches for fresh peaches. You will probably need 2.5 to 3.5 pounds of frozen peaches. See below for using frozen peaches in peach cobbler.

You can substitute canned peaches for fresh peaches. You will probably need 2.5 to 3 cans of canned peaches. See below for details.

This easy 4 ingredient peach cobbler is ridiculously delicious by itself, but friends you can always elevate your peach cobbler experience with a scoop of vanilla ice cream. Your taste buds will love that delicious, delightful dynamic duo.

Easy, tangy and delicious and only 4 ingredients.

Prep Time: 15mins

Cook Time: 45mins

Total Time: 1hr 

Servings: 16 servings 

Equipments

  • 9×13 baking dish
  • Dry Measuring Cups
  • Large Mixing Bowl
  • Spatula

INGREDIENTS:

  • 1¼ cups sugar
  • 1¼ cups butter
  • 1½ cups plus 2 TBS self rising flour
  • 4¼ to 5½ cups peaches cut in bite size pieces. I used around 5 cups (8 medium peaches).

INSTRUCTIONS:

  1. Preheat oven to 350°
  2. Place peaches, that have been cut into bite sized pieces, in 13×9 baking pan that has been greased or sprayed with baking spray. Set aside.
  3. 4¼ to 5½ cups peaches
  4. In large mixing bowl combine sugar, butter and self rising flour until crumbly.
  5. 1¼ cups sugar,1¼ cups butter,1½ cups plus 2 TBS self rising flour
  6. Sprinkle over peaches.
  7. Bake at 350° for 45 – 60 minutes or until golden brown.
  8. No need to cool. Eat up right away if you like.

Notes

  • Use ripe, fresh peaches for this easy cobbler recipe. Ripe peaches will deliver a sweet, juicy flavorful peach cobbler. See below for tips on how to ripen peaches more quickly.
  • Cut peaches in bite size pieces and all around the same size. Cutting your peaches all around the same size will allow even cooking and optimal texture in every bite.
  • Start checking your peach cobbler after it’s been in the over around 40 minutes. I have had it take up to an hour to cook. Make sure it is golden brown when you remove it from the oven.
  • You can substitute frozen peaches for fresh peaches. You will probably need 2.5 to 3.5 pounds of frozen peaches. See below on using frozen peaches in peach cobbler.
  • You can substitute canned peaches for fresh peaches. You will probably need 1.5 to 2 cans of canned peaches. See below for details.
  • This easy 4 ingredient peach cobbler is ridiculously delicious by itself, but friends you can always elevate your peach cobbler experience with a scoop of vanilla ice cream. Your taste buds will love that delicious, delightful dynamic duo.
Nutritional Info:

Calories: 252kcal

Stuffed Cabbage Rolls Recipe

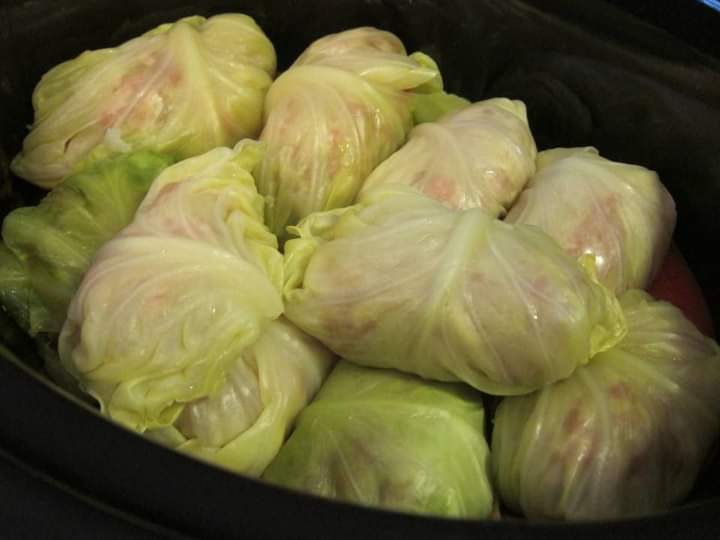
This cabbage rolls recipe is super easy to prep with cabbage leaves, ground beef, rice, and condensed tomato soup. I have been using this recipe for well over 20 years and still love it! To speed things up the rolls are cooked in a skillet on the stovetop but this recipe also works well in a slow cooker.

Prep Time: 15 mins

Cook Time: 1 hr

Total Time: 1 hr 15 mins

INGREDIENTS:

  • ⅔ cup water
  • ⅓ cup uncooked white rice
  • 8 cabbage leaves
  • 1 pound lean ground beef
  • ¼ cup chopped onion
  • 1 egg, slightly beaten
  • 1 (10.5 ounce) can condensed tomato soup, divided
  • 1 teaspoon salt
  • ¼ teaspoon ground black pepper

INSTRUCTIONS:

  1. Bring water and rice to a boil in a saucepan. Reduce heat to low, cover, and simmer until rice is tender and liquid has been absorbed, about 20 minutes.
  2. Meanwhile, bring a large, wide saucepan of lightly salted water to a boil. Add cabbage leaves and cook for 2 to 4 minutes or until softened; drain.
  3. Combine ground beef, 1 cup of cooked rice, onion, egg, 2 tablespoons of tomato soup, salt, and pepper in a large bowl; mix thoroughly.
  4. Spoon about 2 tablespoons of beef mixture onto each cabbage leaf; bring one end of the cabbage leaf over the mixture, rolling and tucking in the ends to prevent the filling from falling out.
  5. Place cabbage rolls in a large skillet over medium heat; pour remaining tomato soup on top. Cover and bring to a boil; reduce heat to low and simmer for about 40 minutes, stirring and basting with the liquid often.

NUTRITIONAL INFO:

CALORIES 223 Total Fat 13g Saturated Fat 5g Cholesterol 66mg Sodium 657mg Total Carbohydrates 13g Dietary Fiber 1g Total Sugars 3g Protein 13g Vitamin C 25mg Calcium 33mg Iron 2mg Potassium 338mg

Beef and Chicken Chimichangas

Beef and cheese chimichangas are large tortillas filled with savory beef, beans, and cheese, then fried to a golden perfection. The perfect quick and easy dinner solution, and even great to make ahead and freeze.

While you are here, you gotta check out these Cheesy Bacon Loaded Breakfast Burritos. Also, be sure to drizzle them with some of this Creamy Jalapeno Salsa, or this amazing Chipotle Salsa.

WHAT IS A CHIMICHANGA?

A chimichanga is a large tortillas, stuffed with various proteins and starches, and deep fried until they are golden brown. You will usually find them in the “Tex-mex” style dishes versus traditional Mexican food dishes.

WHAT IS THE DIFFERENCE BETWEEN A BURRITO AND A CHIMICHANGA?

In essence, both of these are made the same. Use a large tortilla, and roll different fillings inside of it. The biggest difference however, is that the chimichanga is fried! Even more, often times a burrito will be served wrapped in foil or parchment paper, and eaten by hand.

YIELD: 6 CHIMICHANGAS

Beef and cheese chimichangas are made with large tortillas, and filled with savory beef, beans, and cheese, then fried to a golden perfection. The perfect quick and easy dinner solution, and even great to make ahead and freeze.

PREP TIME: 10 minutes

COOK TIME: 20 minutes

TOTAL TIME: 30 minutes

INGREDIENTS:

  • 6 large Flour tortillas
  • 1 pound Ground beef
  • 1 cup Water (to add to cooked and seasoned beef)
  • 2 cups Cheese, shredded
  • 1 can Refried pinto beans
  • 2 cups Vegetable oil (to fry chimichangas)
  • Seasoning for ground beef
  • 1 tablespoon Chili powder
  • 1/2 tablespoon Seasoned salt
  • 1/2 tablespoon Ground cumin
  • 1 teaspoon Black pepper
  • 1 teaspoon Garlic salt (or garlic powder)
  • 1/2 teaspoon dried Oregano
  • 1/2-1 cup Water
Topping Ideas
  • Sour cream
  • Shredded lettuce
  • Salsa
  • Chopped tomatoes

INSTRUCTIONS:

  1. Brown the ground beef in a skillet over medium heat. The meat is fully cooked when there is no longer any pink visible. Use a strainer to drain any excess grease from the skillet.
  2. Put the meat back into the skillet over medium heat. Add all of the seasonings, and water and mix it together thoroughly. Continue to simmer until the water is absorbed.
  3. Heat the vegetable oil in a separate skillet over medium heat. While the oil is heating up, begin assembling the burritos.
  4. Place about one tablespoon of beans on one side of the tortilla and smear it across, somewhat close to the edge. Next place one to two tablespoons of the meat mixture, then a sprinkle of cheese (a generous sprinkle)!
  5. Begin to roll the tortilla up over the mixture, once half way rolled, fold in the sides towards the middle, then continue rolling all the way until it is closed. Roll as tight as possible so that the mixture does not ooze out.
  6. Continue rolling until all of the burritos are made or you run out of mixture.
  7. Place the burritos into the hot oil SEAM SIDE DOWN. Fry on each side for one to two minutes, or until they turn golden brown. Be sure to flip, and fry the sides of the burritos as well,
  8. Remove from the oil and drain on a baking sheet or a bed of paper towels. Top with your favorite garnishes and salsas. Enjoy!

NUTRITION INFO:

YIELD: 6 SERVING SIZE: 1

Amount Per Serving: CALORIES: 419TOTAL FAT: 53gSATURATED FAT: 9gTRANS FAT: 3gUNSATURATED FAT: 37gCHOLESTEROL: 86mgSODIUM: 379mgCARBOHYDRATES: 29gFIBER: 5gSUGAR: 1gPROTEIN: 37g

Maxican Chicken Doritos Casserole Recipe

A chicken casserole makes for a convenient dish. Chicken is a great base for every meal and its neutral taste means it works well with a variety of flavorings.

With a casserole, home cooks can get creative adding any ingredients that may be lying around the kitchen.

If you like your chicken casserole with a kick, read on to find out more about our Mexican chicken casserole and other variations you can make for your family.

Mexican Chicken with Doritos and Velveeta

When we think of Mexican food, we think of ingredients like salsa, beans, and guacamole. This dish takes Mexican in a slightly different direction with the addition of Doritos and Velveeta. This makes for a meal that is a well-deserved guilty pleasure for your hard-working family

Total Time: 50 minutes

Get Mexican flair on the table with this easy Mexican Chicken Casserole. With only 6 ingredients, it comes together in no time. Filled with creamy cheese and layered with Doritos, this will easily satisfy even picky eaters.

INGREDIENTS:

  • 6 chicken breasts, boneless
  • 10 oz. Velveeta cheese
  • 1 can cream of mushroom soup mixed with 1 cup milk
  • 1 can Rotel tomatoes
  • 1 bag Doritos tortilla chips

INSTRUCTIONS:

  1. Boil chicken until cooked throught.Cut into bite sized pieces.
  2. Combine Velveeta, soup mixture and tomatoes; bring to a boil.
  3. Add chicken and simmer 5-10 minutes, stirring often.
  4. Place a layer of Doritos in long casserole dish, then add a layer of the chicken mixture.
  5. Add another layer of chips, another layer of the chicken mixture, ending with chips on top.
  6. Bake at 350 degrees F for 30 minutes.

Puff Pastry Recipe

Leave those frozen sheets on the store shelf! This is the best-tasting, easiest homemade puff pastry recipe ever! Plus, it comes together in just 15 minutes.

Puff pastry: It’s the kind of thing that makes things feel like a special occasion. All those light, flaky layers and that rich buttery flavor!

Prep Time: 15mins

Cook Time: 25mins

Chill Time: 3hrs

Total Time: 3 hrs 40mins

Course: Breakfast, Brunch, Dessert Cuisine: American

Keyword: Homemade Puff Pastry, puff pastry, puff pastry desserts, puff pastry recipe easy, puff pastry recipes, puff pastry sheets

Servings: 8 

Ingredients:

  • 2 cups all-purpose flour
  • 1 teaspoon salt
  • 1 1/4 cups unsalted butter (2 1/2 sticks), cold
  • 1/2 cup cold water

Instructions:

  1. Place the flour and salt in a large bowl and whisk to combine.
  2. Cut the cold butter into 1/4-inch slices and add to the flour mixture, tossing to coat.
  3. Stir in the cold water until a thick dough forms.
  4. Gather the dough into a ball, flatten it into a disk-shape, and wrap in plastic wrap.
  5. Chill for 1 hour in the fridge, or 20 to 30 minutes in the freezer.
  6. Unwrap the dough, dust the work surface with flour, and roll the dough into a rough rectangle shape.
  7. Fold the dough in thirds, like a letter.
  8. Turn 90 degrees, roll and fold again.
  9. Repeat about 2 to 4 times, wrap the dough in plastic wrap, and chill for 2 hours or overnight.*

Notes:

Tips for Making Homemade Puff Pastry

Brush the pastry with an egg beaten with a couple of teaspoons of water before baking for a beautiful sheen.

When you’re ready to bake the pastry, make sure it is COLD and the oven is HOT.

Bake times will vary based on exactly what you are making, so follow your recipe!

The dough can also be frozen. It will keep for several weeks in the freezer, tightly wrapped. Thaw in the refrigerator.

This recipe makes approximately 24 ounces, or 685 grams, of dough.

Nutritional Info:

Serving: 1pastry | Calories: 418kcal | Carbohydrates: 23g | Protein: 3g | Fat: 34g | Saturated Fat: 21g | Cholesterol: 91mg | Sodium: 296mg | Potassium: 43mg | Vitamin A: 1065IU | Calcium: 15mg | Iron: 1.5mg