Cream Puff Recipe

Perfect Cream Puff Recipe: These bake up light as air every time! Filled with sweet whipped cream & dusted with powdered sugar. The ultimate!

Just in time for the weekend, I’m bringing you a classic dessert recipe that just can’t go wrong, no matter the occasion or the time of year: cream puffs!

Like so many other French pastries such as Madeleine cookies, brioche bread, and macarons, cream puffs have a specific set of ingredients and a specific technique. But unlike those others, this recipe is very easy to make.

If you’re aware of the major pitfalls (more on that below), you’ll be able to make this cream puff recipe like a pro! It’s pretty much foolproof!

Prep Time: 20mins

Cook Time: 40mins

Total Time: 1hr

Course: Dessert, Snack

Cuisine: French

Servings: 12 cream puffs

Ingredients:

For the Choux Pastry Puffs:

  • 1 cup water
  • 1/2 cup unsalted butter (1 stick)
  • 1/2 teaspoon granulated sugar
  • 1/4 teaspoon kosher salt
  • 1 cup all-purpose flour
  • 4 eggs, large
  • 1 tablespoon powdered sugar, for garnish
  • For the Cream Puff Filling:
  • 8 ounces cream cheese*
  • 1 cup powdered sugar
  • 2 3/4 cups heavy cream, cold
  • 1 teaspoon vanilla bean paste (extract can be substituted)

Instructions:

To Make the Choux Pastry Puffs:

  1. Preheat the oven to 425 degrees F and line baking sheets with parchment paper.
  2. Place the water, butter, sugar, and salt in a small pot and cook over medium-high heat until the butter is completely melted and the mixture is simmering.
  3. Add in the flour all at once, and continue to cook, whisking, for about 5 minutes, or until the dough gathers itself into a ball and a film begins to form on the bottom of the pot.
  4. Transfer the mixture to a mixing bowl, and beat on medium speed.
  5. Drop in the eggs, one at a time, while continuing to beat. (Allow each egg to become fully incorporated before adding the next.)
  6. Pipe or spoon the dough in 1 1/2-inch balls onto the prepared baking sheets, allowing about 3 inches in between each puff.
  7. Bake for 35 to 45 minutes, or until puffed, golden brown, hollow, dry, and light.
  8. Allow the pastries to cool completely, then slice open horizontally, sandwich with cream puff filling, and dust with powdered sugar.

To Make the Cream Puff Filling:

  1. Place the cream cheese and powdered sugar in a large bowl and beat on medium speed until smooth.
  2. Turn the mixer down to medium-low speed and pour the heavy cream down the side of the bowl in a very slow and steady stream, stopping every now and then to scrape the bottom and sides of the bowl with a silicone spatula.
  3. When all the cream has been added, turn the mixer up to medium-high and whip until the filling holds stiff peaks.
  4. Fold in the vanilla.

Notes:

*Full-fat cream cheese in brick form works best.

Nutritional Info:

Serving: 1cream puff | Calories: 239kcal | Carbohydrates: 20g | Protein: 4g | Fat: 16g | Saturated Fat: 9g | Polyunsaturated Fat: 1g | Monounsaturated Fat: 4g | Trans Fat: 1g | Cholesterol: 97mg | Sodium: 133mg | Potassium: 61mg | Fiber: 1g | Sugar: 12g | Vitamin A: 587IU | Vitamin C: 1mg | Calcium: 32mg | Iron: 1mg
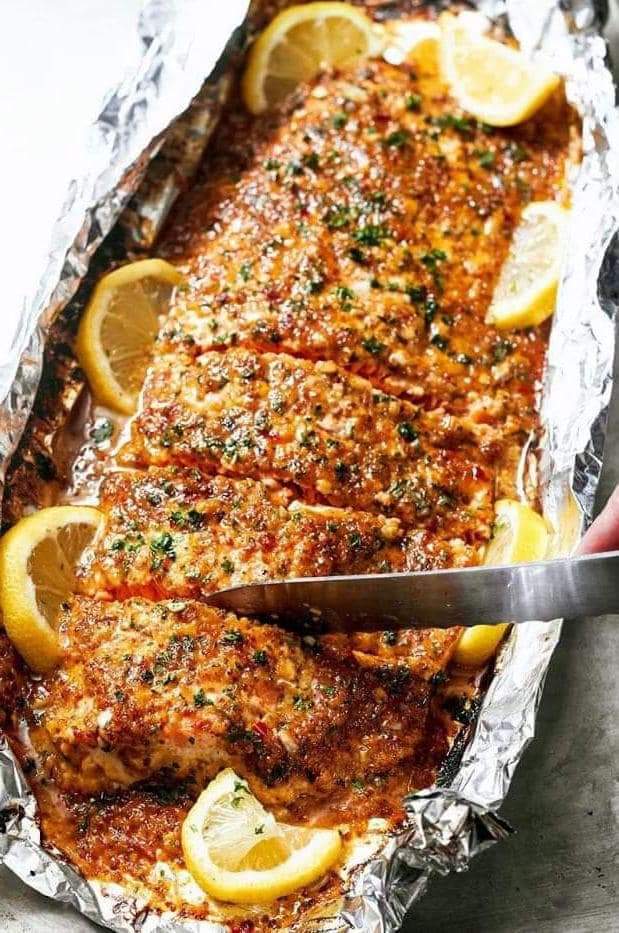
Honey Garlic Butter Salmon In Foil Recipe

THIS honey garlic butter salmon in foil recipe is an easy dinner to throw together on your busy weeknights or weekends!

A delicious 4-ingredient honey garlic butter sauce is baked with a whole side of salmon, wrapped in foil, baked and broiled (or grilled) for that extra golden, crispy, caramelised and flakey finish! The BEST Salmon In Foil IS RIGHT HERE! So simple with minimal mess to clean up!


Honey Garlic Butter Salmon In Foil in under 20 minutes, then broiled (or grilled) for that extra golden, crispy and caramelised finish! So simple and only 4 main ingredients, with minimal clean up!

Prep Time: 10mins

Cook Time: 15mins

Total Time: 25mins

Course: Dinner

Cuisine: American

Servings: 8 people 

Ingredients:

  • 1/4 cup butter
  • 1/3 cup honey
  • 4 large cloves garlic , crushed
  • 2 tablespoons fresh lemon juice (juice of 1/2 a lemon)
  • 1.2 kg | 2 1/2 pound side of salmon
  • Sea salt , to taste
  • Cracked pepper , to taste (optional)
  • Lemon slices (to serve)
  • 2 tablespoons fresh chopped parsley

Instructions:

  1. Position a rack in the middle of the oven. Preheat oven to 375°F | 190°C.
  2. Line a baking tray / sheet with a large piece of foil, big enough to fold over and seal to create a packet (or 2 long pieces of foil over lapping each other lengthways to create your salmon packet, depending on the width of you fillet).
  3. In a small saucepan, melt the butter over low-medium heat.
  4. Add the honey, garlic and lemon, and whisk until the honey has melted through the butter and the mixture is well combined.
  5. Place the salmon onto lined baking tray | sheet.
  6. Pour the butter/honey mixture over the salmon, and using a pastry brush or spoon, spread evenly over the salmon.
  7. Sprinkle with a good amount of salt (about 2 teaspoons) and cracked pepper.
  8. Fold the sides of the foil over the salmon to cover and completely seal the packet closed so the butter does not leak.
  9. Bake until cooked through (about 15-18 minutes, depending on the thickness of your fish and your preference of doneness).
  10. Open the foil, being careful of any escaping steam, and grill / broil under the grill / broiler for 2-3 minutes on medium heat to caramelise the top.
  11. Garnish with parsley and serve immediately with lemon slices.

Nutritional Info:

Calories: 310kcal | Carbohydrates: 9g | Protein: 30g | Fat: 14g | Saturated Fat: 5g | Cholesterol: 97mg | Sodium: 118mg | Potassium: 753mg | Sugar: 11g | Vitamin A: 320IU | Vitamin C: 3.2mg | Calcium: 24mg | Iron: 1.4mg

Loaded Steak Quesadilla Recipe

Are you looking for an easy, filling, 30 minutes or less recipe for dinner? Simple prep and not a lot of clean up? Well, today I gotcha covered! Because I needed a nice, easy breezy meal that would keep me full, keep the kitchen decent, and not take me forever to make. And guess what? Success!!! Meet these 30 Minute Loaded Steak Quesadillas.

Loaded you ask? Not only are these steak quesadillas layered with a pound of top sirloin, there’s also black beans, fire roasted corn, cherry tomatoes, avocado, and of course, two layers of cheese. This amount of goodness brings the basic cheese quesadilla up a bit higher in the world wouldn’t you agree? Like “Instead of as a snack…I’m going to make steak quesadillas for DINNER!” level.

Total Time: 25 mins

Yield: 2 

Delicious, easy, family friendly meal done in just 30 minutes! Great for both an appetizer AND dinner!

INGREDIENTS:

FOR THE STEAK

  • 3/4 – 1 lbs sirloin steak
  • 1 teaspoon ancho chili powder
  • 1/2 teaspoon paprika
  • 1/4 teaspoon ground mexican oregano
  • 1/4 teaspoon cumin
  • 1/4 teaspoon garlic powder
  • 1/4 teaspoon onion powder
  • Pinch of cayenne pepper
  • 1/4 teaspoon salt

FOR THE QUESADILLAS

  • 4 large flour tortillas
  • 2 cups Mexican Cheese Blend
  • 1/2 cup cherry tomatoes, thinly sliced
  • 1/2 cup canned fire roasted corn kernels, drained
  • 1/2 cup canned black beans, drained
  • 1/2 an avocado, diced
  • Limes wedges and fresh minced cilantro for garnish
INSTRUCTIONS:
  1. Preheat oven to 425˚F. Prepare a baking sheet with a piece of parchment paper.
  2. In a small bowl, mix together all spices and salt for the steak. Generously coat steak with spice blend.
  3. Heat 2 tablespoons olive oil in a large skillet over medium high heat. Sear steak, no more than 3 minutes per side. The steak will cook more in the oven so make sure it’s just a sear! Remove from heat and let rest for 5 minutes while prepping quesadillas.
  4. Place 2 tortillas on the prepared sheet and sprinkle each one with 1/2 cup of the cheese.
  5. Top with tomatoes, corn, black beans, and avocado.
  6. Thinly slice steak against the grain. Place slices on top of the loaded tortillas.
  7. Sprinkle the rest of the cheese evenly over both quesadillas and cover with remaining tortillas.
  8. Bake in the oven for 6-8 minutes, until cheese is melted and tortillas are warmed through.
  9. Remove from oven and slice as desired. Top with cilantro and serve with lime wedges, a dollop of sour cream and your favorite salsa and guacamole!
NUTRITIONAL INFO:

Calories: 798kcal | Carbohydrates: 64g | Protein: 50g | Fat: 38g | Saturated Fat: 14g | Polyunsaturated Fat: 19g | Trans Fat: 1g | Cholesterol: 142mg | Sodium: 1156mg | Fiber: 10g | Sugar: 4g

Easy Corn Arepas Recipe

For many, corn arepas are the favorite of the immense variety of arepas that we have in Colombia, due to the ideal contrast between sweet and salty in its composition. Just out of the fire they are a delight for the diner and combine perfectly with the scrambled eggs for breakfast, although I dare to assure you that they are enjoyed very well alone and at any time of the day.

The preparation of corn arepas dates back to before the time of the conquest, when the Indians kneaded the tender grains of the ears, which they later put on the fire. Currently, this kind of arepas is part of the diet of the inhabitants of the Antioquia and Cundiboyacense regions

Like all the typical mixes from my land, pre-cooked flours are already available on the market that facilitate the preparation of these delicacies. However, and as always, I share the traditional recipe. Of course, the quantities of the ingredients vary according to the taste of the diner. For a softer dough, a greater quantity of milk or butter can be added, the same happens when graduating the taste of sweet and salt.

Servings: 5

Prep Time: 15min

Cook Time: 10min

Total Time: 25min

INGREDIENTS:

  • 2 cups of corn kernels
  • ½ cup of milk
  • 1 cup of cornmeal (the one used to make arepas)
  • 2 butter spoons
  • ¼ cup grated brown sugar (or brown sugar)
  • Salt to taste (optional)
  • White cheese (In the USA I use Cotija cheese or fresh cheese)

INSTRUCTIONS:

  1. In the blender, mix the corn kernels and milk.
  2. Transfer the mixture to a container and add the flour, panela and salt to taste.
  3. Knead and check the seasoning.
  4. Make balls and flatten them to form the arepas.
  5. Heat them in a non-stick frying pan and let them cook until golden brown on both sides.
  6. A little before removing them from the heat, cover them with slices of white cheese and let it melt.

Moist Lemon Loaf Recipe

This moist Lemon Cake Recipe is fluffy, tangy and so easy to make from scratch! Every bite of this supremely moist pound cake is bursting with fresh lemon flavor and the easy lemon glaze on top will have you hooked after just one bite.

This homemade lemon pound cake tastes even better than the Starbucks Lemon Loaf!

If you like the Starbucks Lemon Loaf then you’ll love this delicious, moist lemon cake recipe that’s made completely from scratch in less than 10 minutes. It’s one of my favorite afternoon or breakfast treats and it always gets rave reviews, everyone loves it! It’s gone in minutes whenever I make it.

This batter is made with freshly grated lemon zest and fresh lemon juice. When it the cake comes out of the oven it is infused with a homemade lemon syrup to give it an extra lemon kick, and then after cooling down the pound cake is topped with the most delicious lemon glaze.

This easy lemon cake is not dry and not fudgy, it’s perfectly moist while still being fluffy and it keeps fresh for a few days! A perfect cake for every occasion. If you like lemon desserts, you have got to give this cake a try!

Tips and Tricks for Making This Easy Lemon Cake Recipe

You can also make this recipe in a bundt pan. It looks prettier than in a loaf pan but make sure to grease your bundt pan generously so that your cake will come out of the pan.

Don’t leave out the lemon zest, that is what gives it the wonderful lemony flavor! I always use organic lemons and my favorite grater that I’ll like below.

For the best flavor use freshly squeezed lemon juice! Don’t use the bottled stuff, trust me fresh lemon juice tastes so much better.

When you make the lemon glaze for this pound cake don’t add too much liquid. You want the glaze to be nice and thick not runny. Start with 1 tbsp lemon juice and 1 tbsp milk and add the remaining 1/2 tbsp as needed.

This cake keeps well covered at room temperature for up to 4 days.

This moist Lemon Cake Recipe is fluffy, tangy and so easy to make from scratch! Every bite of this supremely moist pound cake is bursting with lemon flavor. If you like the Starbucks Lemon Loaf then you’ll love this homemade lemon pound cake!

Prep Time: 15minutes

Cook Time: 45minutes

Total Time: 1hour 

INGREDIENTS:

For the lemon pound cake:
  • 1 1/2 cups all-purpose flour
  • 1 1/2 tsp baking powder
  • 1 Tbsp lemon zest
  • 1/2 tsp salt
  • 1/2 cup unsalted butter room temperature
  • 1 cup granulated sugar
  • 2 large eggs room temperature
  • 1 tsp vanilla extract
  • 2 Tbsp lemon juice about 1/2 lemon
  • 1/2 cup buttermilk see below for substitution
For the lemon syrup:
  • 1/4 cup lemon juice about 1 lemon
  • 3 Tbsp powdered sugar
For the lemon icing:
  • 1 cup powdered sugar sifted
  • 1.5 Tbsp lemon juice
  • 1 Tbsp milk

INSTRUCTIONS:

  1. Preheat oven to 350°F (177°C). Grease a 9×5-inch (or 8×4-inch) loaf pan (see note).
  2. In a medium bowl combine the flour, baking powder, lemon zest, and salt. Set aside.
  3. In the bowl of a stand mixer fitted with the paddle attachment (or using an electric mixer), cream the butter and sugar together at medium-high speed until pale and fluffy, about 4-6 minutes. Scrape the sides of the bowl as needed.
  4. With the mixer running on low-speed, add the eggs one at a time, then beat in the vanilla extract and lemon juice. Beat on medium-high speed until combined.
  5. With the mixer on low, add about one-third of the flour mixture and mix until almost combined, then add half the buttermilk and mix until just combined. Repeat with another third of flour mixture and then the last half of the buttermilk, ending with the last third of the flour. Beat until just incorporated.
  6. Scrape the batter into the prepared loaf pan and bake for 45-55 minutes until the cake is golden brown and a toothpick comes out mostly clean with only a couple moist crumbs. Baking times vary, so keep an eye on yours.
  7. Let the cake cool for about 15 minutes in the pan. Stir together the lemon juice and confectioners’ sugar for the lemon syrup. Carefully invert the loaf pan, and transfer the cake to a cooling rack, then brush the syrup on the cake while it’s still warm. Allow cake to cool completely.
  8. When the cake is cooled, combine all the icing ingredients, start with 1 tbsp lemon juice and milk and add the remaining lemon juice as needed. The icing should be thick and not runny. Pour icing over cake and let dry before serving.

NOTES:

If you don’t have buttermilk, you can make your own by combining 1/2 cup of milk with 1.5 tsp lemon juice or white vinegar. Let the mixture sit for a few minutes until it starts to curdle.

The longer you beat the sugar and butter, the better the result will be because this process incorporates air into the batter and makes the cake fluffy and tender

I recommend using fresh lemon juice but you can also bottled lemon juice

This cake would also taste great with lime juice or orange juice

NUTRITIONAL INFO:

Calories: 306kcal | Carbohydrates: 49g | Protein: 3g | Fat: 10g | Saturated Fat: 6g | Cholesterol: 58mg | Sodium: 144mg | Potassium: 98mg | Sugar: 34g | Vitamin A: 350IU | Vitamin C: 0.9mg | Calcium: 48mg | Iron: 1.1mg

Easy Layered Taco Bake Recipe

This layered Taco Bake is a simple and quick weeknight meal with layers of tortillas, ground beef and salsa con queso!

One food item I always seem to have in my pantry or in my fridge are flour tortillas. They are good for so many things. Tortillas can be made into so many different types of snacks for kids (and grownups). You can cut them up and fry them or bake them. You can make cinnamon chips, quesadillas, tortilla pizzas. The possibilities are endless and easy on the wallet too.

TIPS FOR MAKING LAYERED TACO BAKE:

Flour tortillas work best in this but if you absolutely must have corn tortillas, then you can certainly switch it out.

Ground turkey and chicken can be substituted for the ground beef.

Try making your own Taco Seasoning for this recipe!

If you like this recipe, you should give these Navajo Tacos a try!

A springform pan makes this easy to remove but an 8-inch round baking pan will work as well.

This meal is delicious served with Spanish style rice

If you are very sensitive to spices, you can certainly use a regular cheese dip instead of the salsa con queso.

Prep Time: 15minutes 

Cook Time: 30minutes 

Total Time: 45minutes

Servings: 6

Ingredients:

  • 1 pound ground beef
  • 1 packet taco seasoning
  • water as called for on back of seasoning packet (usually 3/4 cup water)
  • 1/2 cup salsa con queso
  • 3 (8-inch) flour tortillas (soft taco size)
  • 2 cups shredded Mexican cheese blend (divided use)

Instructions:

  1. Brown and crumble 1 pound ground beef. Drain excess grease.
  2. Add in 1 packet taco seasoning and water as called for on back of seasoning packet (usually 3/4 cup) following directions on back of seasoning packet.
  3. Once the taco meat is ready, turn off heat and add in 1/2 cup salsa con queso. Give it a good stir until thoroughly combined.
  4. Preheat oven to 350F degrees. Spray an 8-inch round baking pan with nonstick cooking spray.
  5. Layer the bottom of the pan with one of the 3 (8-inch) flour tortillas.
  6. Now add about 1/3 of the ground beef taco filling on the the first layer.
  7. Then add 1/3 of the 2 cups shredded Mexican cheese blend.
  8. Continue until you are done with all the layers: another tortilla, more taco mixture, more cheese.
  9. Bake at 350F degrees for about 15-20 minutes until cheese is melted and edges are slightly golden brown.
  10. Allow to cool for a couple of minutes. Slice and serve. Top with desired toppings.