Easy Baked Parmesan Pork Chops Recipe

These Easy Baked Parmesan Pork Chops are a simple and delicious weeknight meal option. Ready in just 30-minutes, they make a great last-minute meal that is always a hit with the family. Simply seasoned and baked, it has a great crispy coating that is baked instead of fried for a healthier meal. 

INGREDIENTS:

▢1/2 cup Parmesan cheese

▢1 egg

▢1 tablespoon milk or skim milk

▢1 teaspoon salt

▢1/2 teaspoon black pepper

▢3/4 cup Italian seasoned bread crumbs

▢4 4-ounce lean, boneless pork chops

▢3/4 cup Panko bread crumbs

INSTRUCTIONS:

Preheat the oven to 400°F and coat a 9×13-inch baking dish with nonstick cooking spray.

In a shallow dish, whisk together the egg, and milk.

In a second shallow dish or plate, stir together the cheese, both bread crumbs, and the salt and black pepper.

Dip the pork chops in the egg, allowing excess to drip off, and then dip them in the breadcrumbs and cheese mixture. Transfer to prepared baking pan.

Spray the tops of the pork chops with cooking spray, and bake in the prepared baking dish uncovered for 14-16 minutes, or until cooked through and golden.

NOTES

How do I Know Pork is Done Cooking? 

The USDA says that a pork chop should be cooked to at least 145ºF internal temperature. Typically, the cooking time listed will be just right, ut if you have a thinner or thicker chop, you may need to adjust to prevent under or overcooked pork.

I also cannot say enough about getting a quality digital meat thermometer that has a longer probe you can put into the meat and leave in while cooking so it alerts you when it reaches temperature. If you are unsure about food safety, it’s a perfect addition to your kitchen gadgets.

What Sides Go with Pork Chops? 

Much like chicken, pork is versatile enough to add just about any side you wish. I have eaten them with many things including classics like pasta or potatoes, but below are a few of my favorite sides that work great alongside my parmesan pork chops recipe.

Easy Baked Parmesan Pork Chops

Pork is the other white meat. A lean cut that is often overlooked, I love adding pork chops to our menu. Not only are they lean and high in protein, but they are also so easy to make and with just a few ingredients you can add so much flavor. This Easy Baked Parmesan Pork Chops Recipe is a family favorite because I can have it ready from start to finish in just 30-minutes.

Don’t fear pork! It makes a great lean protein option in your menu plan!


For this recipe, you can use both boneless and bone-in, but I much prefer the ease of a boneless pork chop. The flavor and cooking method would remain the same no matter which you choose. Just make sure that your pork is cooked to a safe temperature before eating, no matter what cut you choose.

You can also pick up bone-in pork chops on sale and simply trim the bone off the outside and bake as a boneless pork chop if you prefer. There is no right or wrong when making this recipe.

Smart Points: 8

NUTRITIONAL INFO:

Serving: 1pork chop | Calories: 304kcal | Carbohydrates: 20g | Protein: 30g | Fat: 13g | Saturated Fat: 5g | Cholesterol: 99mg | Sodium: 1210mg | Fiber: 1g | Sugar: 2g

Corn Casserole Recipe

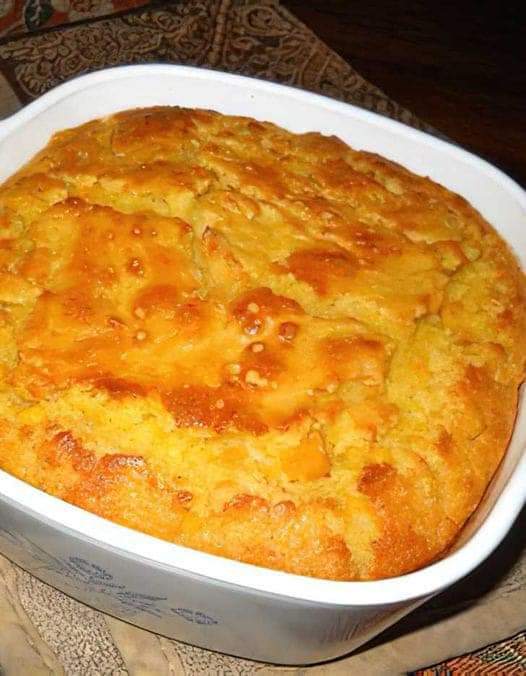
This stupid easy Creamed Corn Casserole recipe is made with a store bought Jiffy cornbread mix, and that’s not an apology. It is SO good! If you grew up with this Thanksgiving side dish you know what I’m talking about. It is creamy, corny, custardy, and sweet. It’s the perfect compliment to a holiday meal.

Prep Time: 10mins

Cook Time: 35mins

Total Time: 45mins

Course: Side Dish

Cuisine: American

Servings: 9

INGREDIENTS:

1/2 cup butter (1 stick)

1 (15-oz) can whole kernel corn drained

1 (15-oz) can creamed corn not drained

1 cup sour cream

3 tablespoons granulated sugar

1/2 teaspoon kosher salt

1 (8-oz) box Jiffy corn muffin mix

INSTRUCTIONS:

Preheat your oven to 350 degrees F.

In a 8×8 or 9×9 inch glass pan, add 1/2 cup butter. Put it in the microwave and melt it right in the pan. (If you only have a metal pan, melt it in a bowl and then transfer to the pan.*) Use a spatula or pastry brush to spread the butter up the sides of the pan, so that it doesn’t stick while baking.

Open the can of whole corn kernels and drain. I usually just press the lid down on the corn holding it upside down over the sink. Add the drained corn to the butter in the pan.

Open the can of creamed corn and dump the whole thing into the pan.

Add 1 cup sour cream.

Add 3 tablespoons sugar and 1/2 teaspoon kosher salt (add 1/4 teaspoon if using table salt).

Add an 8 ounce box of Jiffy corn muffin mix.

Use a spatula to stir it all together until well combined. Scrape down the edges.

Bake at 350 for about 35-40 minutes. The edges should be turning golden brown and pulling away from the sides. When you shake the pan, the center should not be jiggling more than the edges. You can also use the toothpick test, when a toothpick inserted in the center comes out with no wet batter, it’s done.

Let cool on a wire rack for a couple minutes before serving warm!

Variations

Sweet Corn Casserole: Add 1/2 cup or even 3/4 cup sugar instead of 3 tablespoons

For a cake-like texture, rather than custard texture: add 2 eggs. This makes the casserole a little more fluffy and taller. This is a VERY common addition to corn casserole, but I prefer it without the eggs. It’s good both ways though!

Add cheese: how can you go wrong? Omit the 3 tablespoons sugar and stir in 1 and 1/2 cups shredded cheddar cheese. Sprinkle another 1/2 cup cheese on top. You could even go wild and add in some chopped jalapenos…or some cooked bacon!

Make it in the slow cooker: You can make this recipe as written in a 4-quart slow cooker, or double the recipe and make it in a 6 quart slow cooker. Be sure to spray the edges. Cook on high for 2 hours, or low for 3-4 hours. Super handy for Thanksgiving when you need your oven for the turkey!

To make the second version I tried that you see in the photos: Follow the recipe as directed making these changes: reserve half of the sour cream. Add 2 eggs. Mix it all together, then dollop the remaining 1/2 cup sour cream on top and swirl in with a knife. It will take a couple minutes longer to bake.

Notes

*Corn casserole baked in a metal pan will cook a couple minutes faster than in a glass pan, so check it early if you’re using a metal pan.

You can double this recipe and bake in a 9×13 inch pan! It will probably take closer to 45 minutes to bake. A 9×13 inch pan will serve 16-20 people.

NUTRITIONAL INFO:

Calories: 330kcal | Carbohydrates: 37g | Protein: 4g | Fat: 19g | Saturated Fat: 10g | Polyunsaturated Fat: 1g | Monounsaturated Fat: 6g | Trans Fat: 1g | Cholesterol: 41mg | Sodium: 657mg | Potassium: 186mg | Fiber: 2g | Sugar: 11g | Vitamin A: 538IU | Vitamin C: 3mg | Calcium: 48mg | Iron: 1mg

Authentic Cornish Pasties Recipe

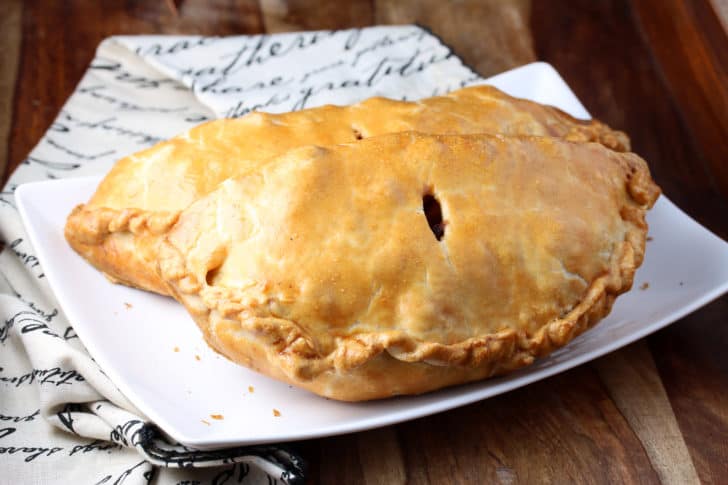
A flaky pastry crust filled with savory meat and vegetables, the Cornish Pasty is English comfort food at its best!

What are Cornish Pasties?

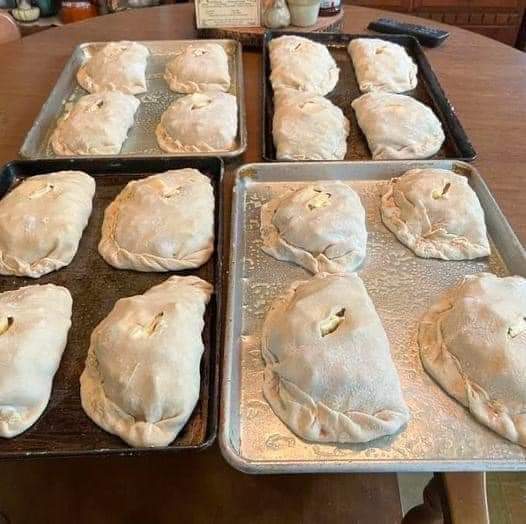
A Cornish pasty is a turnover-shaped baked shortcrust pastry filled with beef and vegetables. The edges are sealed by crimping them in characteristic Cornish fashion.

In 2011, Cornish pasties were given both a Protected Designation of Origin (PDO) and Protected Geographical Indication (PGI) status, which means that in order for these pasties to be made commercially and bear the name “Cornish pasty”, they have to meet very specific requirements. These requirements are as follows:

They have to be made in Cornwall.

They can only contain beef, potato, Swede (rutabaga), onion, salt and pepper. No other meat, no other vegetables, no other seasonings allowed.

The ingredients must be raw when the pasties are assembled and then slowly baked to produce the traditional Cornish pasty flavor and texture.

The edges of the pasties must be sealed by crimping them in traditional Cornish fashion.
PREP TIME: 30mins

COOK TIME: 45mins

CHILL TIME: 3hrs

TOTAL TIME: 4 hrs 15mins

COURSE: Main Course

CUISINE: British, Cornish, english

SERVINGS: 6 large pasties

INGREDIENTS:

For the Shortcrust Pastry:

3 1/2 cups (450 grams) all-purpose flour

1 teaspoon salt

5 ounces (140 grams) unsalted butter , very cold, diced

5 ounces (140 grams) lard , very cold

How to Render Lard (click link to learn how to make it yourself. It’s super easy and much cheaper than store-bought!)

2/3 cup (155 ml) ice cold water

For the Cornish Pasties:

1 pound (450 grams) beef skirt steak or sirloin , cut into small cubes

1 pound (450 grams) firm, waxy potato , peeled and diced in 1/4 inch cubes, or slice them according to personal preference (**starchy potatoes will disintegrate and turn mushy so be sure to use a firm, waxy potato that will hold its shape)

8 ounces (225 grams) rutabaga , peeled and diced in 1/4 inch cubes, or slice them according to personal preference

7 ounces (195 grams) yellow onion , chopped

salt and pepper to taste

unsalted butter (for cutting in slices to lay inside the pasties)

all-purpose flour (for sprinkling inside the pasties)

1 large egg , lightly beaten

INSTRUCTIONS:

To Make the Shortcrust Pastry: Place the flour and salt in a food processor and pulse a few times until combined. Add the cold butter and lard and pulse a few more times until the mixture resembles coarse crumbs. Add the water a little at a time, pulsing between additions, until the mixture begins to come together. DO NOT over-mix the dough or the pastry crust will be tough and won’t be flaky. Form the dough into a ball, wrap in plastic wrap, and refrigerate for at least 3 hours before using (this is crucial). (Can be refrigerated for a few days or frozen for up to 3 months.)

To Make the Cornish Pasties:

Preheat the oven to 350 degrees F.

Cut it into 6 equal pieces (rolling the dough into a log and then cutting makes this easier). Wrap and keep the other 5 pieces chilled in the fridge while you’re working on one at a time. Roll the dough out on a lightly floured work surface to a 8 inch circle that’s about 1/8 inch thick. You can use an 8-inch plate as your guide and cut the dough around it to form your circle.

Layer the filling (see note at end): Put layer of potatoes down the center of the pastry circle, leaving about 3/4 inch space on the top and bottom edges of the pastry dough. Lightly sprinkle with salt and pepper. Next add a layer of rutabagas, onions and finally the beef, adding a light sprinkling of salt and pepper between each layer. Lay a couple pats of butter on top of the beef and sprinkle a little flour over the filling.

Wet the tips of your fingers and lightly moisten the edges of the pastry dough. For this next part work gently so that the filling doesn’t puncture through the dough. If this happens, patch up the hole with some of the scrap pieces of pastry dough. Bring the sides up and seal the pasty down the middle. Turn the pasty onto its side and crimp the edges in traditional Cornish fashion (see blog post pictures as a visual).

Assemble the remaining pasties and lay them on a lined baking sheet. Use a sharp knife to cut a slit in the center of each pasty. Lightly brush each pasty with the beaten egg mixture.

Bake the Cornish pasties on the middle rack for 40-50 minutes until golden in color. Remove from the oven and let them sit for about 10 minutes (they will be very hot inside) before eating.

They can be reheated in the oven (recommended for a crispier crust) or microwave.

NOTE: Depending on how full you stuff the pasties you may have leftover filling. No worries, just fry it up together or add it to soup and enjoy it as a separate meal.

Tips for Making Cornish Pasties

Depending on how thin you roll out your shortcrust pastry you risk having the “hard” ingredients (the potatoes and rutabagas) pierce through the dough. If you prefer a thinner crust and you want to avoid that you can place the softer ingredients on the top and bottom with the harder ingredients sandwiched in the middle: Place the onions on the bottom followed by the potatoes and rutabagas and then the meat on top.

Use firm, waxy potatoes so they hold their shape. Starchy potatoes will disintegrate during baking and turn mushy.

Use a lean cut of beef. Traditional Cornish pasties use skirt steak from the underside belly of the cow because it’s lean and free of gristle.

Add a couple of pats of butter on top of the filling ingredients followed by a light sprinkling of flour. This will both form the gravy as well as absorb the liquids from the vegetables as their cooking to avoid a soggy pastry crust.

Can Cornish Pasties Be Frozen?

Yes. The shortcrust pastry holds up well to freezing and thawing and the filling has little liquid which means the pasties won’t get soggy. You can freeze them either baked or unbaked, whichever you prefer. Wrap each pasty individually in plastic wrap and then store the wrapped pasties in a heavy-duty freezer bag.

If you’re freezing them unbaked it’s best to cook them while frozen – don’t thaw them first. Baking time will take roughly 15-20 minutes longer.

NUTRITIONAL INFO:

Serving: 1large pasty | Calories: 697kcal | Carbohydrates: 63g | Protein: 28g | Fat: 48g | Saturated Fat: 23g | Cholesterol: 148mg | Sodium: 445mg | Potassium: 785mg | Fiber: 5g | Sugar: 3g | Vitamin A: 630IU | Vitamin C: 21mg | Calcium: 72mg | Iron: 8mg

Instant Pot Pork Chops in Creamy Mushroom Sauce

Instant Pot Pork Chops in Creamy Mushroom Sauce – The perfect meal for busy weeknights. These Instant Pot pork chops are an easy and delicious dinner recipe your whole family will love. Seasoned pork chops are seared directly in the Instant Pot with olive oil and butter then smothered with a creamy mushroom sauce. The pork chops come out perfectly juicy and have such great flavor. It’s so easy, you’ll be adding this Instant Pot pork chops recipe to your weeknight dinner rotation soon enough. Enjoy!

INGREDIENTS:

  • 2 pork chops, bone-in (at least 3/4-inch thick – ours make 1-inch )
  • 1 teaspoon paprika
  • 1 1/2 teaspoon kosher salt
  • 3/4 teaspoon black pepper
  • 1 teaspoon Cayenne pepper, optional
  • 1 teaspoon Italian seasoning
  • 1 teaspoon garlic powder
  • 2 tablespoons olive oil
  • 2 tablespoons unsalted butter
  • 1/2 medium yellow onion, diced
  • 8 oz fresh sliced mushrooms
  • 1 cup chicken broth
  • 1/4 cup cornstarch
  • 1/2 cup heavy cream
  • 1/4 cup parmesan, grated, optional
  • Fresh chopped parsley, for garnish

Directions:

1. To make the Instant Pot pork chops in creamy mushroom sauce: Season pork chops with paprika, garlic powder, salt, pepper, Italian seasoning, and Cayenne. Turn on your Instant Pot and select the “Saute” mode. Add olive oil and butter to the insert. Once butter is melted, brown each pork chop 2-3 minutes per side. Remove pork chops to a plate while browning onions and mushrooms.

2. Still using the “Saute” function, cook the onion for about 1 minute, scraping the brown bits from the bottom of the insert. Add mushrooms and cook about 3 minutes until tender. Add in chicken broth. Add pork chops to Instant Pot and secure the lid in place.

3. Select “Pressure Cook” on a high level for 10 minutes, depending on the thickness of pork chops (if very thick, you might need to cook for 12 – 15 minutes). When the cooking time ends, release pressure and do a quick release. Transfer pork chops to a serving dish.

4. Prepare the creamy mushroom sauce by turning the instant pot back on the “Saute” mode.

5. In a small bowl, whisk together cornstarch with about 1/4 cup of the hot broth from the instant pot. Pour the whisked mixture into the instant pot and continue whisking until the sauce bubbles and thickens. Stir in heavy cream, parmesan, and adjust seasoning with more salt and pepper to taste. Return the pork chops into the Instant pot to reheat quickly. Serve the Instant Pot pork chops in creamy mushroom sauce immediately, over cauliflower rice (rice, pasta, or mashed potatoes for non-keto) and garnish with fresh chopped parsley. Enjoy!

For maximum flavor, we suggest you cooking pork chops with the bone is. You can also make Instant Pot boneless pork chops using this same method.

Cream Cheese Cookies Recipe

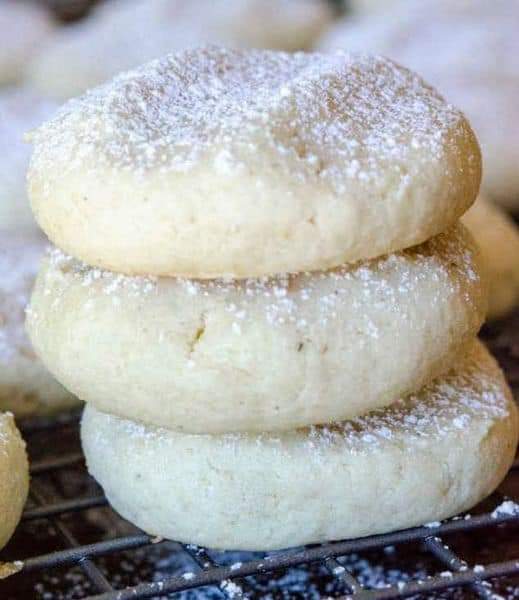
Are you in the mood for a sweet and simple cookie with an incredibly soft melt-in-your-mouth bite? If you’re anything like me, the answer is always and good news – I have just the cookie for you. These Cream Cheese Cookies take your basic baking ingredients and add – spoiler alert – cream cheese to the mix for a soft and nearly creamy cookie that’s a hit any time of year, anywhere

I am partial to drop cookies, mostly because I tend to reserve cut-out and rolled cookies for more special occasions where I can justify the time that goes into them. These do have a chilling step, but it’s only an hour and once the dough is firm it’s just a matter of rolling it into small balls and gently pressing them down after placing them on a cookie sheet. (To me, that’s much easier than finding the rolling pin and the cookie cutters.)

The dough is pretty basic. You just cream together butter and cream cheese before you add in granulated sugar and then the egg, vanilla, baking powder, flour, etc. (You know the drill.) It only takes one bowl and there are no complicated techniques, just a basic cookie dough that the cream cheese brings to new heights.

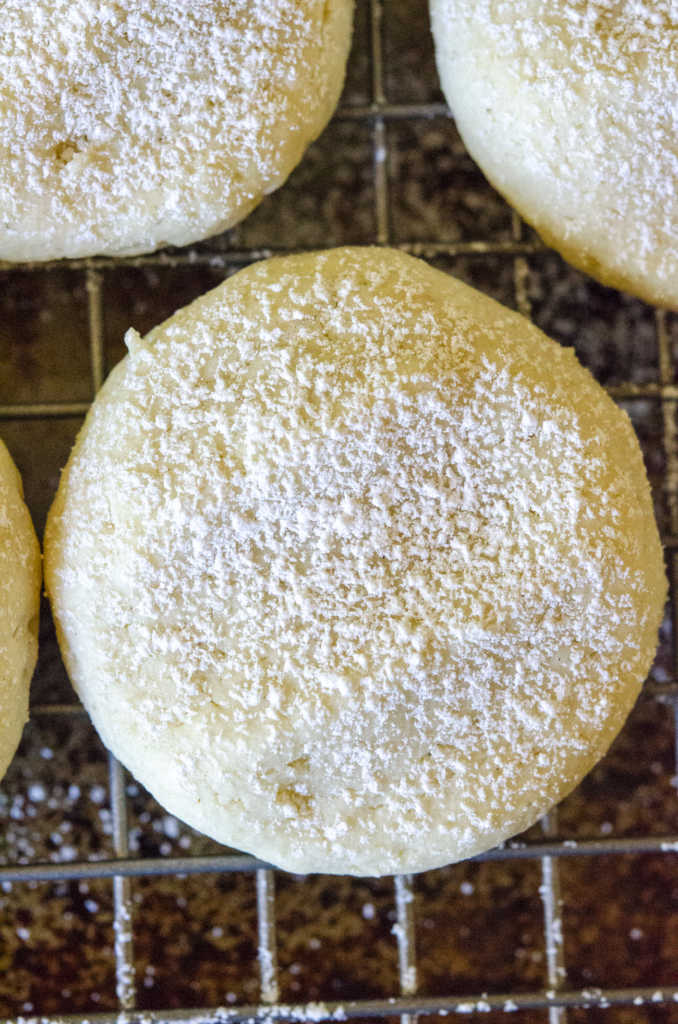
What that cream cheese does is create a soft and cloudy texture – these are not chewy, not crisp in the slightest, just gentle and snowy and sweet. Because they have both butter and cream cheese, the flavor is buttery and just on the edge of richness but it’s straightforward and clean too, not gussied up with nuts or baking chips or fruit. Simple is often best and that’s definitely the case with these.

Yield 20 cookies

15m prep time

10m cook time

1h inactive

Allergens: Eggs, Milk, Gluten

INGREDIENT’S

1/2 cup (1 stick) unsalted butter, at room temperature

4 oz cream cheese, at room temperature

1 cup granulated sugar

1 egg

2 teaspoons vanilla extract

1/2 teaspoon baking powder

1 3/4 cup all-purpose flour

1/2 teaspoon salt

Powdered sugar, for dusting

PREPARATION

Preheat oven to 375°F and line a baking sheet with parchment paper.

In a large bowl, cream the butter and cream cheese with an electric mixer.

Add sugar and beat 1 minute. Add egg and vanilla and mix until combined.

In three additions, add baking powder, flour, and salt, and mix to combine.

Cover dough and chill 1 hour.

Once chilled, dust hands with flour and roll dough into balls between 1-2 inches.

Set out on prepared baking sheet 2-inches apart and flatten gently with your fingers.

Bake 9-11 minutes. The top should remain pale while the bottoms should be golden.

Transfer to a wire rack to cool, then dust with powdered sugar to serve. Enjoy!

Kentucky Blueberry Cobbler Recipe

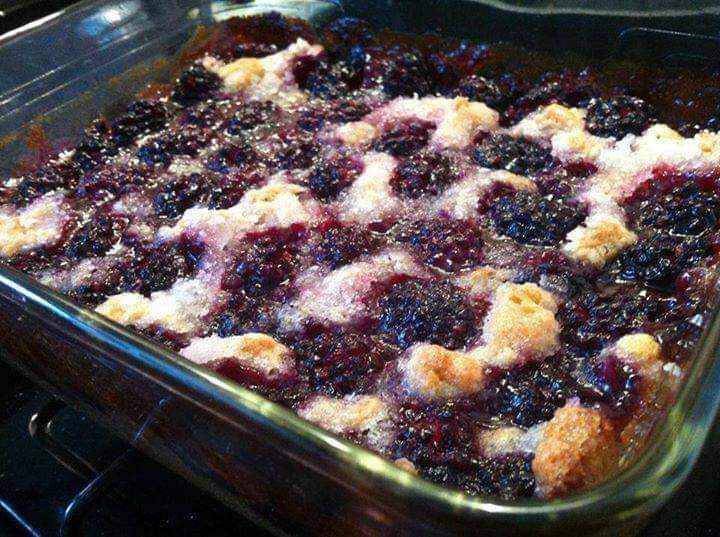
When I serve this wonderful dessert, memories flood back of blackberry picking, chiggers, and my grandmothers kitchen with the wood burning stove…and the wonderful smell of fresh baked blackberry cobbler.

Serves 8 | Prep Time 30 | Cook Time 45 minutes

INGREDIENTS YOU’LL NEED

2 1/2 c blackberries, washed

1 c sugar

1 c flour

2 t baking powder

1/2 t salt

1 c milk

1/2 c unsalted butter, melted

DIRECTIONS

Stir together just the berries and sugar in a large bowl and let it sit out for 25-30 minutes. Preheat oven to 375?. Stir together the flour, baking powder, salt, and milk with a wooden spoon. Next, stir in the melted butter and hand-mix it until the ingredients are well incorporated and you have few clumps. Pour batter into medium baking dish and smooth it out. You can choose to line it with parchment paper or not, but don’t grease the pan. Finally, pour the macerated blackberries on top with all the sugar included and evenly distribute it over the batter.

Bake for 45 minutes to an hour, depending on how golden you prefer it to be. Let it cool for 5 minutes so it will hold its shape.