Spanakopita Triangles Recipe

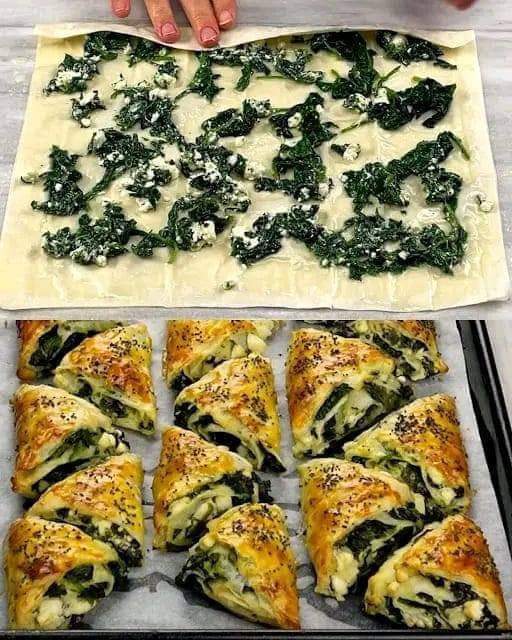
This spanakopita recipe is sauteed spinach, feta cheese and seasonings, all wrapped up in phyllo dough and baked until golden brown and crisp. A savory and hearty appetizer or main course option that always gets rave reviews!

Course Appetizer, Main Course

Cuisine Mediterranean

Prep Time: 45minutes

Cook Time: 25minutes

Total Time: 1hour 10minutes

Servings: 30

INGREDIENTS:

2 tablespoons olive oil divided use

2 pounds fresh spinach leaves

1/2 cup onion finely chopped

1/2 cup green onions thinly sliced

1 teaspoon minced garlic

2 tablespoons chopped fresh parsley

2 tablespoons chopped fresh dill

8 ounces feta cheese crumbled

1 egg lightly beaten

salt and pepper to taste

1 pound phyllo dough sheets thawed

3/4 cup butter melted

INSTRUCTIONS:

Preheat the oven to 375 degrees F. Line 2 sheet pans with parchment paper.

Heat 1 tablespoon of olive oil in a large pan over medium heat. Add half the spinach to the pan and cook until wilted. Add the remaining spinach to the pan.

Cook for 3-4 minutes until all of the spinach is wilted.

Remove the spinach from the pan and let it cool. Wring out excess water. Coarsely chop the spinach.

Wipe out the pan with a paper towel. Heat the remaining tablespoon of olive oil over medium heat.

Add the onion and cook for 3-4 minutes or until softened. Stir in the green onions, garlic, parsley and dill and cook for 30 seconds.

Transfer the onion mixture to a bowl along with the chopped spinach, feta cheese and egg. Season generously with salt and pepper to taste. Stir until thoroughly combined.

Take the phyllo dough out of the package and unroll it onto a flat surface. Keep the phyllo covered with plastic wrap or a damp towel when you’re not working with it.

Lay out one sheet of dough with the long end facing you. Brush the melted butter over the dough.

Add a second layer of dough on top of the first, then brush the second layer with butter.

Cut the dough vertically into 3 inch wide strips.

Place 1 1/2 teaspoons of filling on one end of the dough strip. Fold one corner of the dough over the filling to make a triangle shape.

Fold the strip of dough over itself the same way you’d fold a flag until you reach the end. Brush a little melted butter over the top and place the triangle on the prepared sheet pan.

Repeat the process with the remaining dough and filling.

Arrange the triangles 1 1/2 inches apart on the sheet pans. Bake one pan at a time for 18-20 minutes or until golden brown. Serve immediately.

NOTES

It’s imperative that you squeeze as much liquid as possible out of the cooked spinach so that your filling isn’t watery. I use a potato ricer to press the liquid out, you can also use your hands or a thin kitchen towel to gather the spinach and wring out the liquid.

I think this recipe tastes best with fresh spinach. You can substitute frozen spinach if you prefer, just use 2 10-ounce boxes. Be sure to thaw the spinach and squeeze out any excess water.

NUTRITIONAL INFO:

Calories: 72kcal | Carbohydrates: 1g | Protein: 1g | Fat: 7g | Saturated Fat: 4g | Cholesterol: 24mg | Sodium: 127mg | Potassium: 16mg | Sugar: 0.5g | Vitamin A: 198IU | Vitamin C: 0.5mg | Calcium: 41mg | Iron: 0.1mg

Sliced Baked Potatoes Recipe

These baked potatoes topped with bacon, melted cheese, green onions and sour cream make a great side for steak or light dinner. Enjoy!

INGREDIENTS

Baking potatoes

Cheddar cheese, grated

Bacon, cooked and crumbled

Green onions, sliced

Sour cream

PREPARATION:

STEP 1

Preheat oven to 400°F.

Brush both side of potato slices with butter; place them on a cookie sheet.

Bake for 30 to 40 minutes, or until lightly browned on both sides, turning once.

When potatoes are ready, top with crumbled bacon, cheese, green onion.

Return to oven and continue baking until the cheese has melted.

Add a dollop of sour cream when done and enjoy!

Note:

You can also poke holes in the potatoes and microwave them for six minutes instead of baking.


Pecan Pie Cheesecake Bars Recipe

Pecan pie cheesecake bars are made with a graham cracker crust. Then, we top it with a smooth cream cheese filling. And finally, the top layer is a pecan pie caramel topping! These bars are DIVINE!

How far in advance can I make pecan pie cheesecake bars?

The thing I love most about this recipe is that you can make these pecan pie cheesecake bars up to 4 days in advance. I find that cheesecake most often tastes better the day after it was made, so this is the ideal make-ahead dessert recipe!

How long will these pecan cheesecake bars last?

I mean, if you have any left, you can store them covered in the refrigerator for up to one week. But I highly doubt you’ll have nay for that long!

How do I ensure I get clean cuts?

To make clean cuts, I suggest using a very sharp knife and wiping the blade on a piece of paper towel in between cuts.

Can I freeze these bars?

Yes, you can! We have a large batch stored in the freezer, and when you’re ready to eat, you can do a quick 15-20 second zap in the microwave or allow them to defrost in the refrigerator overnight! These pecan pie cheesecake bars are super low maintenance!

I really hope you won’t let this year go by without trying my favorite dessert – seriously though, and this is by far the best dessert I’ve ever made!

YIELD: 24 BARS

Pecan Pie Cheesecake Bars

prep time 20 MINUTES

cook time 50 MINUTES

total time 1 HOUR 10 MINUTES

Pecan pie cheesecake bars are made with a graham cracker crust. Then, we top it with a smooth cream cheese filling. And finally, the top layer is a pecan pie caramel topping! These bars are simply DIVINE!

INGREDIENTS:

Cheesecake:

1 (13.5-ounce) box graham cracker crumbs (or 3 ¼ cups)

1 ⅓ cup granulated sugar, divided

½ teaspoon ground cinnamon

1 cup (2 sticks) salted butter, melted

4 packets (2 pounds) softened cream cheese

2 large eggs + 2 egg yolks, room temperature

1 tablespoon vanilla extract

¼ cup sour cream, room temperature

Pecan Pie Topping:

½ cup EACH: diced salted butter, light corn syrup, AND heavy cream

1 cup light brown sugar, packed

1 teaspoon vanilla extract

2 cups of toasted pecans

INSTRUCTIONS:

PREP: Position a rack in the center of the oven and preheat the oven to 350ºF. Spray a 13×9 square baking pan with cooking spray and line with parchment paper, making sure it hangs over on all sides, so it’s easy to remove later, set aside.

CRUST: In a medium bowl, stir together the graham cracker crumbs, ⅓ cup sugar, and cinnamon. Add the melted butter and stir to combine. Make sure all the crumbs are moistened. Press the crumbs into the bottom of a baking pan in an even layer and bake for 10 minutes. Remove from oven and allow for it to cool while you prepare the filling.

FILLING: Beat the cream cheese and the remaining 1 cup of sugar together for a minute until smooth. Then, add the eggs + yolks, one at a time, waiting a few seconds, and allowing each egg/yolk to incorporate before adding the next. Add the sour cream, then add the vanilla extract and continue to mix for a few additional seconds. It’s okay if the batter has a few small lumps. When mixed, pour the cheesecake mixture over the graham cracker base and bake for 40-42 minutes or until the cheesecake is set and not wet. Mine was just barely jiggly in the center, and that’s perfect.

PECAN PIE LAYER: Add the butter, corn syrup, and brown sugar to a medium saucepan over medium-high heat and bring to boil while you stir it continuously. When boiling, whisk in the heavy cream and allow for the caramel mixture to cook for 4 minutes on medium-high while you whisk continuously. Remove the pot from the heat and pour in the vanilla extract and stir in the pecans. Then, continuously stir the pecan pie mixture for 5 minutes. Pour the prepared pecan pie layer over the cheesecake and let cool completely to room temperature. Allow the bars to cool in the refrigerator for several hours (ideally overnight), so they are completely set. Remove by gently lifting the parchment and place on a clean flat surface. Cut them into bars and serve!

Notes:

Bars are best when removed from the refrigerator about 15-20 minutes before serving. The pecan pie mixture softens a bit and is much easier to break with a fork!

Harissa Maple Glazed Pork Chops Recipe

These maple glazed pork chops are infused with flavorful harissa for the perfect blend of sweet and spicy. The easy recipe is perfect for a quick weeknight dinner and you only need 5 ingredients to make it.

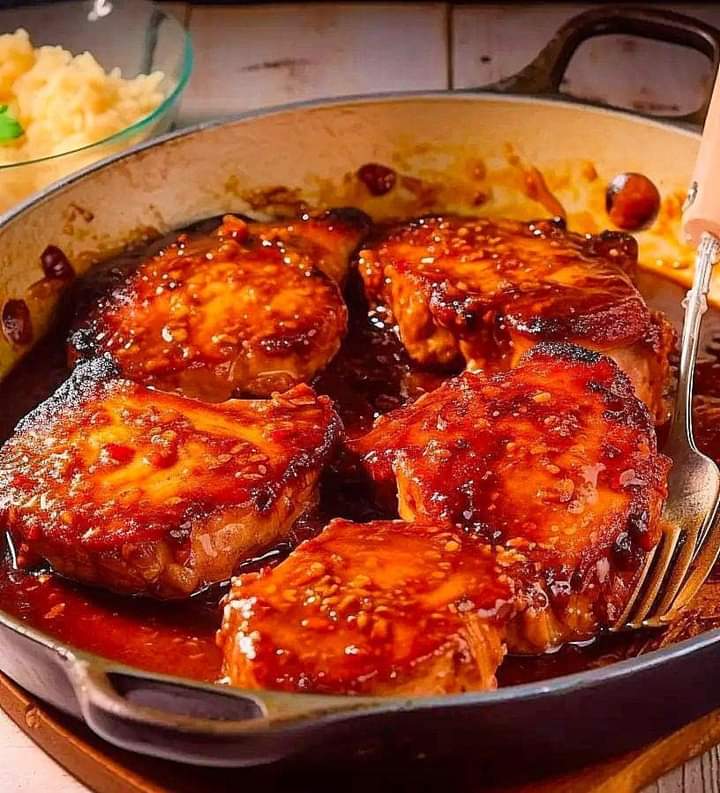
spooning extra pork chop glaze onto maple glazed pork chops in a skillet

Why I love this spicy glazed pork chops recipe

When it comes to dinner, I tend to go for one of two categories. Easy one-pot-type meals like chicken and broccoli or a meat-starch-veggie combo plate, and I have honestly always found the latter to be boring.

Until I realized that a few simple ingredients can turn bland meat into a phenomenal dinner. I did it with my baked mahi mahi recipe and my favorite garlic baked chicken legs, and I think the possibilities are endless.

spicy glazed pork chops in a cast iron skillet with a serving bowl of mashed potatoes, fresh herbs and a blow of glaze to the side

These maple glazed pork chops combine super flavorful and spicy harissa with sweet maple syrup for the perfect sweet and savory recipe. The simple, seasoned pork chops only take 10 minutes to cook and then they’re drenched it a thick, beautiful glaze that packs so much flavor.

Serve them with creamy, dairy free mashed potatoes and your favorite vegetable or salad. If you’re not in the mood for mashed, try crispy roasted potatoes or wild rice pilaf, instead.

 Should you rinse pork chops before cooking?

No. Rinsing any raw meat increases the chances of contaminating your kitchen. Simply remove them from their packaging and blot any excess liquid with a paper towel before seasoning.

How long do you cook pork chops for?

1-inch thick pork chops will generally take about 4 – 5 minutes per side to cook (bone-in) or 3 – 4 minutes per side (boneless). If your chops are a different thickness, you will need to adjust your cooking time accordingly.

What temperature do you cook pork chops to?

Pork chops need to be cooked to an internal temperature of 145˚F to be considered safe to eat. I recommend using a meat thermometer to accurately check the temperature 

These maple glazed pork chops are infused with flavorful harissa for the perfect blend of sweet and spicy. The easy recipe is perfect for a quick weeknight dinner and you only need 5 ingredients to make it.

 Prep Time: 10 minutes

  Cook Time: 15 minutes

Total Time: 25 minutes

  Yield: 4 servings 

INGREDIENTS:

For the pork chop glaze:

6 tablespoons maple syrup

2 tablespoons tomato paste

1/2 tablespoon harissa powder

1 teaspoons minced garlic

1/4 teaspoon coarse salt

For the pork chops

4 bone-in pork chops

1/2 – 1 teaspoon coarse salt

1/4 teaspoon black pepper

1 teaspoon harissa powder

1 tablespoon olive oil

Cook Mode Prevent your screen from going dark

INSTRUCTIONS:

In a small saucepan, combine the glaze ingredients and whisk until smooth. Bring to a boil, then immediately reduce heat to low and simmer for about 10 minutes, until thickened. Once the glaze has thickened, remove from heat and set aside.

Season pork chops with salt, pepper and harissa.

Heat olive oil in a large skillet to medium-high. Add the pork chops and sear for 4 – 5 minutes per side, or until pork chops reach an internal temperature of 145˚F.

Remove from heat and add prepared glaze before serving.

NOTES

This recipe makes enough glaze for up to 8 pork chops. Feel free to double the amount of chops you’re cooking if you need more servings.

NUTRITIONAL INFO:

Serving Size:Calories: 167Sugar: 19.4 gSodium: 493.6 mgFat: 5.1 gSaturated Fat: 1 gCarbohydrates: 22.3 gFiber: 0.4 gProtein: 8.7 gCholesterol: 24.9 mg

Homemade Summer Sausage Recipe

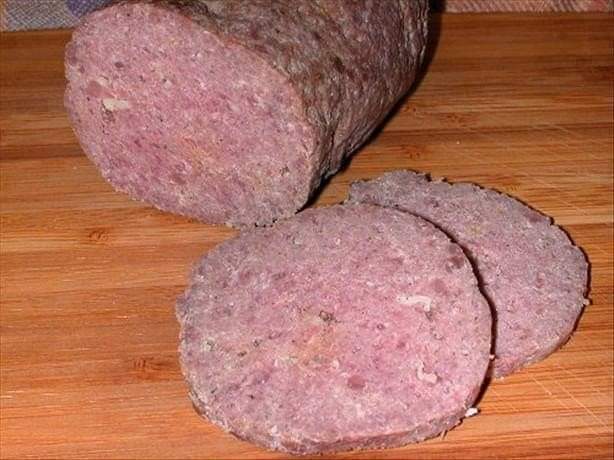
Make the best flavored summer sausage right in your very own home with this easy homemade recipe that requires no casing.

Mmmm homemade summer sausage beats out store bought by 100% any day. You will enjoy reaping the many compliments. This recipe is sure to impress your friends and family. Wherever you take this scrumptious dish be sure to let everyone know that the summer sausage is “homemade”. A well worth recipe in my book for sure!

How To Serve Summer Sausage

Summer sausage can be a simple appetizer served on a tray with cheese and crackers at your next holiday gathering, party or potluck. This summer sausage is a must-have while watching sports at home or just serve as a simple snack. And if you want to add some dipping sauces why not try a sweet hot mustard or your favorite BBQ sauce. However you plan to serve it I’m sure it will be a big hit!

Make the best flavored summer sausage right in your very own home with this easy recipe that requires no casing.

 Course Appetizer, Snack

 Cuisine American

 Prep Time 15 minutes

 Cook Time 8 hours

 chill 1 day

 Total Time 1 day 8 hours 15 minutes

 Servings 4 logs

INGREDIENTS:

3 pounds ground beef (first choice 70/30 or second choice 80/20)

1 Tablespoon Morton Tender Quick Meat Cure (this is usually found in the grocer spice section near the salt)

1 Tablespoon garlic powder

2 teaspoons mustard seed (can use up to 1 Tablespoon)

1/2 Tablespoons liquid smoke flavoring

1/2 cup water

2 1/2 teaspoons coarse ground peppercorns (I use this pepper mill to get fresh course ground)

INSTRUCTIONS:

Combine Ingredients

Place all ingredients into a large mixing bowl. Kneading by hand for about 3-5 minutes or until the mixture has that real sticky look.

Chill

Cover mixture with foil, plastic wrap or lid and place mixture in refrigerator for 8 hours.

Shape and Chill

Remove mixture from refrigerator and knead by hand for about 3 minutes. Using a kitchen scale divide meat evenly into four pieces. Roll each piece into about a 9-inch log. Place prepared logs on a quarter baking pan with rack, cover and return to the refrigerator for 16 more hours.

Bake

Preheat oven to 200 degrees Fahrenheit. Remove baking pan with sausage from refrigerator and discard cover. To get that beautiful brown edge on the outside of the logs bake the sausage on the quarter baking pan with rack for 8 hours uncovered. Carefully remove pan from oven, wrap each log in a sheet of aluminum foil and refrigerate.

Slice and Serve

Slice chilled summer sausage thinly and serve with a variety of cheeses and crackers like pepper cracked water crackers. If desired, serve with some type of sauce (mustard or your favorite BBQ sauce). Oh, and to keep all the food from getting touched by everyone don’t forget to set out the frilly toothpicks in a small cup or container. TIP: if the cup or container is too deep just add a few dried beans and then add the toothpicks. Works perfect!

Old Fashioned Homemade Bologna Recipe

Old-Fashioned Homemade Bologna is thick, meaty, and full of deep flavors. No wonder Grandpa enjoyed it with a smear of mustard and a slab of cheese on homemade bread!

This Homemade Bologna Recipe shows how radically food manufacturers have changed our taste expectations. That greasy, mushy pink stuff we’ve all eaten between slices of flat white bread is nothing like bologna used to be. Now you can enjoy it, too, with none of the guilt for eating the fatty, flavorless stuff from the store.

How To Make Homemade Bologna

It starts off simply enough, using ingredients you can pick up at any grocery store: meat, garlic powder, onion powder, liquid smoke, salt and a bit of brown sugar if you want. For equipment, you can get away with using a food processor, but a stand mixer is even easier.

Tender Quick Is Optional…Sort Of.

One ingredient for this homemade bologna that you probably don’t have in the pantry (unless you cure a lot of meat at home) is Morton’s Tender Quick

I’ve made it both with and without Tender Quick, and the flavor is much deeper when it’s used. If you’re skipping it, you may want to double the amount of garlic and onion powder, and possibly add a bit more liquid smoke.

Emulsifying ground beef and seasonings in a stand mixer bowl

Emulsifying Is A MUST

Unlike the floppy pink slices from the store, old-fashioned homemade bologna is more like salami or summer sausage. That’s not to say it’s spicy, although you can certainly make it that way. The main difference is that homemade bologna is meaty.

That meatiness turned me off the first time because it seemed more like a burger than the smooth stuff of my childhood. A little research revealed the problem: I didn’t know to emulsify the meat by adding ice water before shaping and cooking it. That step has made a world of difference in the texture of my homemade bologna recipe.

Keep Things Chilled Throughout

Once you’ve combined the meat and ice water, you must transfer the bowl to the freezer. This step accomplishes two things:

It allows the meat to firm back up before shaping.

And it’s essential for food safety. Ten minutes should do it.

Wrap And Secure It

After chilling the emulsified mixture, take half of the meat out and shape it into a log. Wrap this tightly with plastic wrap and use a twist-tie to keep the ends shut, so the log maintains its shape.

Overhead view of beef bologna ingredients formed into logs and tightly wrapped in plastic before chiling

Overnight Rest To Meld Flavors

Proceed with the remainder of the meat, then transfer the logs to the refrigerator to chill and rest for 24 hours. This step improves the flavor and lets the moisture in the beef move through the entire product.

After that, unwrap and cook it in the oven on a baking rack propped over a rimmed baking sheet, so excess fat can drip out without making the outside of the bologna greasy.

Why The Cooking Temperature Changes

The initial cooking time of 30 minutes at 300°F dries the exterior which helps the bologna maintain its shape. The rest of the cooking at 250°F for 2 1/2 hours cooks it all the way through, which is vital to food safety. Once cooked, let it cool completely before refrigerating or freezing for future use.

The result? A smooth yet meaty homemade bologna with a hint of smoky garlic flavor that’s perfect on homemade hamburger buns or with cheese and crackers.

Storage

If you skip the Tender Quick and use sea salt, you need to eat or freeze this homemade bologna within three days, just as you’d need to eat anything made of ground meat in that time frame. With the Tender Quick, which acts as a curing preservative, it’ll stay good for at least a month in the refrigerator.

Old world-style bologna with a hint of smoky garlic flavor. Excellent on sandwiches, or served with cheese and crackers.

Prep Time: 1hr

Cook Time: 3 hrs

Chilling Time: 1d

Total Time: 1d 4hrs

Equipment

Food processor OR stand mixer

Plastic wrap and twist ties

Baking Rack

Rimmed baking sheet

INGREDIENTS:

3 pounds ground beef no leaner than 80/20

1 cup water ice cold

1.5 teaspoon Morton’s Tender Quick OR 1 tablespoon sea salt

1 tablespoon brown sugar

1 teaspoon all-natural liquid smoke flavor

½ teaspoon garlic powder May increase to 1 teaspoon if not using Tender Quick

½ teaspoon onion powder May increase to 1 teaspoon if not using Tender Quick

INSTRUCTIONS:

In the bowl of a food processor or stand mixer, combine all of the ingredients until smooth. Transfer the bowl to the freezer for 10 minutes before proceeding.

Remove the bowl of meat from the freezer and divide the mixture in half. Using damp hands, form each half into a log. Compress it tightly as you work. Wrap each log in plastic wrap and use twist-ties to secure the ends tightly. Refrigerate flat for 24 hours.

Preheat oven to 300° F / 150° C / gas mark 2.

Remove plastic wrap from meat and carefully transfer both logs to a baking rack propped over a rimmed baking sheet. Bake for 30 minutes, turning halfway through.

Reduce heat to 250° F / 125° C / gas mark 1 and cook an additional 2 to 2½ hours to an internal temperature of 160° F. Remove from oven and allow to cool completely. Refrigerate up to 3 days. May be frozen for longer storage.

Notes:

For easiest slicing, chill the cooked bologna for 20 minutes and use a sharp, non-serrated knife.

Nutritional Info:

Serving: 1serving | Calories: 110kcal | Carbohydrates: 1g | Protein: 7g | Fat: 9g | Saturated Fat: 3g | Cholesterol: 30mg | Sodium: 113mg | Potassium: 115mg | Sugar: 1g | Calcium: 8mg | Iron: 1mg