Low-Carb Cauliflower Steaks

Looking for a delicious low-carb alternative to baked potatoes? Look no further! This Keto Cauliflower Steak recipe is not only flavorful but also packed with nutrients, making it the perfect side dish or even a main course. Featuring crispy edges, a cheesy topping, and delicious garnishes, these cauliflower steaks are sure to impress. Follow this detailed guide for a comprehensive step-by-step approach, nutritional information, and tips to create the perfect dish.
Ingredients
For the Cauliflower Steaks
1 large head of cauliflower
2 tablespoons olive oil (extra virgin for better flavor)
1 teaspoon salt
1 teaspoon black pepper
1 teaspoon garlic powder
1 teaspoon onion powder
1 teaspoon dried parsley (or fresh, finely chopped if available)
For the Topping
2 tablespoons unsalted butter (melted)
1 cup shredded cheese (cheddar, mozzarella, or a blend)
1/2 cup crumbled bacon (cooked until crispy)
1/2 cup sour cream (full-fat for best flavor)
Equipment Needed
Baking sheet
Parchment paper (optional, for easy cleanup)
Sharp knife
Basting brush
Oven
Large mixing bowl
Instructions
Step 1: Preheat Your Oven
Begin by preheating your oven to 400°F (200°C). Preheating is crucial for achieving a crispy exterior on your cauliflower steaks.

Step 2: Prepare the Cauliflower
Take a large head of cauliflower and remove the outer leaves. Rinse it under cold water to clean it. Pat it dry with a kitchen towel.

Step 3: Slice the Cauliflower
Using a sharp knife, carefully slice the cauliflower into thick steaks, approximately 1-inch thick. You should aim for about 4-6 steaks, depending on the size of your cauliflower head. Keep any florets that fall off for roasting or other recipes.

Step 4: Season the Steaks
In a large mixing bowl, combine 2 tablespoons of olive oil, 1 teaspoon of salt, 1 teaspoon of black pepper, 1 teaspoon of garlic powder, 1 teaspoon of onion powder, and 1 teaspoon of dried parsley. Whisk these ingredients together until well combined.

Step 5: Brush the Cauliflower
Place the cauliflower steaks on a baking sheet lined with parchment paper (if using). Brush each steak generously with the olive oil seasoning mixture using a basting brush. Make sure to coat both sides for maximum flavor.

Step 6: Bake the Cauliflower
Place the baking sheet in the preheated oven and bake the cauliflower steaks for 30 minutes, flipping them halfway through. This ensures even cooking and helps develop a nice golden-brown color.

Step 7: Add Butter and Cheese
After the initial baking time, remove the cauliflower steaks from the oven. Brush each steak with 2 tablespoons of melted unsalted butter for added richness. Then, sprinkle 1 cup of shredded cheese evenly over the top of each steak.

Step 8: Broil for Perfection
Return the baking sheet to the oven and switch the setting to broil. Broil the cauliflower steaks for 2-3 minutes or until the cheese is bubbly and golden brown. Keep a close eye on them during this step to prevent burning.

Step 9: Add Bacon and Sour Cream
Once the cheese is melted and bubbly, remove the baking sheet from the oven. Sprinkle 1/2 cup of crumbled bacon over the top of each steak. Finally, add a dollop of 1/2 cup of sour cream on top of each steak for a creamy finish.

Step 10: Serve and Enjoy
Plate the cauliflower steaks and garnish with additional parsley if desired. Serve immediately while hot and enjoy your delicious, low-carb alternative to baked potatoes!
Nutritional Information (per serving, based on 4 servings)
Calories: 290
Total Fat: 24g
Saturated Fat: 12g
Carbohydrates: 7g
Fiber: 3g
Net Carbs: 4g
Protein: 12g
SmartPoints: 7 points per serving (may vary based on specific ingredients used)
Tips for Making the Best Cauliflower Steaks
Select a Fresh Cauliflower: Choose a firm, heavy head of cauliflower with tightly packed florets. Avoid any that have brown spots or blemishes.
Thickness Matters: Aim for 1-inch thick steaks to ensure they hold together during cooking. Thinner slices may fall apart or become too crispy.
Season Generously: Don’t shy away from seasoning! The flavor of the cauliflower is subtle, so robust seasoning is essential to elevate the dish.
Experiment with Cheese: Feel free to mix and match cheeses based on your preference. Gruyère, pepper jack, or even feta can add unique flavors to the dish.
Bacon Alternatives: If you’re looking for a lower-fat option, consider turkey bacon or leave out the bacon altogether for a vegetarian version.
Meal Prep: This recipe is great for meal prepping. The steaks can be baked in advance and reheated as needed throughout the week.
Storage: Store any leftovers in an airtight container in the refrigerator for up to 3 days. Reheat in the oven or microwave before serving.
Conclusion
This Keto Low-Carb Cauliflower Steak recipe offers a delicious, satisfying alternative to traditional baked potatoes. Bursting with flavor from the olive oil, garlic, and cheese, it’s a dish that everyone will love—keto dieters and non-dieters alike. Not only is it simple to prepare, but it also provides a healthy dose of vegetables and can be customized to suit your taste. Enjoy these cauliflower steaks as a side dish or make them the star of your next meal!

Garlic Herb Roasted Veggies

This recipe for Garlic Herb Roasted Potatoes, Carrots, and Zucchini is a delicious and colorful side dish that’s easy to prepare and goes well with a variety of main courses. Whether you’re serving it alongside a roast, grilled chicken, or fish, these roasted vegetables bring a healthy and flavorful addition to any meal. Here’s how to make it:

Ingredients:

3 medium potatoes, cubed
4 carrots, sliced
2 zucchinis, sliced
3 tablespoons olive oil
4 cloves garlic, minced
1 teaspoon dried thyme
1 teaspoon dried rosemary
1/2 teaspoon dried oregano
Salt and pepper, to taste
Optional: Fresh parsley, chopped for garnish

Instructions:

Preheat the Oven:
Preheat your oven to 400°F (200°C). Line a large baking sheet with parchment paper or lightly grease it to prevent sticking.
Prepare the Vegetables:
Wash and peel the potatoes and carrots. Cube the potatoes and slice the carrots into thin rounds or sticks, depending on your preference.
Wash the zucchinis and slice them into rounds. Try to keep the slices of all vegetables approximately the same thickness for even cooking.
Season the Vegetables:
In a large mixing bowl, combine the cubed potatoes, sliced carrots, and zucchini slices.
Add the minced garlic, olive oil, dried thyme, rosemary, oregano, salt, and pepper to the bowl. Mix everything together until the vegetables are uniformly coated with the oil and seasonings.
Roast the Vegetables:
Arrange the seasoned vegetables in an even layer on the prepared baking sheet. Ensure they are in a single layer and not overcrowded to promote even roasting.
Place in the preheated oven and roast for about 25-30 minutes, or until the vegetables are tender and golden brown. Give the vegetables a gentle stir halfway through the cooking time to ensure they brown evenly.
Serve:
After roasting, take the vegetables out of the oven. If desired, sprinkle with freshly chopped parsley for a burst of color and additional flavor.
Serve hot as a side dish with your favorite protein or enjoy them on their own as a tasty and healthy snack.
Tips:
Uniform Cutting: Ensure all the vegetables are cut into similar-sized pieces to ensure they cook evenly.
Variations: Feel free to add other vegetables like bell peppers or onions to the mix for added flavor and color. You can also experiment with other herbs like basil or marjoram for different flavor profiles.
Storage: Leftover roasted vegetables can be stored in an airtight container in the refrigerator for up to 3 days and reheated in the oven or microwave.
Conclusion:
Garlic Herb Roasted Potatoes, Carrots, and Zucchini is a versatile and easy-to-make dish that adds a healthy and flavorful touch to any meal. It’s perfect for busy weeknights and can be customized with various herbs and vegetables based on your preferences or what you have on hand. Enjoy this delicious mix of roasted vegetables and make the most of your side dishes!

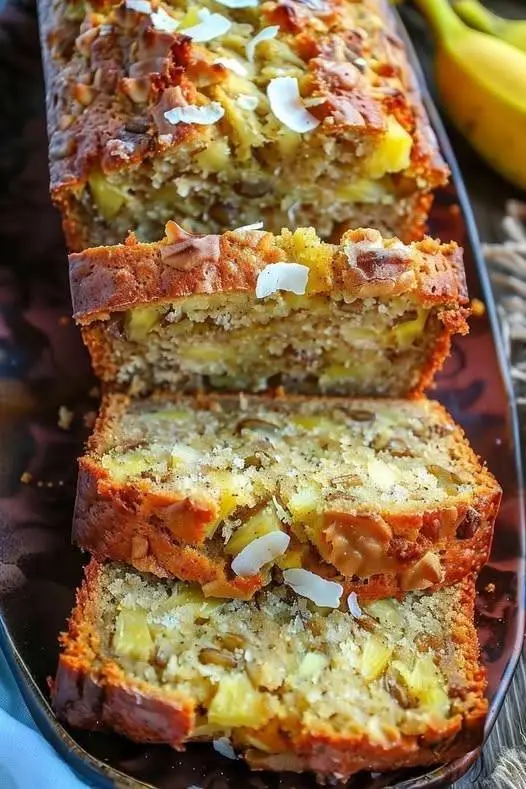
Banana pineapple bread Recipe

Banana pineapple bread is a moist, tropical-flavored quick bread that combines the sweetness of ripe bananas with the tangy juiciness of crushed pineapple. This flavorful loaf is often enriched with warm spices like cinnamon and nutmeg, and sometimes includes chopped nuts or shredded coconut for added texture. The pineapple adds moisture, making the bread extra soft and tender.

Ingredients:

Wet Ingredients:

2 large ripe bananas, mashed

1/4 cup extra virgin olive oil (heart-healthy fat)

1/4 cup unsweetened applesauce (replaces some oil for moisture)

1/4 cup honey or pure maple syrup (natural sweetener)

2 large eggs (or flax eggs for vegan option)

1 teaspoon pure vanilla extract

Dry Ingredients:

1 1/2 cups almond flour (or spelt flour for Mediterranean-friendly fiber)

1 teaspoon baking soda

1/2 teaspoon baking powder

1/2 teaspoon cinnamon

Pinch of sea salt

Add-Ins:

3/4 cup fresh pineapple, diced (or canned in its juice, drained)

1/2 cup unsweetened shredded coconut

1/4 cup chopped walnuts or almonds (optional for added crunch)

Instructions:

Preheat the Oven:

Preheat your oven to 350°F (175°C). Lightly grease a 9×5-inch loaf pan with olive oil or line it with parchment paper.

Mix the Wet Ingredients:

In a large bowl, whisk together the mashed bananas, olive oil, applesauce, honey/maple syrup, eggs, and vanilla extract until smooth.

Combine Dry Ingredients:

In another bowl, whisk together the almonds flour, baking soda, baking powder, cinnamon, and a pinch of sea salt.

Combine Wet and Dry Mixtures:

Gradually fold the dry ingredients into the wet mixture, stirring until just combined. Avoid overmixing.

Add the Pineapple and Coconut:

Gently fold in the diced pineapple, shredded coconut, and chopped nuts (if using).

Bake the Bread:

Pour the batter into the prepared loaf pan. Smooth the top with a spatula.

Bake for 45–55 minutes, or until a toothpick inserted in the center comes out clean.

Let the bread cool in the pan for 10 minutes, then transfer it to a wire rack to cool completely.

Serve and Enjoy:

Slice the bread and enjoy it as a breakfast, snack, or light dessert!

Why It’s Mediterranean-Friendly:

Healthy Fats:

Extra virgin olive oil and nuts provide heart-healthy unsaturated fats.

Natural Sweeteners:

Honey or maple syrup replace refined sugar.

Whole Grains: Whole wheat flour boosts fiber content.

Nutrient-Rich Additions:

Pineapple and coconut add natural sweetness, vitamins, and antioxidants.

Crispy Roasted Cauliflower

Cauliflower has transcended its reputation as a bland, overlooked vegetable and emerged as a culinary superstar, especially when roasted to perfection. My Crispy Roasted Cauliflower recipe is a testament to the versatility and deliciousness of this humble vegetable. Infused with Italian herbs and Parmesan, this dish promises a crispy, flavorful experience that rivals any meat dish. Whether you are a dedicated vegetarian or simply looking to add more vegetables to your diet, this recipe will win you over with its crispy texture and rich, savory taste.

Ingredients
Main Ingredients:
1 head of cauliflower
3 slices of lemon
A handful of dill
1 1/4 cups panko breadcrumbs
1 clove of minced garlic
3/4 cup all-purpose flour
3 eggs

5 tbsp olive oil
1 tsp Italian herbs
A handful of chopped parsley
1 cup grated Parmesan cheese
Salt, to taste
Ground black pepper, to taste
Sauce:
3/4 cup sour cream
1/2 cup yogurt

Freshly chopped parsley
Salt and ground black pepper
Lemon juice
Directions
Step 1: Prepare the Cauliflower
Start by cutting the cauliflower into florets. Bring a pot of salted water to a boil and add the lemon slices, a handful of dill, and the cauliflower florets. Boil for five minutes, then drain and set aside. This step helps to infuse the cauliflower with subtle flavors and tenderize it slightly before roasting.

Step 2: Prepare the Coating Mixture
In a large mixing bowl, combine the panko breadcrumbs, minced garlic, olive oil, Italian herbs, salt, ground black pepper, chopped parsley, and grated Parmesan cheese. Mix until well combined. This breadcrumb mixture will give the cauliflower its irresistible crispy coating.

Step 3: Coat the Cauliflower
Set up a dredging station with a plate of all-purpose flour, a bowl of whisked eggs, and the bowl of breadcrumb mixture. Dredge each cauliflower floret first in the flour, then dip it in the whisked eggs, and finally coat it in the breadcrumb mixture. Ensure each piece is evenly coated for maximum crispiness.

Step 4: Bake the Cauliflower
Place the coated cauliflower florets on a parchment-lined baking tray. Preheat your oven to 350°F (175°C) and bake for 20 minutes, or until the cauliflower is golden brown and crispy. The aroma of the herbs and Parmesan will fill your kitchen, making it hard to wait for the finished product.

Step 5: Prepare the Sauce
While the cauliflower is baking, prepare the sauce. In a small bowl, combine the sour cream, yogurt, freshly squeezed lemon juice, chopped parsley, salt, and ground black pepper. Mix well. This creamy, tangy sauce complements the crispy cauliflower perfectly, adding a refreshing contrast to each bite.

Step 6: Serve and Enjoy
Once the cauliflower is done baking, remove it from the oven and let it cool slightly. Serve the crispy roasted cauliflower with the prepared sauce. Garnish with extra parsley if desired. Enjoy this delicious, meat-free dish that is sure to impress both vegetarians and meat-lovers alike.

Nutrition Information
Per Serving:

Calories: 220
Protein: 10g
Carbohydrates: 25g
Dietary Fiber: 3g
Sugars: 3g
Fat: 10g
Saturated Fat: 3g
Cholesterol: 75mg
Sodium: 320mg
Vitamin A: 8% DV
Vitamin C: 70% DV
Calcium: 20% DV
Iron: 10% DV
Conclusion
This Crispy Roasted Cauliflower recipe is a delightful alternative to traditional meat dishes. The combination of herbs, Parmesan, and a crispy breadcrumb coating makes it a standout dish that will leave you craving more. Perfect for a weeknight dinner or as a side dish for a special occasion, this recipe is sure to become a favorite in your household.

Green Enchilada Chicken Soup

Directions:

  1. Prepare the Chicken and Broth Base:
    • Place chicken, green enchilada sauce, and chicken broth into the Crock Pot.
    • Cook on low for 6-8 hours.
  2. Shred the Chicken:
    • Remove chicken, shred with two forks, and return to the Crock Pot.
  3. Add Creamy Ingredients:
    • Add Monterey Jack cheese, cream cheese, half and half or Greek yogurt, and green salsa.
    • Stir well and cook on low for an additional 30 minutes.
  4. Taste and Adjust Seasoning:
    • Add salt and pepper to taste.
  5. Serve and Garnish:
    • Ladle soup into bowls and top with desired garnishes like avocado, cilantro, green onion, and sour cream.

Tips:

  • Use chicken thighs for more flavor.
  • Adjust spice level with mild or hot enchilada sauce.
  • Make ahead and store in the fridge for up to 3 days or freeze for up to 3 months.
  • Customize with toppings like shredded cheese, jalapeños, or crispy tortilla strips.

Enjoy your comforting and flavorful Crock Pot Green Enchilada Chicken Soup! 🍲😊

This soup combines the tangy flavor of green enchilada sauce, tender chicken, and creamy cheeses for a delightful meal. Perfect for busy weeknights or cozy weekends, it’s sure to become a family favorite.

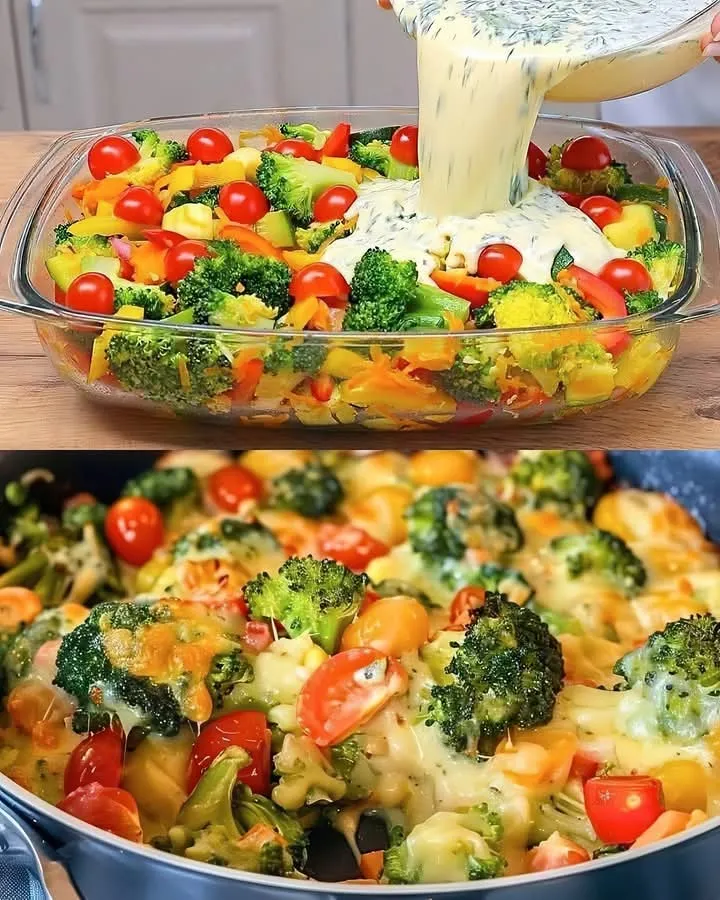
Cheesy Baked Vegetables Casserole Ingredients

Cheesy Baked Vegetables Casserole
This Cheesy Baked Vegetables Casserole is a wholesome, veggie-packed bake layered with tender roasted vegetables, a creamy herbed béchamel-style sauce, and plenty of gooey melted cheese. It’s the ultimate comfort food that’s still full of nourishing ingredients — a fantastic way to enjoy your favorite vegetables in one satisfying dish. Ideal for family dinners, potlucks, or meal prep!

Total Time: 55 minutes
Prep Time: 20 minutes

Cook Time: 35 minutes

Ingredients
For the Vegetables:
1 medium zucchini, sliced

1 medium carrot, thinly sliced

1 small head broccoli, cut into florets

1 red bell pepper, sliced

1 small red onion, sliced

2 tbsp olive oil

Salt and black pepper, to taste

½ tsp dried oregano

½ tsp garlic powder

For the Sauce & Topping:
2 tbsp butter

2 tbsp all-purpose flour

1½ cups milk (or plant-based milk)

½ tsp dried thyme or Italian seasoning

½ tsp Dijon mustard (optional, for depth)

Salt and pepper, to taste

1½ cups shredded cheese (mozzarella, cheddar, gouda, or a blend)

½ cup grated Parmesan (optional)

2 tbsp chopped fresh parsley or chives, for garnish

Instructions
Preheat Oven & Prepare Vegetables:
Preheat oven to 400°F (200°C).
Toss zucchini, carrot, broccoli, bell pepper, and red onion in olive oil, oregano, garlic powder, salt, and pepper.
Spread onto a parchment-lined baking sheet and roast for 15 minutes, just until slightly tender. Set aside.

Make the Cheese Sauce:
In a saucepan over medium heat, melt butter. Whisk in flour and cook for 1 minute to form a roux.
Slowly add milk while whisking to avoid lumps. Simmer and stir until the sauce thickens (about 3–4 minutes).
Stir in thyme (or Italian seasoning), mustard (if using), and salt/pepper to taste.
Remove from heat and mix in 1 cup of shredded cheese until smooth.

Assemble the Casserole:
In a greased 9×9″ or similar baking dish, layer the roasted vegetables.
Pour the cheese sauce evenly over the veggies. Top with the remaining ½ cup shredded cheese and grated Parmesan (if using).

Bake:
Bake uncovered at 400°F (200°C) for 20 minutes, or until the top is golden and bubbly.

Finish & Serve:
Remove from oven, sprinkle with fresh herbs, and let sit for 5 minutes before serving.

Tips
Veggie Prep Tips:
Cut vegetables evenly so they cook uniformly during roasting and baking.

Pre-roast or steam firm veggies like carrots and broccoli to ensure tenderness in the final bake.

Pat moisture-heavy veggies dry (like zucchini or mushrooms) before roasting to prevent a watery casserole.

Cheese Tips:
For best meltability and flavor, grate your own cheese — pre-shredded cheese contains anti-caking agents that can affect the sauce’s texture.

Use a mix of mild and sharp cheeses (like mozzarella + sharp cheddar) for balance.

Sauce Tips:
If the sauce thickens too much, whisk in a little extra milk before pouring over the vegetables.

Add a spoonful of cream cheese or ricotta to the sauce for a silkier texture and extra richness.

Variations
Add Protein:
Stir in cooked shredded chicken, ground turkey, or white beans for a more filling casserole.

Top with crispy bacon or sautéed sausage before baking.

Go Green:
Add spinach, kale, or Swiss chard into the vegetable mix — just sauté or steam before layering.

Mushroom Lover’s Version:
Add sliced mushrooms (button, cremini, or portobello) to the roasted veggie mix for a savory, meaty depth.

Low-Carb Swap:
Replace carrots or potatoes with cauliflower florets or celery root for a lower-carb version.

Spice It Up:
Add a pinch of chili flakes, smoked paprika, or harissa paste to the sauce for a gentle kick.

Vegan Option:
Use plant-based milk and butter, and swap in your favorite vegan cheese shreds or nutritional yeast.

Add a spoonful of blended cashew cream to the sauce for richness.

Crunchy Topping Twist:
Sprinkle with buttered panko breadcrumbs or crushed nuts for a golden, crispy top layer.

Q&A
Q: Can I prepare this casserole ahead of time?
A: Yes! You can assemble it fully (without baking) up to 24 hours ahead and refrigerate. When ready, bake as directed — just add 5–10 extra minutes to the baking time if going straight from the fridge.

Q: Can I freeze Cheesy Vegetable Casserole?
A: Yes, but for best results, freeze it before baking. Wrap tightly and freeze for up to 2 months. Thaw overnight in the fridge and then bake until bubbly.

Q: What are the best cheeses to use?
A: Use melty cheeses like mozzarella, cheddar, gouda, or fontina. Combine with Parmesan or Pecorino for flavor depth.

Q: How do I make it more filling as a main dish?
A: Add proteins like chicken, turkey, beans, or tofu, or stir in a grain like cooked quinoa, bulgur, or brown rice to make it a complete meal.

Q: Can I make it gluten-free?
A: Yes! Substitute the all-purpose flour in the cheese sauce with a gluten-free flour blend or cornstarch (1 tbsp cornstarch = 2 tbsp flour).

Nutrition Facts
Calories: 270

Protein: 10g

Fat: 18g

Carbohydrates: 18g

Fiber: 4g

Sugar: 6g

Sodium: 350mg

Calcium: ~20% DV

Note: Nutritional values vary depending on cheese, vegetables, and milk used.

Conclusion
This Cheesy Baked Vegetables Casserole is proof that comfort food and wholesome eating can go hand in hand. It’s rich, creamy, packed with vibrant veggies, and endlessly adaptable — making it a hit for busy weeknights, festive gatherings, or cozy weekends at home. Whether served as a meatless main or a hearty side, this casserole delivers warmth and satisfaction in every bite.