Classic Soft Bread Rolls (Pide-Style)

Classic Soft Bread Rolls (Pide-Style)

Light • Soft • Beautifully Layered

These bread rolls are wonderfully soft with delicate layers and a tender crumb. They are perfect for breakfast, alongside soups, or served warm at the table for any meal.


Ingredients

Liquid Base

  • 1½ cups (300 ml) warm water
    (Comfortably warm to the touch, not hot)

  • 1 tea glass vegetable oil (about 90 g / 100 ml)

  • 1 tea glass plain yogurt (about 100 ml, room temperature)

Dry Ingredients

  • 1 packet active dry yeast (7 g or 2¼ teaspoons)

  • 1 tablespoon granulated sugar

  • 1 teaspoon salt

  • 4½–5 cups all-purpose flour, added gradually

For Layering & Finishing

  • 50 g butter, melted (for brushing between layers)

  • 1 egg yolk (for brushing the tops)


Step-by-Step Instructions

1. Prepare the Yeast Mixture

  • In a large mixing bowl, add the warm water, sugar, and yeast

  • Stir gently until combined

  • Let the mixture rest for 5–10 minutes until it becomes foamy and active

This step ensures the dough rises beautifully.


2. Combine the Dough Ingredients

  • Add the vegetable oil and yogurt to the yeast mixture

  • Whisk until smooth and well blended

  • Gradually add flour and salt, mixing with a spoon or spatula

  • Continue until a soft dough forms


3. Knead and First Rise

  • Transfer the dough to a lightly floured surface

  • Knead gently for 8–10 minutes until smooth, elastic, and soft

  • Place the dough in a lightly oiled bowl

  • Cover with a clean cloth

  • Let it rest in a warm place for about 1 hour, or until it has expanded noticeably


4. Form the Layers

  • Gently press the dough to release excess air

  • Divide it into 4 equal portions

For each portion:

  • Roll into a thin rectangle

  • Brush evenly with melted butter

Once all pieces are brushed:

  • Stack them neatly on top of each other

  • Roll the stack into a firm log, starting from the long side


5. Shape the Rolls

  • Using a sharp knife or dough scraper, cut the log into triangle shapes by slicing in a gentle zig-zag pattern

  • This shaping helps create the beautiful layered texture once baked


6. Rest and Prepare for Baking

  • Place the shaped rolls on a baking tray lined with parchment paper

  • Leave a little space between each piece

  • Cover lightly and allow them to rest for 20 minutes

Meanwhile:

  • Preheat the oven to 190°C (375°F)


7. Bake to a Golden Finish

  • Brush the tops of the rolls with egg yolk for a glossy, golden surface

  • Bake for 20–25 minutes, until evenly golden and beautifully risen

The rolls should feel light and sound crisp on the outside while remaining soft inside.


Serving Suggestions

  • Serve warm with butter, honey, or jam

  • Pair with cheese, eggs, or soup

  • Excellent for sandwiches or as a dinner side


Helpful Tips

  • Yogurt Temperature: Use room-temperature yogurt to keep the dough comfortable for rising

  • Flour Amount: Add flour gradually; the dough should feel soft and slightly elastic

  • Extra Flavor: Sprinkle sesame or nigella seeds on top before baking if desired
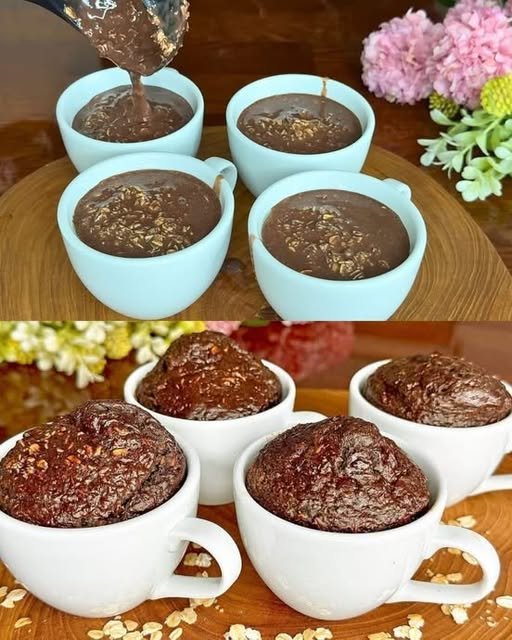
Healthy Chocolate Lava Baked Oats

Healthy Chocolate Lava Baked Oats

Naturally Sweet • Wholesome • Comforting
Serves: 2 generous portions (easily doubled)

This recipe turns simple pantry staples into a warm, chocolatey breakfast or dessert with a naturally soft center. It’s filling, balanced, and made with everyday ingredients.


Ingredients

Oat Base

  • 1 cup rolled oats (old-fashioned oats for best texture)

  • 1 medium ripe banana (naturally sweet and creamy)

  • ½ cup milk of choice (almond, oat, soy, or dairy)

  • 2 tablespoons unsweetened cocoa powder

  • 1–2 tablespoons natural liquid sweetener (maple syrup or honey, to taste)

  • 1 teaspoon baking powder

  • ½ teaspoon pure vanilla extract

  • A small pinch of sea salt (balances the chocolate flavor)

Soft Chocolate Center (Optional but Recommended)

  • 2 small pieces dark chocolate (70% cocoa or higher)
    or

  • 1 tablespoon dark chocolate chips


Step-by-Step Instructions

1. Prepare the Oven

  • Heat your oven to 180°C (350°F)

  • Lightly coat two oven-safe ramekins or ceramic mugs with a little oil or butter to prevent sticking

  • Place them on a baking tray for easy handling


2. Blend the Batter

Add the following to a blender:

  • Rolled oats

  • Banana

  • Milk

  • Cocoa powder

  • Natural sweetener

  • Baking powder

  • Vanilla extract

  • Sea salt

Blend for 30–45 seconds until the mixture is:

  • Completely smooth

  • Thick but pourable

  • Similar to cake or pancake batter

If the batter seems too thick, add 1–2 tablespoons of milk.


3. Fill the Cups

  • Pour the batter into the prepared mugs

  • Fill each about ¾ full to allow gentle rising


4. Add the Chocolate Center

  • Gently press one piece of dark chocolate into the center of each mug

  • Make sure it is fully covered with batter so it stays soft inside


5. Bake

  • Place the tray in the oven

  • Bake for 18–25 minutes, depending on your preferred texture:

    • 18–20 minutes: softer, richer texture

    • 22–25 minutes: more set and cake-like


6. Rest & Enjoy

  • Remove from the oven

  • Let sit for 5 minutes to settle

  • Enjoy warm, straight from the mug or turned out onto a plate


Optional Toppings (Wholesome Add-Ons)

  • Fresh berries or sliced banana

  • A spoon of yogurt or coconut yogurt

  • Chopped nuts or seeds

  • Light drizzle of nut butter


Helpful Notes

Air Fryer Method

  • Cook at 160°C (320°F) for 12–15 minutes

  • Check at 12 minutes and adjust as needed

No Blender Option

  • Use 1 cup oat flour instead of whole oats

  • Mash the banana very smoothly with a fork

  • Whisk all ingredients until well combined

Diet-Friendly

  • Naturally sweetened

  • Made with whole grains

  • Easily adaptable for dairy-free or gluten-free needs (use certified oats)

Homemade Chocolate Hazelnut Truffles


Homemade Chocolate Hazelnut Truffles

Prep time: 30 minutes | Chill time: 1 hour | Yields: Approx. 20–24 truffles

Ingredients

The Filling:

  • 1 cup Chocolate hazelnut spread (like Nutella)

  • 1 cup Toasted hazelnuts, finely chopped (plus 20–24 whole toasted hazelnuts for the centers)

  • 1 cup Crushed wafer cookies (vanilla or hazelnut flavored work best)

The Coating:

  • 1 ½ cups Semi-sweet or milk chocolate chips

  • 1 tsp Coconut oil (helps the chocolate flow smoothly)

  • ½ cup Hazelnuts, very finely chopped (for that signature bumpy texture)


Detailed Instructions

  1. Prepare the Base: In a medium mixing bowl, combine the chocolate hazelnut spread, the 1 cup of finely chopped hazelnuts, and the crushed wafer cookies. Stir until the mixture is uniform and holds its shape when pressed.

  2. Chill to Set: Place the mixture in the refrigerator for about 20–30 minutes. This makes it much easier to roll into balls without it sticking to your hands.

  3. Form the Truffles: Scoop about a tablespoon of the chilled mixture. Press one whole toasted hazelnut into the center, then roll the mixture between your palms to form a smooth ball.

  4. Second Chill: Place the rolled balls on a parchment-lined tray and freeze for 15 minutes. This ensures they don’t melt when you dip them in the warm chocolate.

  5. Melt the Coating: In a microwave-safe bowl, combine the chocolate chips and coconut oil. Microwave in 30-second intervals, stirring in between, until completely smooth. Stir in the remaining ½ cup of finely chopped hazelnuts.

  6. The Dip: Using a fork or a dipping tool, submerge each chilled truffle into the chocolate-nut mixture. Tap the fork against the side of the bowl to let excess chocolate drip off.

  7. Final Set: Place the truffles back on the parchment paper. Let them sit at room temperature until firm, or pop them in the fridge for 10 minutes for a quick set.


Tips for Success

  • Toast Your Nuts: Even if you buy pre-roasted hazelnuts, giving them a quick 5-minute toast in a dry pan over medium heat brings out the oils and makes them much more fragrant.

  • Wafer Texture: Don’t pulverize the wafers into a powder; leave some tiny shards for that authentic “crunch” when you bite into the center.

Bay Leaf & Clove Herbal Tea

Bay Leaf & Clove Herbal Tea

A warm, aromatic, caffeine-free beverage

Bay Leaf and Clove Herbal Tea is a simple, comforting drink made by gently simmering dried bay leaves and whole cloves in water. The result is a lightly golden infusion with a warm, earthy aroma and subtle spice. This tea is appreciated for its soothing character, pleasant fragrance, and ease of preparation.

Bay leaves bring a mild herbal depth with hints of eucalyptus and mint, while cloves add a gentle warmth and soft spice. Together, they create a balanced cup that can be enjoyed plain or customized with natural flavor additions like lemon, honey, ginger, or cinnamon.

This herbal tea contains no caffeine and can be enjoyed at any time of day. It is especially comforting during cool weather or quiet moments when a warm, aromatic drink is desired.


🧺 Ingredients

Base Ingredients

  • 3 dried bay leaves (whole)

  • 5–6 whole cloves

  • 2 cups water

Optional Flavor Add-Ins (choose as desired)

  • 1 teaspoon honey (for gentle sweetness)

  • 1 slice fresh ginger

  • 1 small cinnamon stick

  • 1 teaspoon lemon juice or a lemon wedge

  • 1 mint leaf


🧑‍🍳 Instructions

Step 1: Prepare Ingredients

Ensure the bay leaves and cloves are clean and free of dust.
If using ginger or cinnamon, prepare them by slicing or breaking them into small pieces.

Step 2: Heat the Water

Pour 2 cups of water into a small saucepan.
Place over medium heat and bring to a gentle boil.

Step 3: Add Spices

Once the water begins to boil, add the bay leaves and cloves.
Add any optional ingredients at this stage if using.

Step 4: Simmer

Reduce the heat to low and allow the mixture to simmer gently for 7–10 minutes.
The liquid will gradually take on a light golden color and release a pleasant aroma.

Step 5: Strain

Remove the saucepan from heat and let it rest for 1–2 minutes.
Strain the tea into a cup using a fine mesh strainer, removing all solids.

Step 6: Serve

Serve warm. Stir in honey or lemon juice if desired.
Garnish with a mint leaf or lemon slice for presentation.


🍽️ Servings

Makes 1 large mug or 2 small cups.
The recipe can be doubled or tripled as needed.


📝 Helpful Notes

  • Bay Leaves: Dried whole bay leaves are best. Avoid crushed or powdered leaves, which are difficult to strain.

  • Cloves: Use whole, aromatic cloves for best flavor.

  • Simmering: Gentle simmering preserves aroma and prevents bitterness.

  • Flavor Strength: Adjust steeping time to taste—shorter for mild, longer for stronger flavor.

  • Sweeteners: Honey complements the spice naturally without overpowering.

  • Serving: Best enjoyed warm, but may also be served chilled.

  • Storage: Prepared tea can be refrigerated for up to 24 hours and reheated gently.


🌿 Serving Ideas

  • Enjoy on its own as a calming beverage

  • Pair with light snacks or fruit

  • Serve in a clear glass mug to highlight the golden color

  • Add cinnamon and ginger for a richer, spiced version


Bay Leaf and Clove Herbal Tea is a simple drink made with care and intention. Its warm aroma, gentle flavor, and minimal ingredients make it a pleasant addition to any daily routine. Whether enjoyed alone or shared, this tea celebrates simplicity, tradition, and mindful preparation.

Egg Muffins – Quick & Nutritious Breakfast

Egg Muffins – Quick & Nutritious Breakfast

High in protein, low in carbs, and fully customizable

Prep Time: 10 minutes
Cook Time: 18–22 minutes
Total Time: 30 minutes
Yield: 6 muffins

Egg muffins are a versatile breakfast or snack option. You can add your favorite vegetables, meats, or cheeses, making them ideal for low-carb, keto, or meal-prep-friendly diets.


Ingredients

  • 6 large eggs

  • ¼ cup (60 ml) milk (or unsweetened almond/oat milk for dairy-free)

  • ½ cup shredded cheese (cheddar, feta, or your choice; optional for dairy-free)

  • ½ cup chopped vegetables (bell peppers, spinach, green onions, mushrooms, zucchini, etc.)

  • ¼ cup cooked bacon or ham (optional)

  • Salt and pepper to taste

  • ½ teaspoon garlic powder (optional)

  • ½ teaspoon paprika (optional)


Step-by-Step Instructions

1. Preheat the Oven

Preheat your oven to 375°F (190°C).
Lightly grease a 6-cup muffin tin with cooking spray, oil, or butter. Silicone muffin cups can also be used.


2. Prepare Ingredients

  • Chop your vegetables into small pieces.

  • Dice cooked bacon or ham if using.

  • Pre-sauté watery vegetables (like mushrooms or spinach) for 2–3 minutes to prevent soggy muffins.


3. Whisk the Eggs

In a large bowl, whisk together the eggs, milk, salt, pepper, garlic powder, and paprika until smooth and slightly frothy.
This ensures fluffy muffins with evenly distributed seasoning.


4. Assemble the Muffins

  • Divide the chopped vegetables and cooked meat evenly among the muffin cups.

  • Pour the egg mixture over the fillings, filling each cup about ¾ full.

  • Top each with shredded cheese, if using.


5. Bake

Place the muffin tin in the preheated oven.
Bake for 18–22 minutes, or until the egg muffins are set and lightly golden on top.
A toothpick inserted in the center should come out clean.


6. Cool and Serve

  • Allow the muffins to cool for a few minutes before removing them from the tin.

  • Serve warm, or store for meal prep.


Tips for Perfect Egg Muffins

  • Grease Well: Prevents sticking; silicone cups work best.

  • Whisk Thoroughly: Ensures light, fluffy muffins.

  • Do Not Overfill: Fill ¾ full to prevent overflow.

  • Cool Slightly Before Removing: Prevents breaking.

  • Storage & Reheating: Refrigerate in an airtight container for up to 5 days; microwave for 30–45 seconds to reheat.

  • Freezing: Let muffins cool completely, then freeze in airtight containers or freezer bags for up to 3 months. Reheat 1–2 minutes in the microwave.

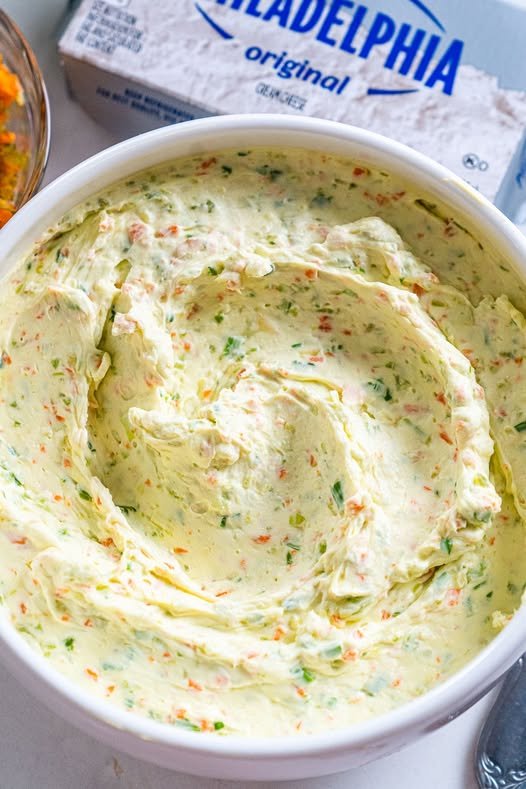
Homemade Garden Vegetable Spread

Homemade Garden Vegetable Spread

This creamy, tangy spread is packed with crunchy carrots, celery, and zesty green onions. It’s the perfect companion for toasted bagels, crackers, or even as a dip for fresh bell pepper strips.

  • Prep time: 15 minutes

  • Inactive time: 1–2 hours (chilling)

  • Yields: Serves 8

  • Dietary Info: Vegetarian, Contains Milk

Ingredients

  • 2 (8 oz) packages cream cheese, softened to room temperature

  • ¼ cup carrots, chopped

  • ½ cup celery, chopped

  • 2 green onions, chopped

  • ½ tsp salt

  • ½ tsp garlic powder

  • ¼ tsp onion powder

Preparation

  1. Prep the Veggies: Place the chopped carrots, celery, and green onions into a food processor. Pulse several times until the vegetables are broken down into very small bits.

    Tip: Be careful not to over-process; you want distinct texture, not a watery paste.

  2. Mix: In a medium-sized mixing bowl, combine the softened cream cheese, the pulsed vegetable mixture, salt, garlic powder, and onion powder. Stir vigorously until the vegetables and seasonings are evenly distributed throughout the cream cheese.

  3. Chill: Spoon the spread into an airtight container or a glass jar. Place it in the refrigerator for at least 1 to 2 hours. This allows the cream cheese to firm back up and the flavors from the onion and garlic to meld.

  4. Serve: Spread generously on toasted bagels or crusty bread.

Storage

Keep the spread refrigerated in an airtight container. It will stay fresh and delicious for 7–10 days.