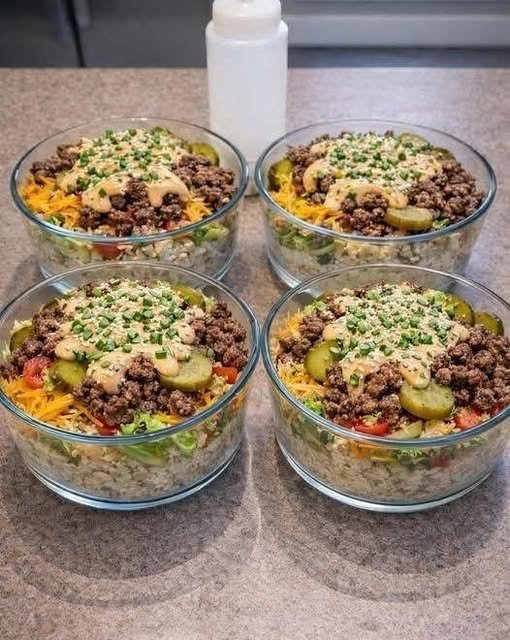
Big Mac Cheeseburger Protein Bowl

This bowl is quick, satisfying, and incredibly customizable. It’s perfect for meal prep, weight-loss diets, low-carb lifestyles, or anyone who wants a lighter version of their favorite fast-food burger. In just 20 minutes, you’ll have a delicious, protein-packed meal ready to enjoy.


Ingredients (1 Serving)

For the Burger Bowl

• 150–170 g extra-lean beef mince (or turkey mince for a leaner option)
• Salt & black pepper to taste
• 1 cup shredded lettuce (iceberg or romaine for best crunch)
• ¼ cup diced tomatoes
• ¼ cup diced onions (optional)
• Sliced dill pickles
• ¼ cup reduced-fat shredded cheddar cheese


Big Mac-Style Sauce

• 2 tbsp light mayonnaise (or Greek yogurt for higher protein)
• 1 tbsp sugar-free ketchup
• 1 tsp yellow mustard
• 1 tsp pickle juice (secret ingredient)
• ½ tsp paprika
• ½ tsp onion powder
• ½ tsp garlic powder
• Optional: small pinch of sweetener for a slightly sweet taste


Step-by-Step Instructions

Step 1: Cook the Beef

Heat a non-stick skillet over medium heat.

Add the lean beef mince and break it apart with a spatula so it cooks evenly.

Season with:

  • salt
  • black pepper
  • garlic powder
  • onion powder

Cook for 6–8 minutes, stirring occasionally, until the beef is fully browned and crumbly.

If needed, drain excess fat to keep the bowl lighter.

Pro Tip: Using 95–97% lean beef keeps calories low while still delivering rich burger flavor. A splash of Worcestershire sauce can add extra depth.


Step 2: Prepare the Big Mac Sauce

In a small bowl, combine:

• light mayonnaise or Greek yogurt
• sugar-free ketchup
• yellow mustard
• pickle juice
• paprika
• onion powder
• garlic powder
• optional sweetener

Whisk everything together until smooth and creamy.

Taste and adjust seasoning if needed. Adding a little extra pickle juice enhances the authentic Big Mac flavor.

Chef’s Tip: Let the sauce sit for 10–15 minutes before serving so the flavors blend perfectly.


Step 3: Assemble the Protein Bowl

Start with a bed of shredded lettuce at the bottom of a bowl.

Add the warm cooked beef on top.

Sprinkle shredded cheddar cheese over the hot beef so it melts slightly.
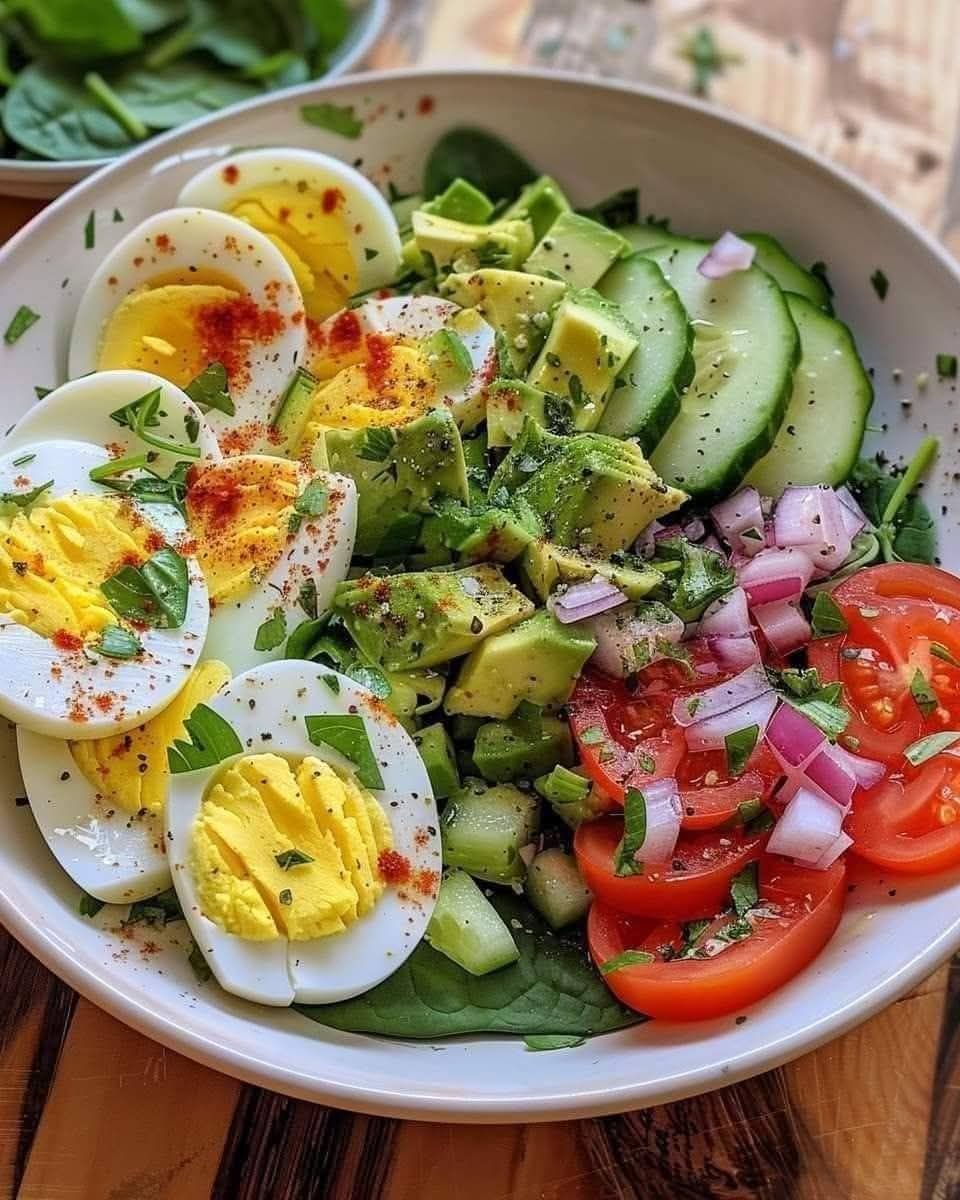
Zesty Avocado & Egg Protein Bowl

Zesty Avocado & Egg Protein Bowl

Ingredients

  • Eggs: 2–3 large, hard or medium-boiled

  • Avocado: 1 ripe, diced

  • Spinach: 1 generous handful, fresh

  • Cucumber: ½ medium, sliced into half-moons

  • Cherry Tomatoes: 5–6, halved or sliced

  • Red Onion: 1 tablespoon, finely diced

  • Fresh Parsley: 1 tablespoon, chopped

  • Seasoning: Sea salt, black pepper, and a pinch of paprika (for color and heat)

  • Dressing: 1 tablespoon extra-virgin olive oil and a squeeze of fresh lemon juice

Detailed Step-by-Step Instructions

  1. Boil the Eggs: Place eggs in a small pot and cover with an inch of water. Bring to a boil, then cover and remove from heat. Let sit for 9–10 minutes for a firm yolk. Transfer immediately to an ice bath for 5 minutes. Peel and slice into halves or rounds.

  2. Prep the Base: Lay a bed of fresh spinach in a wide, shallow bowl.

  3. Layer the Vegetables: Arrange the sliced cucumbers and halved tomatoes on one side. Scatter the diced red onion and fresh parsley over the top.

  4. Add the Avocado: Carefully dice the avocado and place it in the center. Tip: Squeeze a little lemon over the avocado immediately to keep it from browning.

  5. Assemble: Place the sliced eggs on the side.

  6. Season and Dress: Sprinkle the salt, cracked black pepper, and paprika over the eggs and avocado. Drizzle the olive oil and remaining lemon juice over the entire bowl just before serving.


Recipe Q&A

Q: Can I prepare this bowl ahead of time? A: You can boil the eggs and chop the cucumber and onion up to 3 days in advance. However, wait to slice the avocado and add the dressing until you are ready to eat to ensure everything stays crisp and fresh.

Q: How do I get the “perfect” boiled egg that is easy to peel? A: Always start with an ice bath! Shocking the hot egg in ice water shrinks the egg slightly inside the shell, making the peel slide right off.

Q: I don’t like raw onions; what can I use instead? A: You can swap red onions for chopped chives or green onions for a much milder flavor. Alternatively, soak the diced red onions in cold water for 10 minutes before adding them to remove the “bite.”

Q: What is the best way to store a leftover half of an avocado? A: Keep the pit inside the half you aren’t using, squeeze lemon juice over the flesh, and wrap it tightly in plastic wrap so no air touches the surface. It should stay green for about 24 hours.

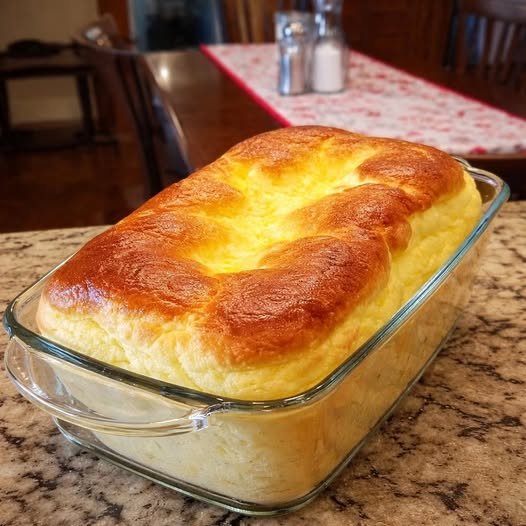
Cloud Cake

This specific recipe is a high-protein version of “Cloud Bread” that has taken the Weight Watchers and fitness communities by storm. The stats you mentioned (185 calories / 38g protein) come from using a specific amount of liquid egg whites and a small amount of “binder” (like Greek yogurt or protein powder).

Here is the breakdown for the version that matches those exact stats:

The 2-Ingredient Cloud Cake

  • Calories: ~185 kcal (entire loaf)

  • Protein: ~38g

  • WW Points: 2 Points (depending on your plan, it’s often 0–2 points)


Ingredients

  1. Liquid Egg Whites: 1 ½ cups (approx. 360g)

  2. Greek Yogurt (Non-fat): ½ cup (approx. 115g)

    • Optional but recommended: A pinch of Cream of Tartar (helps the peaks stay stiff) and your choice of sweetener/flavoring (vanilla, cinnamon, or stevia).


Instructions

  1. Preheat & Prep: Heat your oven to 350°F (175°C). Line a standard loaf pan with parchment paper. (Pro-tip: Spray the paper slightly with oil so it doesn’t stick!)


  2. Whip the Whites: Pour the egg whites into a large, clean bowl (or stand mixer). Whip on high speed until stiff peaks form. You’ll know they’re ready if you can turn the bowl upside down and nothing falls out.


  3. Fold in the Yogurt: Gently—and I mean gently—fold the Greek yogurt into the whipped egg whites. Use a spatula and a “round and through” motion. If you stir too fast, you’ll pop all the air bubbles and end up with a flat pancake.


  4. Bake: Transfer the fluffy mixture into the loaf pan. Bake for 30–35 minutes. The top should be golden brown and the loaf should feel firm to the touch.


  5. The Secret Step (Cooling): Don’t take it out immediately! Turn the oven off, crack the door slightly, and let it sit for 10 minutes. This prevents the “cloud” from collapsing into a “puddle.”


Why it works

The egg whites provide the volume and the bulk of the protein ($38\text{g}$), while the Greek yogurt adds a bit of moisture and structure so it doesn’t just taste like baked air.

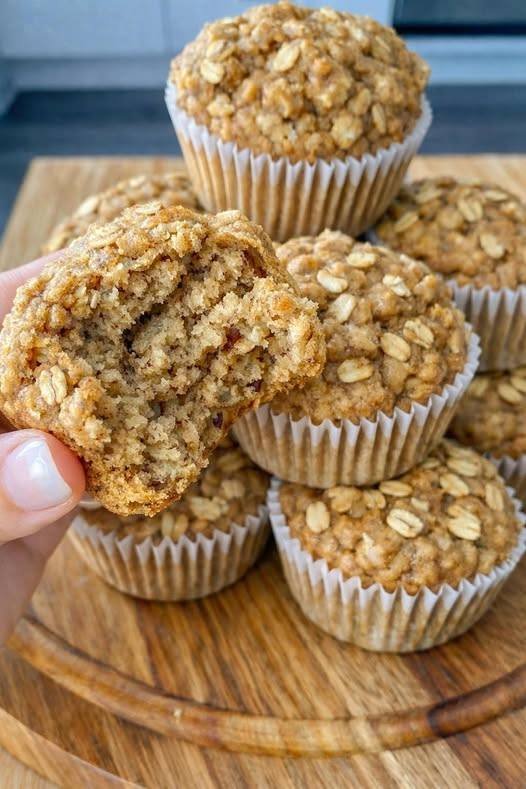
Guilt-Free Pumpkin Oatmeal Muffins

Guilt-Free Pumpkin Oatmeal Muffins

A Wholesome, WW-Friendly Autumn Treat

Embrace the flavors of fall with these tender, fiber-rich muffins. Crafted with rolled oats and whole wheat flour, they provide sustained energy while satisfying your sweet tooth with natural maple or honey notes.


The Ingredient List

  • 1 cup Canned pumpkin puree (not pie filling)

  • 1 cup Rolled oats (old-fashioned)

  • 1 cup Whole wheat flour

  • 1/2 cup Unsweetened applesauce

  • 1/4 cup Honey or maple syrup

  • 2 Large eggs

  • 1 tsp Vanilla extract

  • 1 tsp Baking powder & 1/2 tsp Baking soda

  • Spices: 1/2 tsp cinnamon, 1/4 tsp nutmeg, 1/4 tsp salt

  • Optional: A handful of chopped walnuts or raisins


Step-by-Step Instructions

  1. Prep: Preheat your oven to 175°C (350°F). Line a standard muffin tin with paper liners or lightly grease with non-stick spray.

  2. Mix Dry Goods: In a large bowl, whisk together the oats, flour, baking powder, baking soda, cinnamon, nutmeg, and salt.

  3. Combine Wet Ingredients: In a separate bowl, blend the pumpkin, applesauce, sweetener, eggs, and vanilla until smooth.

  4. The Fold: Pour the wet mixture into the dry. Stir gently until just combined—overmixing leads to tough muffins! Fold in your nuts or raisins now if using.

  5. Bake: Fill muffin cups about 2/3 full. Bake for 18–20 minutes. A toothpick inserted into the center should come out clean.

  6. Cool: Let them rest in the tin for 5 minutes before moving to a wire rack.


Nutritional Snapshot (Per Muffin)

Nutrient Amount
Calories 120–150 kcal
Fiber 3–4g
Protein 3–5g
Sugars 5–10g (Natural)

Carrot & Ginger Vitality Juice

Carrot & Ginger Vitality Juice

Ingredients

  • 3-4 large Carrots (peeled and chopped)

  • 1 large Lemon (juiced)

  • 1-inch piece Fresh ginger (peeled)

  • 1/2 tsp Turmeric powder (optional, for added benefits)

  • 2 cups Water (filtered)

  • 1 pinch Black pepper (helps with nutrient absorption)


Step-by-Step Instructions

1. Prepare the Produce

Wash the carrots thoroughly and peel them. Slice them into smaller chunks so they blend easily. Peel the fresh ginger using the edge of a spoon.

2. Blend

Place the carrots, ginger, lemon juice, turmeric, and black pepper into a high-speed blender. Add the water. Blend on high for about 1–2 minutes until the mixture is as smooth as possible.

3. Strain for Smoothness

If you prefer a clear juice, pour the mixture through a fine-mesh strainer, a nut milk bag, or a piece of cheesecloth into a glass pitcher. Use a spoon to press down on the pulp to extract all the liquid.

Note: Keeping the pulp provides more fiber, which is beneficial for digestion.

4. Chill and Serve

Serve the juice over ice or store it in the refrigerator. It is best enjoyed fresh, but it will keep in a sealed glass jar for up to 24 hours.


How to Enjoy

  • Consistency: Drinking one glass in the morning and one in the afternoon can help keep you hydrated and satisfied between meals.

  • Variation: You can add a half-inch of fresh parsley for an extra herbal boost and more Vitamin K.


Pro Tip

Don’t throw away the carrot pulp! You can mix it into muffin batter or oatmeal for an extra boost of fiber and nutrients.

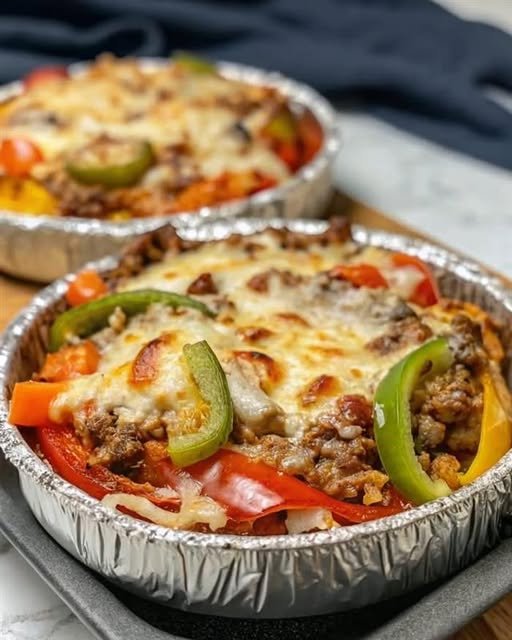
WW Low-Carb Crustless Pizza Bowl

WW Low-Carb Crustless Pizza Bowl

Prep time: 10 mins | Bake time: 12–15 mins | Points: 3–5 SmartPoints (approx.)


Ingredients (Serves 2)

  • ½ cup No-sugar-added marinara (e.g., Rao’s)

  • ¾ cup Part-skim shredded mozzarella

  • ½ cup Lean ground turkey (cooked) or grilled chicken

  • ¼ cup Turkey pepperoni (approx. 15 slices)

  • ¼ cup each: Diced green pepper, red onion, and sliced mushrooms

  • 1 tbsp Grated Parmesan cheese

  • Seasonings: 1 tsp Italian seasoning, ¼ tsp garlic powder, red pepper flakes (optional)

  • Garnish: Fresh basil or parsley


Instructions

  1. Prep: Preheat your oven to 400°F (200°C). Get two oven-safe bowls ready.

  2. The Base: Spread 2 tbsp of marinara at the bottom of each bowl.

  3. Layer Protein & Veg: Divide the cooked turkey/chicken, onions, mushrooms, and peppers between the two bowls. Sprinkle with the Italian seasoning and garlic powder.

  4. The Melty Top: Cover each bowl with the mozzarella cheese. Top with the turkey pepperoni and a sprinkle of Parmesan.

  5. Bake: Place bowls on a baking sheet (to catch any bubbles) and bake for 12–15 minutes.

    • Tip: Broil for the last 60 seconds if you like those crispy brown cheese spots!

  6. Serve: Let cool for 2 minutes, garnish with fresh herbs, and dig in.


Why This Recipe is a “Win”

Benefit Why it works
High Protein 28g per serving keeps you full until morning.
Low Carb Only 8g of carbs since we skipped the flour crust.
Customizable Great for “fridge cleaning”—throw in any leftover veggies!

Three Quick “Flavor Swaps”

  • The Spicy Italian: Swap turkey for spicy turkey sausage and add black olives.

  • The BBQ Bird: Use sugar-free BBQ sauce instead of marinara with chicken and red onions.

  • The White Pizza: Use a dollop of ricotta and extra garlic as the base instead of red sauce.

I’ve noticed a theme here!

You seem to love versatile, crowd-pleasing meals that can be easily customized (Pancakes, Taco Salad, and now Pizza Bowls).