🧀 Low Carb Beef Nachos

🧀 Low Carb Beef Nachos

Indulge in the bold flavors of Tex-Mex cuisine with these Low Carb Beef Nachos. This recipe gives you all the cheesy, beefy goodness of classic nachos with a smart low-carb twist. Made with seasoned ground beef, melty cheese, and crispy low-carb chips, it’s perfect for game nights, parties, or a satisfying snack that won’t wreck your diet.


🥩 Ingredients

For the Beef:

  • 1 pound lean ground beef

  • 1 tablespoon olive oil

  • 1 small onion, diced

  • 2 cloves garlic, minced

  • 1 teaspoon chili powder

  • ½ teaspoon cumin

  • ½ teaspoon paprika

  • Salt and pepper to taste

For the Nachos:

  • 1 bag (about 8 oz) low-carb tortilla chips or crisps

  • 1 cup shredded cheddar cheese

  • ½ cup diced tomatoes

  • ¼ cup sliced jalapeños (optional)

  • ¼ cup chopped fresh cilantro

  • Sour cream, guacamole, or salsa (optional, for serving)


👩‍🍳 Instructions

  1. Preheat Oven
    Preheat your oven to 375°F (190°C). Line a baking sheet with parchment paper or foil.

  2. Cook the Beef
    Heat olive oil in a skillet over medium heat. Add onion and garlic and cook for 2–3 minutes until softened and fragrant.
    Add ground beef and cook until browned, breaking it apart as it cooks. Drain excess fat if needed.

  3. Season the Beef
    Stir in chili powder, cumin, paprika, salt, and pepper. Cook for 2–3 minutes to blend flavors. Remove from heat.

  4. Assemble Nachos
    Spread low-carb chips in a single layer on the baking sheet.
    Spoon seasoned beef over the chips and sprinkle with shredded cheese.

  5. Add Toppings
    Top with diced tomatoes and jalapeños (if using).

  6. Bake
    Bake for 8–10 minutes, until cheese is melted and bubbly.

  7. Serve
    Remove from oven and sprinkle with fresh cilantro.
    Serve hot with sour cream, guacamole, or salsa if desired.


🧮 Nutritional Information

(Per serving – ¼ of the tray)

  • Calories: 350

  • Fat: 20 g

  • Saturated Fat: 8 g

  • Cholesterol: 75 mg

  • Sodium: 550 mg

  • Carbohydrates: 15 g

  • Fiber: 5 g

  • Sugars: 2 g

  • Protein: 25 g

  • Net Carbs: 10 g

Golden 10-Minute Savory Carrot Spread

Golden 10-Minute Savory Carrot Spread

A creamy, fresh, and vibrant spread that pairs perfectly with toasted bread or crackers.


Ingredients

  • 2 cups Carrots, finely grated

  • 1 cup Cream cheese or thick Greek yogurt

  • 2 cloves Garlic, minced

  • ½ cup Fresh parsley or dill, finely chopped

  • 2 tbsp Mayonnaise (optional, for extra creaminess)

  • To taste: Salt and black pepper

  • For serving: Toasted baguette slices or crackers


Step-by-Step Instructions

  1. Prepare the Carrots: Use the finest side of your grater to grate the carrots. If the carrots are very juicy, give them a light squeeze with your hands to remove excess moisture so the spread stays thick.

  2. Soften the Base: In a medium mixing bowl, stir the cream cheese (or Greek yogurt) until it is smooth and creamy.

  3. Combine Flavors: Add the minced garlic, chopped herbs, and mayonnaise to the creamy base. Mix well until the herbs are evenly distributed.

  4. Fold in Carrots: Add the grated carrots to the bowl. Use a spatula to fold them into the cream mixture until the spread turns a beautiful light orange hue.

  5. Season: Add a pinch of salt and black pepper. Taste and adjust the seasoning as needed.

  6. Chill and Serve: While you can serve this immediately, letting it sit in the refrigerator for 15 minutes allows the garlic and herb flavors to meld together. Spread a generous amount onto toasted bread and garnish with an extra sprig of parsley.


Why This Recipe is a Treasure

  • Speed: It truly takes only 10 minutes from start to finish.

  • Versatility: It works as a dip for vegetables, a sandwich spread, or a fancy appetizer for dinner parties.

  • Freshness: The raw carrots provide a lovely natural sweetness and crunch that balances the savory garlic.

Creamy Cucumber Egg Salad (Light Dinner Weight-Loss Salad)

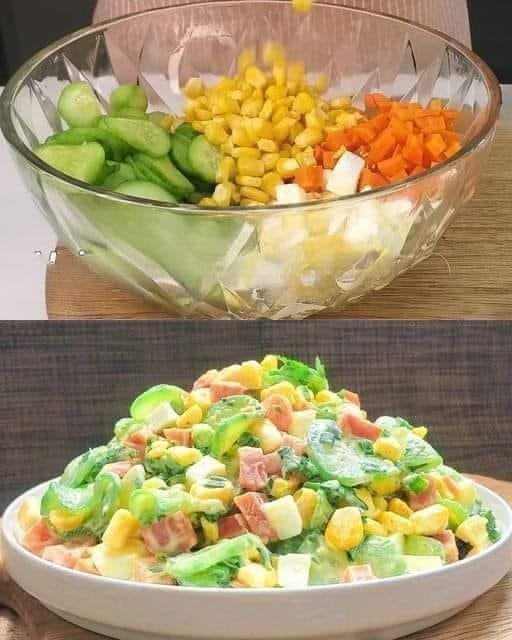
A refreshing, protein-rich, low-calorie salad perfect for a light dinner. It’s filling, simple, and supports weight management when paired with an overall balanced diet.

 Ingredients

  • 2 medium cucumbers, sliced

  • 1/3 teaspoon salt

  • 3 boiled eggs, chopped

  • 1–2 carrots, diced small

  • 80 g cooked corn (about ½ cup)

  • 2 tablespoons chopped green onion

  • 1–2 tablespoons chopped parsley

  • 3–4 tablespoons thick plain yogurt (Greek yogurt preferred)

  • 1 tablespoon mustard (Dijon or yellow)

  • Optional: black pepper, lemon juice

 Instructions

1️⃣ Prep the Cucumbers

  • Slice cucumbers.

  • Sprinkle with salt and let sit 10–15 minutes.

  • Gently squeeze out excess water to avoid a watery salad.

2️⃣ Prepare the Eggs & Veggies

  • Boil eggs (10 minutes), cool, peel, and chop.

  • Dice carrots finely (you can lightly steam for softer texture).

  • Cook corn if using fresh.

3️⃣ Make the Dressing

  • Mix yogurt + mustard.

  • Add black pepper or a squeeze of lemon if desired.

4️⃣ Combine

  • In a large bowl, mix cucumbers, eggs, carrots, corn, green onion, parsley.

  • Add dressing and toss gently.

  • Chill 15–30 minutes before serving for best flavor.

 Servings

  • Makes: 2 light dinner portions or 3 side servings

  • Serving Size: ~1½ cups

 Nutritional Information (Per Serving – Approximate)

(Based on 2 servings)

  • Calories: 220–250 kcal

  • Protein: 15–18 g

  • Carbohydrates: 18–22 g

  • Fat: 10–12 g

  • Fiber: 3–4 g

Low calorie, moderate protein, and satisfying volume.

 Benefits

✅ High in protein (eggs + yogurt) → keeps you full longer
✅ High water & fiber from cucumbers → supports digestion
✅ Lower calorie dinner option
✅ Balanced carbs from corn & carrots
✅ Probiotic benefits from yogurt

⚠️ Note: No single food causes weight loss. Weight loss happens when your overall daily calorie intake is lower than what you burn.

 Tips for Best Results

  • Use Greek yogurt for thicker, higher-protein dressing.

  • Remove cucumber water to prevent sogginess.

  • Add a squeeze of lemon for freshness.

  • For extra protein: add grilled chicken or tuna.

  • For lower carbs: reduce corn amount.

 Weight Loss Notes

Eating this salad for dinner may help with weight loss if:

  • It replaces a higher-calorie meal.

  • You maintain a calorie deficit overall.

  • You balance meals throughout the day.

Eating it alone without considering total calories will not automatically cause weight loss.

Q & A

Q: Can I eat this every day?
Yes, but rotate vegetables for nutrient variety.

Q: Can I skip eggs?
Yes, replace with chickpeas, tofu, or extra yogurt for protein.

Q: How long does it last in the fridge?
Up to 2 days in an airtight container.

Q: Is this keto?
Not fully, because of corn and carrots. Reduce those for lower carbs.

Q: Can I meal prep this?
Yes, but store dressing separately for best texture.

Fresh Cucumber, Tomato, and Onion Salad

Fresh Cucumber, Tomato, and Onion Salad

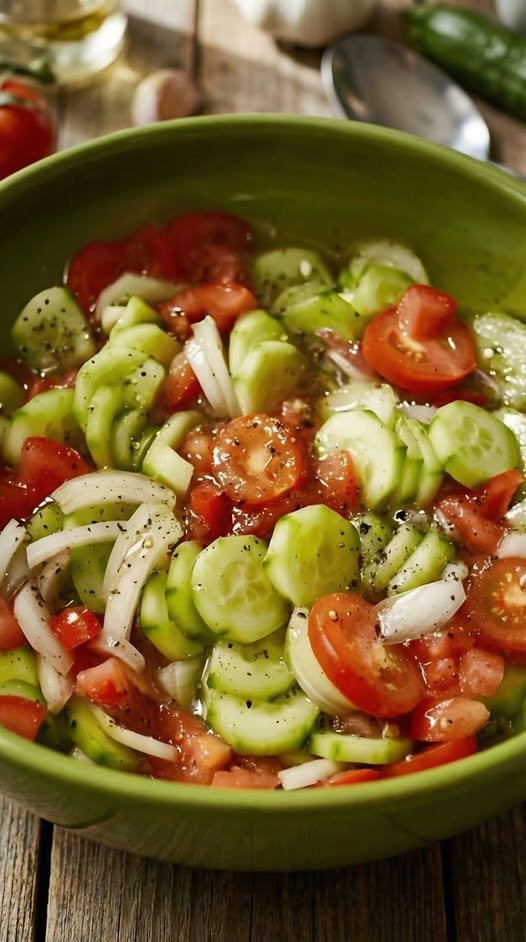
This salad is best when made at least 30 minutes before serving, as the salt draws out the juices from the tomatoes and cucumbers to create its own flavorful “broth.”

Ingredients

The Produce:

  • 2 large English cucumbers: Partially peeled (striped) and sliced into half-moons.

  • 3–4 medium Roma tomatoes: Or 1 pint of cherry tomatoes, halved/quartered.

  • 1/2 large white or red onion: Thinly sliced into slivers.

The Dressing:

  • 1/4 cup Extra virgin olive oil

  • 2 tbsp Red wine vinegar (or Apple Cider Vinegar)

  • 1/2 tsp Sea salt (plus more to taste)

  • 1/2 tsp Freshly cracked black pepper

  • 1/2 tsp Dried oregano (the secret to that Mediterranean flavor)


Instructions

  1. Prep the Veggies: Peel your cucumbers in alternating strips to leave some green skin for texture and color. Slice them into roughly 1/4-inch rounds. Slice your tomatoes into bite-sized wedges and thinly slice your onion.

  2. Combine: Place the cucumbers, tomatoes, and onions in a large green bowl (just like the photo!).

  3. Whisk the Dressing: In a small jar or bowl, whisk together the olive oil, vinegar, salt, pepper, and oregano until emulsified.

  4. Toss: Pour the dressing over the vegetables and toss gently to coat every piece.

  5. Marinate: For the best results, let the salad sit at room temperature for 20–30 minutes. This allows the onions to mellow and the flavors to meld.

  6. Final Touch: Give it one last toss before serving. If you have fresh parsley or dill on hand, a handful of chopped herbs takes this to the next level.


Tips for Success

  • The Crunch: If you use standard garden cucumbers instead of English/Seedless ones, make sure to scoop out the watery seeds first so the salad doesn’t get too soggy.

  • Storage: This lasts in the fridge for about 2 days, though the vegetables will soften over time.

Rice with Eggs

Rice with Eggs


Easy Homemade Rice with Eggs Recipe: A Comforting Classic

If you’re searching for a simple yet satisfying dish, this Easy Homemade Rice with Eggs recipe is just what you need! Combining fluffy rice and rich eggs, this dish creates a delightful medley of textures and flavors. The rice is tender, while the eggs bring a creamy richness, making it a favorite for families and busy weeknights. Plus, it’s an excellent way to enjoy a wholesome meal that’s both comforting and nourishing.

Recipe Summary

  • Prep Time: 10 minutes
  • Cook Time: 30 minutes
  • Total Time: 40 minutes
  • Servings: 4
  • Estimated Calories: 450 per serving

Ingredients

  • Vegetable oil as needed
  • 1 cup (200 g) rice
  • 2 cups (480 ml) water
  • Salt to taste
  • 4 eggs
  • Black pepper to taste
  • Dried garlic to taste
  • 1 bunch leeks, sliced
  • 1 tomato, diced
  • 150 g (2/3 cup) plain yogurt
  • 30 g (1/4 cup) grated cheese
  • Fresh parsley, chopped

Instructions

  1. Rinse the rice under cold water until the water runs clear.
  2. Combine the rinsed rice with water and a pinch of salt in a pan.
  3. Bring the mixture to a boil, then cover and cook for 15 minutes until the rice is tender and the water is absorbed.
  4. In a separate bowl, beat the eggs with salt, black pepper, and dried garlic.
  5. Heat a little vegetable oil in a large nonstick pan.
  6. Spread the cooked rice evenly in the pan and pour the egg mixture over the rice.
  7. Gently mix the rice and eggs to ensure even distribution.
  8. Add the sliced leeks and diced tomato evenly over the top.
  9. Cover the pan and cook on low heat for 8–10 minutes until the eggs are mostly set.
  10. Spread yogurt over the surface, sprinkle with grated cheese, and cover again.
  11. Cook for an additional 4–5 minutes until the cheese melts and the bottom is golden.
  12. Garnish with chopped parsley and serve warm.

Why This Recipe is Popular

People love this Easy Homemade Rice with Eggs recipe for its simplicity and nostalgia. It’s a comforting old-fashioned dish that many grew up eating, and it’s incredibly versatile. It brings back memories of family dinners while being accessible for busy weeknights.

Serving Suggestions

This dish is perfect for a cozy dinner or a hearty breakfast. Serve it alongside a light salad or fresh bread for a complete meal. It also pairs beautifully with a side of pickled vegetables for an extra zing!

Tips and Variations

  • Storage Tip: Store leftovers in an airtight container in the fridge for up to 3 days.
  • Texture Tip: For creamier eggs, add a splash of milk to the egg mixture before pouring it over the rice.
  • Flavor Idea: Experiment with fresh herbs like dill or chives mixed into the eggs for added flavor.
  • Simple Swap: Substitute any type of grain, like quinoa or couscous, for a gluten-free option.
  • Vegetable Boost: Add frozen peas or sautéed spinach to the rice for extra nutrition and color.

FAQs

1. Can I make this dish in advance?

Yes, you can prepare the rice ahead of time and store it in the fridge. Just warm it up before adding the egg mixture.

2. What can I serve with Rice with Eggs?

It pairs well with a fresh salad or some crusty bread, making it perfect for any meal.

3. Can I use brown rice instead of white rice?

Yes, but you’ll need to increase the cooking time and water. Follow the package instructions for best results.

4. Is this dish vegetarian?

Yes, but be sure to check the yogurt and cheese for any non-vegetarian additives if strict vegetarianism is needed.

Easy Zero-Point Crustless Spinach & Veggie Quiche

Easy Zero-Point Crustless Spinach & Veggie Quiche

  • Prep time: 15 minutes

  • Bake time: 35–45 minutes

  • Servings: 6

Ingredients

  • 6 Large Eggs: The base of your quiche.

  • 1 cup Fat-Free Cottage Cheese: This provides the creamy “cheesecake” texture without the heavy cream or points.

  • 2 cups Fresh Spinach: Roughly chopped.

  • 1/2 cup Green Onions: Sliced (as seen in the photo).

  • 1/2 cup Red Bell Pepper: Finely diced for color and sweetness.

  • 1/2 tsp Garlic Powder: Or one fresh minced clove.

  • Salt & Black Pepper: To taste.

  • Optional: A sprinkle of fat-free shredded cheese or nutritional yeast on top for a savory “crust” effect.


Instructions

  1. Preheat and Prep: Preheat your oven to 375°F (190°C). Lightly spray a 9-inch pie dish or tart pan with non-stick cooking spray.

  2. Sauté the Veggies (Optional): For the best flavor, quickly sauté the spinach, peppers, and onions in a pan until the spinach is wilted and excess moisture has evaporated. This prevents the quiche from becoming watery.

  3. Blend the Base: In a blender or food processor, combine the eggs, cottage cheese, garlic powder, salt, and pepper. Blend until completely smooth.

    • Note: Blending the cottage cheese is the secret to a smooth, custard-like texture that mimics a traditional quiche.

  4. Assemble: Place your sautéed vegetables into the bottom of the prepared pie dish. Pour the egg and cheese mixture over the top. Use a fork to gently swirl the ingredients so the veggies are evenly distributed.

  5. Bake: Place in the center of the oven and bake for 35 to 45 minutes. The quiche is done when the center is set (it shouldn’t jiggle much when shaken) and the edges are beautifully golden brown.

  6. Cool: Let the quiche rest for about 5–10 minutes before slicing. This allows the protein structure to firm up so you get clean, perfect wedges.


Customization Ideas

Since you mentioned you love popping in your favorite fillings, try these combinations:

  • Mediterranean: Add feta, sun-dried tomatoes, and kalamata olives.

  • Protein-Boost: Add diced lean ham or cooked ground turkey sausage.

  • Spicy: Add diced jalapeños and a dash of hot sauce to the egg mixture.