Crispy Spinach & Potato Rosti Crustless Bake with Feta & Sun-Dried Tomato
Description
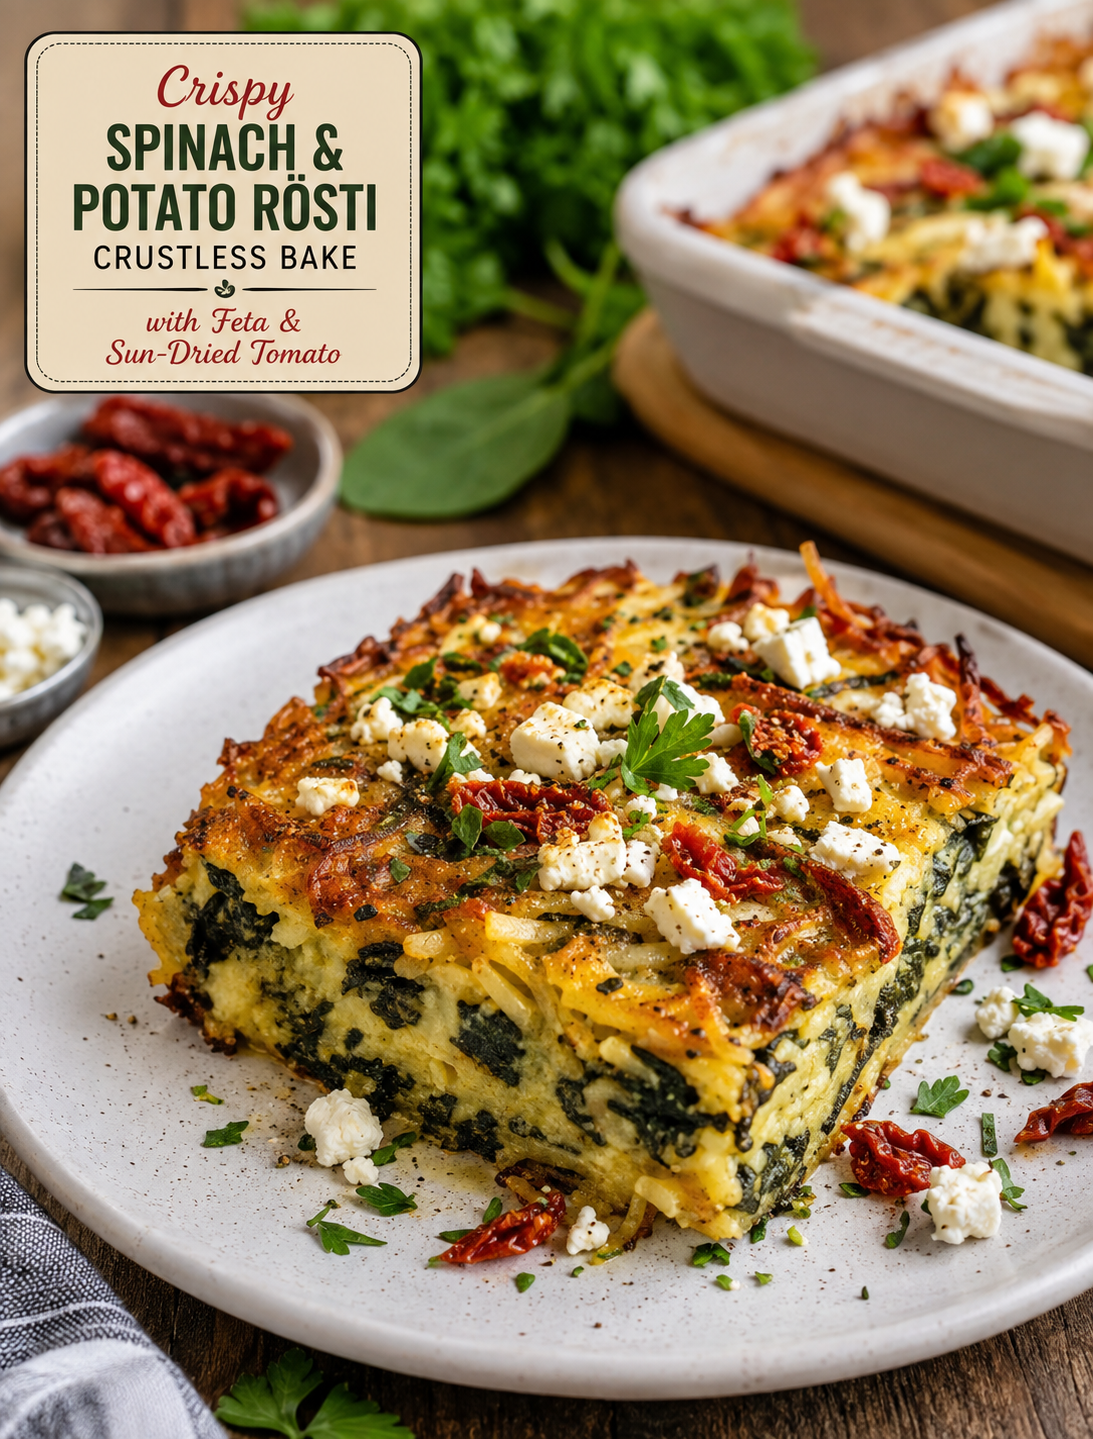
This Crispy Spinach & Potato Rosti Crustless Bake with Feta & Sun-Dried Tomato is a delicious combination of crispy shredded potatoes, tender spinach, tangy feta cheese, and intensely flavourful sun-dried tomatoes, all baked together until golden and beautifully crisp on top.
Inspired by classic Swiss rösti, this recipe transforms those crispy potato flavours into an easy, satisfying crustless bake. Instead of making individual rösti cakes, the ingredients are layered and baked in one dish, making it perfect for breakfast, brunch, lunch, or a light dinner.
The potatoes develop wonderfully crisp golden edges while the centre remains tender and flavourful. Spinach adds colour and nutrients, feta provides a salty, creamy contrast, and sun-dried tomatoes bring a slightly sweet, savoury flavour that makes every bite more exciting.
It is especially delicious served warm with a simple green salad, roasted vegetables, Greek yoghurt, or a dollop of tzatziki.
Recipe Details
Prep Time: 20 minutes
Cook Time: 40–45 minutes
Total Time: About 1 hour 5 minutes
Servings: 6
Course: Breakfast, Brunch, Lunch, or Dinner
Cuisine: Mediterranean-inspired
Difficulty: Easy
Ingredients For:
Potato Rosti Base
- 4 medium russet or Yukon Gold potatoes, about 1½ pounds
- 2 tablespoons olive oil
- ½ teaspoon salt
- ¼ teaspoon black pepper
- ½ teaspoon garlic powder
- ½ teaspoon dried oregano
- ¼ teaspoon smoked paprika
Spinach Filling
- 5 ounces fresh baby spinach
- 1 small onion, finely diced
- 2 cloves garlic, minced
- 1 teaspoon olive oil
- ½ teaspoon dried oregano
- ¼ teaspoon black pepper
- ¼ teaspoon salt
Egg Mixture
- 6 large eggs
- ½ cup milk or unsweetened almond milk
- ½ cup crumbled feta cheese
- ⅓ cup chopped sun-dried tomatoes, preferably oil-packed and drained
- ¼ cup grated Parmesan cheese
- 2 tablespoons fresh parsley, chopped
- ¼ teaspoon black pepper
For Topping
- ¼ cup crumbled feta
- 2 tablespoons chopped sun-dried tomatoes
- 1 tablespoon fresh parsley or basil
- 1 teaspoon olive oil
- A pinch of black pepper
- Optional: a small sprinkle of red pepper flakes
Instructions
Step 1: Prepare the Oven and Baking Dish
Preheat your oven to 400°F (200°C).
Lightly grease a 9-inch square baking dish or similar-sized oven-safe casserole dish with olive oil. For extra easy removal, you can also line the bottom with parchment paper while lightly greasing the sides.
The relatively hot oven is important because it helps the potatoes become golden and crisp rather than soft and pale.
Step 2: Prepare the Potatoes
Peel the potatoes if desired, although leaving the skins on can add extra texture and nutrients.
Using a box grater or food processor, grate the potatoes into thin shreds.
Place the shredded potatoes in a large bowl of cold water and gently swish them around. This removes some of the excess starch and helps prevent the potatoes from becoming gummy.
Drain thoroughly.
Now comes one of the most important steps: squeeze the potatoes extremely well.
Transfer them to a clean kitchen towel or several layers of paper towel and press firmly to remove as much moisture as possible.
The drier the potatoes, the crispier your rösti-style crust will become.
Step 3: Season the Potatoes
Return the dry shredded potatoes to a bowl.
Add:
- 2 tablespoons olive oil
- ½ teaspoon salt
- black pepper
- garlic powder
- oregano
- smoked paprika
Toss everything together until the potato shreds are evenly coated.
Step 4: Build the Crispy Potato Base
Transfer approximately two-thirds of the seasoned potatoes into the prepared baking dish.
Spread them evenly across the bottom.
Using the back of a spoon or your fingertips, gently press the potatoes into a compact, even layer.
Don’t make the layer too thick. A relatively thin, firmly pressed layer will crisp much better.
Drizzle the remaining teaspoon or so of olive oil over the potatoes.
Bake for approximately 20 minutes, or until the edges are beginning to turn golden.
Step 5: Cook the Spinach
While the potatoes are baking, heat 1 teaspoon olive oil in a skillet over medium heat.
Add the diced onion and cook for approximately 3–4 minutes, until softened.
Minced garlic and cook for another 30 seconds.
Fresh spinach in handfuls.
Cook until the spinach wilts, usually about 2–3 minutes.
Season with oregano, salt, and black pepper.
Remove from the heat.
If the spinach mixture contains noticeable liquid, allow it to cool slightly and squeeze or drain away excess moisture. This prevents the finished bake from becoming watery.
Step 6: Prepare the Egg Mixture
In a large bowl, whisk together the eggs and milk until smooth.
Add:
- ½ cup feta
- Parmesan
- chopped sun-dried tomatoes
- parsley
- black pepper
Stir until everything is evenly distributed.
The feta and sun-dried tomatoes already provide plenty of flavour, so go easy on additional salt.
Step 7: Assemble the Bake
Remove the partially baked potato crust from the oven.
Spread the cooked spinach and onion mixture evenly over the potato layer.
Pour the egg mixture over the spinach.
Gently shake the baking dish so the egg mixture settles into the vegetables and potatoes.
Scatter the remaining shredded potatoes over the top.
Finish with the additional feta and chopped sun-dried tomatoes.
Drizzle lightly with olive oil.
Step 8: Bake Until Golden
Return the dish to the oven.
Bake at 400°F (200°C) for 20–25 minutes, or until the eggs are completely set and the potato topping is deeply golden and crisp.
If the top is browning too quickly before the centre is cooked, loosely cover the dish with foil for the remaining baking time.
For an extra-crispy finish, place the bake under the broiler for 1–2 minutes at the end.
Watch it carefully because the potatoes can brown very quickly.
Step 9: Rest Before Serving
Remove the bake from the oven and let it rest for 5–10 minutes.
This short resting period allows the egg mixture to finish setting and makes slicing much easier.
Sprinkle generously with fresh parsley or basil and add another small crumble of feta if desired.
Cut into six portions and serve warm.
Serving Suggestions
This bake is incredibly versatile.
Breakfast or brunch, serve it with:
- Fresh sliced tomatoes
- Avocado
- Greek yogurt
- Fresh berries
- A simple fruit salad
Lunch or dinner, pair it with:
- Mediterranean cucumber salad
- Mixed green salad
- Roasted zucchini
- Grilled vegetables
- Steamed broccoli
- Tzatziki
- A spoonful of hummus
For extra protein, serve it alongside grilled chicken, turkey, or a portion of white fish.
Recipe Notes
1. Dry potatoes are essential
Do not skip the squeezing step. Potatoes naturally contain a lot of water, and excess moisture is one of the biggest reasons homemade rösti becomes soft instead of crispy.
2. Don’t overload the filling
Although it can be tempting to add lots of vegetables, too many moisture-rich ingredients can prevent the eggs from setting properly.
3. Use block feta when possible
A good-quality feta crumbled by hand generally has better texture than very finely precrumbled feta.
4. Sun-dried tomatoes vary in saltiness
Taste your ingredients before adding extra salt. Oil-packed sun-dried tomatoes and feta can both be quite salty.
5. Let it rest
Cutting the bake immediately after removing it from the oven can cause the filling to appear loose. Give it several minutes to settle.
Helpful Tips for the Crispiest Rosti
Use russet potatoes: Their higher starch content makes them excellent for achieving crisp edges.
Squeeze twice if necessary: After squeezing the shredded potatoes, let them sit for a minute and squeeze them again.
Don’t overcrowd the pan: a thick potato layer can steam instead of crisp.
Preheat properly: Put the bake into a fully preheated oven.
Use enough oil: You don’t need a lot, but a light coating of olive oil helps the potatoes brown beautifully.
Don’t cover the bake while cooking; covering it traps steam and can make the potatoes soft.
Broil briefly at the end: A short burst of high heat creates an especially attractive golden crust.
Make-Ahead Instructions
This recipe is excellent for meal prep.
You can prepare the complete bake, allow it to cool, cover it, and refrigerate it for up to 3–4 days.
For the best texture, reheat individual portions in an oven, toaster oven, or air fryer rather than the microwave.
To reheat in the oven, place a portion in a 375°F (190°C) oven for approximately 10–15 minutes, or until heated through and crisp around the edges.
Storage
Allow leftovers to cool completely before transferring them to an airtight container.
Refrigerator: Store for up to 3–4 days.
Freezer: Individual portions can be frozen for approximately 2 months. Wrap portions tightly and place them in a freezer-safe container.
Thaw overnight in the refrigerator before reheating for the best texture.
Approximate Nutritional Information
Nutritional values will vary depending on the exact ingredients and brands used.
Per serving, based on 6 servings:
- Calories: Approximately 330
- Protein: 16–18 g
- Carbohydrates: 35–38 g
- Fat: 14–16 g
- Fiber: 4–5 g
- Sugar: Approximately 4–5 g
- Sodium: Approximately 550–650 mg
- Calcium: Approximately 180–220 mg
- Iron: Approximately 3 mg
For a lighter version, reduce the Parmesan and use less olive oil. For a higher-protein version, add extra egg whites or serve with Greek yoghurt.
Benefits of This Recipe
Spinach
Spinach provides fibre, folate, vitamin K, vitamin A, vitamin C, iron, and other beneficial plant compounds. It also adds plenty of colour and volume without requiring a large number of calories.
Potatoes
Potatoes provide carbohydrates for energy and contain potassium and vitamin C. Keeping the skin on can also contribute additional fibre.
Eggs
Eggs provide high-quality protein and several important nutrients, making the bake more satisfying and filling.
Feta Cheese
Feta contributes protein, calcium, and a strong savoury flavour, allowing you to use a moderate amount while still getting plenty of flavour.
Sun-Dried Tomatoes
Sun-dried tomatoes provide concentrated tomato flavour along with antioxidants such as lycopene. Their sweet-savoury taste works especially well with spinach and feta.
Olive Oil
Extra-virgin olive oil contributes monounsaturated fats and gives the potatoes their delicious golden crispness.
Overall, this recipe combines vegetables, protein, carbohydrates, healthy fats, and flavourful Mediterranean-inspired ingredients in one convenient meal.
Frequently Asked Questions
Can I use frozen spinach?
Yes. Thaw the spinach completely and squeeze out as much liquid as possible before adding it to the recipe. Frozen spinach contains considerably more released moisture, so draining it well is particularly important.
Can I make this without feta?
Absolutely. Goat cheese, ricotta, cottage cheese, or shredded mozzarella can be used instead. For a dairy-free version, use a suitable dairy-free feta alternative.
Can I use sweet potatoes?
Yes. Sweet potatoes can replace regular potatoes, although they have a softer texture and slightly sweeter flavour. They may not become quite as crisp as russet potatoes.
Can I add more vegetables?
Yes, but choose vegetables that don’t release excessive water. Bell peppers, mushrooms, zucchini, broccoli, and roasted red peppers can work well. Cook watery vegetables first and remove excess moisture.
Can I make it vegetarian?
Yes. The recipe is already vegetarian as written.
Can I make it gluten-free?
Yes. The ingredients listed are naturally gluten-free, but always check packaged ingredients such as seasonings and sun-dried tomatoes if you need to avoid gluten strictly.
Why did my potato crust turn soggy?
The most common reasons are excess moisture in the potatoes, too much filling liquid, or an oven that wasn’t hot enough. Make sure the shredded potatoes are thoroughly squeezed and the spinach is well drained.
Can I make this in a cast-iron skillet?
Yes. A well-seasoned oven-safe cast-iron skillet can produce excellent crispy edges. Make sure the skillet is appropriately sized so the potato layer isn’t excessively thick.
Can I prepare it the night before?
Yes. You can assemble it in advance and refrigerate it covered. When ready to bake, allow the chilled dish a little extra cooking time because the ingredients will be cold.
Is it good for meal prep?
Definitely. It stores and reheats well, making it a convenient breakfast or lunch option for several days.
What can I serve with it?
A fresh cucumber-tomato salad, Greek yoghurt, tzatziki, avocado, roasted vegetables, or a simple green salad are excellent choices.
Final Recipe Summary
This Crispy Spinach & Potato Rosti Crustless Bake with Feta & Sun-Dried Tomato delivers everything you want from a comforting baked dish: crispy golden potatoes, creamy eggs, tender spinach, salty feta, sweet-savoury sun-dried tomatoes, and plenty of Mediterranean flavour.
The secret is simple: remove as much moisture as possible from the potatoes and spinach, use a hot oven, and give the finished bake enough time to become beautifully golden and crisp.