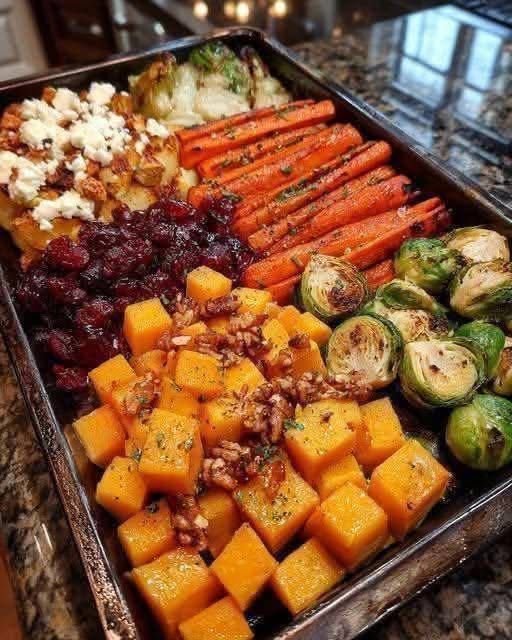
Oven-Roasted Veggie Tray

Oven-Roasted Veggie Tray

πŸ›’ Ingredients

  • Carrots (whole or halved)
  • Butternut squash (cubed)
  • Brussels sprouts (halved)
  • Potatoes (cubed)
  • Cranberries (fresh or dried)
  • Olive oil
  • Garlic (minced)

πŸ‘©β€πŸ³ Step-by-Step Instructions

  • πŸ”₯ Preheat the oven
    β†’ Set oven to 200Β°C (400Β°F)
    β†’ Line a large baking tray with parchment paper or lightly grease it
  • πŸ”ͺ Prep all vegetables
    β†’ Peel and cube the butternut squash into medium-sized chunks
    β†’ Cut potatoes into similar-sized cubes for even cooking
    β†’ Trim and halve Brussels sprouts
    β†’ Wash carrots and leave whole or slice lengthwise
  • πŸ§„ Make garlic oil mix
    β†’ In a bowl, combine olive oil with minced garlic
    β†’ Let it sit for 2–3 minutes so the flavor infuses nicely
  • πŸ₯• Arrange veggies on tray
    β†’ Place each vegetable in separate sections (like in the image)
    β†’ Keep carrots together, squash together, sprouts together, etc.
    β†’ This helps control cooking and gives a beautiful presentation
  • πŸ«’ Coat with flavor
    β†’ Drizzle garlic olive oil over all vegetables
    β†’ Toss lightly or brush so every piece is coated
    β†’ Make sure not to overcrowdβ€”leave a little space between pieces
  • πŸ‡ Add cranberries
    β†’ Scatter cranberries over one section (or across the tray)
    β†’ They’ll become soft and slightly jammy when baked
  • πŸ«• Roast to perfection
    β†’ Place tray in oven and bake for 25–30 minutes
    β†’ Flip/stir vegetables halfway through for even roasting
  • πŸ”₯ Final roasting touch
    β†’ Bake another 10–15 minutes until edges are golden and slightly crispy
    β†’ Carrots should be tender, squash soft, and sprouts nicely browned
  • ⏳ Rest & serve
    β†’ Let the tray rest for 5 minutes after removing from oven
    β†’ Serve warm directly from tray or plate beautifully

❓ Q&A

Q1: Why are my veggies not crispy?
βœ”οΈ Overcrowding causes steaming. Keep space between pieces for roasting.

Q2: Can I add nuts like in the image?
βœ”οΈ Yes! Add chopped nuts in the last 5 minutes for crunch.

Q3: Can I use other vegetables?
βœ”οΈ Absolutely! Sweet potatoes, zucchini, or bell peppers work great too.

Q4: How do I store leftovers?
βœ”οΈ Keep in fridge for up to 3 days and reheat in oven for best texture.


✨ A colorful, healthy, and super satisfying roasted veggie tray!
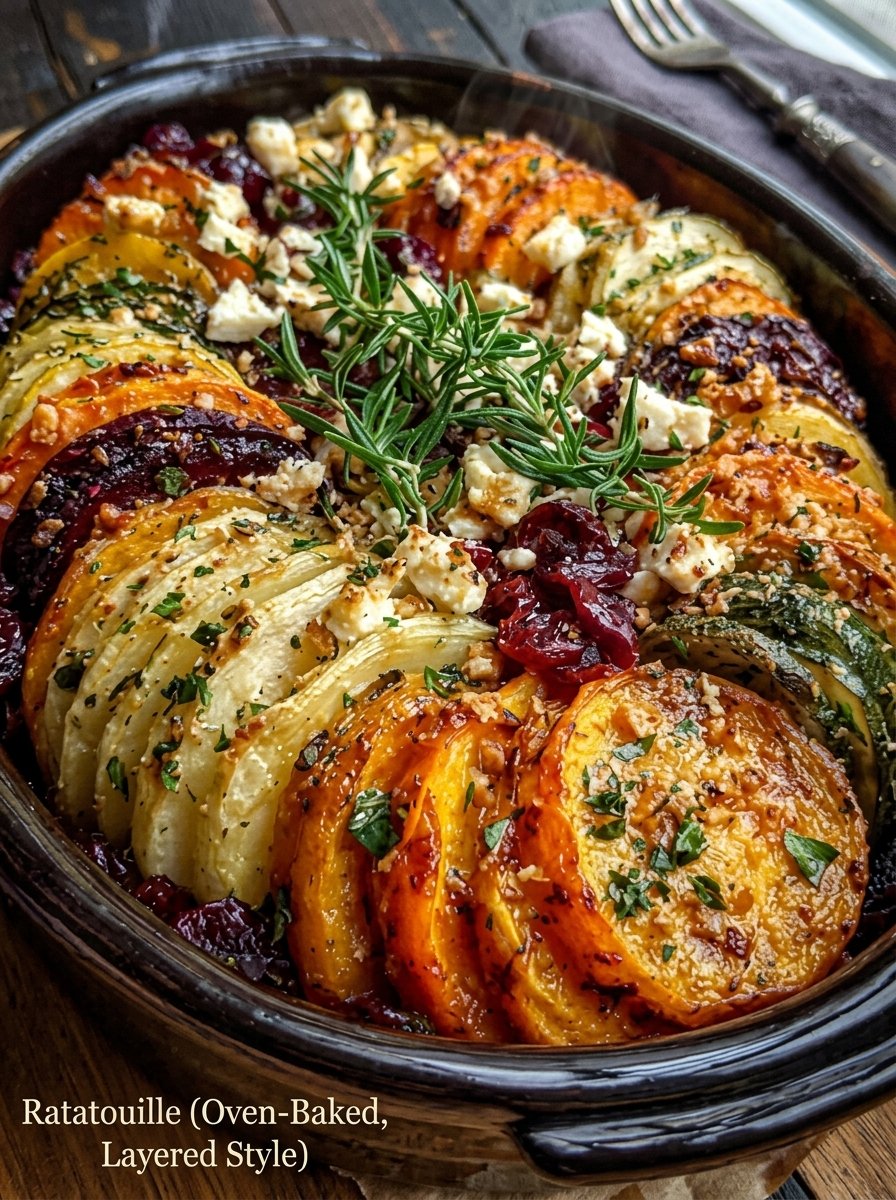
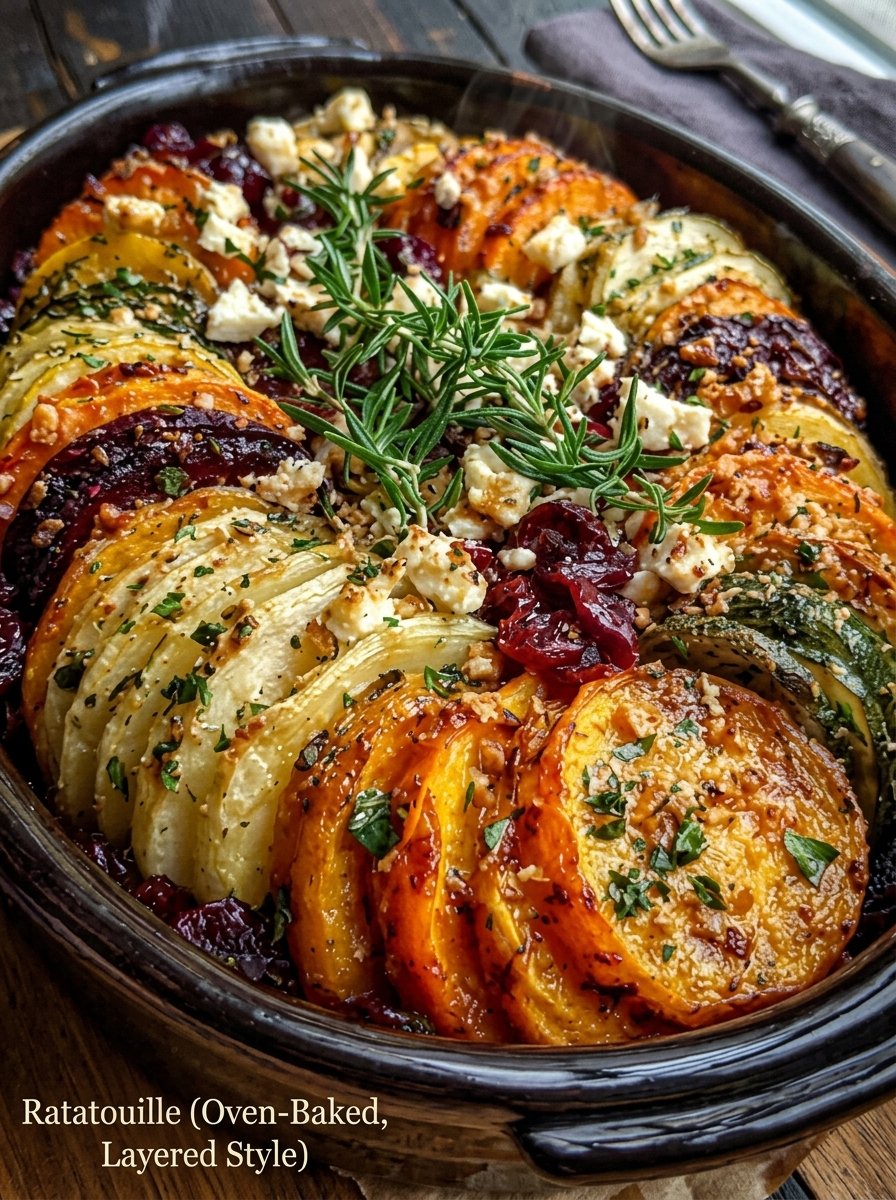
Oven-Baked Layered Ratatouille

Oven-Baked Layered Ratatouille (Colorful & Flavorful)

πŸ›’ Ingredients

  • Zucchini (thinly sliced)
  • Eggplant (thinly sliced)
  • Tomatoes (thinly sliced)
  • Yellow squash (thinly sliced)
  • Olive oil
  • Garlic (minced)

πŸ‘©β€πŸ³ Step-by-Step Instructions

  • πŸ”₯ Preheat & prepare the dish
    β†’ Preheat your oven to 180Β°C (350Β°F) so it’s evenly hot before baking
    β†’ Take a baking dish (round or rectangular) and grease it well with olive oil
    β†’ Make sure every corner is lightly coated to prevent sticking and enhance flavor
  • πŸ§„ Create a flavorful base layer
    β†’ In a small bowl, mix minced garlic with 2–3 tablespoons of olive oil
    β†’ Let it sit for 2–3 minutes so the garlic infuses into the oil
    β†’ Spread this mixture evenly across the bottom of your baking dish
    β†’ This layer will act as a rich, aromatic base for all the vegetables
  • πŸ”ͺ Prepare the vegetables carefully
    β†’ Wash all vegetables thoroughly
    β†’ Slice zucchini, eggplant, tomatoes, and yellow squash into thin, even rounds (about 2–3 mm thick)
    β†’ Try to keep all slices similar in size so they cook evenly
    β†’ If eggplant feels too watery, lightly pat slices dry with a paper towel
  • 🎨 Arrange the vegetables beautifully
    β†’ Start stacking the slices in a repeating pattern:
    zucchini β†’ eggplant β†’ tomato β†’ yellow squash
    β†’ Place them upright (slightly tilted) in the dish
    β†’ Pack them tightly together so they support each other and create that classic layered look
    β†’ You can arrange in straight rows or a spiral pattern for a more aesthetic presentation
  • πŸ«’ Season and add moisture
    β†’ Drizzle olive oil evenly over all the vegetables
    β†’ Make sure every slice gets a light coating so it doesn’t dry out
    β†’ Gently brush or spread oil if needed for even coverage
    β†’ The oil helps in roasting and brings out natural sweetness
  • πŸ«• Cover and start baking
    β†’ Cover the dish tightly with foil
    β†’ Bake in the preheated oven for 30–35 minutes
    β†’ This step helps soften the vegetables and allows flavors to blend together
  • πŸ”₯ Uncover for roasting finish
    β†’ Remove the foil carefully
    β†’ Continue baking for another 20–25 minutes
    β†’ Watch for lightly golden edges and tender texture
    β†’ The top should look slightly roasted but not burnt
  • ⏳ Rest before serving
    β†’ Remove from oven and let it sit for 5–10 minutes
    β†’ This helps the juices settle and enhances flavor
    β†’ It also makes serving easier without the layers collapsing
  • 🍽️ Serve and enjoy
    β†’ Serve warm as a main dish or side
    β†’ Scoop gently to keep the layered look intact
    β†’ Enjoy the soft, rich, and naturally sweet flavors

❓ Q&A

Q1: Why is my ratatouille watery?
βœ”οΈ This happens if vegetables release too much moisture. Slice thinly and avoid overcrowding with too much oil.

Q2: Can I make it ahead of time?
βœ”οΈ Yes! You can assemble it earlier and bake when needed, or reheat before serving.

Q3: Can I add herbs?
βœ”οΈ Absolutely! Herbs like thyme or basil can enhance the flavor beautifully.

Q4: How do I know it’s fully cooked?
βœ”οΈ The vegetables should be soft when pierced with a fork and slightly golden on top.

Oven-Baked Layered Ratatouille

Oven-Baked Layered Ratatouille

πŸ›’ Ingredients

  • Zucchini (thinly sliced)
  • Eggplant (thinly sliced)
  • Tomatoes (thinly sliced)
  • Yellow squash (thinly sliced)
  • Olive oil
  • Garlic (minced)
  • Salt
  • Black pepper
  • Dried thyme or oregano
  • Fresh rosemary or parsley
  • Crumbled feta cheese (optional)
  • Chili flakes (optional)

πŸ‘©β€πŸ³ Step-by-Step Recipe

  • πŸ”ͺ Prepare the vegetables
    ➑️ Wash all vegetables thoroughly.
    ➑️ Slice zucchini, eggplant, tomatoes, and squash into thin, even rounds for uniform cooking.
    ➑️ Keep slices similar in thickness to ensure even baking.
  • πŸ§„ Prepare the base flavor
    ➑️ Lightly grease a baking dish with olive oil.
    ➑️ Spread a thin layer of olive oil and sprinkle minced garlic evenly across the base.
    ➑️ Add a pinch of salt, pepper, and dried herbs to create a flavorful foundation.
  • 🎨 Arrange the layers
    ➑️ Start placing vegetable slices vertically in a circular pattern.
    ➑️ Alternate between zucchini, eggplant, tomato, and squash for a beautiful layered effect.
    ➑️ Pack them tightly so they support each other while baking.
  • πŸ«’ Season generously
    ➑️ Drizzle olive oil evenly over the arranged vegetables.
    ➑️ Sprinkle salt, black pepper, dried thyme or oregano, and chili flakes if using.
    ➑️ Ensure the seasoning reaches all layers.
  • πŸ§€ Add topping (optional)
    ➑️ Sprinkle crumbled feta cheese over the top for a creamy, slightly tangy finish.
  • πŸ”₯ Bake to perfection
    ➑️ Cover the dish with foil and place in a preheated oven at 180°C (350°F).
    ➑️ Bake for about 30–35 minutes until vegetables are tender.
    ➑️ Remove the foil and bake another 10–15 minutes until the top is slightly golden.
  • 🌿 Garnish & serve
    ➑️ Remove from oven and let it rest for a few minutes.
    ➑️ Garnish with fresh rosemary or parsley for aroma and freshness.
    ➑️ Serve warm and enjoy the rich, layered flavors!

❓ Q/A

  • Q: Can I make it ahead of time?
    ➑️ Yes! Assemble it earlier and bake when ready to serve.
  • Q: What if I don’t have all vegetables?
    ➑️ You can use any combination available; just keep slices thin and uniform.
  • Q: How to store leftovers?
    ➑️ Store in an airtight container in the fridge and reheat before serving.

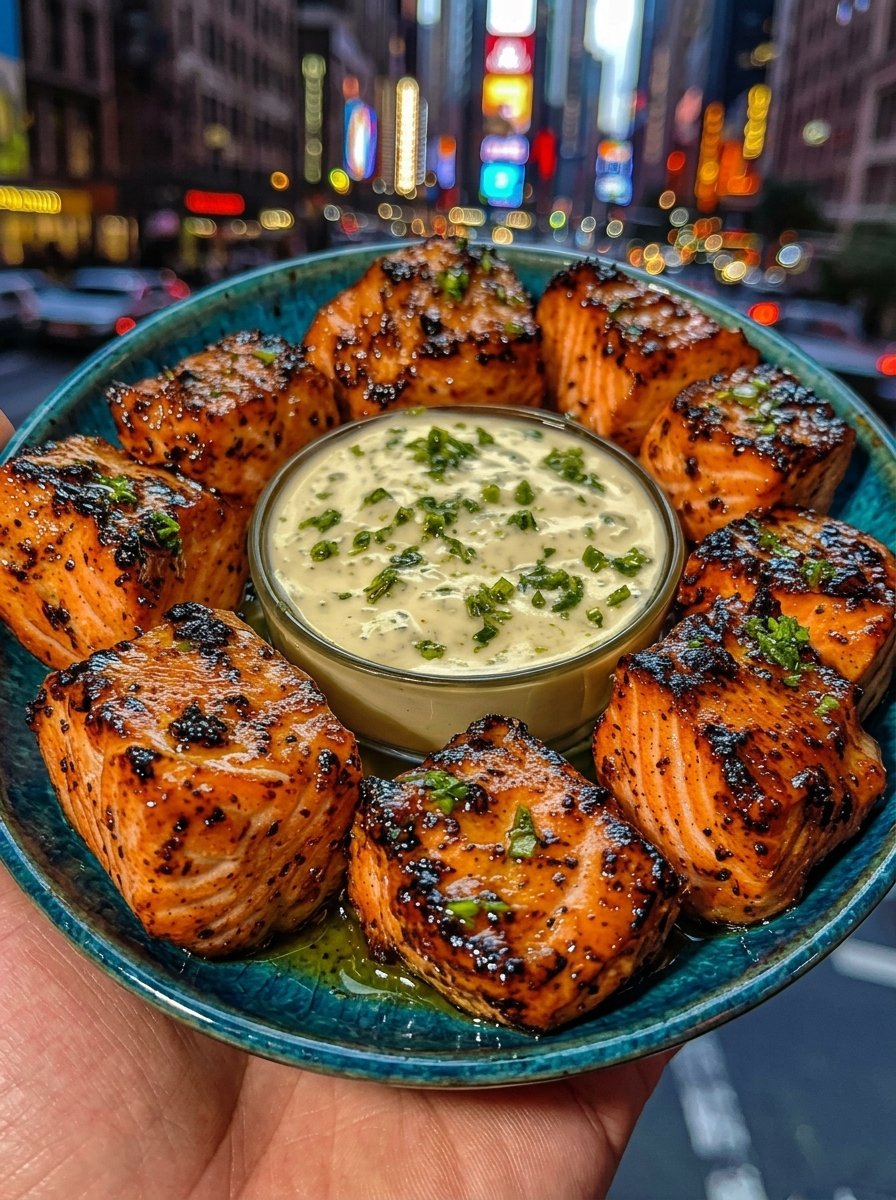
Garlic Butter Salmon Bites with Creamy Herb Sauce

🧾 Ingredients

For the salmon:

  • 500 g (1 lb) salmon fillet (skin removed, cut into cubes)
  • 2 tbsp olive oil or melted butter
  • 3 cloves garlic (minced)
  • 1 tbsp soy sauce
  • 1 tbsp honey
  • 1 tsp paprika
  • 1/2 tsp black pepper
  • Salt to taste

For the creamy herb sauce:

  • 1/2 cup mayonnaise or Greek yogurt
  • 2 tbsp sour cream (optional, for extra richness)
  • 1–2 cloves garlic (finely minced)
  • 1 tbsp lemon juice
  • 1 tbsp chopped parsley or cilantro
  • 1 tsp Dijon mustard (optional)
  • Salt & pepper to taste

πŸ‘©β€πŸ³ Instructions

1. Prep the salmon

  • Pat salmon dry and cut into bite-sized cubes.
  • In a bowl, mix olive oil, garlic, soy sauce, honey, paprika, salt, and pepper.
  • Toss salmon pieces until well coated.

2. Cook the salmon

  • Heat a pan over medium-high heat.
  • Add salmon pieces in a single layer.
  • Cook for 2–3 minutes per side until golden, slightly crispy, and cooked through.
  • Spoon some extra glaze from the pan over the top.

3. Make the sauce

  • In a bowl, combine mayo (or yogurt), sour cream, garlic, lemon juice, herbs, mustard, salt, and pepper.
  • Mix until smooth and creamy.

4. Serve

  • Arrange salmon bites around a bowl of the sauce (like in the image).
  • Garnish with chopped herbs.

πŸ”₯ Tips

  • Don’t overcrowd the panβ€”cook in batches if needed
  • Use high heat for that caramelized crust
  • Swap sauce base with Greek yogurt for a lighter version
  • Add chili flakes if you want some heat 🌢️

Crispy Salmon Bites with Creamy Herb Sauce

🐟πŸ”₯ Crispy Salmon Bites with Creamy Herb Sauce

🧾 Ingredients

  • Salmon (boneless, skinless)
  • Olive oil
  • Garlic
  • Salt
  • Black pepper
  • Paprika (optional)
  • Fresh parsley (or herbs)
  • Mayonnaise or yogurt
  • Lemon juice

πŸ‘©β€πŸ³ Step-by-Step Recipe

  • πŸ‘‰ Step 1:
    Cut the salmon into evenly sized bite cubes for even cooking πŸ”ͺ🐟
  • πŸ‘‰ Step 2:
    Place pieces in a bowl and drizzle olive oil over them πŸ«’
  • πŸ‘‰ Step 3:
    Add minced garlic, salt, black pepper, and paprika, then toss well to coat every piece 🀲✨
  • πŸ‘‰ Step 4:
    Heat a pan on medium-high until hot πŸ”₯
  • πŸ‘‰ Step 5:
    Place salmon pieces in the pan, leaving space between them (don’t overcrowd) 🍳
  • πŸ‘‰ Step 6:
    Cook for 2–3 minutes on each side until golden, crispy outside and tender inside πŸ”„πŸ˜‹
  • πŸ‘‰ Step 7:
    Remove from heat and sprinkle fresh chopped herbs on top 🌿
  • πŸ‘‰ Step 8:
    In a small bowl, mix mayonnaise (or yogurt) with lemon juice, garlic, and herbs πŸ₯£πŸ‹
  • πŸ‘‰ Step 9:
    Stir until smooth and creamy sauce forms πŸ₯„
  • πŸ‘‰ Step 10:
    Serve salmon bites hot with the dipping sauce in the center 🀀πŸ”₯

❓ Q&A

Q1: Can I bake instead of pan-fry?
πŸ‘‰ Yes! Bake at 200Β°C (400Β°F) for about 10–12 minutes πŸ”₯

Q2: How do I keep salmon juicy?
πŸ‘‰ Don’t overcookβ€”remove as soon as it flakes easily 🐟

Q3: Can I air-fry this?
πŸ‘‰ Yes! Air fry at 180Β°C for 8–10 minutes for a crispy finish πŸƒ


Enjoy your crispy, juicy salmon bites! 😍🐟✨

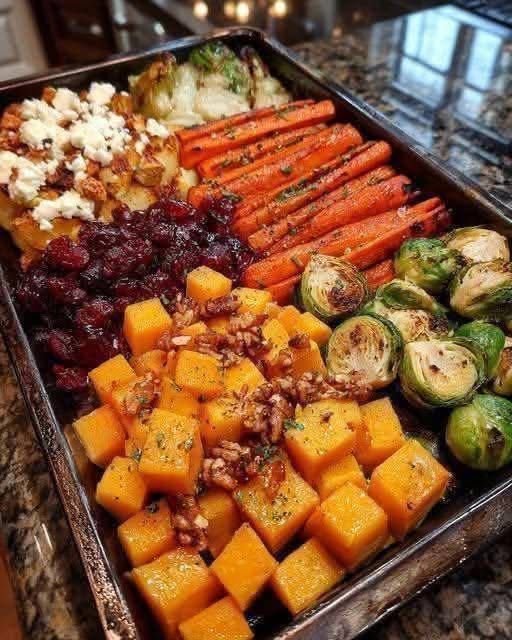
Roasted Veggie Tray BakeΒ 

πŸ₯•πŸ₯¦ Roasted Veggie Tray Bake

🧾 Ingredients

  • Carrots
  • Broccoli
  • Cauliflower
  • Brussels sprouts
  • Butternut squash (cubed)
  • Dried cranberries
  • Walnuts
  • Olive oil
  • Salt
  • Black pepper
  • Garlic (fresh or powder)
  • Dried herbs (thyme/rosemary)

πŸ‘©β€πŸ³ Step-by-Step Recipe

  • πŸ‘‰ Step 1:
    Preheat oven to 200Β°C (400Β°F) πŸ”₯ and line a large tray with parchment paper
  • πŸ‘‰ Step 2:
    Wash and cut everything into similar-sized pieces so they cook evenly πŸ”ͺπŸ₯•
  • πŸ‘‰ Step 3:
    Spread vegetables on the tray in a single layer with space between them (this helps crispiness) ✨
  • πŸ‘‰ Step 4:
    Drizzle olive oil evenly over everything πŸ«’
  • πŸ‘‰ Step 5:
    Add salt, black pepper, garlic, and herbs πŸŒΏπŸ§‚
  • πŸ‘‰ Step 6:
    Toss well until all pieces are nicely coated 🀲
  • πŸ‘‰ Step 7:
    Roast for 25–30 minutes, flipping halfway for even browning πŸ”„β³
  • πŸ‘‰ Step 8:
    Roast until edges are golden and slightly crispy πŸ”₯πŸ₯¦
  • πŸ‘‰ Step 9:
    Add dried cranberries and walnuts while still hot πŸ‡πŸŒ°
  • πŸ‘‰ Step 10:
    Let rest for 2–3 minutes, then serve warm πŸ˜‹

❓ Q&A

Q1: Why aren’t my veggies crispy?
πŸ‘‰ Most likely overcrowding or too little heatβ€”give them space and keep oven hot πŸ”₯

Q2: When should I add nuts?
πŸ‘‰ Always at the end to keep them crunchy 🌰

Q3: Can I make this ahead?
πŸ‘‰ Yes, but reheat in oven (not microwave) for best texture ♨️