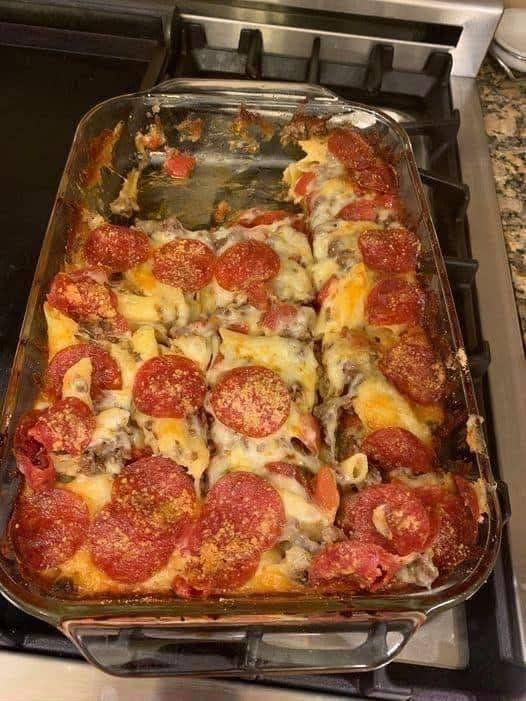
Carnivore Pepperoni Cheeseburger Bake

Carnivore Pepperoni Cheeseburger Bake

📌 Description

This hearty carnivore casserole combines seasoned ground beef, melted cheese, and crispy baked pepperoni for a zero-carb, protein-packed comfort meal. It’s cheesy, meaty, and incredibly satisfying — perfect for strict carnivore or keto eaters.


🧾 Ingredients

  • 2 lbs (900g) ground beef (80/20 recommended)

  • 1 tsp salt (adjust to taste)

  • ½ tsp black pepper (optional)

  • 1 tsp garlic powder (optional, omit for strict carnivore)

  • 2 cups shredded mozzarella cheese

  • 1 cup shredded cheddar cheese

  • 20–30 slices pepperoni (100% pork/beef, no fillers)

  • 4 oz cream cheese (optional, for extra creaminess)


👩‍🍳 Instructions

1️⃣ Preheat Oven

Preheat to 375°F (190°C).

2️⃣ Cook the Beef

  • In a large skillet over medium heat, cook ground beef until browned.

  • Season with salt (and pepper/garlic if using).

  • Drain excess grease if desired (leave some for flavor).

3️⃣ Layer the Casserole

  • Spread cooked beef evenly in a greased 9×13 baking dish.

  • Dot with cream cheese if using.

  • Sprinkle mozzarella and cheddar evenly over the top.

  • Arrange pepperoni slices over the cheese (like in the photo).

4️⃣ Bake

Bake for 15–20 minutes until cheese is melted and bubbly.

5️⃣ Broil (Optional but Recommended)

Broil 2–3 minutes to crisp the pepperoni slightly and brown the cheese.

6️⃣ Rest & Serve

Let rest 5–10 minutes before slicing.


🍽️ Serving Suggestions

  • Serve as-is for strict carnivore

  • Top with a fried egg

  • Add extra melted butter on top

  • Pair with crispy bacon on the side

  • Meal prep for the week (reheats beautifully)


🔄 Variations

Extra Cheesy Version
Add provolone or Monterey Jack.

Bacon Lover’s Version
Mix cooked bacon into the beef layer.

Spicy Version
Use spicy pepperoni or add crushed red pepper (keto version).

Pizza-Style Version (Keto)
Add a thin layer of low-carb tomato sauce under the cheese (not strict carnivore).


🧮 Nutrition (Approx. Per Serving – 6 servings)

  • Calories: ~520

  • Protein: 35g

  • Fat: 42g

  • Carbs: 1–2g (depending on pepperoni brand)

  • Sugar: 0g


❓ Common Questions

Is pepperoni carnivore?
Yes, if it contains only meat, salt, and spices without sugar or fillers.

Can I freeze it?
Yes. Freeze in portions up to 2 months.

Why is there liquid in the pan?
Beef releases fat and juices. Let it rest to absorb back in.


📝 Final Thoughts

This Carnivore Pepperoni Cheeseburger Bake is basically a crustless meat pizza casserole — rich, satisfying, and incredibly easy to make. It’s perfect when cravings hit but you want to stay zero-carb.

1-Minute Savory Breakfast Egg Bowls

1-Minute Savory Breakfast Egg Bowls

A quick, flour-free, and sugar-free alternative for busy mornings.

Ingredients

  • 2 large Eggs

  • 1 tbsp Unsweetened almond milk or heavy cream (for fluffiness)

  • 1/4 cup Fresh spinach, chopped

  • 3-4 Cherry tomatoes, halved

  • 1 tbsp Feta or goat cheese crumbles

  • A pinch of salt and black pepper

  • Optional: A dash of red pepper flakes or fresh chives


Instructions

  1. Prep the Ramekin: Lightly grease a microwave-safe ramekin or small mug with a tiny bit of olive oil or butter to prevent sticking.

  2. Whisk: Crack the eggs directly into the ramekin. Add the milk (or cream), salt, and pepper. Whisk with a fork until well combined.

  3. Mix in Add-ins: Stir in the chopped spinach, cherry tomatoes, and cheese. Ensure the vegetables are slightly submerged in the egg mixture.

  4. Microwave: Place the ramekin in the microwave. Cook on high for 60 to 90 seconds.

    • Tip: Stop at 60 seconds to check the consistency. The eggs should be set but still look slightly moist on top—they will finish cooking with the residual heat.

  5. Rest and Serve: Let it sit for 30 seconds before eating. Top with fresh herbs or red pepper flakes if desired.


Meal Prep Tip

You can chop the vegetables and place them in the ramekins the night before. In the morning, just crack the eggs in, whisk, and microwave!

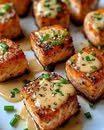
Zesty Salmon Bites with Mustard Cream Sauce

Zesty Salmon Bites with Mustard Cream Sauce

A high-protein, heart-healthy dish that’s elegant enough for guests but easy enough for a weeknight.

Ingredients

For the Salmon:

  • 1 lb (450g) skinless salmon fillet, cut into 1-inch bite-sized cubes

  • 1 tbsp olive oil

  • 1/2 tsp garlic powder

  • Salt and black pepper, to taste

  • Optional: A pinch of paprika or chili flakes for a gentle warmth

For the Mustard Cream Sauce:

  • 2 tbsp Dijon mustard

  • 1/4 cup Greek yogurt or sour cream (unsweetened)

  • 1 tsp lemon juice

  • 1/2 tsp garlic powder

  • Salt and pepper to taste

Toppings:

  • Fresh chopped chives or parsley for a burst of color and freshness


Instructions

  1. Season the Salmon: In a medium bowl, gently toss the salmon cubes with olive oil, garlic powder, salt, pepper, and your optional spices until every piece is evenly coated.

  2. Sear to Perfection: Heat a large non-stick skillet over medium-high heat. Once hot, add the salmon cubes in a single layer (do not overcrowd the pan).

  3. The Golden Crust: Sear the cubes for 2–3 minutes per side. You want a beautiful golden-brown crust while keeping the inside tender. Remove from heat and set aside on a plate.

  4. Whisk the Sauce: In a small bowl, combine the Dijon mustard, Greek yogurt, lemon juice, and seasonings. Whisk until smooth and creamy.

  5. Assemble: Arrange the salmon bites on a serving platter. Drizzle a small amount of the mustard cream sauce over each piece, or place a neat dollop on top using a small spoon.

  6. Garnish: Finish with a generous sprinkle of fresh chives or parsley. Serve warm.

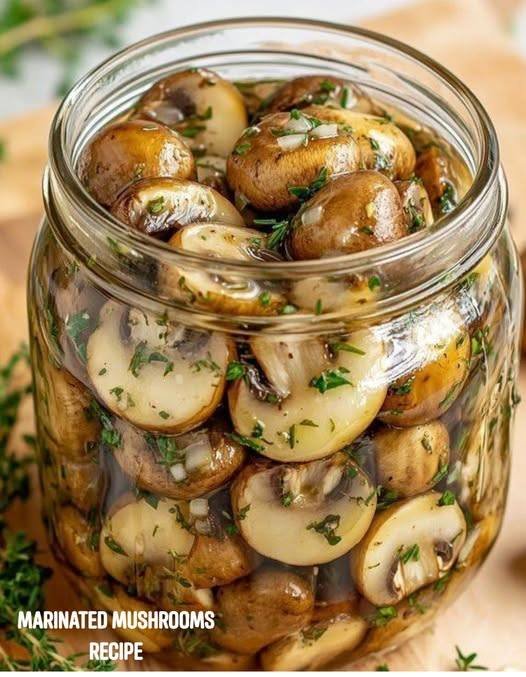
Marinated Mushrooms Recipe!

Marinated Mushrooms Recipe

Marinated mushrooms are a flavorful and versatile dish that’s perfect as a snack, appetizer, or a salad topping.

Ingredients:

  • For the Mushrooms:

    • 1 lb (450g) button mushrooms, cleaned and sliced (or whole)

  • For the Marinade:

    • 1/2 cup olive oil

    • 1/4 cup red wine vinegar (or white wine vinegar)

    • 2 tbsp lemon juice

    • 1 tsp Dijon mustard (optional, for a little tang)

    • 2-3 cloves garlic, minced

    • 1 small shallot or onion, finely chopped

    • 1 tbsp fresh thyme (or 1 tsp dried thyme)

    • 1/2 tsp red pepper flakes (optional, for a hint of heat)

    • Salt and pepper, to taste


Instructions:

  1. Prepare the Mushrooms:

    • If you’re using whole mushrooms, simply clean and trim the stems. If you prefer sliced mushrooms (as shown in the image), slice them evenly.

    • Pat the mushrooms dry with a paper towel to remove any moisture. This helps the marinade absorb better.

  2. Make the Marinade:

    • In a medium bowl, whisk together olive oil, red wine vinegar, lemon juice, Dijon mustard (if using), garlic, shallots, thyme, red pepper flakes, salt, and pepper until everything is well combined.

  3. Combine the Mushrooms and Marinade:

    • Place the cleaned and sliced mushrooms into a large jar or airtight container.

    • Pour the marinade over the mushrooms, making sure they are all covered with the marinade.

    • Seal the jar or container and refrigerate for at least 24 hours. The mushrooms will absorb the flavors better if marinated for 2-3 days.

  4. Serve:

    • After marinating, the mushrooms are ready to serve. You can serve them chilled or at room temperature. They’re great on their own, mixed into salads, served with crackers, or as part of a charcuterie board.


FAQs:

1. Can I use other types of mushrooms?

Yes, you can use different types of mushrooms like cremini, portobello, or oyster mushrooms. Just make sure to clean them thoroughly before marinating. If you’re using larger mushrooms, slice them to ensure the marinade soaks in well.

2. Can I make these mushrooms spicy?

Yes! You can increase the amount of red pepper flakes for a spicier kick. You could also add a bit of hot sauce or finely chopped fresh chili for extra heat.

3. How long should I marinate the mushrooms?

The mushrooms should marinate for at least 24 hours, but ideally for 2-3 days. The longer they marinate, the more the flavors will develop. Just be sure to store them in the fridge.

4. How long do marinated mushrooms last?

In the refrigerator, they’ll last for about 1-2 weeks. Make sure they’re kept in an airtight container to maintain freshness.

5. Can I make the marinade ahead of time?

Absolutely! You can prepare the marinade in advance and store it in the fridge for a few days. When you’re ready to marinate the mushrooms, just pour the prepared marinade over them.

6. Can I make these mushrooms vegan?

Yes, this recipe is already vegan-friendly! The marinade doesn’t include any animal-based products, so it works perfectly for a plant-based diet.

7. Can I use this marinade for other vegetables or meats?

Yes! This marinade is versatile and can be used for other vegetables like artichokes, bell peppers, or carrots. You can also use it to marinate meats or tofu if you’re looking for a flavorful marinade for grilling or roasting.

8. How do I store these marinated mushrooms?

Keep them in an airtight jar or container in the refrigerator. If you use a glass jar, make sure it’s sealed tightly to prevent air from affecting the flavor and freshness.

Snicker Peanut Buster Parfait

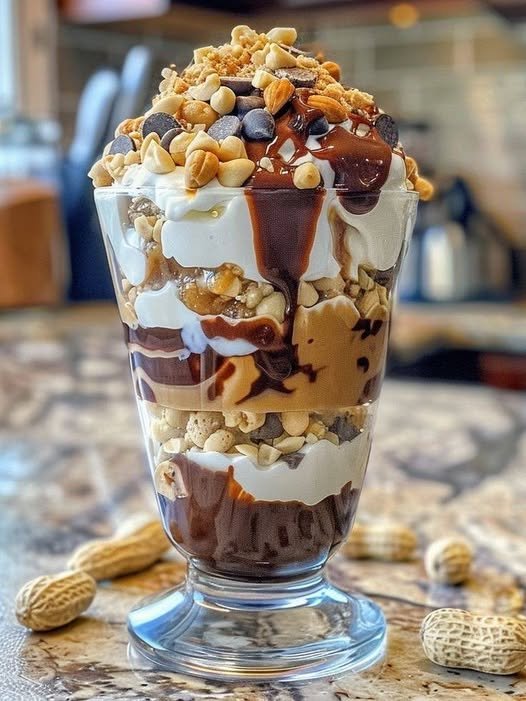
🍫🥜 Keto Snicker Peanut Buster Parfait

This Keto Snicker Peanut Buster Parfait is a rich, layered dessert inspired by the classic Peanut Buster Parfait and the flavors of a Snickers bar. It combines creamy chocolate mousse, smooth vanilla cream, sugar-free caramel, and crunchy peanuts for a satisfying low-carb treat.

Perfect for keto and low-carb lifestyles, this dessert is also great for make-ahead treats, special occasions, or when you want something indulgent without traditional sugar and flour.


📝 Why You’ll Love It

  • Low in carbs compared to traditional parfaits

  • Rich and creamy texture

  • Simple ingredients

  • Customizable layers

  • Great for meal prep

  • Elegant enough for guests


🧾 Ingredients (Makes 4 Parfaits)

Chocolate Layer

  • ½ cup heavy whipping cream

  • 2 tbsp unsweetened cocoa powder

  • 1½ tbsp powdered erythritol or monk fruit sweetener

  • ¼ tsp vanilla extract

  • Pinch of salt

Vanilla Cream Layer

  • ½ cup full-fat cream cheese, softened

  • ¼ cup heavy cream

  • 1 tbsp powdered erythritol

  • ¼ tsp vanilla extract

Caramel Sauce

  • ¼ cup unsalted butter

  • 2 tbsp powdered allulose (or erythritol)

  • 2 tbsp heavy cream

  • ¼ tsp xanthan gum (optional, for thickening)

  • Pinch of sea salt

Additional Layers

  • ¼ cup salted roasted peanuts, chopped

  • 2 tbsp sugar-free chocolate chips, melted

  • 1 tbsp coconut oil (for melting chocolate)


🧰 Tools Needed

  • Hand mixer

  • Mixing bowls

  • Saucepan

  • Parfait glasses or small jars

  • Spatula

  • Microwave-safe bowl


👩‍🍳 Instructions

Step 1: Chocolate Mousse

Whip heavy cream until soft peaks form.
Add cocoa powder, sweetener, vanilla, and salt.
Whip until thick and smooth.
Refrigerate for 10–15 minutes.


Step 2: Vanilla Cream

Beat cream cheese until smooth.
Slowly add heavy cream and whip until creamy.
Add sweetener and vanilla; beat until fluffy.
Chill until ready to use.


Step 3: Caramel Sauce

Melt butter in a saucepan over medium heat.
Stir in sweetener and cook 1–2 minutes.
Add cream and stir until combined.
(Optional) Add xanthan gum for thickness.
Add salt and remove from heat.
Cool slightly before using.


Step 4: Assemble

In each glass:

  • 2 tbsp chocolate mousse

  • 2 tbsp vanilla cream

  • 1 tbsp caramel sauce

  • 1 tbsp chopped peanuts

Repeat layers once more.
Drizzle with melted chocolate on top.


🍽 Serving Tips

  • Serve chilled

  • Garnish with extra peanuts or a pinch of flaky salt

  • Use clear glasses to show layers


🧊 Storage

  • Refrigerate up to 5 days

  • Best assembled shortly before serving

  • Freezing not recommended (texture may change)


🧮 Estimated Nutrition (Per Serving)

  • Calories: ~320

  • Fat: ~30g

  • Protein: ~5g

  • Net Carbs: ~5–6g

(Values vary by ingredients used.)


🔄 Ingredient Swaps

  • Sweeteners: Monk fruit, erythritol, or stevia blends

  • Dairy-free: Coconut cream and dairy-free cream cheese

  • Nut-free: Omit peanuts or use seeds

  • Lower fat: Use light cream cheese and reduce peanuts


🎉 Perfect For

  • Dinner desserts

  • Meal prep

  • Holidays

  • Special occasions

  • Low-carb lifestyles


⚠️ Important Notes (Removed Harmful Claims)

❌ Not a medical food
❌ Not a blood sugar treatment
❌ Not a ketosis guarantee
❌ Not a weight-loss product

✔ Simply a low-carb dessert option
✔ Enjoy in moderation
✔ Works within many low-carb plans


💬 Final Thoughts

Desserts don’t have to disappear when you cut carbs. This Keto Snicker Peanut Buster Parfait gives you rich chocolate, creamy vanilla, sweet caramel, and crunchy peanuts in every spoonful—without traditional sugar or flour. It’s indulgent, elegant, and easy to make.

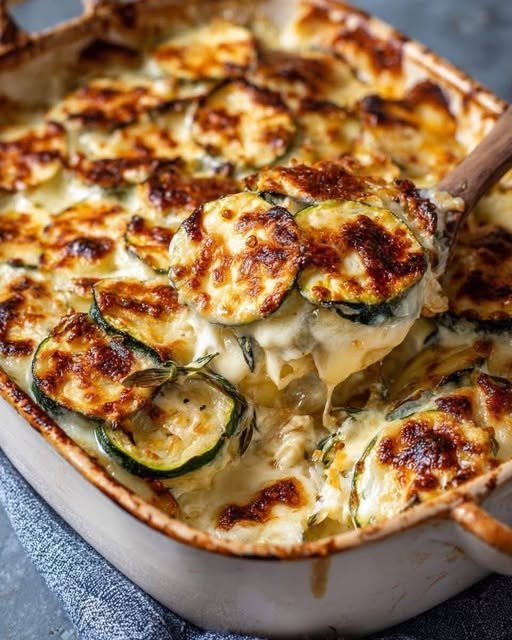
Mediterranean Creamy Zucchini Gratin

Mediterranean Creamy Zucchini Gratin

Yields: 6 servings | Prep time: 20 mins | Bake time: 40 mins

Ingredients

Vegetables

  • 3-4 large Zucchini, thinly sliced into rounds

  • 2 garlic cloves, minced

  • ½ large onion, thinly sliced (optional)

  • 1 tbsp olive oil

  • ½ tsp dried oregano or fresh thyme

The Creamy Sauce

  • 1 ½ cups heavy cream (or half-and-half)

  • 1 cup shredded Gruyère or sharp white Cheddar

  • ½ cup grated Parmesan cheese

  • ¼ tsp ground nutmeg

  • Salt and black pepper to taste

The Topping

  • ¼ cup extra Parmesan

  • A sprinkle of red pepper flakes (optional)


Instructions

1. Prep the Zucchini

  1. Prevent sogginess: Zucchini has high water content. Toss the sliced rounds with a teaspoon of salt in a colander and let them sit for 15 minutes. Pat them very dry with paper towels before proceeding.

  2. Preheat your oven to 400°F (200°C). Grease a shallow baking dish with butter or olive oil.

2. Sauté the Aromatics

  1. In a skillet over medium heat, sauté the onions (if using) in olive oil until translucent (about 5 mins).

  2. Add the minced garlic and cook for just 1 minute until fragrant. Remove from heat.

3. Create the Cream Mixture

  1. In a medium bowl, whisk together the heavy cream, shredded cheese (Gruyère/Cheddar), half of the Parmesan, nutmeg, oregano, salt, and pepper.

  2. Stir the sautéed garlic and onions into this mixture.

4. Layer and Bake

  1. Arrange the zucchini slices in the baking dish. You can layer them flat or shingle them upright for a more decorative look like in the photo.

  2. Pour the cream and cheese mixture evenly over the zucchini.

  3. Sprinkle the remaining Parmesan over the top.

  4. Bake for 30–35 minutes until the zucchini is tender and the top is deeply browned and bubbling.

    • If the top browns too quickly, tent it loosely with foil for the last 10 minutes.

5. Finish

  1. Let the gratin rest for 10 minutes before serving. This is crucial—it allows the cream sauce to thicken so it doesn’t run all over the plate.